Page
Important Safety Instructions
For Users in the UK, EIRE, Malta Cyprus only
For a longer service life
For repair or adjustment
For safe operation
Special Features
What YOU can do with this Machine
Utility Stitches
Character/Decorative Stitches
Embroidery
Embroidery Editing
HOW to USE this Manual
To sew utility
Stitches To sew
Character or
Contents
Sewing Character/ Decorative Stitches
Embroidery
Appendix
Index
For U.S.A. only
Embroidery Unit Hard Case
Embroidery Unit Storage Case
Operation Buttons
Thread Cutter Button
Needle Position Button
Reverse/Reinforcement Stitch Button
Presser Foot Lever Sewing Speed Controller
Top Cover Supplemental Spool Pin Flat Bed Attachment
Feed Dog Position Switch Presser Foot Dial Knee Lifter
Index
Included Accessories
Part Name Part Code
Part Name Part Code Others
When Using the Multi-thread Stand
Options
Part Name Part Code Others
Connecting the Power
Basic Operation
Viewing the LCD Display
Key Functions
Display Key Name Explanation
Needle mode
Using the LCD Display
Adjusting Screen Brightness
Press to open the screen at left
Choosing the Display Language
Japanese
Using the Machine Settings Key
Using the Machine Operations Key
Example Displaying information about upper threading
Contents
Index
Using the Pattern Explanation Key
Example Displaying information about
Bobbin Winding/Lower Threading
Pull the thread out as indicated on drawing
Index
Wound evenly Wound poorly
Winding the Bobbin During Sewing
27,1-28
Setting the Bobbin
Upper Threading
When sewing with fine, cross-wound thread see the il
Pass the thread through the groove according to
Hook
Index
Using the Spool Net
Pulling Up the Bobbin Thread
Removing the Presser Foot
Attaching the Presser Foot
Attaching the Walking Foot
Lower the presser foot lever, insert the screw large
Reattaching the Presser Foot Holder
Index
Do not apply pressure to the needle clamp screw. Do
Ing so may damage the needle or machine
About the Needle
Fabric/Thread/Needle Combinations
Index
Trial Sewing
Basic Sewing
Chine
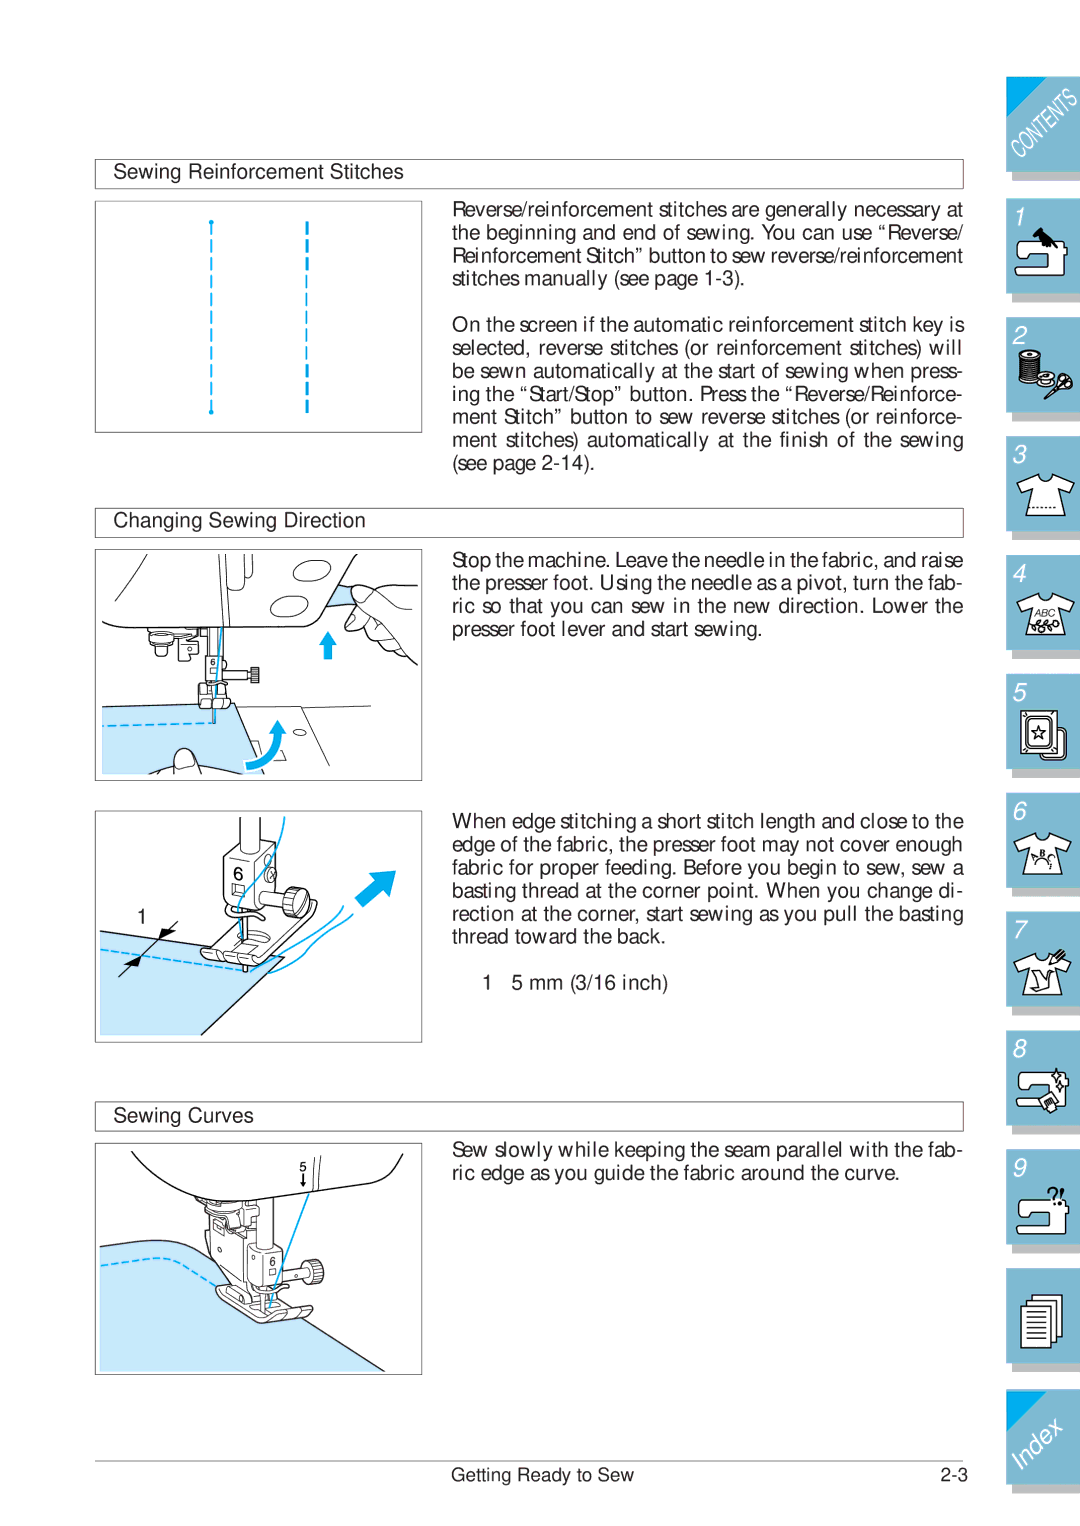
Sewing Reinforcement Stitches
Changing Sewing Direction
Sewing Curves
Sewing Heavyweight Fabrics
Sewing Lightweight Fabrics
Using the Twin Needle Mode
Index
Press To select twin needle mode
Sample of Twin Needle Sewing
Stitch Settings
Setting Stitch Width for Zigzag Stitch Patterns
Setting the Stitch Length
Stitch Pattern Width/ Stitch Length Settings Table
64 1/16 16 1/4 16 3/16 32 1/4 15/64 61 3/16 64 3/16
Non adjustable
Setting the Thread Tension
Proper Thread Tension
Machine Function Settings
Automatic Reinforcement Stitching
Using the Automatic Thread Cutter
This function is set automatically when sewing embroi- dery
Index
Sewing Utility Stitches
Quick Reference Table
Single diamond overcast
Type Twin
Type Twin Name of pattern
Honeycomb stitch
Pattern Name of pattern Presser Use
Darning
Forward Zigzag
Selecting Utility Stitches
Selecting a Stitch Pattern
Multi-directional Sewing
Using the Mirror Image Key
Saving Your Preferred Stitch Settings
Using the Sewing Type Selection Key
Example Displaying information about overcasting
Index
Index
Sewing the Stitches
Straight Stitches
4 reverse stitches
Stitch width
Basting
Overcasting Using a Zigzag Stitch
Zigzag Stitches
Appliqué Using a Zigzag Stitch
Sewing Curves Using a Zigzag Stitch
Patchwork for Crazy Quilt
Elastic Zigzag Stitches
Tape Attaching
Overcasting
Overcasting Using Presser Foot G
Overcasting Using Presser Foot J
Overcasting Using the Side Cutter
Make a cut of about 20 mm 3/4 inch in the fabric
When Sewing Straight Stitches only
Quilting
Piecing
Sewing Utility Stitches
Appliqué
Dresden plate Stained glass Sunbonnet sue
Quilting with Satin Stitches
Index
Blind Hem Stitches
If the Needle Does not Catch the Fold
If the Needle Catches Too Much of the Fold
Ing stitch to attach the appliqué to the fabric. This will
Sewing Sharp Curves
Shelltuck Stitches
Off the edge of the fabric, and start sewing
Scallop Stitches
Patchwork Stitches
Select a stitch pattern
Smocking Stitches
Contents
Fagoting
Tape or Elastic Attaching
Select Sew over the tape or elastic
Heirloom Hemstitching 1 Daisy stitch
Hemstitching 2 Drawn work
Loosely woven fabrics work best for this
Index
Hemstitching
Buttonholes
For tailored and/or decorative front closures
Mark on the presser foot
Making sure that there is no gap behind the part
For Keyhole Buttonholes
Sewing Stretch Fabrics
Set the stitch width to the width of the gimp thread
Darning
Maximum length of darning is 30 mm 1-3/16 inch
Darning Stitch Cycle
Bar Tacks
Making sure that there is no gap behind
Part of the foot marked A. If the button
Hole foot is not slid back as far as possible
Bar Tacks on Thick Fabrics
Index
Attaching 4 Hole Buttons
Attaching a Shank to the Button
Eyelet
Index
Multi-directional Sewing Straight Stitch and Zigzag Stitch
Index
Make sure you sew using the middle needle position
Zipper Insertion Centered Zipper
Make sure the needle does not strike the zipper
Needle may break, leading to injury Inserting a Side Zipper
Index
Index
Sewing Character/Decorative Stitches
Selecting a Stitch Pattern
Decorative Stitch Patterns
7mm Decorative Stitch Patterns
Satin Stitch Patterns
7mm Satin Stitch Patterns
Cross Stitch
Utility Decorative Stitch Patterns
Alphabetical Characters
Example Enter the word Bus
If You Make a Mistake Selecting the Character
Patterns
Sewing Attractive Finishes
When Sewing Character Stitches
Basic Sewing of Character/Decorative Stitches
When sewing is completed, trim any excess thread
Making Stitch Pattern Adjustments
Sewing Character/Decorative Stitches
Editing CHARACTER/DECORATIVE Stitch Patterns
Key Functions
Key or Display Name Function of the key or display
Changing the Size of the Stitch Patterns
Actual Stitch Pattern Size
Creating a Vertical Mirror Image
Creating a Horizontal Mirror Image
Sewing Pattern Continuously
Changing Thread Density Only for Satin Stitch Patterns
Combining Stitch Patterns
Before Combining Stitch Patterns
Combining Decorative Stitch and Character Stitch Patterns
Sewing Character/Decorative Stitches
Combining Large and Small Stitch Patterns
Combining Horizontal Mirror Image Stitch Patterns
Combining Stitch Patterns of Different Lengths
Example Sewing
Index
More Examples
Checking Combined Stitch Patterns
Memory Functions
Saving Stitch Patterns
Example Saving Happy birthday
If You Can Not Save the Stitch Pattern
Deleting a Previously Saved Pattern
Index
Index
Retrieving Saved Stitch Patterns
Index
Preparing to Embroider
Before Beginning Copyright Information
About Floppy Disks
Basic Embroidery
Step # Action
Attaching Embroidery Foot Q
Raise the presser foot lever
Index
Index
Removing the Embroidery Unit
Selecting Patterns
One Point Patterns
Index
Character Patterns
Example Selecting Bus
Floral Alphabet Patterns
Index
Frame Patterns
Example Selecting
Contents
Selecting Patterns from an Embroidery Card
Contents
Viewing the Sewing Screen
Example One point pattern
Preparing the Embroidery Frame
Attaching a Stabilizer Material to the Fabric
Large Medium Plus
Index
Using the Embroidery Sheet
Align the embroidery frame guide with the right edge
Removing the Embroidery Frame
Determining the Pattern Position
Changing the Pattern Position
Checking the Pattern’s Position
Previewing the Completed Pattern
Sewing AN Embroidery Pattern
Needle Plate Cover
Basic Embroidery Method
Example Embroidering
Follow the same steps for embroidering the second color
Embroidering Order for Pattern Parts
Sewing Embroidery Patterns Which Use Appliqué
Directions for Appliqué
Index
Adjustments During the Embroidery Process
Bobbin Runs Out of Thread
Presser foot when removing or attaching the em
Thread Breaks During Sewing
Index
Sewing Again from the Beginning
Use
Making Embroidery Adjustments
Adjusting Thread Tension
Correct Thread Tension
If the Upper Thread Tension is Too Strong
Adjusting the Embroidery Speed
If the Upper Thread Tension is Too Weak
Changing the Thread Color Display
Changing the Embroidery Frame Display
Example
Revising the Pattern
Pattern Revision Keys
Changing the Size of the Pattern
Rotating the Pattern
Press to return to the pattern selection screen
Changing the Colors of Character Patterns
Memory Function
Saving Embroidery Patterns
Saving a Pattern
If You Can Not Save the Pattern
Index
It takes about 10 seconds to save a pattern
Retrieving Patterns from Memory
Index
Embroidery Applications
Aligning the Left Side of a Pattern and Sewing
Connecting Characters
Example Connecting the letters Abcde with Fghi
Index
Embroidering an Outline of a Pattern
Using a Frame Pattern to Make Appliqué
Index
Do not change the size or position of the pattern
Embroidering Small Fabrics or Fabric Edges
Embroidering Small Fabrics
Embroidering Edges or Corners
Embroidering Ribbons or Tape
Explanation of the Editing Functions
Selecting Patterns to Edit
Key Display
Index
Contents
Selecting Character Patterns
Contents
Index
Editing Embroidery Patterns
Key or Display Name Explanation
Moving the Pattern
Rotating the Pattern
Changing the Size of the Pattern
Deleting the Pattern
Changing the Thread Color
Contents
Changing the Configuration of Character Patterns
Changing Character Spacing
Changing the Color of Each Character in a Pattern
Adjusting Patterns After Editing
Index
Combining and Editing Patterns
Press Times, then press
Press Select the characters Happy
To change
Use To move the letters Press Press again
To move the letters
Example Changing the size of the border
Index
Sewing Combined Embroidery Patterns
Follow the instructions from for embroidering the pat- tern
Index
Adjusting Edited Patterns
Index
Saving Edited Patterns Saving a Pattern
To delete a previously saved pattern
Index
It will take about 10 seconds to save the pattern
Retrieving Saved Patterns
Index
Index
MY Custom Stitch
Designing the Stitch
Stitch My Custom Stitch
Entering Stitch Data
Creating Stitch Data
To the coordinates of the first
Index
Editing Stitch Data
Moving a Point
Moving Part or All of the Design
Inserting New Points
Index
Storing the custom design
Index
Retrieving a Stitch Design That Has Been Saved Preparation
Index
Sewing screen for that stitch will then be displayed
Index
Care and Maintenance
Changing the Light Bulb
Cleaning the Machine
Cleaning the Machine Casing
Cleaning the Race and Shuttle
Shelf Spring Reattach the needle plate
Cleaning the Floppy Disk Drive Heads
Troubleshooting
Adjusting the Screen
Adjusting the Touch Panel
+2+3
Using the Troubleshooting Function
Making Minor Machine Adjustments
Problem Cause Solution
Cap
Etc Fabric was not inserted into the frame
Ing Spool cap is set incorrectly
There is no pattern selected Select a pattern
Error Messages
Is touched
Index
Is pressed
This message is dis- played when
Or is
Alarm Sounds
Index
Specifications
Appendix
Appendix
Index
Using a frame pattern to make appliqué 5-59,5-60
MY Custom Stitchtm
Index
Index