3.3 How Do I Build Network Partitions?, page
3.1 Overview
C H A P T E R
3.1 Overview, page 3.2 How Do I Build Groups?, page
3.2.2 Copying Groups
3.2 How Do I Build Groups?
3.2.1 Adding Groups
3.2.4.1 Deleting a Single Group
3.2.3 Moving Groups
3.2.4 Deleting Groups
3.5.6 Automatically Grouping NEs in Subnetworks, page
3.3 How Do I Build Network Partitions?
3.3.1 Adding Network Partitions
3.2.4.2 Deleting Multiple Groups
Field Descriptions for the Network Partition Properties Pane
3.3.2 Modifying Network Partitions
3.3.3 Deleting Network Partitions
Field Descriptions for the Add New Network Partition Dialog Box
3.4.1 Adding Subnetworks
3.4 How Do I Build Subnetworks?
Step 3 Choose Edit Delete
3.5 How Do I Build NEs?
3.4.2 Moving Subnetworks
3.4.3 Deleting Subnetworks
3.5.1.2 Prerequisites for Adding ONS 15302 and ONS 15305 NEs
3.5.1 Prerequisites for Adding NEs
3.5.1.1 Prerequisites for Adding ONS 15216 EDFA2 or EDFA3 NEs
GNE trap port GNE community string public GNE version
3-10
3.5.1.4.1 Hostnames and IP Addresses Required
3.5.1.4.2 SNMP Community Strings Required
To add entries to the SNMP Community String table
an Efficient Network.”
3-11
3-12
3.5.1.4.3 Topology Setup
3.5.1.4.4 Patch Setup
3.5.1.4.6 Performance Monitoring Optional
3.5.1.5 Prerequisites for Adding ONS 1580x NEs
3.5.1.6 Prerequisites for Adding Cisco CRS-1 and XR 12000 NEs
3.5.1.4.5 Unbundled CiscoView Optional
3-14
3.5.1.8.1 How Do I Configure the SNMP Community String?
3.5.1.7 Prerequisites for Adding Cisco Catalyst 6509 NEs
3.5.1.8 Prerequisites for Adding Cisco MGX Voice Gateway Devices
3-15
3.5.1.8.2 Setting Up Nonstandard Community Strings
3.5.1.8.3 Changing Community Strings Using the Domain Explorer
3.5.1.8.4 Changing Community Strings Using the CLI
3-16
3.5.1.8.5 Changing the Service-Level Passwords Using the CLI
3-17
3.5.2 Adding NEs
3.5.2.1 Adding a Single NE
Step
3-18
3-19
3.5.2.2 Adding Multiple NEs
a. NE ID- Read-only
NE Addition Panel
3-20
Table 3-7 Field Descriptions for the Add New NE Wizard
NE Properties Panel
3-21
Field Descriptions for the Add New NE Wizard continued
automatic subnetwork
grouping is enabled
password on the ONS 15216 EDFA2, ONS 15216 EDFA3, ONS 15216 OADM, ONS
not selectable if
3-23
3.5.3 Copying an NE from One Group to Another
3.5.4 Moving an NE from One Group to Another
3-24
3.5.5 Moving an NE from One Network Partition to Another
3.5.6 Automatically Grouping NEs in Subnetworks
3-25
3.5.7 Deleting NEs
3.5.7.1 Deleting a Single NE
3-26
3.5.7.2 Deleting Multiple NEs
3-27
3.5.7.4 Removing a Deleted NE
back again
3.6 How Do I Build Links?
3.5.8 Restoring a Deleted NE
3.5.9 Searching for an NE
3-29
3.6.2 Overview of Supported Links
Links Supported Between NEs at Compatible Layer Rates
3-30
NE Model
Supports Links with These NEs at Compatible Layer Rates
3.6.2 Overview of Supported Links
3-31
Links Supported Between NEs at Compatible Layer Rates continued
Supported NE Links
Physical
3-32
NE Model
NE Card
Physical
3-33
NE Model
NE Card
File
choose Configuration Link Table
Configuration
3.6.3 Viewing the Link Table
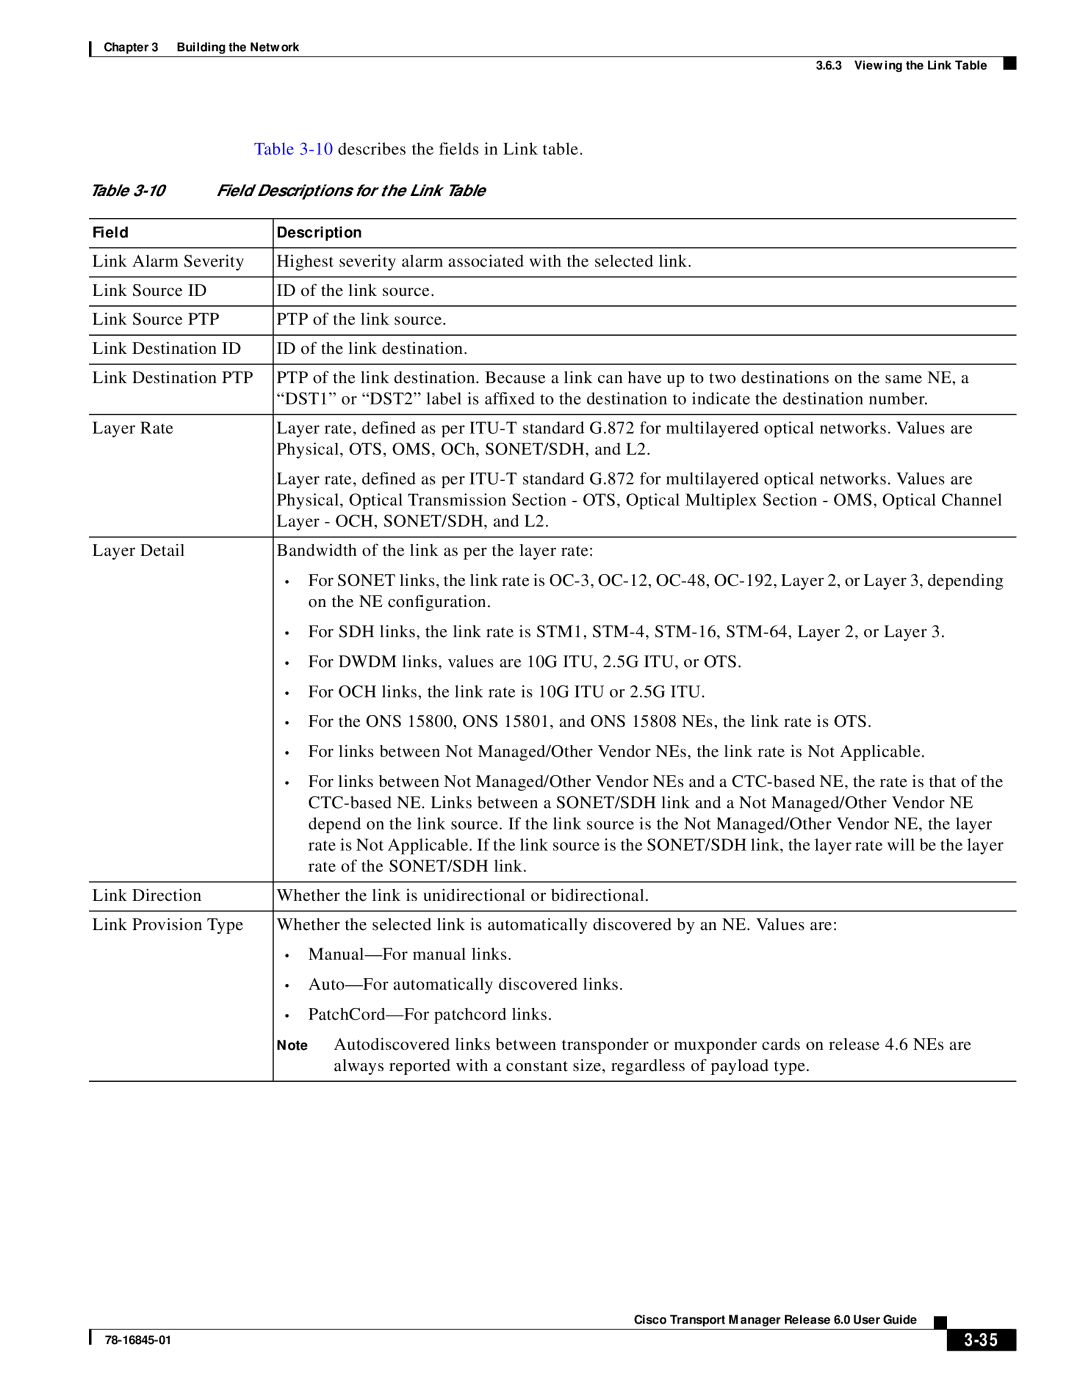
Field Descriptions for the Link Table
3-35
Field
Description
Is Link Valid
3-36
3-37
3.6.4 Filtering the Link Table
3.6.5 Filtering Links in the Network Map
3-38
3.6.6 Creating Links
Protection Direction
3-39
Link Attributes Panel
3-40
Step 4 Click Finish
Table 3-12 Field Descriptions for the Create Link Wizard
Link Destination Panel
3-41
Field Descriptions for the Create Link Wizard continued
Summary of Link Color
3.6.7 Modifying Links
3-42
Table 3-12 Field Descriptions for the Create Link Wizard continued
Table 3-14 Field Descriptions for the Modify Link Wizard
3-43
Field
Description
Field Descriptions for the Modify Link Wizard continued
3.6.8 Deleting Links
3.6.9 Viewing Link Utilization
3-44
Field Descriptions for the Link Utilization Table
3.6.10 Filtering the Link Utilization Table
3-45
3.7.1 Customizing a Network Map
3.7.3 Adjusting the Zoom Level or Pan Position
3.7 How Do I Use Network Maps?
3.7.1 Customizing a Network Map
3-47
b. Click UI Properties
3-48
3.7.3 Adjusting the Zoom Level or Pan Position
3.7.2 Viewing a Node in the Network Map
3-49
3.7.4 Modifying a Node Icon or a Map Background Image
3.7.4.1 Modifying a Node Icon
3.7.4.2 Modifying a Map Background
3-50
3.8 How Do I Discover the Network for Optical and Routing Devices?
3.7.5 Saving Changes to the Network Map
3-51
3.8.1 Discovering CTC-Based NEs
3.8.2 Discovering ONS 155xx NEs
3.8.2.1 Discovery Information Table
time stamp
3.8.3 Rediscovering ONS 155xx, CRS-1, and XR 12000 NEs
time stamp
3-52
3-53
3.8.4 Resetting the Resync Interval
3-54
Step 2 Expand NE Service
3.9 How Do I Discover the Network for MGX Voice Gateway Devices?
SSM Generation 1 Message Set
3.9.1 Discovering NEs
3-55
SSM Generation 2 Message Set
3.10.1.1 Setting Up External or Line Timing for CTC-Based SONET NEs
3-56
AMI alternate mark inversion
3-57
3-58
3.10.1.2 Setting Up Internal Timing for CTC-Based SONET NEs
3-59
Configuration NE Explorer
Steps 1 through 6 and choose Configuration NE Explorer
SDH SSM Message Set
3.10.2.1 Setting Up External or Line Timing for CTC-Based SDH NEs
3-60
3-61
unframed , FAS , FAS + CAS
Step 6 In the Status subtab, complete the following information
3-62
Internal Clock
3.10.2.2 Setting Up Internal Timing for CTC-Based SDH NEs
Internal Clock
3-63
3.11.1.2 Displaying the List of Available Clock Sources
3.11.1.1 Configuring Global Clocking
3.11 How Do I Synchronize the Network for MGX Voice Gateway Devices?
3.11.1 Viewing Clocking Sources
3-65
3.11.1.1 Configuring Global Clocking
3.11.1.2 Displaying the List of Available Clock Sources
3.11.1.3 Displaying the List of Manual Clock Sources
3-66
3.12 How Do I Test Connectivity for Optical and Routing Devices?
3.11.1.4 Creating a Manual Clock Source
3-67
3.12.2 Testing NE Connectivity
3.13 How Do I Test Connectivity for MGX Voice Gateway Devices?
3.12.1 Pinging an NE
Step 3 Enter the Service Level username and password
3-68