Americas Headquarters
Page
Common Phone Tasks
Phone Screen Icons
Contents
Viewing or Removing Conference Participants
Using a Speakerphone
Cisco One-Year Limited Hardware Warranty Terms Index
Using this Guide
Getting Started
If you want to Then
Safety and Performance Information
Finding Additional Information
Power Outage
Using External Devices
Cisco Product Security Overview
Accessibility Features
Connecting Your Phone
Removing the Hookswitch Clip Required
Adjusting the Handset Rest Optional
Registering with Taps
Adjusting the Footstand Optional
Using a Headset
Headset Support
OL-22332-01
An Overview of Your Phone
Understanding Buttons and Hardware
Cisco Unified IP Phone 7975G
Cisco Unified IP Phone 7970G and 7971G-GE
Cisco Unified IP Phone 7945G
Description
Using Call Logs,
Cleaning and Maintaining
Accessing Voice Messages
Accessing the Help System
Understanding Lines and Calls
Understanding Line and Call Icons
Icon Line or call state Description
Understanding Phone Screen Features
Icons, page 7, and Viewing Multiple Calls,
Menus,
Screen item Do this
Cleaning and Maintaining the Phone Screen
Choosing Phone Screen Items
Cisco Unified IP Phone 7975G, 7971G-GE, and 7970G
Understanding Feature Buttons and Menus
Cisco Unified IP Phone 7965G and 7945G
If you want to
Understanding Feature Availability
Accessing the Help System on Your Phone
Feature Softkey Line Button Label and Icon
Understanding SIP and Sccp
Understanding Energy Savings
An Overview of Your Phone
OL-22332-01
For more information
Basic Call Handling
Placing a Call-Basic Options
If you want to Then See
Placing a Call-Additional Options
Setting Up Phones
Access Lists for Mobile
Corporate
Personal
Directory to log
Choose Personal Address Book
Answering a Call
If you want to Then For more information, see
Answer or
Sending a Call to a Voice
Using AutoAnswer with a
Using a Single Phone Number
Message System,
Using Hold and Resume
Ending a Call
Or EndCall
Using Mute
Toggle Microphone on Press Toggle Microphone off
Switching Between Multiple Calls
Switching an In-Progress Call to Another Phone
Viewing Multiple Calls
Transferring Calls
Sending a Call to a Voice Message System
Forwarding Calls to Another Number
Settings on the Web,
Press CFwdALL or Forward All
User Options Web Pages,
Using Do Not Disturb
Making Conference Calls
Press DND or Do Not Disturb
Using Conference Features
See Viewing or Removing Conference Participants,
Using Join
Using cBarge
Tip
Viewing or Removing Conference Participants
See Using Conference,
Placing or Receiving Intercom Calls
Press ConfList or Conference List
If you want to Then
Speed Dialing
Web pages. See Accessing Your User Options Web Pages,
Advanced Call Handling
Directory on Your Phone,
Using the Personal Directory on the Web,
Picking Up a Redirected Call on Your Phone
Personal Directory on Your Phone,
Storing and Retrieving Parked Calls
Logging Out of Hunt Groups
Using a Shared Line
Using Barge to Add Yourself to a Shared-Line Call
Understanding Shared Lines
CBarge and Barge
Single-button and Multi-touch Barge
Press Private
Using BLF to Determine a Line State
Making and Receiving Secure Calls
VPN Configuration
Press Mcid or Malicious Call ID
Tracing Suspicious Calls
Prioritizing Critical Calls
If you Then
Using Cisco Extension Mobility
Change Credentials
Press Change
Press ChangePIN
Access Lists for Mobile Connect,
See Switching an In-Progress Call to Another Phone,
See Answering a Call,
See Placing a Call-Additional Options,
OL-22332-01
Using a Handset, Headset, and Speakerphone
Using a Handset
Using a Headset
Using Wideband with your Headset
Using a Speakerphone
Using a Wireless Headset
Choose User Preferences Audio Preferences Wideband Headset
Using AutoAnswer with a Headset or Speakerphone
OL-22332-01
Accessing Your User Options Web Pages,
Changing Phone Settings
Customizing Rings and Message Indicators
User Preferences Rings
User Preferences Brightness
Customizing the Phone Screen
Options Web Pages,
User Preferences Viewing Angle
See Cleaning and Maintaining the Phone Screen,
User Preferences Background Images
OL-22332-01
Missed Calls, Placed Calls, or Received Calls. Each
Using Call Logs and Directories
Using Call Logs
Missed Calls, Placed Calls, or Received Calls
State,
Directory Dialing
Missed Calls or Received Calls
Press EditDial
Using Corporate Directory on Your Phone
Using Personal Directory on Your Phone
Corporate Directory exact name can vary
Press Fast Dial
Press Select
Personal Directory Personal Fast Dials
Accessing Voice Messages
Customizing Rings and Message Indicators,
Message System,
If you want to Then do this
Using the User Options Web Pages
Accessing Your User Options Web Pages
Options Device
Choose User Options Device Click Service URL
Configuring Features and Services on the Web
Using the Personal Directory on the Web
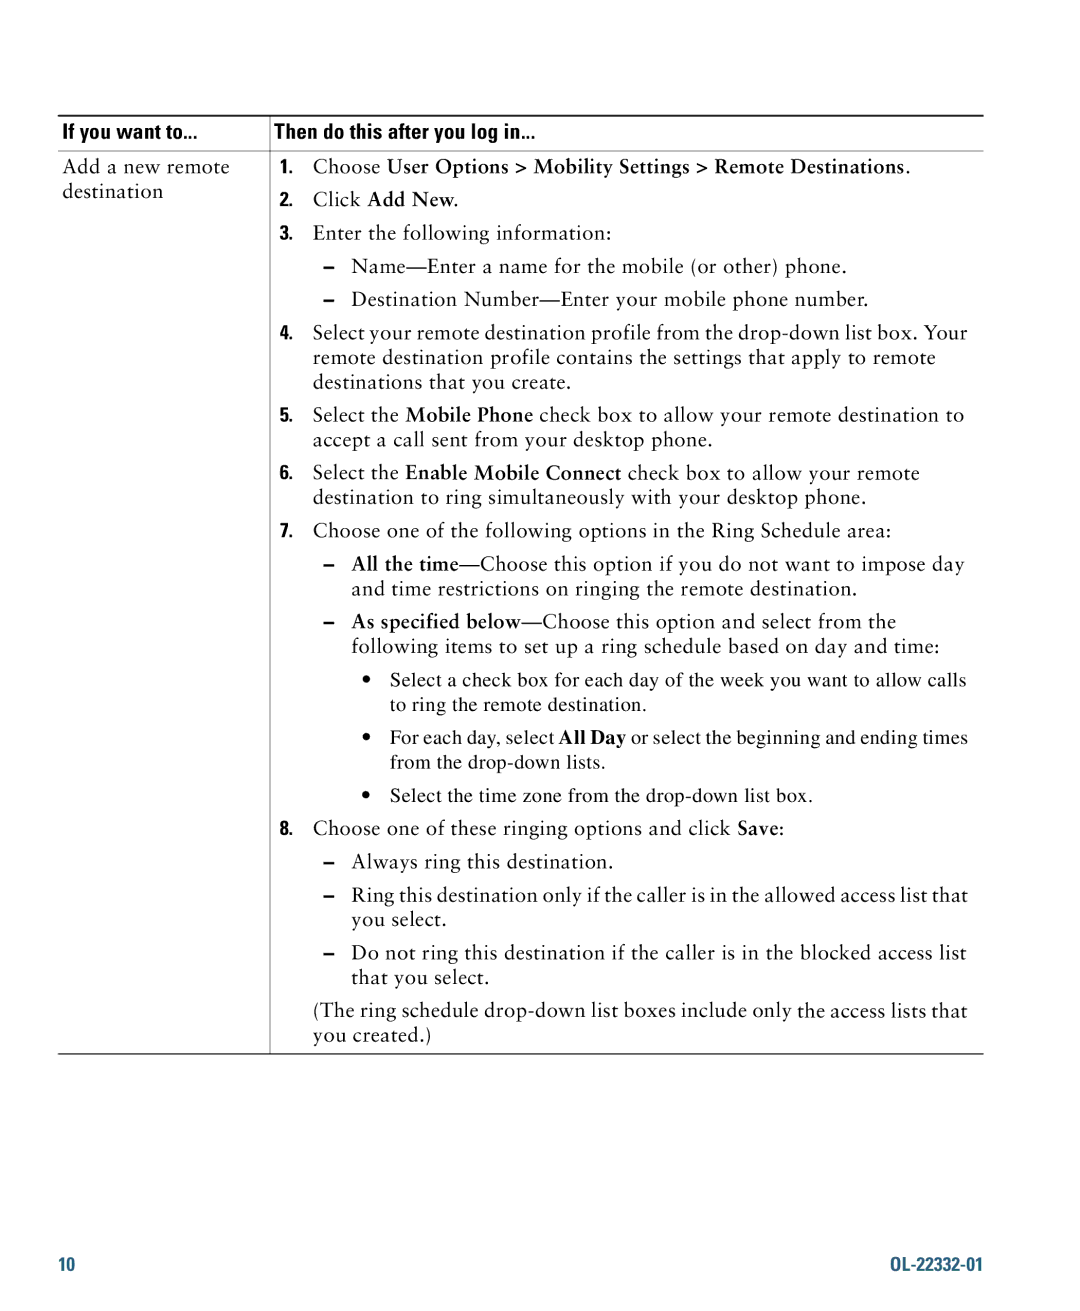
If you want to Then do this after you log
Click Add New
Create a PAB entry. See Using Your Personal Address Book on
Choose User Options Fast Dials
Choose User Options Device
Setting Up Speed Dials on the Web
Using the Address Book Synchronization Tool
Click Phone Services
Setting Up Phone Services on the Web
See Configuring Fast Dials on the Web,
Your Phone,
Services
Feature buttons
Programmable phone button
Controlling User Settings on the Web
Controlling Line Settings on the Web
Choose User Options User Settings
Set up call forwarding
Setting Up Phones and Access Lists for Mobile Connect
Choose User Options Mobility Settings Access Lists
Choose User Options Mobility Settings Remote Destinations
Using Cisco WebDialer
Configuration Host Name
Network
Understanding Additional Configuration Options
If you Then For more information
See Using Cisco Extension
See Using AutoAnswer with a
See Using BLF to Determine a Line
Advanced Call Handling
Symptom Explanation
Troubleshooting Your Phone
General Troubleshooting
CallBack fails
Viewing Phone Administration Data
If you are asked to Then
Using the Quality Reporting Tool
OL-22332-01
Cisco One-Year Limited Hardware Warranty Terms
OL-22332-01
Index
OL-22332-01
Page
OL-22332-01
Page
Taps