Data Editing
2.Scan the START bar code.
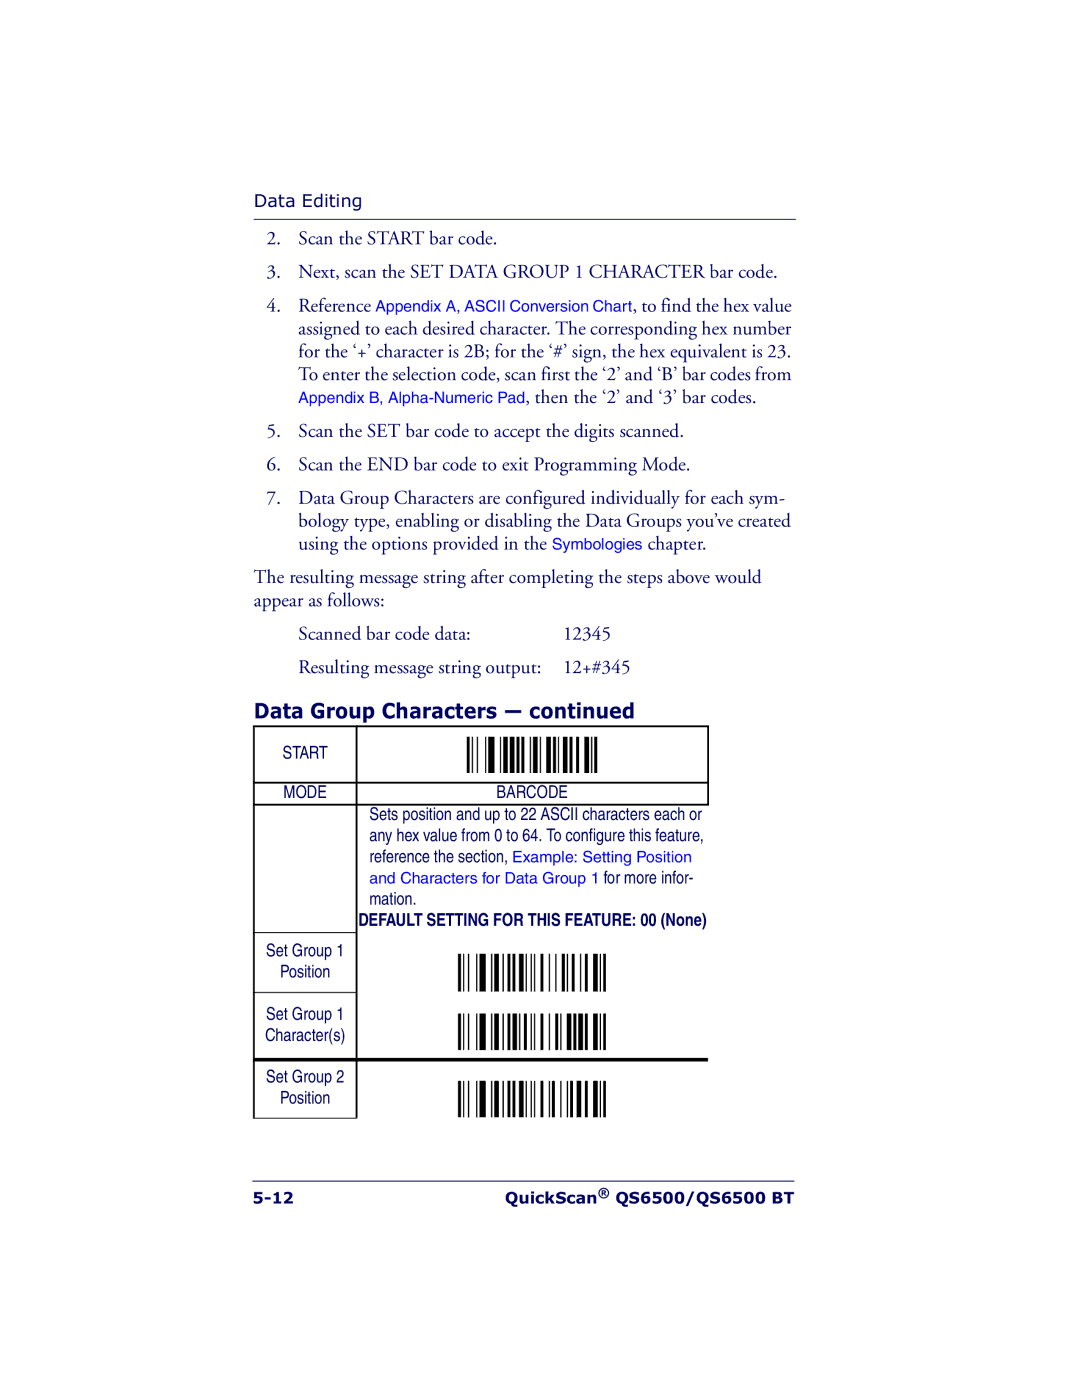
3.Next, scan the SET DATA GROUP 1 CHARACTER bar code.
4.Reference Appendix A, ASCII Conversion Chart, to find the hex value assigned to each desired character. The corresponding hex number for the ‘+’ character is 2B; for the ‘#’ sign, the hex equivalent is 23.
To enter the selection code, scan first the ‘2’ and ‘B’ bar codes from Appendix B,
5.Scan the SET bar code to accept the digits scanned.
6.Scan the END bar code to exit Programming Mode.
7.Data Group Characters are configured individually for each sym- bology type, enabling or disabling the Data Groups you’ve created using the options provided in the Symbologies chapter.
The resulting message string after completing the steps above would appear as follows:
Scanned bar code data: | 12345 |
Resulting message string output: 12+#345
Data Group Characters — continued
START |
|
|
|
|
|
|
|
|
|
|
|
|
|
|
|
|
|
|
|
|
|
|
|
|
|
|
|
|
|
|
|
| |
|
|
|
|
|
|
|
|
|
|
|
|
|
|
|
|
|
|
|
|
|
|
|
|
|
|
|
|
|
|
|
|
|
|
MODE |
|
|
|
|
|
|
|
| BARCODE | |||||||
| Sets position and up to 22 ASCII characters each or | |||||||||||||||
| any hex value from 0 to 64. To configure this feature, | |||||||||||||||
| reference the section, Example: Setting Position | |||||||||||||||
| and Characters for Data Group 1 for more infor- | |||||||||||||||
| mation. | |||||||||||||||
| DEFAULT SETTING FOR THIS FEATURE: 00 (None) | |||||||||||||||
|
|
|
|
|
|
|
|
|
|
|
|
|
|
|
|
|
Set Group 1 |
|
|
|
|
|
|
|
|
|
|
|
|
|
|
|
|
Position |
|
|
|
|
|
|
|
|
|
|
|
|
|
|
|
|
|
|
|
|
|
|
|
|
|
|
|
|
|
|
|
|
|
Set Group 1 |
|
|
|
|
|
|
|
|
|
|
|
|
|
|
|
|
|
|
|
|
|
|
|
|
|
|
|
|
|
|
|
| |
Character(s) |
|
|
|
|
|
|
|
|
|
|
|
|
|
|
|
|
|
|
|
|
|
|
|
|
|
|
|
|
|
|
|
|
|
|
|
|
|
|
|
|
|
|
|
|
|
|
|
|
|
|
Set Group 2 |
|
|
|
|
|
|
|
|
|
|
|
|
|
|
|
|
Position |
|
|
|
|
|
|
|
|
|
|
|
|
|
|
|
|
|
|
|
|
|
|
|
|
|
|
|
|
|
|
|
|
|
QuickScan® QS6500/QS6500 BT |
