W . d e l l . c o m s u p p o r t . d e l l . c o m
Dell OptiPlex User’s Guide
September JN460
Contents
General Drive Installation Guidelines
Connecting and Disconnecting Drive Cables
DC Power Connectors P3, P5, P8, and P9
Desktop Computer
127
General Drive Installation Guidelines 127
Connecting and Disconnecting Drive Cables 129
DC Power Connector P5 and P6 160 Contents
166
Small Form Factor Computer Specifications 175
163
About Your Small Form Factor Computer 165
202
Connecting and Disconnecting Drive Cables 196
197
199
228
Ultra Small Form Factor Computer Specifications 241
Connecting and Disconnecting Drive Cables 248
About Your Ultra Small Form Factor Computer 227
258
Installing a Device When Your Computer Is Turned Off 255
About Smart Cards and Fingerprint Readers 276 Contents
255
278
Deleting or Changing an Existing System Password 278
Deleting or Changing an Existing Administrator Password 280
277
296
Configuring Power Management Settings 295
294
295
Mini-Tower, Desktop, and Small Form Factor Computers 317
Addressing Memory Configurations 314
313
316
329
Problems writing to an optical drive 333
Mail, Modem, and Internet Problems 334
Troubleshooting Power Problems 339
Windows Vista Dell Factory Image Restore 362
Using Microsoft Windows System Restore 359
Undoing the Last System Restore 360
Using Dell PC Restore and Dell Factory Image Restore 361
367
Returning Items for Warranty Repair or Credit 367
365
366
Support.dell.com
How to set up my computer
Finding Information
Desktop System Software DSS
Dell Product Information Guide
What Are You Looking For? Find It Here Warranty information
For your configuration How to use Windows XP
Order status, warranty, and repair information
Updates
Segment, and enter your Service Tag
System you ordered
Not ship with your computer
Turning Off Your Computer
Before You Begin
Recommended Tools
Before Working Inside Your Computer
Before You Begin
Mini Tower Computer
Mini Tower Computer
About Your Mini Tower Computer
Front View
No light The computer is turned off
Blinking green The computer is in a power-saving mode
Power problem may exist see Power Problems on
21 for more information
Back View
Back Panel Connectors
Address. For more information, see System Setup Options on
Green a good connection exists between a 10-Mbps network
Removing the Computer Cover
Cap
That came with your computer
Security cable slot Cover release latch Padlock ring
Inside Your Computer
Chassis Intrusion Switch
Replacing the Chassis Intrusion Switch
Removing the Chassis Intrusion Switch
Resetting the Chassis Intrusion Detector
System Board Components
SATA3
Mini Tower Computer
Mini Tower Computer Specifications
Maximum PCI Express Connectors
Connectors
Connector size
Connector data width
Two Sata optical drives
Drives
Two Sata Serial ATA hard drives
One3.5-inch floppy drive or media reader
Rating Voltage
AC power source Wattage
Controls and Lights
Heat dissipation
Depth
Weight
Physical Height
Width
Mini Tower Specifications
Installing a PCI or PCI Express Card
Cards
Cards
Cards
Cards
Cards
Removing a PCI or PCI Express Card
Card retention latch Alignment guide
Card-edge connector Card connector
Card retention latch
PS/2 Serial Port Adapter
Card fully seated Card not fully seated Bracket within slot
Cards
Card retention latch Alignment guide
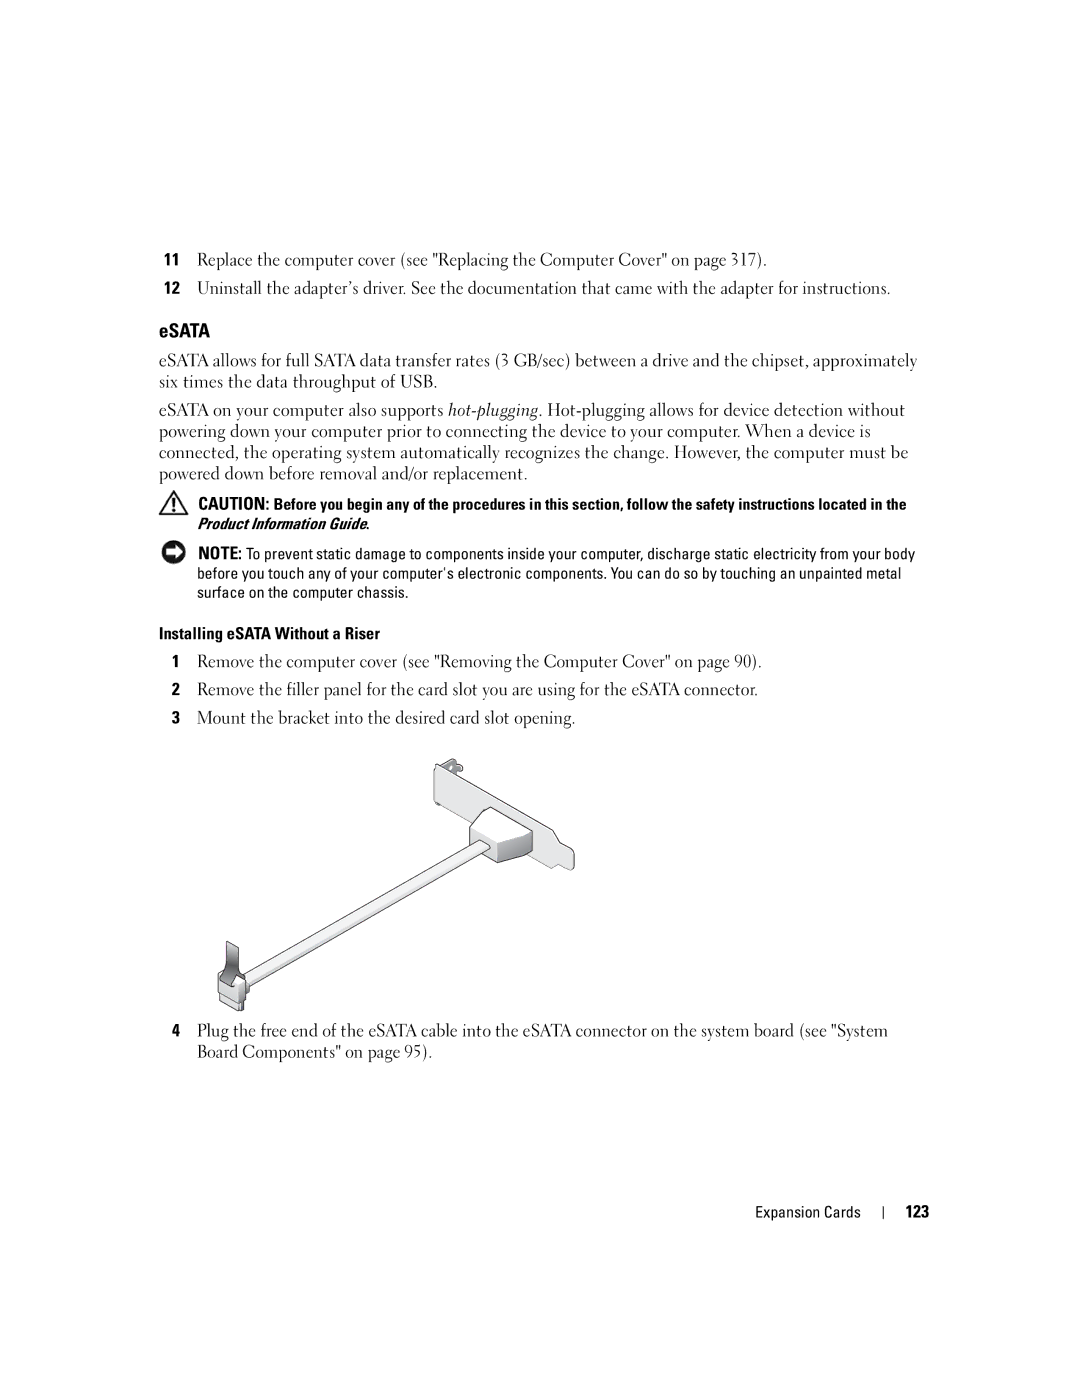
Installing eSATA
Cards
Drives
General Drive Installation Guidelines
Sata Connector
Power Cable Connectors
Hard Drive
Data cable Hard drive system board Power cable Connector
Hard drive Release tabs
Snap the bracket onto the new drive
Drives
Drives
Hard drive Hard drive bracket Pins
Drives
Floppy Drive
Floppy drive Drive release latch
Floppy drive Shoulder screws Shoulder screw slots
Media Card Reader
Media card reader Drive release latch
Media card Shoulder screws Shoulder screw slots Reader
Optical Drive
Optical drive Drive release latch
Optical drive Shoulder screws Shoulder screw slots
Power cable Data cable Sata optical drive connector
Processor
Removing the Processor
Processor
Installing the Processor
Processor
Processor
Panel
Removing the I/O Panel
Panel
Replacing the I/O Panel
Power Supply
Replacing the Power Supply
Power Supply
Release button Power supply Screws AC power connector
DC Power Connector P1
DC Power Connectors
Pin Number Signal name AWG Wire
DC Power Connector P2
DC Power Connectors P3, P5, P8, and P9
Pin Number Signal Name
DC Power Connector P10
DC Power Connector P7
Installing a Speaker
Speakers
Speakers
Removing a Speaker
Desktop Computer
Desktop Computer
About Your Desktop Computer
Your Computer on page 21 for more information
Power Management for Windows XP and Windows Vista on
Blinking or solid amber See Power Problems on
Position
Removing the Computer Cover
Inside Your Computer
Chassis Intrusion Switch
Replacing the Chassis Intrusion Switch
Removing the Heat Sink Assembly
System Board Components
Desktop Computer
Desktop Computer Specifications
Desktop Computer Specifications
Card or a DVI graphics card for dual-monitor support
PCI without riser-card cage Connectors
Maximum PCI Express without riser-card Cage Connectors
Board
Expansion Bus Connector size
Maximum ESATA Desktop Computer Specifications
Maximum
Port adapter
100
One3.5-inch floppy drive or media card reader
One Sata optical drive
101
Power source Wattage
Power Heat dissipation
102
Rating
PCI Cards
103
Expansion Cards
Expansion Cards
105
Expansion Cards
107
Expansion Cards
109
Expansion Cards
111
112
113
Press in on the tab to raise the card-retention latch 114
115
PS/2 Serial Port Adapter
117
Expansion Cards
119
Riser-card cage Handle Riser cards
121
Expansion Cards
123
ESATA
Expansion Cards
125
Replace the riser
127
128
129
Drive Inserts
130
131
Drive release latch Optical drive
133
134
135
Drive insert
Information Guide Drives
137
Drive release latch Media card reader
139
Drive insert
141
Hard Drive
143
Hard drive Release tabs Plastic hard drive bracket
145
Drives
147
Data cable Hard drive system board Connector
149
Installing the Processor
151
Processor
153
Replacing the I/O Panel
155
Release button Power supply Screws AC power connector
157
158
Pin Signal name 18-AWG Number Wire
159
160
DC Power Connector P3
DC Power Connector P4
DC Power Connector P5 and P6
161
162
163
164
Small Form Factor Computer
Small Form Factor Computer
About Your Small Form Factor Computer
165
166
167
Removing the Computer Cover
169
170
171
172
173
174
Small Form Factor Computer Specifications
Small Form Factor Computer Specifications
175
Connector
Maximum PCI Express Connector
176
Port adapter Video
177
178
179
180
181
Expansion Cards
183
184
185
PCI Express and DVI Cards
186
187
Expansion Cards
189
Expansion Cards
191
PS2/SERIAL2
193
Expansion Cards
195
General Installation Guidelines
Serial ATA Sata Connector
197
Securing tabs Hard drive
199
Release tabs Hard drive Hard drive bracket
201
Replacing a Hard Drive Fan
203
Optical Drive
205
Floppy Drive
207
Installing a Floppy Drive
209
Media card reader data cable
211
Replacing a Media Card Reader
Drives
213
Installing the Processor
215
Processor
217
Replacing the I/O Panel
219
Mounting screw
221
Pin Signal Name Number
222
DC Power Connectors P3
Pin Signal 18-AWG Number Name Wire
223
DC Power Connector P5
DC Power Connector P6
224
225
226
3 4
Ultra Small Form Factor Computer
About Your Ultra Small Form Factor Computer
227
Management for Windows XP and Windows Vista on
Blinking or solid yellow See Power Problems on
Side View
228
229
Network controller is turned off in system setup
231
Connecting Two Monitors
232
233
Removing the Chassis Intrusion Switch
235
236
237
Cable Cover Optional
Information Guide
Connecting the AC Power Adapter
239
Dell Badge
240
241
Ultra Small Form Factor Computer Specifications
242
Ultra Small Form Factor Computer Specifications
243
AC power source
244
Physical
245
246
247
Your computer supports One Sata serial ATA hard drive
248
249
Drives
251
Drives
253
Drives
Module Bay
Installing a Device When Your Computer Is Turned Off
Module Bay
255
Bottom of computer Security screw
257
Latch release
259
Securing a Device in the Module Bay
260
261
Top of heat sink Heat sink Retention base Release tab
263
Processor
265
266
267
Removing a Speaker
Manageability
Advanced Features
Advanced Features
LegacySelect Technology Control
Advanced Functionality
Error Message Description
Active Management Technology
270
271
Alert Standard Format
Dell OpenManage Applications
Alert Description
273
Dell Client Manager DCM
Padlock Ring and Security Cable Slot
Option Settings
Physical Security
Chassis Intrusion Detection
Enabling the TPM Feature
Trusted Platform Module TPM
275
276
Security Management Software
Computer Tracking Software
About Smart Cards and Fingerprint Readers
Password Protection
System Password
277
Type the password and press Enter
279
Administrator Password
Overview
System Setup
Disabling a Forgotten Password and Setting a New Password
Entering System Setup
System Setup Screens
System Setup Options
281
282
Internal default
283
No Boot setting
Performance
284
Computrace server
285
286
Suspend
Event Log
287
Boot Sequence
Memory Key
Booting to a USB Device
Jumper Settings
Mini Tower and Desktop Small Form Factor Advanced Features
289
Ultra Small Form Factor Computer Jumper Setting Description
Clearing Forgotten Passwords
291
Clearing Cmos Settings
Power Management for Windows XP and Windows Vista
Hyperthreading and Multi-Core Technology
Options in Windows XP
293
Options in Windows Vista
295
About RAID Configurations
Verifying That RAID Is Working
RAID Level
Segment Hard drive
RAID Level 1 Configuration
Configuring Your Computer for RAID
297
Creating a RAID Level 1 Configuration
Creating a RAID Level 0 Configuration
299
Creating a RAID Level 1 Configuration
Migrating to a RAID Level 0 Configuration
Migrating to a RAID Level 1 Configuration
301
Advanced Features
303
Battery
Replacing the Battery
Battery
Battery
305
306
Replacing the System Board
307
Replacing the System Board
308
Mini Tower System Board Screws
309
Desktop System Board Screws
310
Small Form Factor System Board Screws
311
Ultra Small Form Factor System Board Screws
312
Memory
DDR2 Memory Overview
313
Installing Memory
Addressing Memory Configurations
Crossbar
Memory connector closest to Securing clips Processor
315
Cutouts Memory module
Removing Memory
317
Replacing the Computer Cover
Mini-Tower, Desktop, and Small Form Factor Computers
Ultra Small Form Factor Computers
318
Installing Your Computer in an Enclosure
Installing Your Computer in an Enclosure
319
320
321
Installing Your Computer in an Enclosure
Computer, Keyboard, and Monitor
Cleaning Your Computer
Cleaning a Non-Optical Mouse
Cleaning an Optical Mouse
CDs and DVDs
Floppy Drive
Microsoft Windows XP
Microsoft Windows Features
Microsoft Windows XP Features
Transferring Information to a New Computer
Microsoft Windows XP Features
Microsoft Windows Vista
Click Finished and restart the new computer
327
Network device Network adapter connector on computer
Setting Up a Home and Office Network
Connecting to a Network Adapter
Network Setup
329
330
Solving Problems
Troubleshooting
Battery Problems
Card Problems
332
Drive Problems
333
Optical drive problems
Problems writing to an optical drive
Hard drive problems
Windows XP Click Start→ All Programs→ Modem Helper
Mail, Modem, and Internet Problems
334
Click Properties→ Tools→ Check Now
335
Lockups and Software Problems
Keyboard Problems
Solid blue screen appears
Other software problems
Program crashes repeatedly
Program is designed for an earlier Windows operating system
Memory Problems
Mouse Problems
338
339
Network Problems
Power Problems
Troubleshooting Power Problems
340
Power Supply Self-Test
341
Printer Problems
342
Scanner Problems
Sound and Speaker Problems
No sound from speakers
343
Video and Monitor Problems
No sound from headphones
Screen is blank Screen is difficult to read
3D image quality is poor
Power Lights
Power Light Problem Description Suggested Resolution
System Lights
345
346
Power Light Problem Description
Diagnostic Lights
Light Pattern Problem Description
347
348
Light Pattern Problem Description Suggested Resolution
349
Beep Codes
350
Code Cause
System Messages
351
Message Possible Cause Corrective Action
Message Possible Cause
352
Product Information Guide
Dell Diagnostics
When to Use the Dell Diagnostics
353
Solving Problems
355
Option Function
Tab Function
What Is a Driver?
Drivers
Identifying Drivers
357
Reinstalling Drivers and Utilities
358
To start the Hardware Troubleshooter
Using Microsoft Windows System Restore
You can restore your operating system in the following ways
Restoring Your Operating System
Starting System Restore
Using Dell PC Restore and Dell Factory Image Restore
Using PC Restore
361
Image Restore
Removing PC Restore
363
Using the Operating System Media
Click Finish to reboot the computer
Click Exit if the Install Windows message appears
Solving Problems
365
Online Services
Getting Help
Obtaining Assistance
AutoTech Service
Automated Order-Status Service
Support Service
Problems With Your Order
Before You Call
367
Guide
368
369
Contacting Dell
Warranty
Warranty
371
372
FCC Notices US Only
FCC Notices U.S. Only
FCC Class B
373
374
375
Glossary
376
377
378
379
380
381
382
383
384
Video resolution See resolution
385
386