DVD Multitrack Recorder
Safety Instructions
Important Safety Instructions
Table of contents
Skip/locate functions
Recording/playback
Advanced operations
Jam function the optional Model 8348 required
100
Creating and editing ALE files Edit EDL File menu
103
105
140
Specifications
155
156
About this manual
Precautions on installation
Introduction
Main features/functions
DV824 options and related Fostex products
What is in the box
Options
Related products
DVD Multitrack Recorder DV824
Table of contents
Preparation before using the DV824
Turning on the power
Power connection
Realtime clock setting
Inserting/removing a disk
About recommended disks
Unused formatted disk
Unformatted disk
Recorded disk
CD-DA format audio CD
Drive
Initial format of a DVD-RAM disk
Press the ENTER/YES key again
Key
Adjusting display contrast
Rear panel
Front panel
Front panel
LCD display
Time mode indicators
Quick SET/1, Space key
Slate TONE/4, G, H, I key
CHASE/6, M, N, O key
PRE REC/3, D, E, F key
Shift key
EXIT/NO key
ALL INPUT/8, T, U, V key
SAFE/RDY/9, W, X,Y, Z key
Clear
Transport control keys
MARK/CUE/0, symbol key
Phones section
OPEN/CLOSE key
USB Kybd only port
Record key
Rear panel
Analog Input Balanced connectors
Parallel Remote connector
Terminate switch 100Ω, ON/OFF
P2/ES BUSS/INPUT connector
P2/ES BUSS/THRU connector
DC in 12V connector
Digital I/O AES/EBU connector
Word IN/WORD OUT connector
Word in terminate switch
Analog Output Balanced connectors
Home screen
Status information
Current settings of menu items are shown
Screen examples
TCP/IP Setup menu screen
Segment LED time indicator
RS422 Setup menu screen
Edit EDL File menu screen
Connection
Table of contents
Digital audio connection
Basic connection
Analog audio connection
External parallel controller connection
Sync signal word clock connection
External video editor connection
Ethernet connection
Connection to a film machine for the optional TC/SYNC card
Connection for optional cards
USB keyboard connection
Other connection
DVD Multitrack Recorder DV824
Skip/locate functions
Recording/playback
Basic audio recording
Setup for recording in quick setup mode
Quick setup mode
Select the desired item and press the ENTER/YES key
Entering the quick setup mode
Input signal selection Input of the status information area
30DF
23.97
29.97DF
TC generator setting of the status information area
22.05kHz/16bit
Recording tracks 7GB 7GB 3x speed
44.1kHz/16bit
48kHz/16bit
Next file name setting Next of the status information area
Reference level setting
Other settings
Recording level setting
Digital input channel selection
Headphone monitor selection
Time display mode selection
Press the Record key to start recording
Starting recording
Press the SAFE/RDY key to make the unit record ready
Tip
To stop recording, press the STOP/HOME key
To cancel the most recent take, press the ENTER/YES key
Canceling recording False Start
Recording in Pre rec mode
For details
Recording the slate tone
Viewing the cue point list
Cue point setting
Setting a cue point on the fly during audio recording
Editing a cue label
Editing a cue point
Deleting a cue point
Adding a new cue point to the cue point list
Editing cue point data
Basic playback
Selecting a file using the SKIP/CURSOR key
Normal playback
Selecting a file from the File SEL screen
To stop playback, press the STOP/HOME key
Cueing playback
Skipping through files
Skip/locate functions
Skipping through cue points
Locating to the beginning or end of a file
Locating to a desired time point
Shift indicator, followed by the Locate
Locating to a desired cue point
While the unit is stopped, press the MARK/CUE key
Controlling the unit from a video editor
File data transfer using FTP server function
Jam function the optional Model 8348 required
Auto copy function the optional Model 9057 required
Audio CD playback
Track selection in the File SEL mode
Setting CD stop mode
While SYS Setup is highlighted, press the ENTER/YES key
Option Function
LTC-Link
List play function
Song-Link
List-Link
List play in Song-Link mode
List play in LTC-Link mode
List play in List-Link mode
001 002 003 004
While the unit is stopped, press the List Play
Setting list play mode/Executing list play
While All Link is highlighted, press the ENTER/YES key
About Stop Mode
Link Mode setting
Locating to the beginning of the play list
Viewing linked audio files
Locating to the end of the play list
Highlight Execute and press the ENTER/YES key
Controlling the unit from a video editor
Necessary setting RS422 Setup menu
Both
Local
Lynx
DVD
Video
Connecting with a personal computer
File data transfer using FTP server function
Where audio files are stored?
FTP client applications
Connecting DV824 directly to PC
Setting example of PC connection
Make TCP/IP setting on the PC
Setting of Fetch
If you use Fetch
Connecting DV824 to LAN
FTP command details
Sub net mask setting
TCP/IP Setup menu setting
IP address setting
Login name/password setting
Anonymous on/off setting
TCP/IP Enable mode on/off setting
Mac address checking
Start up the WS FTP application
File transfer example between the DV824 and a PC
Click on OK in the Session Properties dialog box
Click on the desired drive
Transferring an audio file from the PC to the DV824
Click on the bwf folder
Transferring an audio file from the DV824 to the PC
TC generator mode setting
Frame rate setting
Recording time code
24H Run
Menu items which affect time code output
Time code output setting
Playing back time code
To exit the jam function, press the EXIT/NO key
Executing jam function
Press the ENTER/YES key to execute the jam function
Immediately mode
Selecting auto copy mode
Background mode
Select a partition to which audio data is recorded
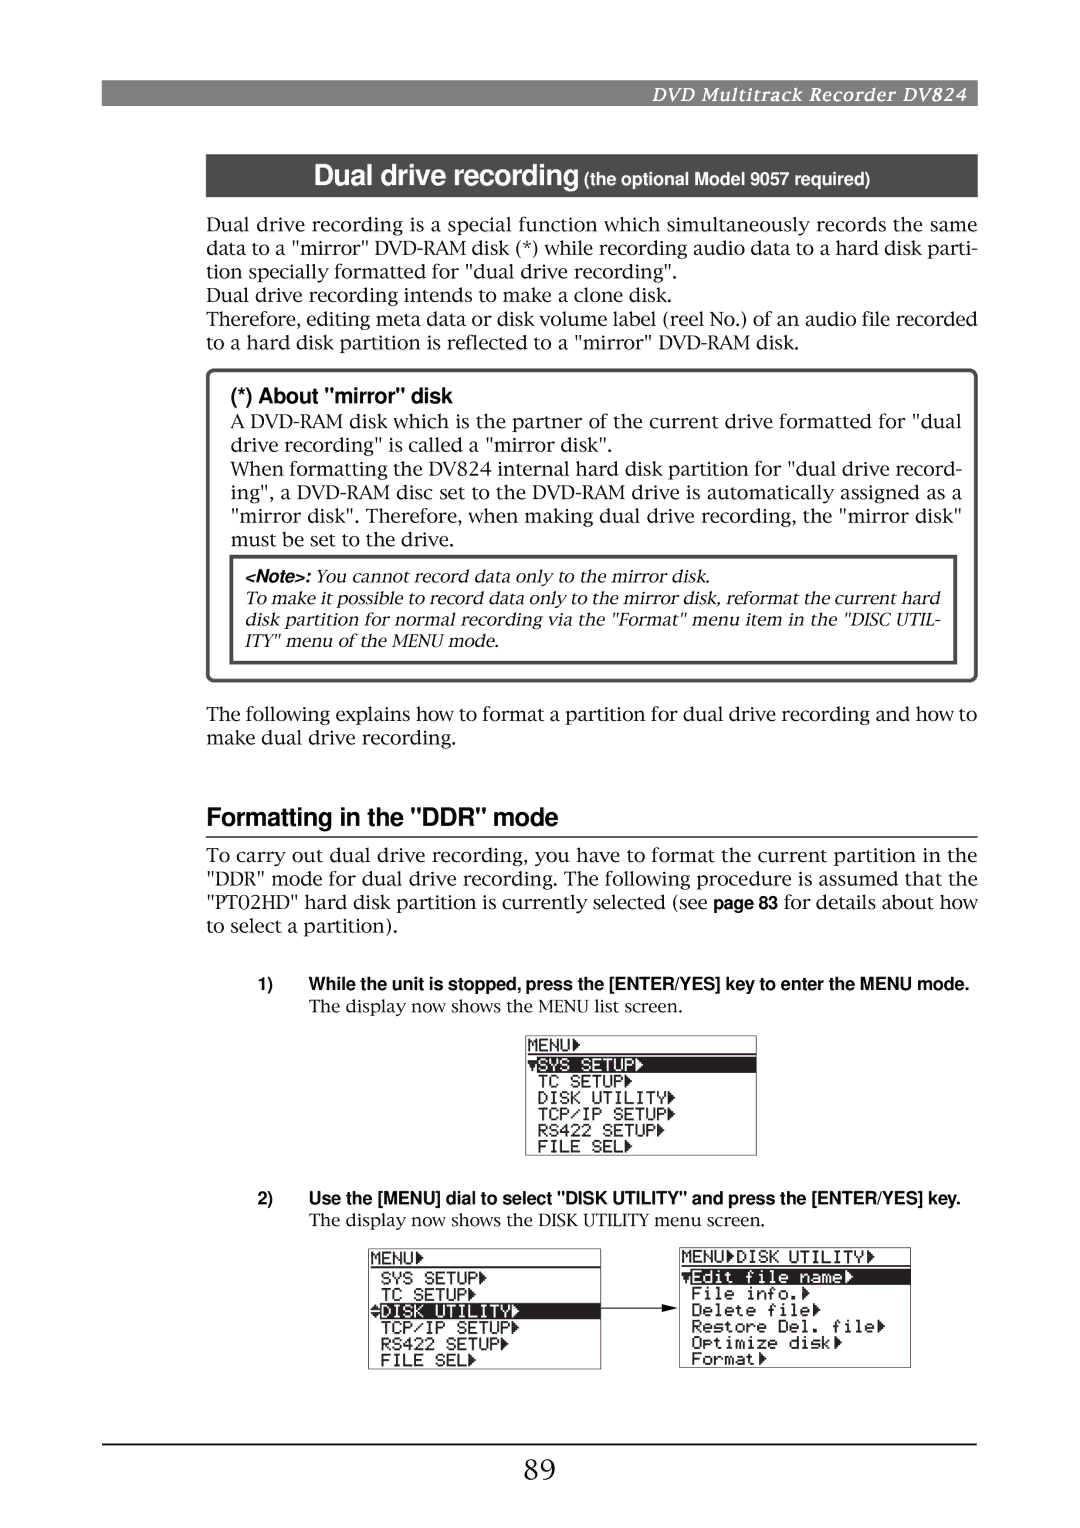
Display now shows the Menu list screen
Press the STOP/HOME key to stop recording
Making auto copy
Press the Record key to start recording to the partition
Disk copy function the optional Model 9057 required
Making disk copy
If you are sure, press the ENTER/YES key
Making file copy
After making audio file selection, press the ENTER/YES key
About mirror disk
Formatting in the DDR mode
While Execute is highlighted, press the ENTER/YES key
Use the Menu dial to select DDR and press the ENTER/YES key
Start recording to partition 2 PTO2
Making dual drive recording
Preparations
Set the chase mode appropriately
Chasing
Set the system clock reference to Video
Macintosh OS9.2.1, OS9.2.2
When connecting via the USB port Windows XP, Windows
Macintosh OSX, OS9.2.1, OS9.2.2
Example of copying data to a computer hard disk
Connecting PC to the unit
How to unmount the DV824 from the PC
Click on Convert -, followed by Done indicated by an arrow
Example of exporting data to a computer application
Computer starts saving the file to the selected file
Spot Dialog setting window appears
DVD Multitrack Recorder DV824
107
103
105
About an ALE file
Creating a new ALE file
100
While New file is highlighted, press the ENTER/YES key
101
Tape
Sets the reel number Tape of an ALE file
102
After making necessary settings, press the EXIT/NO key
While Video format is highlighted, press the ENTER/YES key
Press the ENTER/YES key
103
Adding audio file entries to an ALE file
While ALL-TAKE.ale is highlighted, press the ENTER/YES key
While New entry is highlighted, press the ENTER/YES key
After adding audio file entries, press the EXIT/NO key
How to set Circle Take to a file
104
105
Viewing and editing audio file entries
Viewing audio file entries
Deleting an audio file entry
Adding an audio file entry to an existing ALE file
106
Press the EXIT/NO key twice
Editing an ALE file name
Editing an ALE file
107
After completing editing the name, press the ENTER/YES key
108
Remaking an ALE file
While Remake ALE is highlighted, press the ENTER/YES key
Select the desired type and press the ENTER/YES key
109
Deleting an ALE file
After Remake ALE completes, press the EXIT/NO key
Press the ENTER/YES key to delete the file
110
111
112
About Menu mode
113
SYS Setup menu
Menu item Details of settings Default
114
Basic procedure for using the SYS Setup menu
While the unit is stopped, press the ENTER/YES key
Example of a menu item which has the second level screen
Selecting the File name mode
Default file name setting Default file name
Default file name Scene NAME/TAKE Number setting
115
116
Default track name setting Default track name
Next event number setting Next event No
117
Recording track setting Record tracks
Recording FS/bit length setting Record FS&Bit
118
Pull up/down setting Pull Up/Down
Maximum file length setting Max file length
Input selection Select input
Digital input channel setting Setup digital
119
Analog
Pre recording time setting Pre rec time
Digital output signal format selection Digital out
120
Spdif
Slate tone/pop tone recording mode setting Tone rec mode
Auto EE mode selection Auto EE mode
Tone rec time setting
Tone rec On/Off setting
Reference level setting Reference level
Peak hold time setting Peak hold
End pop tone On/Off setting
122
Diagnoses file setting diagnoses
Skip mode setting Skip mode
USB keyboard type setting Keyboard
123
ROM version checking Version
Startup disk selection Startup disk
124
Japan
Menu item Setting/function Default
TC Setup menu
125
Both
126
Basic procedure for using the TC Setup menu
127
System clock selection Sync clock
TC frame rate selection Frame rate
Internal TC generator setting Set Gen TC
Generator mode selection Gen mode
128
Select the Set Gen TC menu item and press the ENTER/YES key
129
130
Jam mode setting JAM mode
User bit setting Gen Ubit
131
Default LTC start time setting Default LTC start
Time code output source selection Sel.TC Out
132
LTC start time editing Edit LTC start
Select the RepTC Ubit menu item and press the ENTER/YES key
Ubit setting of playback time code RepTC Ubit
133
Reference time code selection Ref TC sel
Time code output while paused Rep pause TC
134
Off
135
Chase mode selection Chase mode
Once
Continue
Chase offset editing
Chase offset setting Chase offset
136
Catch offset
137
Chase offset trimming
Resetting the current film position to the start time
Synchronization to a film machine Bi-Phase setup
While ResetCounter is highlighted, press the ENTER/YES key
138
Setting the film leader length and film size
Setting the number of pulses per frame
139
Editing the film start time
140
Disk Utility menu
141
Basic procedure for using the Disk Utility menu
Enter the desired name
Editing a file name Edit file name
142
Viewing file information
143
Viewing descriptor information
Select the File Info. menu item and press the ENTER/YES key
144
Line No Contents Details
Editing descriptor information
145
Adding descriptor information
Deleting descriptor information
146
Deleting an unnecessary audio file Delete file
Select Delete file and press the ENTER/YES key
Press the ENTER/YES again
147
Restoring a deleted audio file Restore Del. file
Select Restore Del. file and press the ENTER/YES key
148
Optimizing a disk Optimize disk
Drive selection
Formatting a disk Format
149
Format mode selection
Volume label setting
150
Normal
151
Physical format on/off setting
Select the Reel No. menu item and press the ENTER/YES key
Editing the reel number Volume label Reel No
152
153
Record protection On/Off setting Rec protect
154
Resume function On/Off setting Resume
Partition protection On/Off setting Part. protect
155
Load Setup menu
156
Save Setup menu
User box selection
User box name entry
157
Specifications
158
159
160
Physical dimensions
161
Affect of Immunity on This Equipment
413760