HP LaserJet P2050 and P2030 Series Printers
Page
Page
Trademark Credits
Copyright and License
Table of contents
Paper and print media
Control panel
Manage and maintain
Theory of operation
Removal and replacement
Solve problems
Enww
Parts and diagrams
301
Appendix a Service and support
Appendix B Specifications
Appendix C Regulatory information
Product basics
CE457A CE459A CE460A
Product comparison
HP LaserJet P2050 Series Printers
HP LaserJet P2055d printer HP LaserJet P2055dn printer
HP LaserJet P2030 Series Printers
HP LaserJet P2035 printer
CE461A CE462A
Feature Description
Product features
Button, 6 LED control panel
Front view
Product walkaround
Rear view
Model and serial number label
Interface ports
HP LaserJet P2030 Series Printers
Rear view
1HP LaserJet P2035 printer
Model and serial-number label location
Macintosh software
Software installation types for Windows
Supported product software
Software included with the product
Software for networks
HP Web Jetadmin
Other software provided
Software for Windows
Software
Software for other operating systems
System minimum requirements
Windows requirements
Macintosh requirements
2Network product discovery
Service name Description
Connectivity
Supported networks HP LaserJet P2050 Series Printers
4IP addressing
Supported network HP LaserJet P2030 Series Printers
6Network product discovery
7Messaging and management
8IP addressing
Product basics
Control panel
Control panel HP LaserJet P2050 Series Printers only
Control-panel layout
Number Button or light Function
Use the menus
Use the control-panel menus
Menu item Description
Reports menu
Menu item Sub-menu item Description
System setup menu
Control panel
Service menu
Use this menu to establish network configuration settings
WEB
Go button and light
Control panel HP LaserJet P2030 Series Printers only
Paper and print media
Supported paper and print media sizes
Size and dimensions Tray Optional 500-sheet Duplexer
Supported paper and print media
Paper for the HP LaserJet P2050 Series Printers
Supported paper and print media types
Recycled
Tray or bin Paper type Specifications Quantity
Paper for the HP LaserJet P2030 Series Printers
Tray and bin capacity
2Supported paper and print media sizes
Size and dimensions Tray
Paper type printer driver Tray
Tray and bin capacity
Load paper and print media
Load trays
Paper orientation for loading trays
Tray
Load A6-size paper
Optional Tray 3 HP LaserJet P2050 Series Printers only
Manual feed
Configure trays
Configure trays HP LaserJet P2050 Series Printers only
Configure trays HP LaserJet P2030 Series Printers only
Print to the top standard output bin
Use paper output options
Print to the straight-through paper path rear output
Paper and print media
Manage and maintain
Name of report Description
Print the information pages
Demo
Print the information pages
Supplies Status
Configuration
View HP ToolboxFX
Event log
Status
Help
Set up Status Alerts
Set up E-mail Alerts
Alerts
Device Information
Device Settings
PostScript
Paper Handling
Printing
PCL5c
Network Settings
Shop for Supplies
Other Links
Enww
Manage a network product
Open the embedded Web server
Status tab
Use security features
Use HP Web Jetadmin software
Manage supplies
Supplies life
Manage the print cartridge
Enww
Supply replacement guidelines
Replace supplies and parts
Redistribute toner
Change the print cartridge
Enww
Install product memory
Install memory HP LaserJet P2050 Series Printers only
Install memory HP LaserJet P2050 Series Printers only
Enww
Save resources permanent resources
Check Dimm installation
Click the Device Settings tab
Enable memory for Windows
Clean the print-cartridge area
Clean the product
Clean the paper path HP LaserJet P2030 Series Printers only
Clean the paper path HP LaserJet P2050 Series Printers only
Settings tab
Clean the Tray 1 pickup roller
Enww
Enww
Enww
Clean the Tray 2 pickup roller
Enww
Reconnect the power cord, and turn the product on
Manage and maintain
Theory of operation
Introduction
1Block diagram
2Cross-section of product
Internal components
Enww
Timing
1Sequence of operation
Name Timing Purpose
3Engine control system
Engine control system
4DC controller
DC controller
Swon
Low-voltage power supply
6High-voltage power supply
High-voltage power supply
7Laser/scanner system
Laser/scanner system
Laser failure detection
Primary charging
Image-formation system
10 Developing
11 Transfer
13 Fusing
Pickup/feed/delivery system
Pickup/feed/delivery system
16Jam detection
Jam detection
Enww
Removal and replacement
Electrostatic discharge
Removal and replacement strategy
1Phillips and pozidrive screwdriver comparison
Required tools
After performing service
Before performing service
Print-quality test
Post-service test
Print cartridge
3Remove the Tray 2 cassette
Tray 2 cassette
Pickup roller Tray
Rollers and pads
Release two tabs
8Remove the pickup roller Tray 1 5 Removal and replacement
9Remove the pickup roller assembly Tray 2 1
Pickup roller assembly Tray
Enww
13Remove the pickup roller Tray 2 5
14Remove the separation-pad assembly Tray 2 1
Separation-pad assembly Tray
Transfer roller
19Remove the transfer roller 4 Removal and replacement
20Remove the transfer roller 5
Dimm door HP LaserJet P2050 Series only
External panels, covers, and doors
Right cover
26Remove the right cover 4 Removal and replacement
Reinstall the right cover
Left cover
Enww
Rear cover, rear door, and duplex-paper-feed assembly
Remove five screws callout
Enww
Enww
Top-cover assembly
Enww
Remove three screws callout
44Remove the cartridge door assembly and front cover 2
Cartridge-door assembly and front cover
Carefully remove the cartridge-door assembly
Reinstall the cartridge-door assembly and front cover
Formatter PCA HP LaserJet P2030 Series
Internal assemblies
Internal assemblies
Formatter PCA HP LaserJet P2050 Series
Enww
Paper-pickup-gear assembly
55Remove the paper-pickup-gear assembly 3
Reinstall the paper-pickup-gear assembly
Enww
Cartridge-door switch
Tray 1 pickup solenoid
Enww
Fan
65Remove the fan 3
Reverse-sensor assembly HP LaserJet P2050 Series
Remove the reverse-sensor assembly
68Remove the power-switch assembly 1 Removal and replacement
Power-switch assembly
70Remove the power-switch assembly 3
71Remove the power-switch assembly 4 Removal and replacement
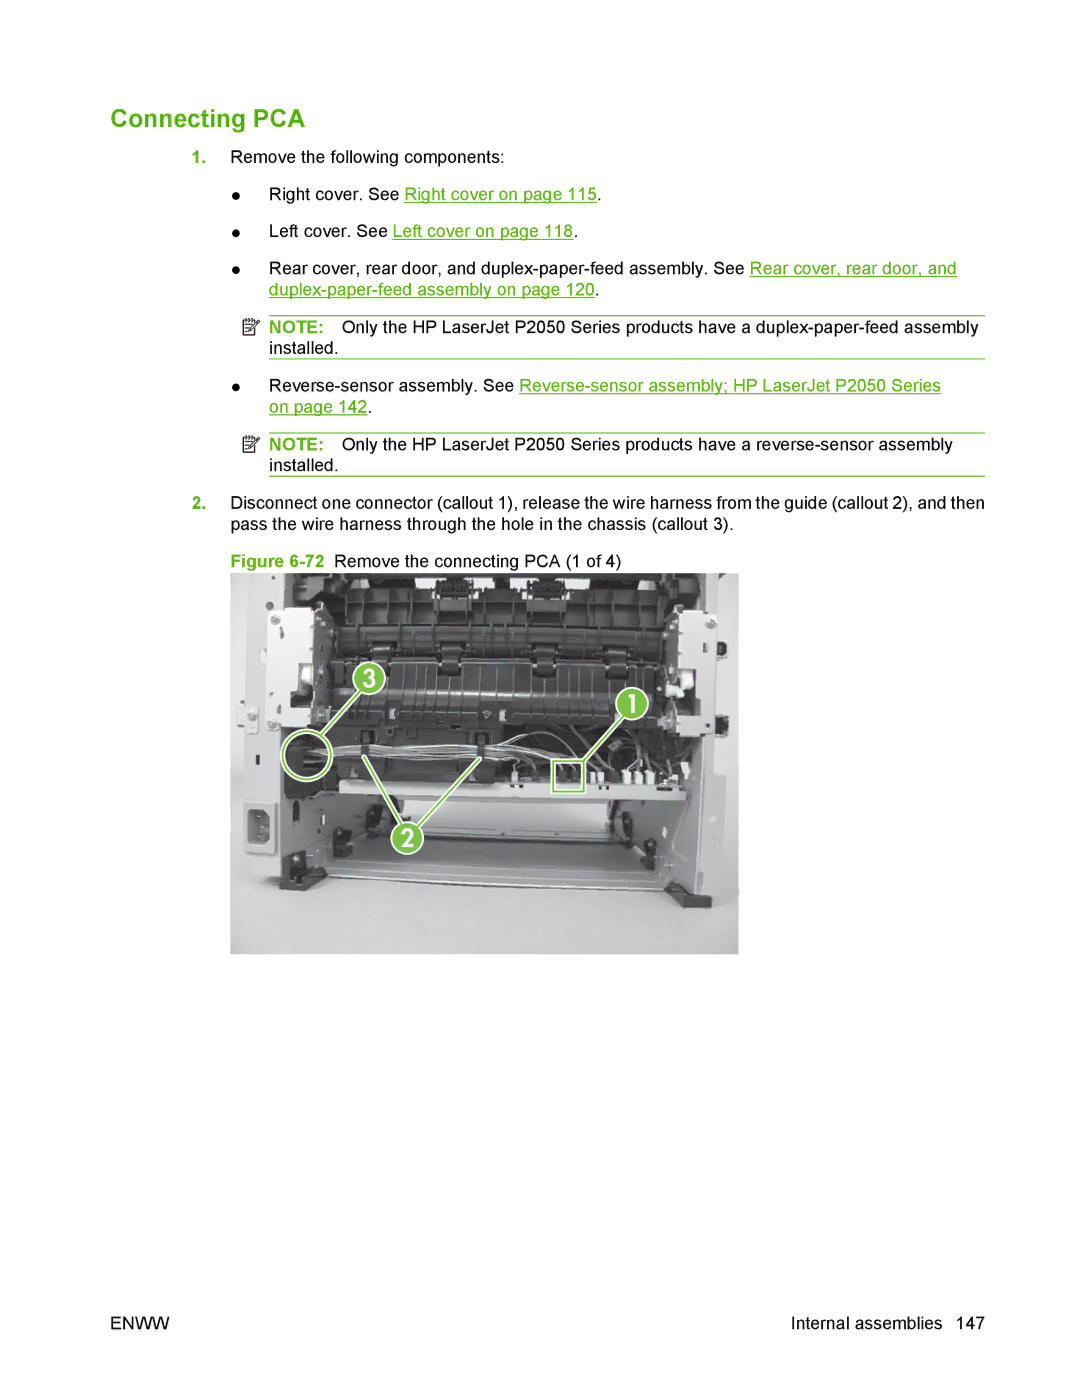
72Remove the connecting PCA 1
Connecting PCA
Enww
75Remove the connecting PCA 4
76Remove the inlet-cable assembly 1 Removal and replacement
Inlet-cable assembly
78Remove the inlet-cable assembly 3
Top cover assembly. See Top-cover assembly on
Registration assembly
80Remove the registration assembly 2 Remove the guide
Enww
85Remove the registration assembly 7
Laser/scanner assembly
87Remove the laser/scanner assembly 2
Fuser
88Remove the fuser 1 Removal and replacement
Enww
Enww
94Remove the fuser 7
Reinstall the fuser
Engine controller unit ECU
Enww
101Remove the ECU 5
Enww
Enww
107Remove the ECU 11 Removal and replacement
109Remove the ECU 13
111Reinstall the fuser 1 Removal and replacement
Reinstall the ECU
Enww
Paper-feed-guide assembly
114Remove the paper-feed-guide assembly 2
Main motor
117Remove the main motor 3
118Remove the main motor 4
Face-down-drive or duplexing-paper-feed assembly
Remove the fan duct
Remove the face-down-drive or duplexing-paper-feed assembly
Duplex solenoid HP LaserJet P2050 Series
125Remove the paper-retaining-delivery assembly 1
Paper-retaining-delivery assembly
Enww
Enww
Remove the paper-retaining-delivery assembly
Solve problems
Troubleshooting checklist
Solve general problems
Factors that affect product performance
Basic problem solving
1Basic problem solving
Problem Cause Solution
Engine test page on
Engine components
Print a menu map
Menu map HP LaserJet P2050 Series Printers only
Troubleshooting process
Pre-troubleshooting checklist
General topic Questions
For 10 to 20 minutes
Drum rotation functional check
Tools for troubleshooting
Continuous self-test HP LaserJet P2050 Series only
Half self-test functional check
Heating element check
High-voltage contacts check
Checking the print cartridge contacts
1High-voltage contact points on the print cartridge
Component locations
2Left-side components
Reference Component Description If disconnected or blocked
FM1
3Right-side components
Reference Component Description
4Connector PCA components
Cartridge area appears
5Rear-side components
6Print cartridge components
Output bin appears
Bin full appears
7Top components
8Tray 1 and Tray 2 components
Component Distance between defects
Problem-solve diagrams
Repetitive image defect ruler
9Repetitive defects
10Engine controller connectors
Description When disconnected
Engine controller PCA
Supply memory error appears
Control-panel messageLoad paper appears
Open door and clear jam appear
11Major components
Major components
12 PCAs
PCAs
Chart
Timing chart
General
Circuit diagram
Circuit diagram
13Status-light legend
14Control-panel light messages
Light status State of the product Action
Processing Data
Manual Feed or Continuable Error
Toner Low
Jam
Toner Missing
Paper Mount
Alert message Description Recommended action
Supply memory error
Fuser error
Scanner Error
Jam in cartridge area
Engine communication error
Install black cartridge
Door Open
Jam in Tray
Jam in output bin
No paper pickup
Non-HP supply installed
Load paper
Manual feed
Press OK
Engine error
Control-panel messages
Print failure
41.X.Error
Error
Turn off then on
XX Error 51.0000
Turn off then on Laser/scanner assembly error
Fan error
Press OK Door open
Service error
Device error
Genuine HP supply installed
Specifications
Press OK for available media
Cleaning mode OK to start
Load paper
Load tray # Type Size
Manual feed Type Size
Load tray 1 Type Size
Manual duplex
Load tray
Used cartridge installed
Used cartridge in use
To accept press OK
Event log messages
Event-log messages
Print the event log HP LaserJet P2050 Series Printers only
Print an event log HP LaserJet P2030 Series Printers only
Solve problems
Common causes of jams
Paper-handling problems
Product is jammed.1 Cause Solution
Jams
Jam locations
Clear jams
Internal areas Print-cartridge area and paper path
Enww
Duplex paper path HP LaserJet P2050 Series Printers only
Enww
Enww
Input trays Tray
Tray
Enww
Tray 3 HP LaserJet P2050 Series Printers only
Output bins
Enww
Solve image-quality problems
Printed page is different from what appeared onscreen
16Printed page is different from what appeared onscreen
Light print or faded
Image defect examples
Gray background
Toner specks
Dropouts
Vertical lines
Misformed characters
Toner smear
Loose toner
Vertical repetitive defects
Skew
Curl or wave
Wrinkles or creases
Toner scatter outline
Print-quality problems associated with jams
Solve print-quality problems
Print-quality problems associated with paper
Print-quality problems associated with the environment
Solve performance problems
Solve connectivity problems
Solve direct-connect problems
Solve network problems
17Secondary Service menu
Service mode functions
Open the secondary service menu
Secondary service menu structure
Nvram initialization HP LaserJet P2050 Series Printers only
Engine resets
Restore defaults
Engine test
Solve problems
Parts and diagrams
Order parts, accessories, and supplies
Memory
Paper-handling accessories
Part numbers
Print cartridges
Product Model Voltage Description Part number
Whole unit replacement
Screws
1Common fasteners
Example Description Size Part Number
How to use the parts lists and diagrams
How to use the parts lists and diagrams
HP LaserJet P2035
External covers, panels, and doors
Description Part number Qty
2External covers, panels, and doors HP LaserJet P2035
HP LaserJet P2055
3External covers, panels, and doors HP LaserJet P2055
Hplj 2050 Series only
Internal components 1
4Internal components 1
4Internal components 2
Internal components 2
5Internal components 2
Hplj 2030 Series only Hplj 2050 Series only
Internal components 3
6Internal components 3
6Internal components 4
Internal components 4
7Internal components 4
7Internal components 5
Internal components 5
8Internal components 5
9Alphabetical parts list
Alphabetical parts list
Internal components 1
Switch, push SW301 cartridge-door interlock WC4-5171-000CN
Numerical parts list
10Numerical parts list
Part number Description
External covers, panels, and doors HP LaserJet P2035 on
RM1-6445-000CN Reverse-sensor assembly HP LaserJet P2055
Parts and diagrams
Service and support
Hewlett-Packard limited warranty statement
Print cartridge limited warranty statement
Transfer
End User License Agreement
End User License Agreement
Customer self-repair warranty service
Ljp2030series
Customer support
Weekly volume on-site service
HP maintenance agreements
On-site service agreements
Next-day on-site service
Extended warranty
Appendix a Service and support
Specifications
Table B-3Product dimensions and weights
Physical specifications
Electrical specifications
Table B-1Product dimensions and weights
Operating environment
Acoustic emissions
Appendix B Specifications
Regulatory information
FCC regulations
Declaration of conformity
Declaration of conformity
Declaration of Conformity
Safety statements
Laser safety
Canadian DOC regulations
Luokan 1 laserlaite
Laser statement for Finland
Substances Table China
Cables
Symbols/Numerics
Dimm
Macintosh
See also solving
PCL
Enww
Enww
TCP/IP
Enww
Page
CE457-90980* *CE457-90980