HP Officejet Pro L7500/L7600/7700
Page
Page
Page
Contents
Set up the device
Set up the device
This section summarizes the setup process for the device
Before you begin
USB
Complete the installation
Verify that the device is set up correctly
Verify that the device software is installed correctly
Finding more information
Identify the device parts
Front view
Printing supplies area
Memory card slots
Back view
Control panel
Speed Dial
Keypad
Display
Power button and lights
Other buttons
Set up the fax optional
Countries/regions with parallel- type phone systems
Countries/regions with serial-type phone systems
Venezuela
Dedicated phone line
Shared phone line
Use the fax setup tables
Voice and Fax
Fax and Internet
Voice, Fax, and Internet dial-up
Voice, Fax, and Internet DSL
Configuration guideline
Configuration instructions
Telephone company, for example, double rings or triple rings
Managing and configuring fax settings
Set up speed-dial entries
Test fax setup
To set up speed-dial entries
Set up Direct Digital Filing for scanning optional
Setting it up…
Required information
Direct Digital Filing Action
Set up a shortcut to the folder on the network
Create and share a folder on the network
Trying it out…
Test and use Direct Digital Filing
Communication mode
Security Settings
Network name Ssid
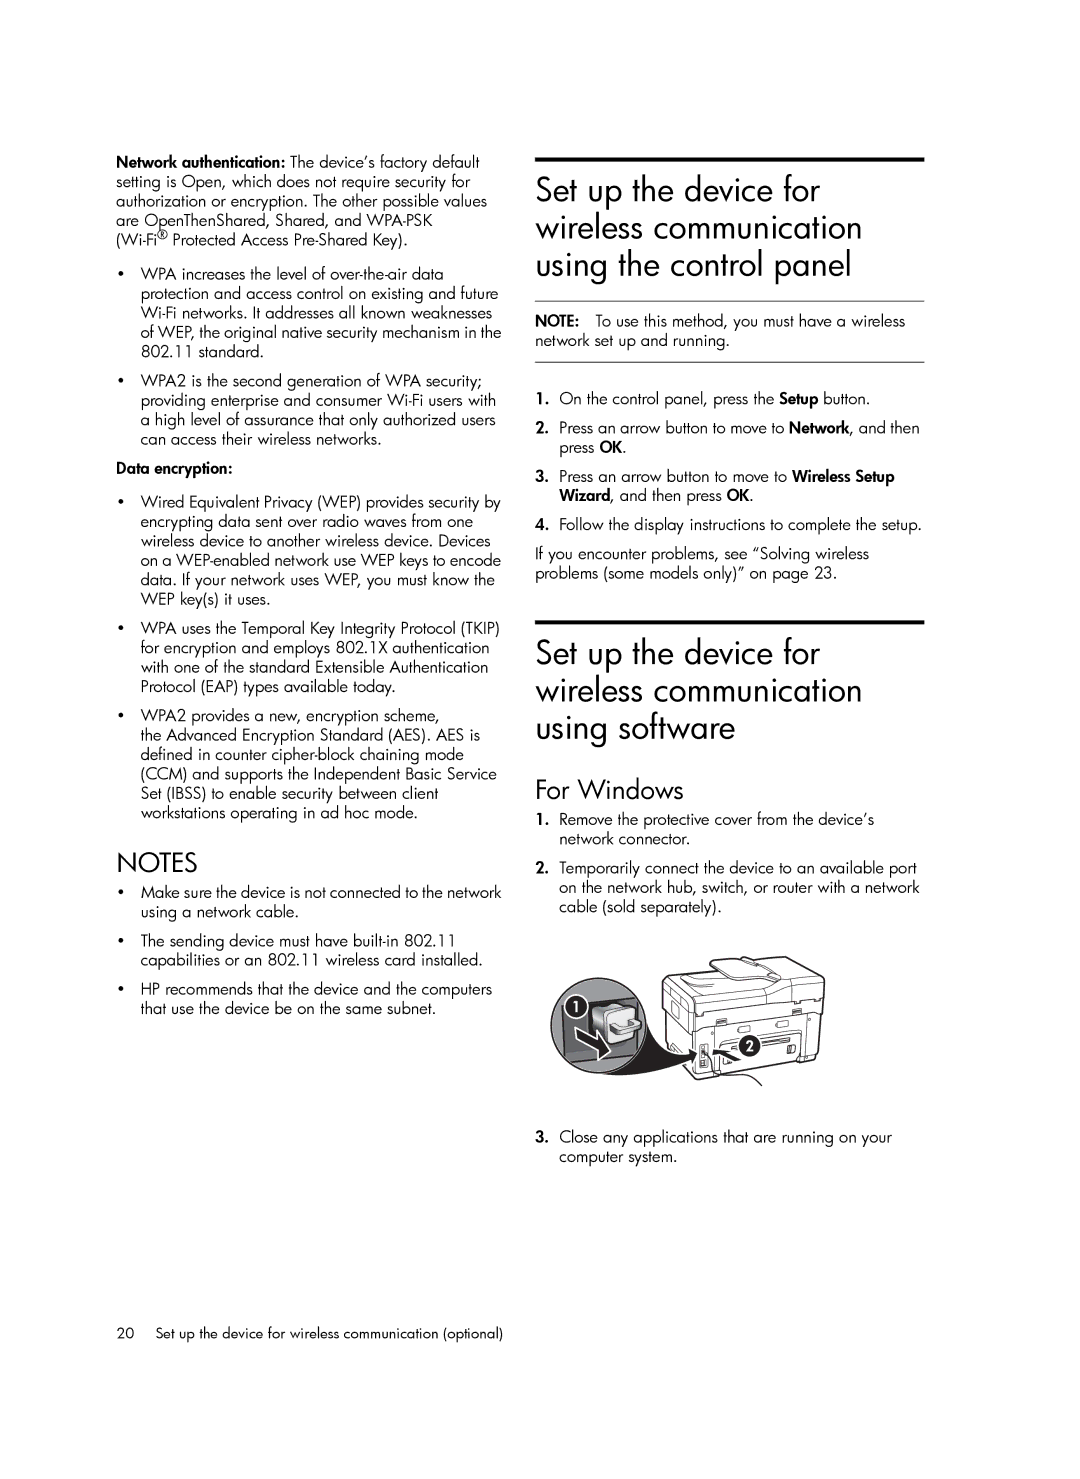
Set up the device for wireless communication using software
For Windows
For Mac OS
Troubleshooting
Solving installation problems
Hardware installation suggestions
Software installation suggestions
Solving network problems some models only
General network troubleshooting
Problems connecting to a wired network
Though it is not recommended that you assign
Solving Direct Digital Filing problems optional
Add hardware addresses to a wireless access point WAP
Reset network configuration settings
Unable to scan to network folder
Filename prefix has not been set up correctly
Disk is full
Server name cannot be resolved
Solving fax problems optional
Solving fax problems optional
Troubleshooting and configuration tools
Self-test diagnostic
Network configuration
Embedded Web server
Hewlett-Packard limited warranty statement
HP product Duration of limited warranty
Page
Vue de face Vue arrière Panneau de commande
Sommaire
Configuration de l’appareil
Configuration de l’appareil
Choix de l’emplacement
Avant de commencer
Réseau Ethernet
Clôture de l’installation
Vérification de la configuration de l’appareil
Enregistrement de l’’appareil
Pour ouvrir le logiciel HP Photosmart Windows
Recherche d’informations supplémentaires
Identification des différentes parties de l’appareil
Vue de face
Zone d’approvisionnement pour l’impression
Logements pour carte mémoire
Vue arrière
Port USB Universal Serial Bus avant compatible PictBridge
Panneau de commande
Numérotation rapide
Pavé numérique
Affichage
Autres boutons
Interrupteur et voyants de marche/arrêt
Configuration du télécopieur facultatif
Pays/régions équipés de systèmes téléphonique parallèles
Ligne téléphonique dédiée
Pays/régions équipés de systèmes téléphoniques en série
Des télécopies automatiquement, contactez votre
Utilisation des tableaux de configuration du télécopieur
Ligne téléphonique partagée
Tableau 3-1 Téléphone et télécopieur
Tableau 3-2 Télécopieur et Internet
Tableau 3-3 Téléphone, télécopieur et Internet numérotation
Tableau 3-4 Téléphone, télécopieur et Internet DSL
Procédure de configuration
Instructions de configuration
Configuration du télécopieur facultatif
Configuration d’entrées de numérotation rapide
Test de la configuration du télécopieur
Pour définir des entrées de numérotation rapide
’aide du clavier numérique, puis appuyez sur OK
Pour tester la configuration du télécopieur
Test de la configuration du télécopieur
Configuration…
Informations requises
’archivage numérique ’action
Etape 1 Création et partage d’un dossier sur le réseau
Test…
Etape 3 Test et utilisation de l’archivage numérique
Mode de communication
Nom du réseau Ssid
Paramètres de sécurité
Remarques
Pour Windows
Pour Mac OS
Résolution des problèmes d’installation
Suggestions pour l’installation du matériel
Suggestions pour l’installation du logiciel
Dépannage
Résolution des problèmes réseau
Vérification des étapes préalables à linstallation
Problèmes lors d’une connexion à un réseau câblé
Vérification des paramètres de communication sans fil
Ajout d’adresses matérielles à un point d’accès sans fil WAP
Résolution des problèmes d’archivage numérique facultatif
Réinitialisation des paramètres de la configuration réseau
Impossible de numériser vers le dossier réseau
Résolution des problèmes de télécopie facultatif
Combiné est décroché
Outils de dépannage et de configuration
De diagnostic d’autotest
De configuration réseau
Serveur Web intégré
Déclaration de garantie limitée Hewlett-Packard
Produit HP Durée de la garantie limitée
Page
Contenido
Vista frontal Vista posterior Panel de control
Configure el dispositivo
Configure el dispositivo
Antes de comenzar
Prepare la ubicación
USB bus serie universal
Finalice la instalación
Registre el dispositivo
Para abrir el software HP Photosmart Windows
Para abrir el software HP Photosmart Studio Mac OS
Más información
Identificar las piezas del dispositivo
Vista frontal
Área de suministros de impresión
Ranuras de tarjetas de memoria
Vista posterior
Panel de control
Marcación rápida
Fax
Escáner
Pantalla
Otros botones
Copia
Foto
Configurar el fax opcional
Sistemas telefónicos en serie y en paralelo
Línea telefónica dedicada
Enchufe telefónico
Línea telefónica compartida
Uso de las tablas para la instalación del fax
Tabla 3-1 Voz y fax
Tabla Fax e Internet
Tabla 3-3 Voz, fax e Internet conmutada
Tabla 3-4 Voz, fax e Internet DSL
Pautas de configuración
Instrucciones de configuración
Page
Administración y configuración del fax
Prueba de la configuración de fax
Configuración de entradas de marcación rápida
Para configurar entradas de marcación rápida
Probar la configuración de fax
Prueba de la configuración de fax
Configurar el Archivado digital para el escaneo opcional
Configurarlo…
Información requerida
Archivado digital En acción
Paso 1 crear y compartir una carpeta en la red
Probarlo…
Paso 3 pruebe y utilice el Archivado digital
Información sobre la configuración de red inalámbrica
Nombre de la red Ssid
Modo de comunicación
Configuración de seguridad
Notas
Para Windows
Para Mac OS
Solución de problemas
Solución de problemas de instalación
Sugerencias para la instalación de hardware
Sugerencias para la instalación de software
Solución de problemas de red sólo en algunos modelos
Solución de problemas de red generales
Problemas durante la conexión a una red por cable
Verifique las pautas de instalación
Solución de problemas inalámbricos sólo en algunos modelos
Revise los parámetros de la comunicación inalámbrica
Solución de problemas del archivado digital opcional
Restablezca los parámetros de configuración de la red
No se pudo escanear a la carpeta de red
Solución de problemas de fax opcional
Recibir faxes en forma automática
Solución de problemas y herramientas de configuración
Página de configuración de red
Página de autodiagnóstico
Servidor Web incorporado
Declaración de garantía limitada de Hewlett-Packard
Producto HP Duración de la garantía limitada
Page
Conteúdo
Visão frontal Visão traseira Painel de controle
Configurar o dispositivo
Configurar o dispositivo
Esta seção resume o processo de configuração do dispositivo
Antes de começar
Execute um dos procedimentos a seguir
Concluir a instalação
Registre o dispositivo
Para abrir o software HP Photosmart Windows
Para abrir o software HP Photosmart Studio Mac OS
Como obter mais informações
Identificação das peças do dispositivo
Visão frontal
Áreas de suprimentos de impressão
Visão traseira
Slots de cartão de memória
Painel de controle
Discagem rápida
Teclado
Digite números, valores ou texto de fax
Visor
Outros botões
Botão e luzes de energia
Configurar o fax opcional
Sistema telefônico serial x paralelo
Países/regiões com sistemas telefônicos seriais
Linha telefônica dedicada
Uso da tabelas de configuração de fax
Linha telefônica compartilhada
Tabela 3-1 Voz e Fax
Tabela 3-2 Fax e Internet
Tabela 3-3 Voz, Fax e Internet discagem
Tabela 3-4 Voz, Fax e Internet DSL
Instruções de configuração
Instruções de configuração
Nenhuma chamada
Configurar entradas de discagem rápida
Testar configuração do fax
Gerenciando e definindo configurações de fax
Para configurar entradas de discagem rápida
Verifique o relatório
Testar configuração do fax
Configurando…
Informações necessárias
Arquivamento digital direto Em ação
Etapa 1 Criar e compartilhar uma pasta na rede
Testando…
Etapa 2 Configurar um atalho para a pasta na rede
Etapa 3 Testar e usar o Arquivamento digital direto
Configurar o dispositivo para comunicação sem fio opcional
Entendendo configurações de rede sem fio
Configurações de segurança
Nome da rede Ssid
No Windows
Para Mac OS
Solução de problemas
Solucionando problemas de instalação
Sugestões de instalação de hardware
Sugestões de instalação de software
Solucionando problemas de rede apenas alguns modelos
Solução de problemas gerais de rede
Problemas na conexão com uma rede com fio
Verifique as configurações de comunicação sem fio
Redefina as configurações da rede
Não é possível digitalizar para pasta de rede
Solucionando problemas de fax opcional
Dispositivo não consegue
Ferramentas de solução de problemas e de configuração
Página de Configuração da rede
Página de Diagnóstico de autoteste
Declaração de garantia limitada da Hewlett-Packard
Produto HP Duração da garantia limitada
EN FR ES PT
C8187-90001