Service and Technical Reference Guide
Service and Technical Reference Guide
About This Book
Iv About This Book
Table of contents
Serial and Parallel ATA drive guidelines and features
Identifying routine care and disassembly preparation
Appendix B Power cord set requirements
Appendix F Memory
Enww
Install the operating system
Installing or upgrading device drivers
Transferring files and settings
Creating a disc recovery set
Computer Setup F10 utility
Computer Setup F10 utilities
Using Computer Setup F10 utilities
Heading
Computer Setup-File
2Computer Setup-File
Computer Setup-Storage
3Computer Setup-Storage
Storage Options Removable Media Boot
Boot Order
Shortcut to Temporarily Override Boot Order
Computer Setup-Security
4Computer Setup-Security
Setup Security Level
Network Service
Boot
System IDs
Computer Setup-Power
5Computer Setup-Power
Computer Setup-Advanced
6Computer Setup-Advanced for advanced users
Bus Options
Configuration
PCI Devices
Device Options
Recovering the configuration settings
Accessing HP Insight Diagnostics
HP Insight Diagnostics
HP Insight Diagnostics
Survey tab
Test tab
Select the Test Mode Interactive or Unattended
Status tab
Help tab
Saving and printing information in HP Insight Diagnostics
Log tab
Restoring the software
Downloading the latest version of HP Insight Diagnostics
Protecting the software
Enww
Initial configuration and deployment
Desktop management
HP OpenView Agent
Altiris Deployment Solution Agent
HP Backup and Recovery Manager
Enww
HP Client Management Interface
Remote system installation
Software updating and management
HP System Software Manager
HP Client Manager
HP ProtectTools Security Manager
HP Client Management Premium Suite
HP Client Foundation Suite
HP OpenView Client Configuration Manager
HP OpenView Workstation Configuration Management solutions
Proactive change notification
Retired solutions
ROM Flash
Subscriber’s Choice
HPQFlash
Boot Block Emergency Recovery Mode
Remote ROM Flash
Copying to multiple workstations
Replicating the setup
Copying to single workstation
Creating a bootable device
Repset.exe
Enww
Unsupported USB flash media device
Dual-State power button
Asset tracking and security
HP web site support
Industry standards
1Security Features Overview
Option Description
Identify the system
Password security
Board
DriveLock some models
Establishing a Setup password using Computer Setup
Changing a power-on or Setup password
National Keyboard Delimiter Characters
Arabic Greek Russian Belgian Hebrew Slovakian
Using DriveLock
DriveLock
Enww
Smart Cover Sensor
Level Setting Description
You must enter the setup password to continue
Smart Cover Lock
Cable Lock provision
Locking the Smart Cover Lock
Fingerprint identification technology
Fault notification and recovery
Surge-tolerant power supply
Drive protection system
Enww
Sata hard drives
Serial and Parallel ATA drive guidelines and features
Serial ATA Hard Drive Characteristics
Sata Identification Color Port
Sata data cable
Sata power cable
Sata hard drive cables
Pin Number Usage Device Plug Host Plug
Hard drive capacities
Pata device information
ATA Smart Drives
FAT
Enww
Identifying routine care and disassembly preparation
Preventing electrostatic damage to equipment
Electrostatic discharge information
Generating static
Relative Humidity Event 55% 40% 10%
Recommended materials and equipment
Personal grounding methods and equipment
Grounding the work area
Static Shielding Protection Levels
Enww
Operating guidelines
General cleaning safety precautions
Cleaning the workstation case
Routine care
Cleaning the keyboard
Cleaning the monitor
Power supply fan
Service considerations
Cleaning the mouse
Tools and software requirements
Hard drives
Cables and connectors
Lithium coin cell battery
Removal and replacement procedures
Preparation for disassembly
External security devices
Installing a cable lock
Installing a padlock
Access panel
Front bezel
Front drive bezels
Cable management
Cable PCA Designator
Cable connections
Cable Cable Designator
Memory
Expansion cards
Enww
Enww
Enww
Enww
Enww
Enww
Removing an external drive
Drives
Drive positions
Drive Positions Ite Description m
Drives
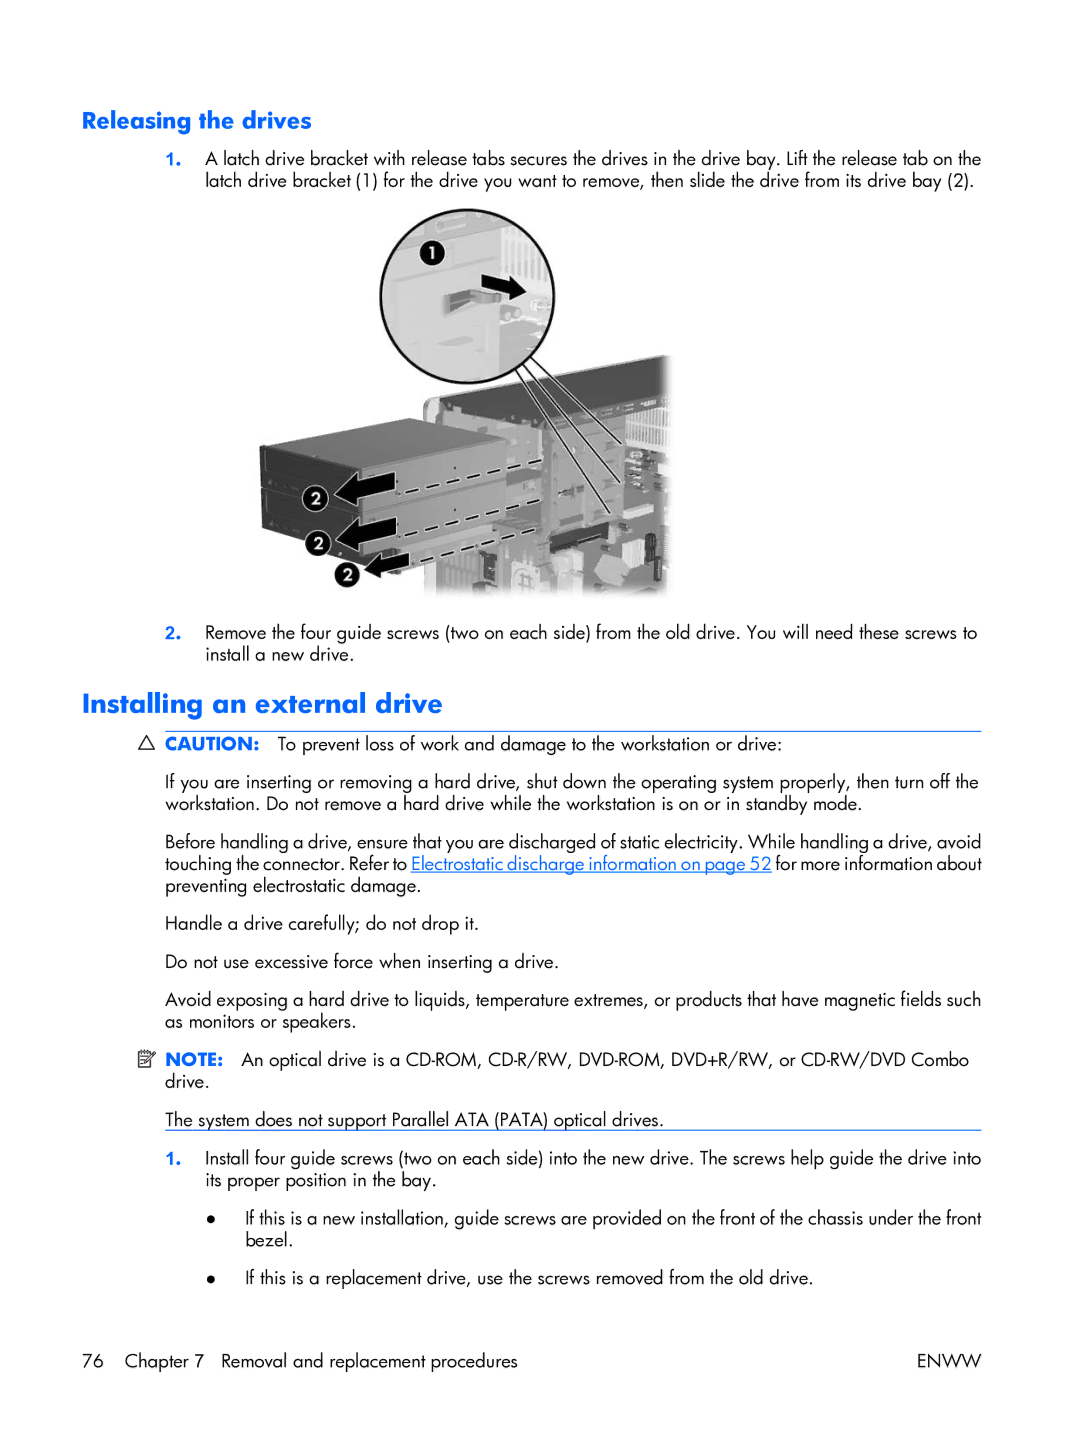
Installing an external drive
Releasing the drives
Enww
Enww
Replacing an internal hard drive
Enww
Enww
Enww
Chassis fan
Fan shroud
Front I/O panel housing assembly
Heatsink
Processor
Enww
Speaker
Power supply
System board
Battery
Type 1 Battery Holder
Type 2 Battery Holder
Type 3 Battery Holder
Keyboard
Connector pin assignments
Connector and Icon Pin Signal
Mouse
+ Transmit Data
Ethernet RJ-45
Ethernet AUI
+ Receive Data
Serial interface, powered and non-powered
Parallel interface
Headphone
Connector and Icon 1/8 miniphone Pin Signal
Microphone
Line-in audio
External infrared transceiver
Monitor
Pin Power
ATA/ATAPI IDE Standard drive cable
Drive Connector Pin Signal
Pin Power for CPU
Sata data and power
X1, x4, x8, and x16 PCI Express Connector Pin a Signal
X1, x4, x8, and x16 PCI Express Connector Pin B Signal
DVI connector
Enww
General requirements
Power cord set requirements
Japanese power cord requirements
Country-specific requirements
Austria
Australia
Italy
Japan
Post error messages
Power-On Self-Test Post
Table C-1Numeric Codes and Text Messages
ROM Download to Disable to
Post numeric codes and text messages
Control panel message Description Recommended action
Control panel message Description
Advanced Onboard Devices
Display cache is detected unreliable
Replace diskette drive
Devices
Replace system board if minimal graphics
Under Storage DPS Self-test
Keyboard Attached Enabled Turned off
Inventory error during MEBx execution
Network Server Mode Active and No
Then save changes
Remove the workstation cover, press
Table C-2Diagnostic Front Panel LEDs and Audible Codes
Activity Beeps Possible Cause Recommended Action
Device that is causing the failure. Continue
Cards. Power on the system. If the system
Procedure until failure occurs. Replace
Replace the power supply
Open hood and check that the power button
Red Power LED flashes nine System powers on but is
Times, once every second Unable to boot
Check that both power supply cables are
Enww
Troubleshooting without diagnostics
Safety and comfort Before you call for technical support
Helpful hints
Helpful hints
Problem persists, replace the RTC battery. See the Hardware
Solving general problems
Table D-1Solving General Problems
Prolongs the life of the RTC battery
There is no sound or sound volume is too low Cause Solution
Poor performance is experienced Cause Solution
Heatsink is not properly attached to the processor
Heatsink/fan assembly
Cause Solution
If fan is plugged in, but is not spinning, then replace
Enww
Power supply shuts down intermittently Cause Solution
Solving power problems
Table D-2Solving Power Problems
Diskette drive light stays on Cause Solution
Solving diskette problems
Table D-3Solving Diskette Problems
Drive not found Cause Solution
Diskette drive cannot read a diskette Cause Solution
Cannot format diskette Cause Solution
Problem has occurred with a disk transaction Cause Solution
Invalid system disk message is displayed Cause Solution
Media Boot function in Computer Setup overrides the Boot
Order enable command
Solving hard drive problems
Table D-4Solving Hard Drive Problems
Workstation seems to be locked up Cause Solution
Storage Boot Order list
Workstation will not boot from hard drive Cause Solution
Can not write to the media card Cause Solution
Solving media card reader problems
Table D-5Solving Media Card Reader Problems
Solving media card reader problems
Blank screen no video Cause Solution
Solving display problems
Table D-6Solving Display Problems
Dim characters Cause Solution
ImageControl/ Horizontal Position or Vertical
Image is not centered Cause Solution
Out of Range displays on screen Cause Solution
Assist you with the synchronization, go to the following
Certain typed symbols do not appear correct Cause Solution
Monitor’s on-screen display menu
Web site, select the appropriate monitor, and download
Sound cuts in and out Cause Solution
Solving audio problems
Table D-7Solving Audio Problems
From the Control Panel, select Sounds and Audio Devices
Speech and Audio Devices, then click Sounds
On the Properties tab, make sure Enable digital CD
Audio for this CD-ROM device is checked
Audio Devices
Solving printer problems
Table D-8Solving Printer Problems
Click Shut Down . The Shut Down Windows dialog
Solving keyboard and mouse problems
Table D-9Solving Keyboard Problems
Select Shut down
Table D-10Solving Mouse Problems
Workstation will not start Cause Solution
Solving hardware installation problems
Table D-11Solving Hardware Installation Problems
Option card
Goes away
Once bad card is identified, remove and replace bad
Wake-on-LAN feature is not functioning Cause Solution
Solving network problems
Table D-12Solving Network Problems
Wake-on-LAN is not enabled Enable Wake-on-LAN
Resource settings for the board
Diagnostics reports a failure Cause Solution
Under the Computer Setup Advanced menu, change
Cable Correctly
New network card will not boot Cause Solution
Out of memory error Cause Solution
Solving memory problems
Table D-13Solving Memory Problems
Memory count during Post is wrong Cause Solution
Solving memory problems
Some fans only operate when needed
Solving processor problems
Table D-14Solving Processor Problems
Make sure the processor heatsink is installed properly
Enabled in Storage Boot Order
Solving CD-ROM and DVD problems
Table D-15Solving CD-ROM and DVD Problems
Mode in Security Password Options
DVD driver
Movie will not play in the DVD drive Cause Solution
Cannot eject compact disc tray-load unit Cause Solution
Try a different brand of media. Quality varies widely
Disconnect the drive cable from the system board
Drive cable is still attached to the system board
USB Drive Key not found identified Cause Solution
Solving drive key problems
Table D-16Solving Drive Key Problems
System will not boot from USB Drive Key Cause Solution
Restart the workstation
Solving front panel component problems
Table D-17Solving Front Panel Component Problems
Unable to connect to the Internet Cause Solution
Solving internet access problems
Table D-18Solving Internet Access Problems
Properties
Manager button
Double-clickPorts COM & LPT
Post error has occurred
Solving software problems
Table D-19Solving Software Problems
Determine possible causes
System board and riser board reference designators
Designator Component
Enww
Main Power/HDD LED connector
Connector 20 or 24 pin
Second P/S connector as required
Speaker connector
Security hood switch on riser card
SW2
Super I/O
Battery retainer
South bridge
Clock chip
Secondary NIC clock crystal
Y5/H5 RTC clock crystal/tie-down
Memory
DDR2-SDRAM DIMMs
Populating Dimm sockets
Description Socket Color
Populating Dimm sockets
Enww
Symbols/Numerics
Index
Keyboard
PXE
Restore Plus