OPERATION GUIDE
FS-1028MFP/FS-1128MFP
Introduction Thank you for your purchase of FS-1028MFP/FS-1128MFP
Included Guides
Operation Guide This Guide
Symbols
Safety Conventions in This Guide
OPERATION GUIDE
2 Preparation before Use
Contents
Contents
1 Part Names
Job Finish Notice File Name Entry Print Override
7 Status / Job Cancel
Pause and Resumption of Jobs Canceling of Jobs Device/Communication
8 Default Setting System Menu
Appendix
Maintenance
Troubleshooting
Management
other countries
Caution / Warning Labels
For U.S.A. and
Canada
Other precautions
Installation Precautions
Environment
Handling of plastic bags
Power supply/Grounding the machine
Avoid locations with direct exposure to hot or cold air
Cautions when using the machine
Precautions for Use
viii
Do not attempt to perform any operations not explained in this guide
Cautions when handling consumables
Store the machine while avoiding exposure to direct sunlight
Laser Safety Europe
xiii
Safety Instructions Regarding the Disconnection of Power Europe
Radio Frequency Transmitter
Radio Tag Technology
1. Safety of laser beam
SAFETY OF LASER BEAM USA
2. The CDRH Act
3. Optical unit
4. Maintenance
MERCURY WARNING
Safety Instructions Regarding the Disconnection of Power USA
Other precautions for users in California, the United States
Radio Tag Technology
MULTIFUNCTIONAL PRODUCT LIMITED WARRANTY
Warranty USA FS-1028MFP/FS-1128MFP
xvii
xviii
Legal Restriction on Copying/Scanning
Legal and Safety Information
Legal Information
Regarding Trade Names
Copyright c 1998-2006 The OpenSSL Project. All rights reserved
Open SSLeay License
xxii
xxiii
Original SSLeay License
xxiv
Monotype Imaging License Agreement
Paper Recycling
Low Power Mode
Energy Saving Control Function
Automatic 2-Sided Copy Function
Chapter 9 - Maintenance
About this Operation Guide
Chapter 7 - Status / Job Cancel
Chapter 8 - Default Setting System Menu
Example
Conventions in This Guide
Convention
Description
xxviii
Machine
1 Part Names
This chapter identifies the machine parts and operation panel keys
Operation Panel
Part Names
Operation Panel
Used to select a menu item, move the cursor when
1 Original Cover For FS-1028MFP only 2 Platen
Machine
3 Original Size Indicator Plate 4 Operation Panel 5 Top Cover
6 Front Cover 7 Drum Unit 8 Main Charger Cleaner 9 Lock Lever
14 Paper Width Guides 15 Cassette 16 Paper Width Guides MP Tray
11 Top Tray 12 Paper Length Guide 13 Paper Stopper
17 MP Multi-Purpose Tray 18 MP Tray Extension
21 Network Interface Connector 22 Rear Cover 23 Main Power Switch
19 Anchor Pin 20 USB Interface Connector
24 Power Cord Connector
2 Preparation before Use
Documents
Check bundled items
Documents Contained in the Included CD-ROM
Preparation before Use
Printing
Determining the Connection Method and Preparing Cables
Connection Example
Send E-mail
Interface
Preparing Necessary Cables
Available Standard Interfaces
Function
Connecting Cables
4 Turn the main power switch on . The machine begins to warm up
Common Settings a b
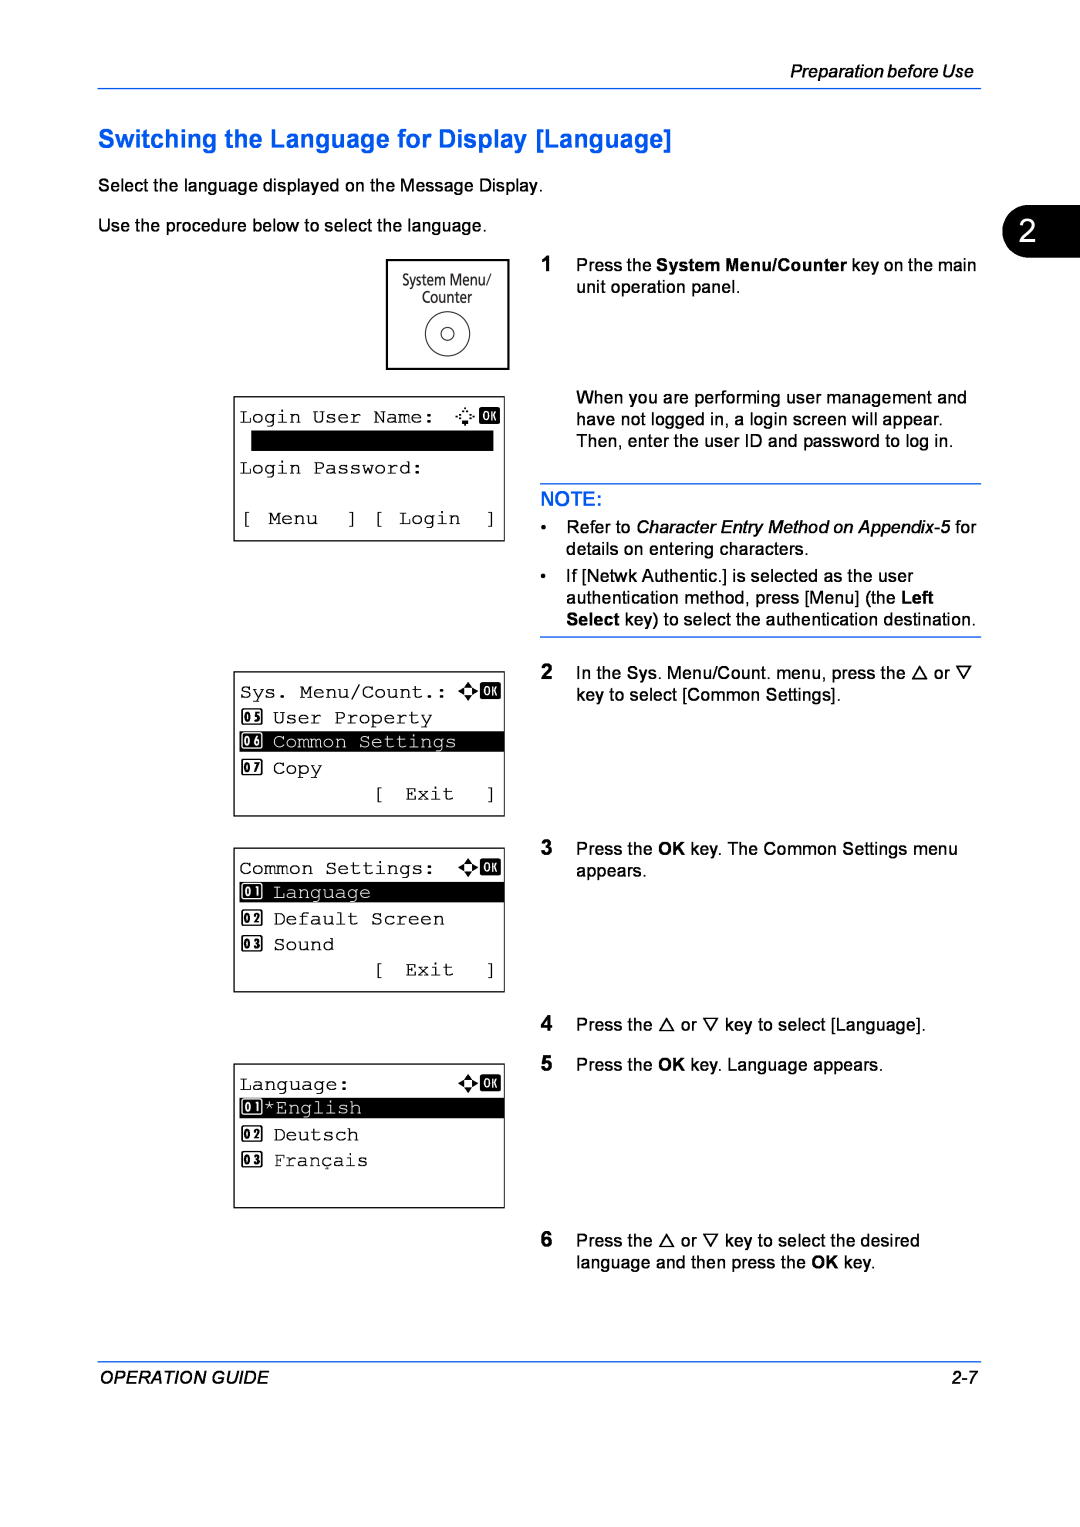
Switching the Language for Display Language
Login User Name L b
Login Password Menu Login
OPERATION GUIDE
Login Password Menu Login Sys. Menu/Count. a b 5 User Property
Setting Date and Time
2 Date Format 3 Time Zone Exit
Time Zone a b
Login Password Menu Login Date Setting a b
Date Setting a b 2 Date Format 3 Time Zone
Date Setting
2-12
Network Setup LAN Cable Connection
TCP/IP IPv4 Setup by Entering IP Addresses
Sys. Menu/Count. a b 1 Report 2 Counter
2 IPv4 Setting 3 IPv6 Setting Exit
Administrator only
Network Setting a b
2 NetWare 3 AppleTalk Exit TCP/IP Settings a b
2 Bonjour 3 IP Address Exit
TCP/IP Settings a b 1 TCP/IP
3 IPv6 Setting Exit IPv4 Setting a b
IPv4 Setting a b 1 DHCP
the IPv4 Setting menu
IPv4 Setting a b 1 DHCP 2 Bonjour
123.145.167.189 IPv4 Setting a b 3 IP Address
5 Default Gateway Exit
2-16
123.145.167.189 IPv4 Setting a b 3 IP Address 4 Subnet Mask
Exit Default Gateway a b 123.145.167.189
Subnet Mask
Setting page 2-18 to Off
When setting an Default Gateway, set the DHCP
2-17
DHCP Settings
Login User Name L b
Login Password
Menu Login
2-19
2-20
Bonjour Settings
3 IPv6 Setting Exit
2 I/F Block Set 3 Security Level Exit Network Setting a b
2 IPv4 Setting 3 IPv6 Setting Exit TCP/IPa b
2 *On TCP/IP Settings a b 1 TCP/IP
2-22
AppleTalk Setup
2-23
Exit Administrator only
2 NetWare 3 AppleTalk Exit
AppleTalk
2-24
Installing Software
For details, refer to the KYOCERA COMMAND CENTER Operation Guide
COMMAND CENTER Settings for E-mail
2-25
2-26
Sending E-mail
2-27
Description
Before Loading Paper
Loading Paper
2-28
2-29
Loading Paper in the Cassettes
2-30
NOTE Paper sizes are marked on the cassette
2-31
5 Load the paper in the cassette. Ensure the side to be printed is facing down and the paper is not folded, curled, or damaged
2-32
Loading Paper in the Multi Purpose Tray
Pull out the subtray
Pull the MP tray towards you until it stops
2-33
2-34
Loading Envelopes
Acceptable Envelope
Size
2-35
2-36
When you load envelopes or cardstock in the multi purpose tray
2-37
IMPORTANT How to load envelopes orientation and
Selectable Size/Type
Specifying Paper Size and Media
Specifying Paper Size and Media Type for the Cassettes
Selection Item
Cassette 1 Set. a b
7 Copy Exit Common Settings a b
2 Default Screen 3 Sound Exit Orig./Paper Set. a b
2 Def. Orig. Size 3 Custom PaperSize Exit
Exit Cassette 1 Type a b
Cassette 1 Size a b
2 Legala 3 Statementa
Cassette 1 Set. a b 1 Cassette 1 Size
Plain, Recycled, Bond, Color, High Quality and Rough
Specifying Paper Size and Media Type for the Multi Purpose Tray
2-41
2 MP Tray Type Exit
2 Def. Orig. Size 3 Custom PaperSize Exit MP Tray Set. a b
2-42
x ***11.49
MP Tray Size a b
Others
2 Envelope #10 3 Envelope #9 Size EntryY D b 5.83
Placing Originals on the Platen
Loading Originals
2-44
Originals Not Supported by the Document Processor
Loading Originals in the Document Processor
Part Names of the Document Processor
Originals Supported by the Document Processor
2-46
How to Load Originals
3 Basic Operation
When the main power indicator is off
Power On/Off
Power On
When the main power indicator is lit
In case of not using the machine for a extended period of time
Power Off
Auto Low Power Mode
Sleep
Sleep and Auto Sleep
Auto Sleep
Login
Login/Logout
Logout
One-Touch Key
One-Touch Keys and Program Keys
Address Entry B b
ABC Text Address Entry A b 5y@kyoceramita.co.jp ABC Text
100%
Message Display
Ready to copy
Copies
Copying
Collate
Adjusting Density
Density Adjustment Option
Function Menu
Function Menu a b
Selecting Image Quality
Manual
2 v Lighter 3 w Lighter
Standard Zoom
Zoom Copying
Auto Zoom
Zoom Entry
Zoom Entry
2 Auto 3 Standard Zoom
Standard Zoom a b
2 200% 3 141% A5 A4
3-14
Duplex Copying
One-sided to Two-sided
Two-sided to One-sided
2 d Top Edge left
2 1-sided2-sided 3 2-sided1-sied
Finish. Binding a b
2 p Top Orig.Orientation a b
2 d Top Edge left Orig.Orientation a b
2 d Top Edge left Scanning Job No Pages Cancel
Orig. Binding a b
2 d Top Edge left Orig. Binding a b
Set original and press Start key. Job No Pages 3 Cancel End Scan
Collate Copying
3-17
3-18
Printing - Printing from Applications
3-19
7 Click Source and select the paper source
3-20
Sending
ABC Text
Send as E-mail
Send to
2 G FolderSMB 3 H FolderFTP Address Entry B b
p aaaaaaaaa@kyoceramN p bbbbbbbbb@kyoceramN Exit
Dest. Confirm. a b
3-22
Host NameSMB A b Osaka SD ABC Text
Send to Folder SMB/Send to Folder FTP
1 p E-mail
3 H FolderFTP
SD3\report
Login User Name C b Maury*S ABC Text Login Password A b
Path
A b
Data to be entered
Dest. Confirm. a b p Morgan@kyoceramitaN
b Exit
For send to folder SMB
3-26
G EI5 G PT10 Exit
Destination List a b
Confirm Destination Screen
b 0667640000 b Cancel Next p Morgan@kyoceramNa b 1 Detail 2 Delete
Set original and press Start key Cancel
t Ext Address Book Exit
Specifying Destination
Choosing from the Address Book
Select Addr Book a b
Search in External Address Book
Search in Address Book
ABC Menu Text Ext Address Book a b
Choosing by One-Touch Key
Sending to Different Types of Destinations Multi Sending
SearchName A b ma
2 Cancel Job Job will be canceled. Are you sure? z 0008 r Copy
Canceling Jobs
Canceling Jobs
Job Cancel List a b
Status
Checking Remaining Toner and Paper
Checking Remaining Toner
Checking Remaining Paper
Program Copying and Sending
Registering Settings
Changing and Deleting Settings
Recalling Settings
3-34
4 Copying Functions
2 Legalq 3 Statementq
Original Size
How to Select
Original Size a b
2 Envelope #10 3 Envelope #9
Selecting the Cassette
Paper Selection
2 A Lettera Plain 3 B Customa Plain
Select
Selecting the Multi Purpose Tray
Category
How to
Page
OPERATION GUIDE
Top Edge Top
When placing originals on the platen
When placing originals on the optional document processor
Original Orientation
Orig.Orientation a b 1 c Top Edge Top
EcoPrint
EcoPrint
4-10
2-in-1 Mode
Combine Mode
4-11
4-12
4-in-1 Mode
2 2 in 3 4 in Detail 2 in 1 Layout a b
Types of Page Boundary Lines
Function Menu
Combine
2 l Solid Line 3 m Dotted Line
Border Line
4-14
Continuous Scan a b
Continuous Scan
4-15
Example of Job Finish Notice
Job Finish Notice
4-16
p Maury p Morgan Menu Address Entry B b @abcdefg.jp ABC Text
JobFinish Notice a b
Destination a b
2 Address Entry Address Book a b
File Name Entry A b File2009
File Name Entry
4-18
Print Override a b
Print Override
4-19
4-20
5 Sending Functions
Detail
Original Size
Original Image
Sending Functions
OPERATION GUIDE
the same
Sending Size
Relationship between Original Size, Sending Size, and Zoom
Original Size and the size you
2 Letter 3 Legal
Sending Size a b
2 Auto
Zoom
Original
Duplex Sending
2 2-sided
Detail
When placing the original on the optional document processor
When placing the original on the platen
the basic screen for sending
2 TIFF 3 XPS Detail
File Format
Adjustable range of image
File Format
5-11
5-12
Original Image
2 Manual
Adjusting Density
5-13
5-14
Scan Resolution
Scan Resolution a b 3 200x400dpi S.Fin
5 400x400dpi U.Fin
5-15
Color / Grayscale / Black and White Selection
Color Selection a b
2 Grayscale 3 Black & White
5-16
5-17
5-18
Subject and Body Entry
Subject Entry B b
Body Entry
2 G FolderSMB 3 H FolderFTP
WSD Scan
Procedure using computer
Procedure using this machine
Select Computer a b
P Computer02 P Computer03 Cancel Detail
WSD Scan
1 From Computer
5-21
p Maury p Morgan Menu Address Entry A b @abcdefg.jp ABC Text
5-22
10 Specify the destination, and press the Start key to start sending
FTP Encrypted TX a b
FTP Encrypted TX
Original Size
Original Image
5-24
Sanning Image using Application
Removing USB Memory
6 Document Box
Printing Documents Stored in USB Memory
Saving Documents to USB Memory Scan to USB
Document Box a b
Printing Documents Stored in USB Memory
Limitations
Printing
Ready to print. Copies
USB Memory
N Store File
Menu Select USB Memory a b
Storing Documents
Saving Documents to USB Memory Scan to USB
Ready to scan A4q
OPERATION GUIDE
1 Memory Detail 2 Remove Memory USB memory can be safely removed
Removing USB Memory
Menu Select
MenuFolder
7 Status / Job Cancel
2 Send Job Status 3 Store Job Status Pause Print Job Status a b
Checking Job Status
Available Status Screens
Status / Job Cancel
Item / Key
When complete job name not displayed in detailed information
0009 Detail
Processing
Page
When complete destination name not displayed in detailed information
Store Job Status screen
Details
Display / Key
Job histories to be displayed
Checking Job History
Available Job History Screens
Displaying Print Job Log
00100
Error
0006 Detail
Result
0004 Detail
Displaying Send Job Log
7-10
menu appears
Displaying Store Job Log
7-12
10200
Displaying Job Log History Menu
Sending the Job Log History
NOTE7
Confirming Current Destination
Setting the destination
2 Address Entry
Registering Destination
Destination a b 1 Confirmation
Register
2 Send History 3 Destination Exit Auto Sending a b
Automatic Job Log History Transmission
Register a b
2 *Address Entry
16*jobs
Setting E-mail Subject
Manual Job Log History Transmission
Jobs
7-18
Job Log History a b 2 Send History 3 Destination
Subject
printer
Pause and Resumption of Jobs
Canceling of Jobs
9 Printer Pause Scannerb Ready
Device/Communication
Check of Device Status
7 Store Job Log
C b
Handling the Devices
7-22
8 Default Setting System Menu
Default Setting System Menu
Common Settings
How to display the Sys. Menu/Count. menu
Switching the Language for Display Language
Optional language
Sys. Menu/Count. a b 4 User/Job Account 5 User Property
Message display
5 Press the U or V key to select a language
Korean Simplified Chinese Traditional Chinese
3 Send
Default Screen
Common Settings a b 1 Language
3 Sound Exit Default Screen a b 1 Status
2 FAX Speaker 3 FAX Monitor Exit
Sound
Common Settings a b 1 Language 2 Default Screen
Exit Sounda b
Key Confirmation a b
Display Bright
Exit Common Settings a b
2 Default Screen 3 Sound Exit Display Bright. a b 3 Darker
Orig./Paper Set. a b
Original/Paper Settings
Custom Original Size Setup
Dimensions
J **11.23
Size EntryX D b 1.97
2 Def. Orig. Size 3 Custom PaperSize Exit Def. Orig. Size a b
Default Original Size Setup
8-10
8-11
Adding a Custom Size and Media Type for Paper to Print
J ***6.00
2 Def. Orig. Size 3 Custom PaperSize Exit Custom PaperSize a b
2 Cassette 2 Size 3 Cassette 3 Size
Size EntryX D b 4.13
Sys. Menu/Count. a b
Common Settings
Default Screen
Paper Size and Media Type Setup for Cassettes
Cassette 1 Type a b
2 Cassette 1 Type Exit Cassette 1 Size a b
8-14
8-15
Paper Size and Media Type Setup for Multi Purpose Tray
2 Envelopr #10 3 Envelope #9
MP Tray Size a b 16Ka = Others
8-16
Paper types and weights
Paper Weight
8-17
8-18
2 Transparency 3 Rough Exit
2 Print Density Exit Paper Weight a b
1 Paper Weight
2 Def. Orig. Size 3 Custom PaperSize Exit Media type Set. K b
14 Press the OK key. The Print Density menu appears
Osaka SD Kyocer*S
Name Entry
8-21
8-22
Default Paper Source
2 Def. Orig. Size 3 Custom PaperSize Exit Def. PaperSurce a b
2 Cassette 3 Cassette
Media for Auto Selection
2 Def. Orig. Size 3 Custom PaperSize Exit Media for Auto a b
1 All Media Type
3 Transparency
8-24
Special Paper Action
8-25
2 Def. Orig. Size 3 Custom PaperSize Exit SpecialPaper Act.a b
2 Speed Priority
SpecialPaper Act.a b 1 Adj. PrintDirect
2 Default Screen 3 Sound Exit Preset Limit D b 1
Preset Limit
8-26
8-27
Switching Unit of Measurement
Measurement a b
2 mm
8-28
Error Handling
Duplexing Error
Paper Mismatch Error
Error Handling a b 1 DuplexPaperError
Error Handling a b
2 PaperMismatchErr Exit DuplexPaperError a b
2 Display Error
Orig.Orientation
Function Defaults
Exit Function Default a b
2 Scan Resolution 3 FAX Resolution Exit
Continuous Scan
2 Default Screen 3 Sound Exit Function Default a b
8-31
8-32
Original Image
8-33
Function Default a b
2 Scan Resolution 3 FAX Resolution Exit Original Image a b
Scan Resolution
8-34
2 Scan Resolution 3 FAX Resolution Exit Scan Resolution a b
2 200x200dpi Fine 3 200x400dpi S.Fin
Color Selection
8-35
2 Scan Resolution 3 FAX Resolution Exit Color Selection a b
8-36
Density
2 TIFF 3 XPS
8-37
8-38
Zoom
8-39
File Name Entry
Subject/Body
2 Scan Resolution 3 FAX Resolution Exit File name Entry A b doc
ABC Text Additional Info. a b
2 Date 3 Job No
8-41
Subject Entry K b abcdefghijklmnopqrstu vwxyzABCDEFGHIJKLMNOP
QRSTUVWXYZ* S
abcdefghijklmnopqrstu vwxyzABCDEFGHIJKLMNOP QRSTUVWXYZ ABC Text
NOTE Refer to page 3-17 for Collate/Offset
Collate
8-42
NOTE Refer to page 4-10 for EcoPrint
EcoPrint
8-43
8-44
2 in 1 Layout
4 in 1 Layout
Detail Setting a b
2 4 in 1 Layout 3 Border Line Exit
2 in 1 Layout
8-46
2 Scan Resolution 3 FAX Resolution Exit Detail Setting a b
2 4 in 1 Layout 3 Border Line Exit 4 in 1 Layout a b
2 i Down then Right 3 j Left then Down
8-47
Border Line
8-48
Orig. Binding
2 p Top
2 4 in 1 Layout 3 Border Line Exit Orig. Binding a b
8-49
8-50
Finish Binding
Image Quality
Finish.. Binding a b
8-51
Color TIFF Comp
2 4 in 1 Layout 3 Border Line Exit Image Quality a b
8-52
8-53
Color TIFF Comp. a b
2 TTN2
XPS FitTo Page
8-54
2 4 in 1 Layout 3 Border Line Exit XPS FitTo Page a b
8-55
Login Operation
Login Operationa b
2 Select Character
Printer
Copy Settings
Photo Processing
Sys. Menu/Count.a b
8-57
Paper Selection
2 Paper Selection 3 AutoPaperSelect Exit Paper Selection a b
2 Def. PaperSource
AutoPaperSelect.a b
Auto Paper Selection
Auto % Priority
2 Paper Selection 3 AutoPaperSelect Exit
2 Paper Selection 3 AutoPaperSelect Exit Auto % Priority a b
Copya b
8-59
8-60
Select Key Set
4 Duplex
Select Key Set. a b
2 Right Exit
Left
8-62
Sending Settings
2 Color Selection
Sys. Menu/Count.a b 7 Copy 8 Printer
Exit Senda b
2 DestinationCheck Exit Select Key Set. a b
8-64
DestinationCheck
2 DestinationCheck Exit DestinationChecka b
2 Check New Dest Exit Dest. Confirm. a b
8-65
8-66
Document Box Settings
Print
Store
2 Right Exit Lefta b
Edit Destination = Adjust/Maint Exit
2 Select Key Set 3 Polling Box Exit
2 Store Exit Printa b
8-68
This function is already registered
8-69
Printer Settings
Emulation Set
Selection of emulation
8-70
Sys. Menu/Count.a
2 EcoPrint 3 Override A4/LTR Exit
Emulation Set. a b 5 PCL6 6 KPDL
Emulation Set. a b 5 PCL6
KPDL Error Rpt a b
When KPDL Is Selected for Emulation
When KPDLAuto Is Selected for Emulation
9 Send Exit Printer a b
EcoPrint
Alt. Emulation a b 3 DIABLO 4 EPSON LQ-850
Sys. Menu/Count.a b 7 Copy
8-73
Override A4/LTR
8-74
Duplex
Override A4/LTR a b 1 Off
Finish
999*copies
Copies
2 Bind Long Edge 3 Bind Short Edge
2 EcoPrint 3 Override A4/LTR Exit CopiesD b 1
8-76
Orientation
2 EcoPrint 3 Override A4/LTR Exit Orientation a b
2 Landscape
7 Copy
FormFeed Timeout
LF Action
FormFeed TimeOut* b 5
Ignore LF
CR Action
LF Action
2 LF and CR 3 Ignore LF
8-79
Paper Feed Mode
CR Action
2 LF and CR 3 Ignore CR
2 Fixed
Paper Feed Mode a b
8-80
Status Page
Printing Reports/Sending Notice
Printing Reports
Menu Map Status Page
2 Press the OK key. The Report menu appears
2 Admin Rpt Set 3 Result Rpt Set Exit Report Print a b
Reporta b
2 Status Page 3 Font List Exit
Network Status Page
Service Status Page
Print Are you sure? z Status Page
Sys. Menu/Count.a b Document Box Edit Destination
Print Are you sure? z Network Status
Adjust/Maint. a b
2 Send/Box Density 3 Correct. Bk Line Exit Service Setting a b
2 Network Status 3 New Developer Exit
2 FAX RX Result 3 JobFinish Notice Exit
Send Result Report
2 Admin Rpt Set 3 Result Rpt Set Exit
Result Rpt Set. a b
2 FAX Exit E-mail/Folder a b 1 Off 2 On
Send Result a b
8-86
Document Box
Adjustment/Maintenance
Copy Denst. Adj
Sys. Menu/Count. a
Send/Box Densitya b
Send/Box Density
5 +1
2 Send/Box Density 3 Correct. Bk Line Exit
8-89
Correct. Bk Line
8-90
New Developer
2 Send/Box Density 3 Correct. Bk Line Exit Correct. Bk Linea b
2 OnLow 3 OnHigh
8-91
New Developer. Are you sure?
8-92
Date/Timer
Date/Time
Sys. Menu/Count.a b 4 User/Job Account 5 User Property
2009
8-94
NOTE If you try to change the date/time when a trial application page 8-151 is running, the If you change Date/Time setting, trial functions will be unavailable
8-95
Date Format
2 Default Screen 3 Sound Exit Login User Name L b
Date Format a b
8-96
Time Zone a b
Time Zone
8-97
8-98
8-99
Summer Time
3 Time Zone 4 Summer Time Exit
Summer Time a b
8-100
Auto Error Clear ON/OFF
Auto Error Clear
8-101
Auto Err. Clear a b
Login Password Menu Login Timer Setting a b
2 Sleep Timer 3 PanelReset Timer Exit
Error Clear Timer
Auto Sleep ON/OFF
Auto Sleep
2 Sleep Timer 3 PanelReset Timer Exit Err. Clear Timer D b 5
30*sec
8-104
Auto Sleep
8-105
Sleep Timer D b 1
Sleep Timer
15*min
Auto Panel Reset ON/OFF
Auto Panel Reset
8-106
Panel Reset Timer
Auto Panel Reseta b 1 Off
8-107
90*sec
Low Power Timer
Timer Setting a b
PanelReset TimerD b 5
8-109
Unusable Time
Low Power Timer D b 1
2*min
8-110
2 Sleep Timer 3 PanelReset Timer Exit Unusable Time a b 7 Off
Start Time
Current Time
8-111
End Time
Unlock Code
0000
Sys. Menu/Count.a b Document Box
Editing Destination Address Book/Adding One-Touch Keys
Adding an Individual Destination
= Adjust/Maint Exit
Entering Contact Name
Entering Folder SMB/FTP Address
p E-mail Address 4/7 tmaury@kyoceramita.N
Entering E-mail Address
Specifying Destination on page
Ntid7004
G FolderSMB
8-115
8-116
Login User Name A b Maury*S ABC Text Login Password A b
Address Number
Dest. Confirm. a b p Morgan@kyoceramitaN b 0667640000********* b Exit
Address Number
Address Number D b 001
1 Detail/Edit 2 Delete
Adding a Group
= Adjust/Maint Exit Edit Destinationa b
2 Print List Exit Addressbook a b
Entering Group Name
Entering Group Member
l Sally
Deleting member from group
1 Detail
3 Add Member
Delete Are you sure? z p Sally
Editing a Destination
Page
Registering new destination
Adding a Destination on One-touch Key
Select Key No. a b
2 No Exit Addressbook a b
Editing One-touch Key
2 No Exit
Key Edit
Delete
7 Press the OK key. A confirmation screen appears
Overwrite. Are you sure? z No Yes No
8-126
5 Op Functions Exit Restart Are you sure? Yes No
Restarting the System
Sys. Menu/Count.a b 1 Report 2 Counter
3 Security Level
2 NetWare 3 AppleTalk
Network Setup
LAN Interface Setup
Login
2 10Base-Half 3 10Base-Full
TCP/IP IPv4 Setup
TCP/IP IPv6 Setup
LAN Interface a b
8-130
NetWare Setup
IPv6 Setting a b
Systema b
2 On
8-132
WSD Scan Setup
WSD Print Setup
8-134
2 NetWare 3 AppleTalk Exit WSD-PRINT a b
Restarting the
Protocol Detail
Default Setting
SSL Setting on page
8-136
Exit Protocol Detail a b
FTPClient a b
Port Number D b
TCP/IP Settings a b 2 IPv4 Setting 3 IPv6 Setting
Network Security
SSL Setting
8-138
IPP Security
8-140
8 Host Name 9 LAN Interface Exit Secure Protocol a b 1 SSL
3 HTTP Security Exit IPP Security a b 1 IPP/IPP over SSL
HTTP Security
Page
LDAP Security
8 Host Name 9 LAN Interface Exit
8-142
2 LDAPv3/TLS 3 LDAP over SSL
SNMPv3 Setting
Secure Protocol a b 2 IPP Security 3 HTTP Security
LDAP Security a b
IPSec Setting
8-145
Rule Setting a b
3 Security Level Exit I/F Block Set. a b
Interface Block Setting
USB Host USB memory slot setting
1 Network Setting
Press the U or V key to select I/F Block Set
USB Device USB interface setting
Press the U or V key to select USB Device
8-148
USB Device
I/F Block Set. a b 1 USB Host 2 USB Device
Optional interface Optional interface card setting
8-149
8-150
Security Level Security Level setting
Op Functions
Optional Functions
8-151
8-152
Toner Container
9 Maintenance
This chapter describes cleaning and toner replacement
Cleaning
Maintenance
Cleaning
Cleaning the Machine
Glass Platen
IMPORTANT Do not place the drum unit on end
CLEANER HOME POSITION
Toner Container
Toner Container Replacement
Turn the lock lever to the lock position Close the front cover
4 Remove the label from the toner container
Prolonged Non-use
Prolonged Non-Use and Moving of the Machine
Moving the Machine
OPERATION GUIDE
Solving Malfunctions
10 Troubleshooting
This chapter explains how to solve problems with the machine
Responding to Error Messages
Checkpoints
Solving Malfunctions
Troubleshooting
Symptom
Clean the charger wire
Symptom
Clean the platen or the document
Is the charger wire dirty?
10-4
10-5
Responding to Error Messages
Alphanumeric
Error Message
10-6
An error has occurred during
Error Message
The job is canceled. Press the OK
STOP key to cancel printing
10-8
scanned pages. Press the Cancel
job is canceled. Press the OK key
installed toner containers regional
specification does not match the
10-10
Responding to an Error Lamp Flashes
Reference Page
FAX Operation Guide
Online Help Messages
Jam Location Indicators
Precautions with Paper Jams
Clearing Paper Jams
Duplexer
Paper Cassette/Paper Feeder
10-13
2 Open the duplexer’s cover in front of the machine and remove any jammed paper
Inside the Machine
Rear Cover
Optional Document Processor
6 Close the document processor 7 Place the originals
Open the document processor Remove the jammed original
10-17
10-18
Checking the Counter
11 Management
11-1
Job Accounting
Management
User Login Administration
First User Login Administration
Enabling/Disabling User Login Administration
2 Local User List Exit
5 User Property 6 Common Settings Exit
2 Job Account. Set 3 Unknown ID Job Exit User Login Set. a b
User/Job Account a b
Host Name
User Login
1 *Off
3 Netwk Authentic
Auto Logout
Login/Logout
11-5
Accounting on page
Adding a User
11-6
Page
OOOOOOOOOOO
11-9
Changing User Properties
Account Name
k KyoceramitaOsaka Change
Changing user information
3 Add User
Unknown login user name Job
Local User List a b l DeviceAdmin
1 Detail/Edit
2 Permit
Login Password Menu Login User/Job Accounta b 1 User Login Set
2 Job Account. Set
Exit Unknown ID Job a b
11-13
First Job Accounting Setup
Job Accounting
Enabling/Disabling Job Accounting
11-14
3 Unknown ID Job Exit Job Account.Set.a b
2 Account. Report 3 Total Accounting Exit Job Accounting a b
2 On
Account ID
When the screen to enter the login user name and password appears
11-15
11-16
Managing Accounts
3 Unknown ID Job Exit
Use of the Machine on page
Page
11-18
6 Default Setting Exit
Changing account information
Delete Are you sure? z k UI R&D DEPT
Managing the Copier/Printer Counts
Account. List a b k UI R&D DEP
3 Add Account
1 Apply Limit
User/Job Accounta b 1 User Login Set
2 Account Report 3 Total Accounting Exit Default Setting a b
Job Account.Set a b
Restriction Items
Restricting the Use of the Machine
11-22
Page
Applying Limit of Restriction
2 User Property 3 Common Settings Exit
Limit Pages D b 1 - 9999999 **123456*pages Overwrite. Are you sure?
z k Osaka GUI DESIGN
3 Alert Only Exit
Exit Default Setting a b
Job Account.Set.a b 4 Each Job Account 5 Account. List
2 Copy/Print Count 3 Counter Limit Exit Apply Limit a b 1 Immediately
11-26
Available Settings
Default Counter Limit
11-27
Job Account.Set.a b 1 Each Job Account 2 Account. List
User Property
11-28
Copy RestrictionD b
Default Setting a b
2 Copy/Print Count 3 Counter Limit Exit Counter Limit a b
2 Print Restrict 3 ScanRest.Other
Total Job Accounting/Resetting the Counter
Counting the Number of Pages Printed
11-30
11-31
2 Account. Report 3 Total Accounting Exit Total Accountinga b
2 Scanned Pages 3 FAX TX Pages Exit Copy/Print PagesC b Copy1/3
1234567
11-32
Exit Reset counter. Are you sure? z Total JobAccounting
Each Job Accounting/Resetting the Counter
Total Accountinga b 1 Printed Pages 2 Scanned Pages
k Kyoceramita k UI R&D DEPT Osaka GUI DESIGNa b
5 Account List 6 Default Setting Exit Each Job Accounta b
2 Scanned Pages 3 Counter Reset Exit
Job Account.Set.a b
11-34
Exit Reset counter. Are you sure? z k Osaka GUI DESIGN Yes No
Copy/Print PagesC b Copy1/3 1234567 Limit1234567 Osaka GUI DESIGNa b
1 Printed Pages 2 Scanned Pages
When Split is selected for Managing the Copier/Printer Count
Printing an Accounting Report
11-35
11-36
3 Unknown ID Job Exit Job Account.Set a b
2 Account. Report 3 Total Accounting Exit Print Are you sure?
z Total JobAccounting
2 Scanned Pages Exit
Checking the Counter
Sys. Menu/Count.a b 1 Report
3 System Exit
4 Press the Y or Z key to check the count
Printed Pages C b Copy1/4 1234567
11-38
Appendix
Paper Feeder PF-100
Optional Equipment
Overview of Optional Equipment
Document Processor DP-110
Installing the Memory Module
Precautions for Handling the Memory Module
Appendix-3
Verifying the expanded memory
Removing the Memory Module
Appendix-4
Keys Used
Character Entry Method
Appendix-5
OsakaSD3 123 Text
Selecting Type of Characters
File name input
Symbols
Available characters
Entering Characters
Entering Alphabets and Numerals
Entry mode
abcdefghijklmnopqrst uvwxyzABCDEFGHIJKLMNO Next
Login User Name a b Kyocer
Entering Symbols
Entry When Select Character Is Selected in Login Operation Settings
Multi Purpose tray MP tray
Paper
Cassette
Optional paper feeder
Appendix-10
Supported Paper
Basic Paper Specifications
Basic Paper Specifications
Specifications
Supported Paper Sizes
Choosing the Appropriate Paper
Condition
Ingredient
Smoothness
Basis Weight
Moisture Content
Other Paper Specifications
Appendix-14
Special Paper
Appendix-15
Choosing Special Paper
Transparency OHP film
Cardstock
Appendix-16
Envelopes
Thick Paper
Label
Appendix-17
Colored Paper
Preprinted Paper
Recycled Paper
FS-1128MFP
Specifications
Machine
FS-1028MFP
Appendix-19
Appendix-20
Printer
Appendix-21
Scanner
2 Available Operating System Windows Vista
Document Processor option
Environmental Specifications
Appendix-22
DHCP Dynamic Host Configuration Protocol
Glossary
Auto Form Feed Timeout
Default Gateway
FTPFile Transfer Protocol
NetBEUI NetBIOS Extended User Interface
EcoPrint Mode
Emulation
Printer Driver
POP3 Post Office Protocol
PostScript
PPM prints per minute
WIA Windows Imaging Acquisition
TCP/IP IPv6
TWAIN Technology Without Any Interested Name
USB Universal Serial Bus2.0
Auto Sleep 3-5, Appendix-23
Index
Numerics
AppleTalk Appendix-23
FTP Appendix-24
DHCP Appendix-23
dpi Appendix-23 Duplex 3-14
Emulation Appendix-24
NetBEUI Appendix-24 NetWare 8-130, Appendix-24
Login 3-6 Logout 3-6
KPDL Appendix-24
Label Appendix-16
PPM Appendix-25
Resolution Appendix-19, Appendix-20
Special Paper 8-24, Appendix-14
POP3 Appendix-25
TWAIN Appendix-26
SMTP Appendix-25
Status Page 8-81, Appendix-25
TCP/IP Appendix-25
Index-6
Page
Page
First Edition