T640, T642, T644
Safety information
Edition March
Contents
Contents
Index 123
Models
Learning about the printer
Identifying printers
T640 T642 T644
Standard network Fully configured
Configured models
Learning about the printer
Reports
Settings
Paper Menu
Security
Back
Indicator light
Understanding the printer operator panel
Menu
Numeric pad
Navigation buttons
USB Direct interface
Display panel
Windows
Installing drivers for local printing
Operating system Go to
Click Install Printer and Software
Using Windows 95 and Windows 98 first edition
Installing drivers for local printing
Serial printing
Setting parameters in the printer
Setting parameters in the communications COM port
Click Properties
Macintosh
Double-clickPrint Center or Printer Setup Utility
Creating a desktop printer icon Mac OS
Mac OS 9.0 Open Apple LaserWriter
UNIX/Linux
Double-clickDesktop Printer Utility
Printing a network setup
Installing drivers for network printing
Assigning a printer IP address
Supported printer drivers
Verifying the IP settings
Installing drivers for network printing
Supported network printer ports
Shared
Printing configuration Operating system Go to
Direct
Click Add Port
Installing drivers for network printing
Click Start Æ Settings Æ Printers
Close Network Neighborhood
Install a custom PPD file
Configuring Drag‘N’Print
Mac OS
Using IP Printing
NetWare
Create a desktop printer
Installing input options
Installing and removing options
Order of installation
Installing a 250-sheet or 500-sheet drawer
Installing and removing options
Installing a duplex unit
Installing memory or option cards
Accessing the printer system board
Accessing the printer system board
Installing or removing a memory card
Installation
Removal
Installing or removing a flash memory or firmware card
Removal
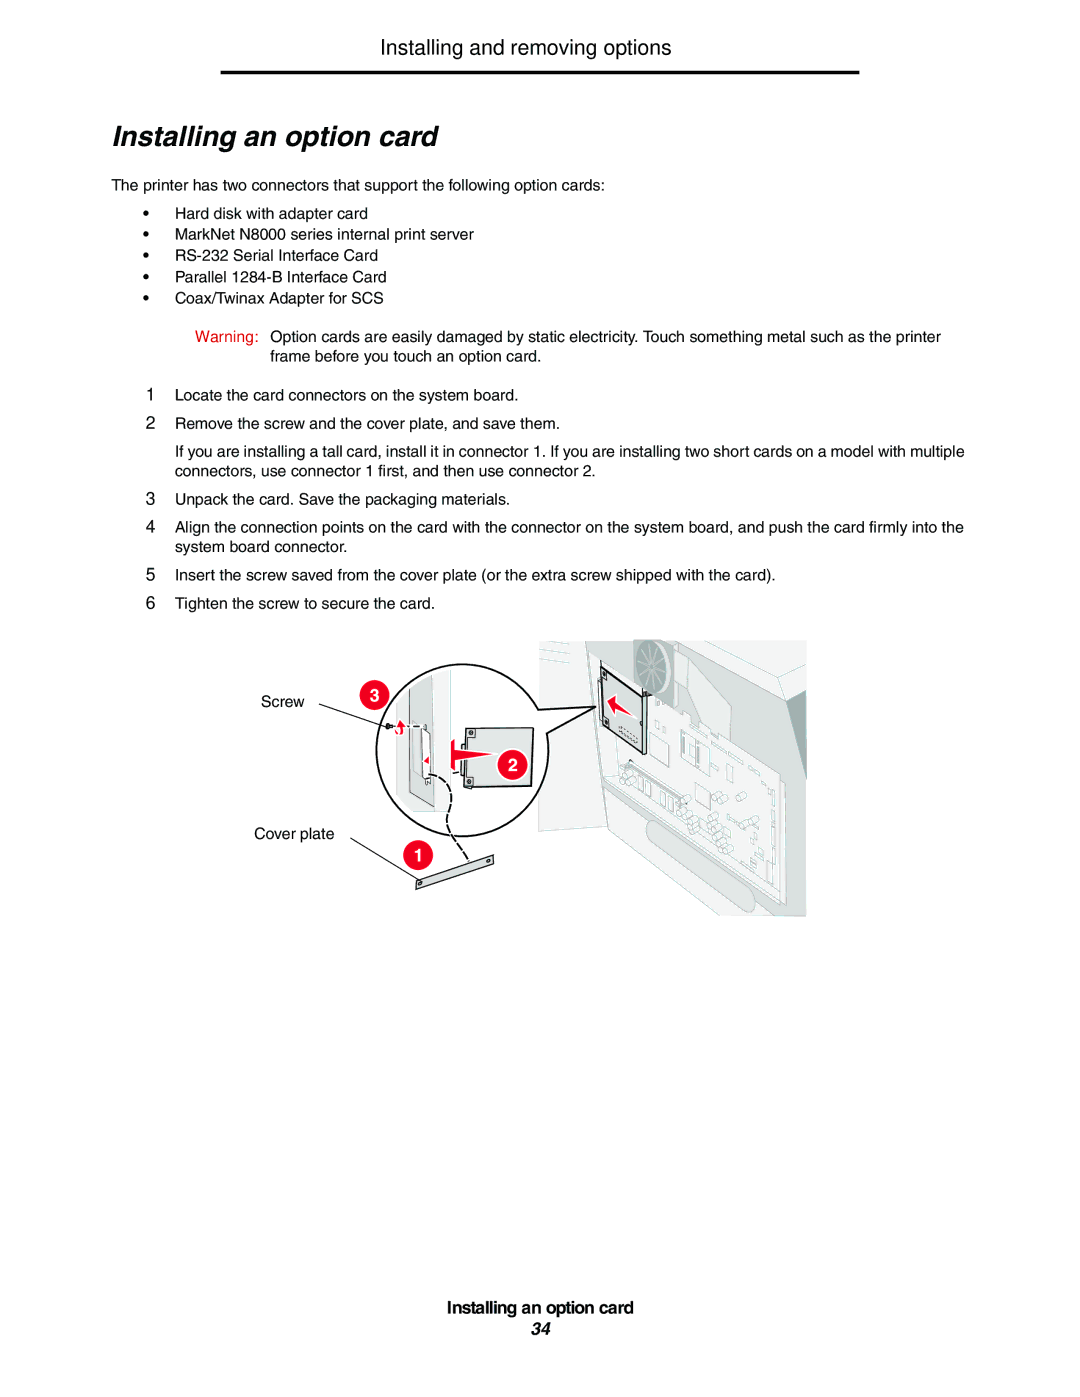
Installing an option card
Replacing the shield
Sending a job to print
Printing
Printing from a USB flash memory device
Copies
Printing
USB drive
Mydocument01 Mydocument02
Canceling a job from a computer running Windows
Canceling a print job
Canceling a job from the printer operator panel
Canceling a job from the taskbar
Canceling a print job from a computer running Mac OS
Printing the menu settings
Canceling a job from a Macintosh computer
Canceling a job from a computer running Mac OS
Printing confidential and held jobs
Printing a font sample list
Printing a directory list
Printing a confidential job
Print Time Filters
Entering a personal identification number PIN
Copies & Pages or General pop-up menu, select Job Routing
At the printer
Reserve Print
Printing and deleting held jobs
Verify Print
Repeat Print
Printing on specialty media
Loading standard trays and optional trays
Printing
Without an optional finisher With an optional finisher
Simplex Duplex
Setting the Paper Type and Paper Size
Loading the multipurpose feeder
Paper Envelopes Transparencies
Loading paper, transparencies, or envelopes
Simplex single sided Duplex
Loading letterhead or preprinted paper
Closing the multipurpose feeder
Loading the 2000-sheet drawer
Duplex Simplex single sided
Loading the envelope feeder
Printing
Linking trays
Identifying and linking output bins
Output bins available
Linking output bins
Understanding paper and specialty media 6 guidelines
Supported print media
Print media sizes
Print media size Dimensions
Understanding paper and specialty media guidelines
Indicates support
Understanding paper and specialty media guidelines
Print media types
Finisher
Print media weights
Weight table
Media weights supported in optional output bins
Finisher media
Media sizes supported in the finisher
Media weights supported in the finisher
Understanding paper and specialty media guidelines
Paper
Paper characteristics
Selecting print media
Unacceptable paper
Envelopes
Transparencies
Selecting transparencies
Labels
Storing print media
Card stock
Avoiding jams
Maintaining the printer
Storing supplies
Conserving supplies
Supply Menu selection item What the setting does
Determining the status of supplies
Maintaining the printer
For the Americas2
Ordering supplies
Ordering a print cartridge
For Europe, the Middle East and Africa3
Ordering a maintenance kit
For the Asia Pacific Region4
Recycling Lexmark products
Moving the printer within the office
Moving the printer
Preparing the printer for shipment
Clearing jams
Identifying jams
Clearing jams
Access doors and trays
Doors and trays Path and locations
Message What to do
Understanding jam messages
Clearing printer jams
After clearing the jam, press to resume printing
Paper Jam Check MP Feeder
Clearing jams
23x and 24x jams
Clearing jams
201 Paper Jam Remove Cartridge
Clearing jams
Paper Jam Open Rear Door
23x Paper Jam Open Duplex Rear Door
280 Paper jams
27x Paper Jam Check Bin
28x Paper Jam Check Finisher
Clearing staple jams
Clearing jams
Clearing jams
Adjusting operator panel brightness and contrast
Administrative support
Disabling operator panel menus
Administrative support
Restoring factory default settings
Enabling operator panel menus
Adjusting Power Saver
Disabling Power Saver
Click Configuration
Setting security using the Embedded Web Server EWS
Setting the system password
Encrypting the disk
Using the secure Embedded Web Server
Supporting IPSec Internet Protocol Security
Click TCP/IP Port Access
Using Secure mode
Using 802.1x Authenticating
Click Certificate Management
Locking the operator panel menus
Confidential Print Setup
Printing Lockout
Online technical support Checking an unresponsive printer
Troubleshooting
Understanding printer messages
Message Action
Symptom Cause Solution
Solving printing problems
Troubleshooting
Check the Print as image box
Set Page Protect to Off from the Setup Menu
Finishing Menu
Option Action
Solving option problems
See Supported print media
See Solving 2000-sheet drawer problems
Solving 2000-sheet drawer problems
Problem Solution
Solving paper feed problems
See the Card Stock & Label Guide available on our
Problem Action
Solving print quality problems
Specialty media guidelines for more details
111
112
Menu selection Purpose Values†
Driver option Purpose Values†
114
Licensing notice
Trademarks
Lexmark International, Inc. All rights reserved
116
European Community EC directives conformity
Industry Canada compliance statement
Avis de conformité aux normes de l’industrie du Canada
Japanese Vcci notice
Noise emission levels
Hinweis zum GS-Zeichen
Physical address
German GS mark notice
Mailing address
Meter average sound pressure, dBA T640 T642 T644
Laser notice
Statement of limited warranty
Warranty
Lexmark International, Inc., Lexington, KY
Extent of limited warranty
Limited warranty service
Limitation of liability
Additional rights
Index
Numerics
Index
PIN
125