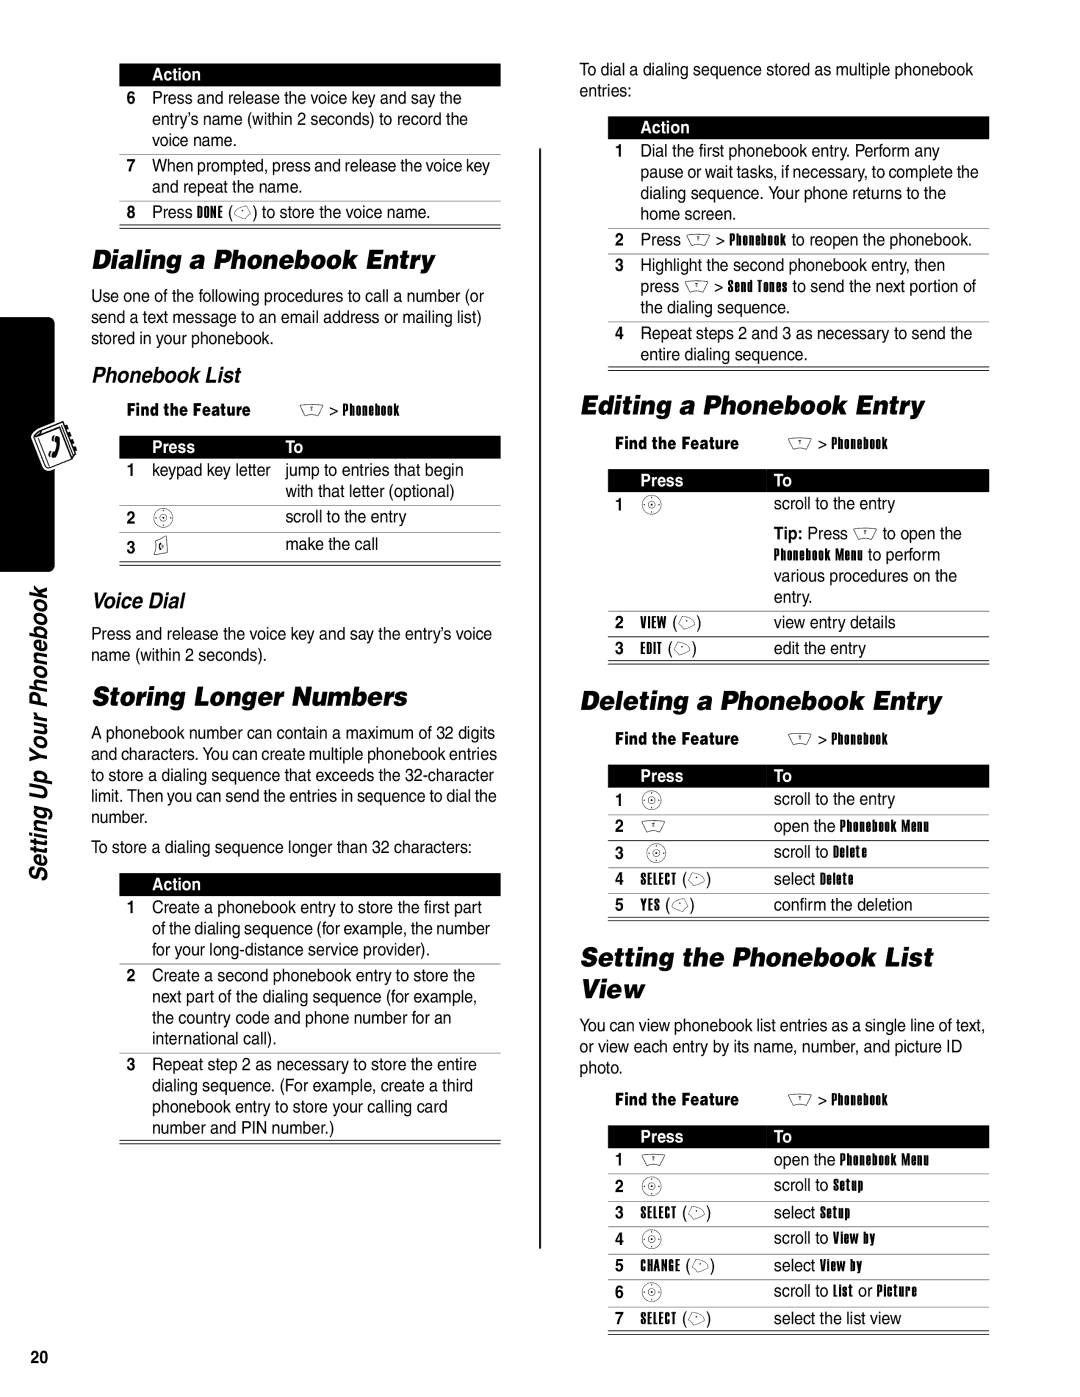
Setting Up Your Phonebook
Action
6Press and release the voice key and say the entry’s name (within 2 seconds) to record the voice name.
7When prompted, press and release the voice key and repeat the name.
8Press DONE
Dialing a Phonebook Entry
Use one of the following procedures to call a number (or send a text message to an email address or mailing list) stored in your phonebook.
Phonebook List
Find the Feature | M > Phonebook | |
|
|
|
| Press | To |
1 | keypad key letter | jump to entries that begin |
|
| with that letter (optional) |
|
|
|
2 | S | scroll to the entry |
|
|
|
3 | N | make the call |
|
|
|
|
|
|
Voice Dial
Press and release the voice key and say the entry’s voice name (within 2 seconds).
Storing Longer Numbers
A phonebook number can contain a maximum of 32 digits and characters. You can create multiple phonebook entries to store a dialing sequence that exceeds the
To store a dialing sequence longer than 32 characters:
Action
1Create a phonebook entry to store the first part of the dialing sequence (for example, the number for your
2Create a second phonebook entry to store the next part of the dialing sequence (for example, the country code and phone number for an international call).
3Repeat step 2 as necessary to store the entire dialing sequence. (For example, create a third phonebook entry to store your calling card number and PIN number.)
To dial a dialing sequence stored as multiple phonebook entries:
Action
1Dial the first phonebook entry. Perform any pause or wait tasks, if necessary, to complete the dialing sequence. Your phone returns to the home screen.
2Press M > Phonebook to reopen the phonebook.
3Highlight the second phonebook entry, then press M > Send Tones to send the next portion of the dialing sequence.
4Repeat steps 2 and 3 as necessary to send the entire dialing sequence.
Editing a Phonebook Entry
Find the Feature | M > Phonebook | |
|
|
|
| Press | To |
1 | S | scroll to the entry |
|
| Tip: Press M to open the |
|
| Phonebook Menu to perform |
|
| various procedures on the |
|
| entry. |
|
|
|
2 | VIEW (+) | view entry details |
3 | EDIT (+) | edit the entry |
|
|
|
Deleting a Phonebook Entry
Find the Feature | M > Phonebook | |
|
|
|
| Press | To |
1 | S | scroll to the entry |
|
|
|
2 | M | open the Phonebook Menu |
3 | S | scroll to Delete |
|
|
|
4 | SELECT (+) | select Delete |
5 | YES | confirm the deletion |
|
|
|
Setting the Phonebook List View
You can view phonebook list entries as a single line of text, or view each entry by its name, number, and picture ID photo.
Find the Feature | M > Phonebook | |
|
|
|
| Press | To |
1 | M | open the Phonebook Menu |
2 | S | scroll to Setup |
|
|
|
3 | SELECT (+) | select Setup |
4 | S | scroll to View by |
|
|
|
5 | CHANGE (+) | select View by |
6 | S | scroll to List or Picture |
|
|
|
7 | SELECT (+) | select the list view |
|
|
|
20
