Data/Voice/Fax Concentrator
Record of Revisions
DataTalker Series
Patents
Trademarks
Contents
Installation
Unpacking and Configuration
Troubleshooting
Warranty, Service and Tech Support
Glossary Index
Page
Introduction and Description
Introduction
Configuration Examples
About This Manual
Introduction
Installation
Unpacking and Configuration
Troubleshooting
Service, Warranty and Tech Support
+++ATCR
Product Description
Introduction and Description
System Features
Operational Statistics
Diagnostics
FCC Regulations for Telephone Line Interconnection
Canadian Limitations Notice
System Control Command Port
Specifications
Async Data Channel
Sync Data Channel
Internal DSU
Internal Modem
Isdn Terminal Adapter
Voice/Fax Channel
Desktop Models
Electrical/Physical
Rack-mount Models
Configuration
Valid Voice/Fax Configurations Description
DataTalker Configurations
Configuration
Configuration 1 Dial-Up Link
Home Office
Quick Setup
DOD/DOI
AT$D1 CR
Page
Adding Voice to Data-Only Network
Configuration 2 MMH900 Series with Voice/Fax
CTS
Composite Link Settings Internal DSU Speed
Ethernet Concentrator
Configuration 3 LAN to LAN
CTS
Enter
DOI
Remote Site
Configuration 4 PBX to PBX
Local Site
FXS
DOD/DOI
Front and Rear Panel Descriptions
LED Indicators
Indicators
Data/Command Indicators
Composite Link Status
Front and Rear Panel Descriptions Voice/Fax Channels
Page
Connectors
8 DSU/TA Digital Connector
VOICE/FAX Channel 1 E&M Connector
Modem Leased Connector
Modem DIAL-UP Connector
Front Panel Switches
Switches and Shunts
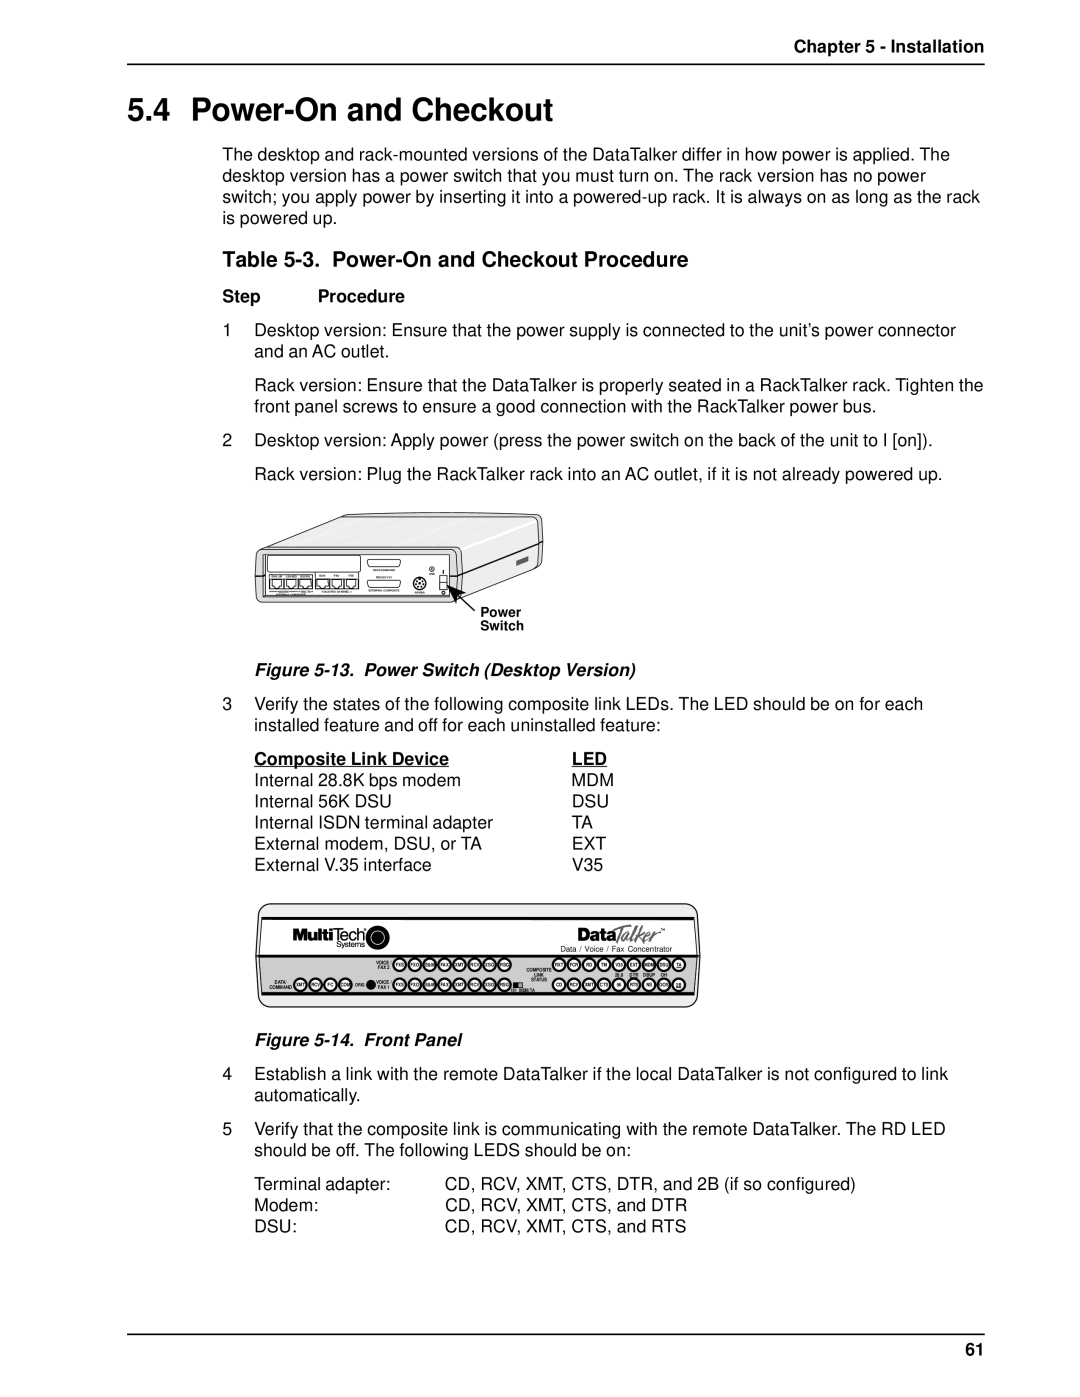
Power Switch
4 RS232C/V.35 Shunt
DIP Switch
Position
Unpacking and Configuration
Unpacking
Unpacking
Data Port Configuration Considerations
Configuration Summary
Voice/Fax Channel Configuration Considerations
Composite Link Configuration Considerations
Configuration Procedure
Configuration Procedure
CTS
Voice/Fax Channel Configuration
Composite Link Configuration
DOD/DOI
DOI
Page
Installation
Step Procedure Composite Link
Cabling Procedure
Device DIP Switch
Cabling
Isdn Terminal Adapter
Installation MMH2834 Modem, Leased Line
Data Channel
External Modem, DSU, or Isdn Terminal Adapter
Voice/Fax Channel
PBX Connection
Installation
Step Procedure
V.35 Shunt Procedure
V.35 Shunt
Power-On and Checkout Procedure
Power-On and Checkout
Composite Link Device
Composite Link
Installation Voice/Fax Channel
Page
Menus
Configurations Menu
Menus
Data Port Configuration
OUT
NRZ
Sync Data Port Configuration
Voice/Fax Channel 1 Configuration
Voice/Fax Channel Configuration
Configuration Local Remote
Page
Composite Link Settings Internal MMH2834
Composite Link Configuration
Selection
Composite Link Settings Internal TA
Composite Link Settings Internal 56K DSU
Enter the number of minutes P Previous Menu
Composite Link Settings External Device
Statistics
Diagnostic Tests
Reset Options
Voice Loopback Test
Loop Tests
Internal DSU Test
External Device Test
1 MMV8/16/32 Configuration Options
Configure Remote Unit
Do you wish to continue y/n?
Quick Setup
MMH2834 Modem Dial-up
Main Office Installation
MMH2834 Modem Leased Line
Digital DSU
DATA/COMMAND
Home Office Installation
DATA/COMMAND
Troubleshooting
Importance of the Composite Link Statistics Report
Test Cables
Troubleshooting
Troubleshooting Guide
Composite Link Troubleshooting Internal DSU
Command Port Troubleshooting
Solution
XMT, and RD LED on
Composite Link Troubleshooting Internal DSU
Internal Isdn Terminal Adapter
Internal MMH2834 Modem
External Composite Link Device
Solutions
Async Data Channel
Data Channel Troubleshooting
Sync Data Channel
Voice/Fax Troubleshooting
Voice/Fax Troubleshooting
Composite Link Settings Internal DSU
Composite Link Settings Internal DSU
Composite Link Settings Internal Isdn Terminal Adapter
Composite Link Settings Internal Isdn Terminal Adapter
100
StepProcedure
Composite Link Settings Internal Modem
101
102
Composite Link Settings External Device
Composite Link Statistics
Composite Link Statistics
103
104
10. Data Port Configuration
10Data Port Configuration
105
NRZ
106
11. Voice/Fax Channel Configuration
Voice/Fax Channel Configuration
107
FXS
108
12. Diagnostic Testing
12Diagnostic Testing
109
110
Warranty, Service and Tech Support
On-line Warranty Registration
Limited Warranty
112
Warranty, Service and Tech Support
Service
Tech Support
Recording DataTalker Information
To log on to the Multi-Tech BBS
Multi-Tech BBS
To Download a file
115
About the Internet
116
Appendixes
118
Appendix a Ascii Conversion Chart
Appendix B RS-232C Interface Specification
Appendix B RS-232C Interface Specification
119
Channel Cables
Appendix C Cabling Diagrams
120
Composite Link Cabling
Appendix C Cabling Diagrams
121
122
3 4 5 6 7
Voice/Fax Channel Cable
Voice/Fax Channel Connectors
DSU Back-to-Back Cable
124
Appendix D Flow Control Background
Number of Rings Until Modem Answers
Appendix E MMH2834 Modem S-Registers
Wait Time for Dial Tone
Pause Time for Comma
S19 Dial-Back Timer
S13 Remote Configuration Escape Character
S11 Tone Dialing Tone Spacing and Duration
S18 Automatic Leased Line Restoral
MMH2834 Command Summary
Appendix F MMH2834 Modem Commands Introduction
Appendix F MMH2834 Modem Commands
127
128
E15
Dial Command
Dialing Action Commands
Continuous Redial
Dialing a Stored Number N
Pulse or Tone Dial P
Dial Modifier Commands
Set Pulse Dial Ratios &P
Automatic Pauses in Dialing
Wait for New Dialtone
Reverse the Mode of Operation R
Flash On Hook
Calling Card Detect Tones
Storing Phone Numbers
Phone Number Memory Commands
Number Linking
Listing Numbers Stored in Memory
Loading Factory Defaults &F
Configuration and Default Storage Commands
Modem Reset
Async/Sync Mode Switching
Echo Command Mode Characters
Command Response Result Code Commands
Result Codes Enable/Disable and No Response Answer
Result Codes Multi-Tech or Standard AT
Result Codes Basic and Extended and Call Progress Selection
Result Codes Verbose/Terse
135
136
RS232C Interface Control Commands
Phone Line Conditioning Commands
Mode Select
Error Correction Commands
Auto-Reliable Buffering
138
Error Correction/300bps
Enable/Disable Auto-Reliable Fallback Character
Retransmit Count
139
Data Compression
Compression and Maximum Block Size Commands
Maximum Block Size
140
Speed Conversion $BA
Speed Conversion Commands
Modem Baud Rate $MB
AT$SB115200
Serial Port Baud Rate
= 115,200 bps
142
Help Screens $H
Immediate Action Commands
Inquiry for Product Code
Listing Current Operation Parameters L5, L7
144
Listing On-Line Diagnostics
Glossary
Glossary
145
146
147
Format
148
Parameter
149
150
151
152
Index
153
Index
154
42, 56