FO-4700 FO-5550 FO-5700
About the Telephone Consumer Protection ACT
Pages ave
Introduction
Full Dual Access
Printing resolution
Power requirements
Operating temperature
Power consumption
Important safety information
Dimensions FO-4700 FO-5550/FO-5700
Weight
Page
Table of Contents
Optional Settings Printing Lists and Reports Maintenance
Unpacking Checklist
Installation
Look at the Operation Panel
Service indicator
Line in USE light
Status Check light
Toner cartridge indicator
Paper out indicator
Drum cartridge indicator
Power Save key
Rapid Dial Keys
Timer key
Contrast key
Counter key
Life key
Relay key
18 MEM. Status key
Search Dial key
Function key
Dial keypad numeric keys
Speed Dial key
Copy key
Redial key
Duplex Scan key
Speaker key
Broadcast key
Connecting the power cord
Points to keep in mind when setting up
Press the power switch to turn on the power
Connections
Connecting a telephone optional
Connecting the telephone line cord
Attaching the document OUT tray
Pull out the tray extension
Attaching the received document tray
Turn Off
Connection to a computer option
Verification Stamp option
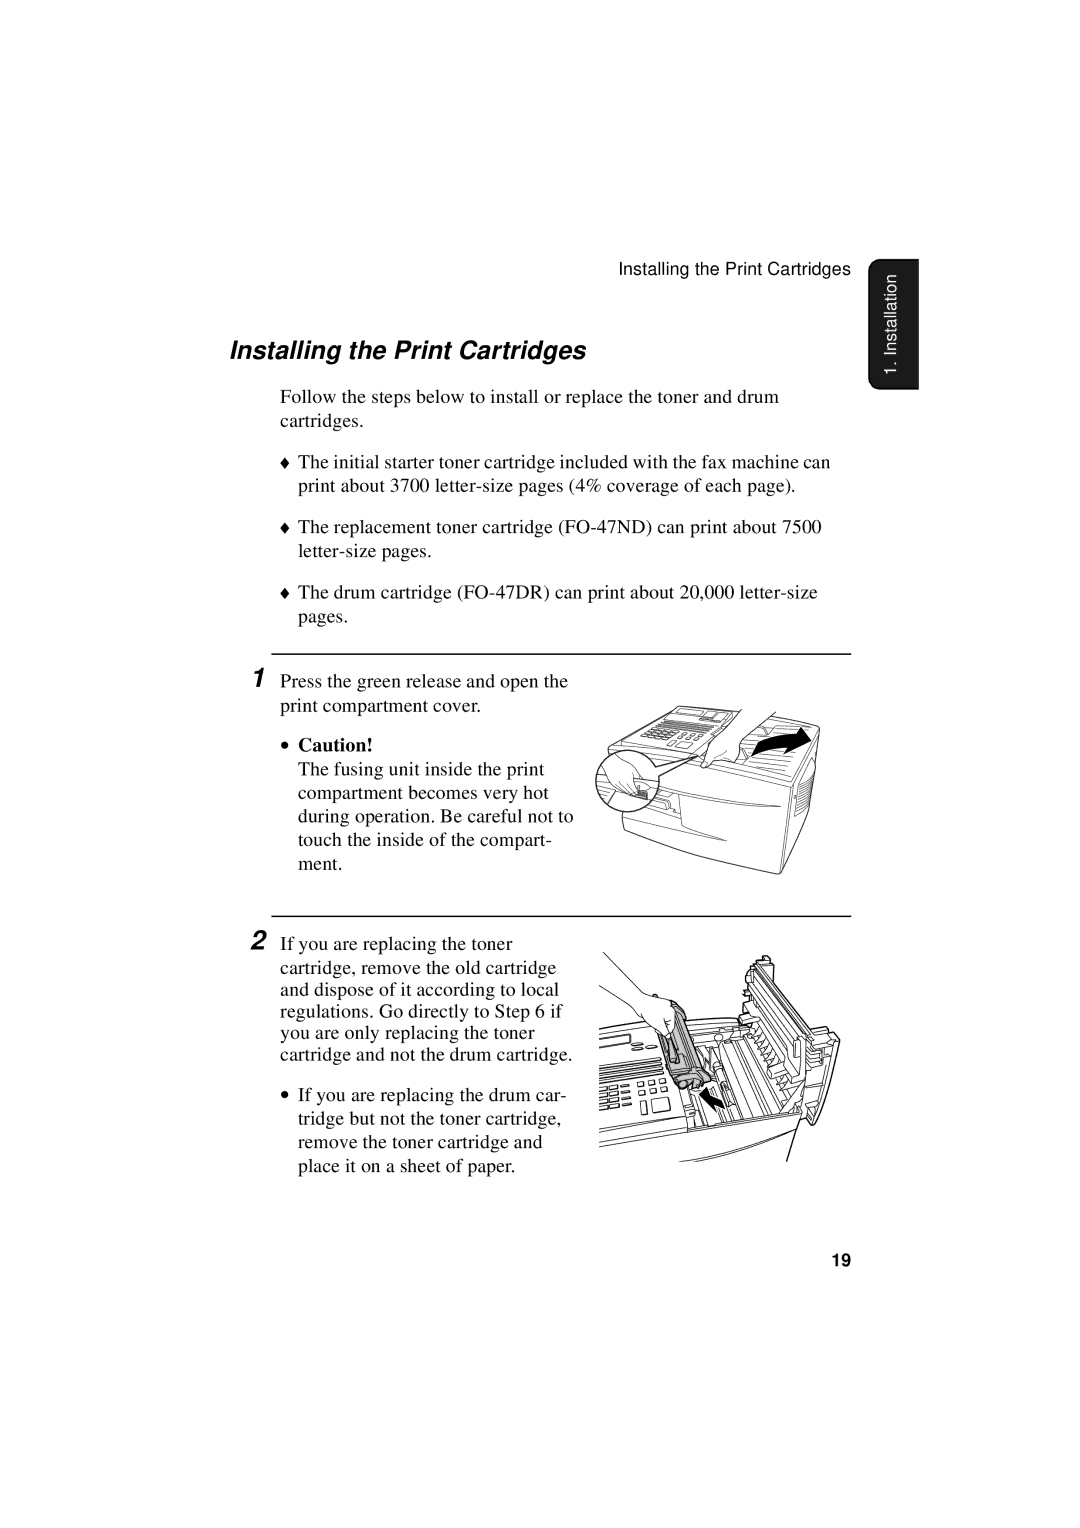
∙ Caution
Installing the Print Cartridges
Blue Green
Installation1
Overlay, 2, and the Start key
When to replace the drum cartridge
When to replace the toner cartridge
Sharp FO-47ND toner cartridge
Sharp FO-47DR drum cartridge
Loading paper in the paper tray
Loading Printing Paper
Loading paper in the paper cassette
Loading Printing Paper
3ENTRY Mode Enter #1-9,*,#
Entering Your Name and Fax Number
3OWN Passcode SET Enter FAX #
Enter SENDER’S Name
Example
4DATE &TIME SET Mode Press Start KEY
4DATE&TIME SET Mode Date
Setting the Date and Time
Example January
Example the 5th
YES
Daylight Saving Time
Speaker Volume High Middle LOW
Volume Adjustment
Speaker
Display
Ringer
4RINGER Volume High Middle LOW OFF OK?PRESS Start
Transmittable Documents
Size and weight
Loading one page at a time
Loading several pages at once
Other restrictions
Maximum scanning area
Loading the Document
Resolution
Adjusting the Resolution and Contrast
Fine
Super Fine
Light
Contrast
Sending a Fax by Normal Dialing
2 4 4 1
Using the Redial key
Programming Auto-Dial Numbers
1FAX/TEL. # Mode 1=SET, 2=CLEAR
FO-4700/FO-5550, or 1 to
Example Sharp
SET Cancel
Chain Diaing for area and access codes
Enter a name, go directly to
Example SHARP2
1FAX/TEL. # Mode =SET, 2=CLEAR
Clearing auto-dial numbers
Key
Making changes
Dual Access
Sending a Fax by Automatic Dialing
If the memory becomes full
Sending a Fax by Automatic Dialing
Example Rapid Key
Rapid Key Dialing
Example Speed Dial
Speed Dialing
Direct Keypad Dialing
Searching for an auto-dial number
Example a
To cancel a fax transmission or reception
Chain Dialing
Checking the telephone line status
Memory Retransmission
Automatic redialing
Checking documents in memory
4MESSAGE Clear Enter Message #
To cancel a memory transmission
Cover Sheet
Cover Sheet Mode
Enter # of Pages
Batch Page Numbering
Enter #
Example 8 pages
Comments
Manual mode
Auto mode
Setting the reception mode
Up the extension phone
Using Auto Reception Mode
Using Manual Reception Mode
Start key on the fax machine
Up the Rapid Key overlay
Substitute Reception to Memory
Enter #01-99
Copy Mode
Example Three copies per original
MULTI/SORT Copy Mode 1=MULTI, 2=SORT
Multi Sort
Example of three copies each of three originals
Checking copy jobs in memory
Broadcasting
Broadcast Mode Enter Station #
Broadcast Mode Select the Mode
Broadcasting using a Group Key
2GROUP Entry Mode 1=SET, 2=CLEAR
Storing numbers in Group Keys
SET Clear
Return to to program another
Confidential transmission
Confidential Operations
Desired
1CONF. TX Enter BOX # or Start
∙ Press a Rapid Key
Programming the confidential passcode
Confidential reception
3CONF. Code SET
Enter BOX #
4CONF. Code Clear Enter BOX #
Clearing the passcode
2CONF. Data Print
Printing out received documents
Enter your confidential passcode Press the Start key
Storing a relay group
Relay Request
2RELAY Group SET Enter #01-10
Example Rapid
Example Group Key
Numbers 10
3RELAY Group Clear Enter #
Clearing a relay group
1RELAY TX Enter #
Requesting a relay transmission
4RELAY Passcode 1=SET, 2=CLEAR
Relay Broadcast
Press 1 to enter a number, or 2 to clear
8SERIAL POLL. Mode Enter Station #
Polling
Polling others
Being polled Memory polling
Serial Polling using a Group Key
Time
9MEMORY Poll Mode Enter #1-2,*,#
Polling Security
Clearing a document
2PASSCODE # Mode =SET, 2=CLEAR
Turning Polling Security on and off
Storing and clearing fax numbers for polling permission
Programming and clearing a System number
7SYSTEM # Mode 1=SET, 2=CLEAR
Storing and clearing ID numbers for polling permission
6ID # Mode 1=SET, 2=CLEAR
Enter the ID number 4 digits by Pressing the numeric keys
Selecting the Power Save Type
Power Save Mode
4OPTIONAL Setting
Enter #01-34, *,#
Real Time Timer
34POWER Save Type 1=REAL TIME, 2=TIMER
Turning on Power Save Mode when Real Time is selected
Power Save Mode
Turning on Power Save Mode when Timer is selected
Power Save Mode 1=TIMER ON, 2=SET
Example 500 P.M
Example 800 A.M
Weekend Setting 1=YES, 2=NO
Period Setting 1=YES, 2=NO
YES no
December 24th
January 1st
Timer ON? 1=YES, 2=NO
Timer Operations
Initial procedure
Timer Mode =SET, 2=CLEAR
Example Monday
Transmission
104
105
Polling
Serial Polling
Broadcasting
Relay Request
2TIMER COMM. Clear Enter #01-48
Canceling a timer operation
Press the Stop key repeatedly until
Programming a Batch Key
Batch Transmission
Clearing a Batch Key
Storing documents for transmission
Press the Stop key Document will be transmitted
Canceing a document stored for batch transmission
Entering and Using Programs
1PROGRAM Entry Mode =SET, 2=CLEAR
Rapid Key that has not yet been Programmed
TuesdayExample Monday
117
118
119
120
121
122
123
124
Batch transmission
126
1PROGRAM Entry Mode 1=SET, 2=CLEAR
Clearing a Program Key
Press the Program Key you want to Clear
Using a Program Key
Canceling a programmed timer operation
Duplex Scanning for Two-sided Documents
131
Programming the Print Hold code
Print Hold
6PRINT Hold
Enter #1-3, *,#
1HOLD Data Print Enter Passcode #
Turning on Print Hold
9DEPT. Code Mode 1=SET, 2=CLEAR
Department Control
Entering Department Codes
Press the Start key
Enter a name for the Department Code
Accessing the machine
8STORE Junk FAX # 1=SET, 2=CLEAR
Blocking Reception of Unwanted Faxes
Enter the fax number
Using Department Control
Telephone Billing
Direct billing code entry
If desired
Adjust the resolution and/or contrast
Distinctive Ring
4OPTIONAL Setting Enter #01-34,*,#
Ring Pattern
Example Option Setting
Optional Settings
Setting 01 Fine Resolution Priority
Option Settings
Setting 02 Number of Rings Auto Reception
Setting 03 Number of Rings Manual Reception
Setting 05 Transaction Report Print Selection
Setting 04 Auto Listing
Setting 06 Recall Times
Setting 07 Recall Interval
Setting 09 Error Correction Mode ECM
Setting 08 Security Selection
Setting 10 Auto Cover Sheet
Setting 12 Copy Scanning
Setting 14 Receive Reduce
Setting 15 Image Memory Print
Setting 16 Cassette Selection
Setting 18 Retransmission Interval
Setting 17 Retransmission Times
Setting 19 Heater Mode
Setting 20 ANTI-JUNK FAX
Setting 22 Dial Mode
Setting 21 Alarm Volume
Setting 23 Quick ON-LINE
Setting 24 Multi TTI
Setting 26 Telephone Billing Code
Setting 27 Department Code Digits
Setting 28 Distinctive Ring
Setting 30 Print Hold
Setting 29 Verification Stamp
Setting 31 PC Interface Mode
Setting 32 Copy Resolution
Setting 34 Power Save Mode
Setting 33 Separate Mode
2LISTING Mode
Enter #01-11, *,#
Example Activity Report
Activity Report List
Explanation of headings
Type
Timer List List
Telephone Number List List
Relay Group List List
Optional Setting List List
Passcode List List
Batch Transmission List List
Program and Group List List
Confidential Reception List List
Department Usage List List
Transaction Report
Anti Junk Number List List
Cleaning the Scanning Glass and Rollers
Panel Release and pull up
White backplate Scanning glass
Replacing the Verification Stamp
Housing
163
Line error
Problems and Solutions
Dialing and transmission problems
166
Reception and copying problems
Transmittable Documents in Chapter
General problems
Display messages
Messages and Signals
169
Audible signals
Clearing a jammed document
Clearing Paper Jams
Clearing jammed printing paper
173
174
FCC Regulatory Information
A R P
Material Safety Data Sheet 2/2
Transmitting documents
Quick Reference Guide
179
Transmisión de documentos
Guia DE Consulta Rapida
Index
182
183
Page
Sharp Electronics Corporation