Copier Guide
Table of Contents
Colour Adjustments KEY
Mixed Size Original Copying Thin Originals Slow Scan Mode
Image Edit KEY
Interrupting a Copy RUN Interrupt copy JOB Status Screen
About this Manual
Please note
Manuals Provided with the Machine
Manual name Contents
Icons used in the manuals
Base Screen of Copy Mode
Paper select display
Number of copies display
Special Modes key
12 2-Sided Copy key
Customizing displayed keys
System Settings Administrator Customize Key Setting
Checking what special modes are selected
Basic copy settings
Sided copy settings
Copying Sequence
Place the original
Special mode settings
Output settings
Number of copies sets setting
To cancel all settings, press the Clear ALL key
Start copying
Originals
Checking the Original Size
Standard sizes
Standard sizes detected original sizes
Standard original placement orientations
Automatic copy image rotation Rotation Copy
Example
Document feeder tray
System Settings Administrator Paper Tray
Paper Trays
Touch the Paper Select key
Select the tray that you want to use
Check the paper to be used and the colour mode
Using the Automatic Document Feeder to Make Copies
Making Copies
To cancel scanning of the original and copying
If an incorrect number of copies is set
Making a Copy Using the Document Glass
Document glass scale
Touch the Read-End key
Or or the Black & White Start key
Using the Automatic Document Feeder to Make 2-SIDED Copies
Select the 2-sided copy mode
Touch the key of the desired mode
Automatic 2-SIDED Copying
Press the Colour Start key Or the Black & White Start key
Using the Binding Change key
Originals Binding Change is used Binding Change is not used
Automatic 2-SIDED Copying Using the Document Glass
Automatic 2-sided copying of 1-sided originals
Touch the 1-Sided to 2-Sided key Touch the OK key
Scanning begins
System Settings Administrator 2-Sided Copy
Copy Colour Modes
Full Colour
Auto
Single Colour
Selecting single colour copying
System Settings Administrator Colour Mode
Selecting 2 colour copying
Automatic Adjustment of the Exposure and Original Type
Mode Description
Changing the Exposure and Original Image Type
Select the original image type
Adjust the exposure level
Touch the OK key
To cancel automatic ratio selection
System Settings Administrator Copy Ratio
REDUCTION/ENLARGEMENT/ZOOM
Automatic Ratio Selection Auto Image
Manually Selecting the Ratio Preset ratios/Zoom
Set the ratio
1st screen
2nd screen
Touch the OK key
ENLARGING/REDUCING the Length and Width Separately XY Zoom
Original Sizes
Specifying the Original Size
Specifying an AB original size
Specifying an inch original size
Storing Frequently Used Original Sizes
Storing original sizes editing/clearing
Enter the original size
Touch the Custom Size key
Store the original size
To cancel the operation
If you wish to edit or clear a previously stored key
Retrieving a stored original size
Retrieve the desired stored original size
Output
Example
Sort mode
Group mode
Output Modes
Offset function
Staple sort function / Saddle stitch function
Staple sort Saddle stitch
Applicable paper sizes
Number of sheets that can be
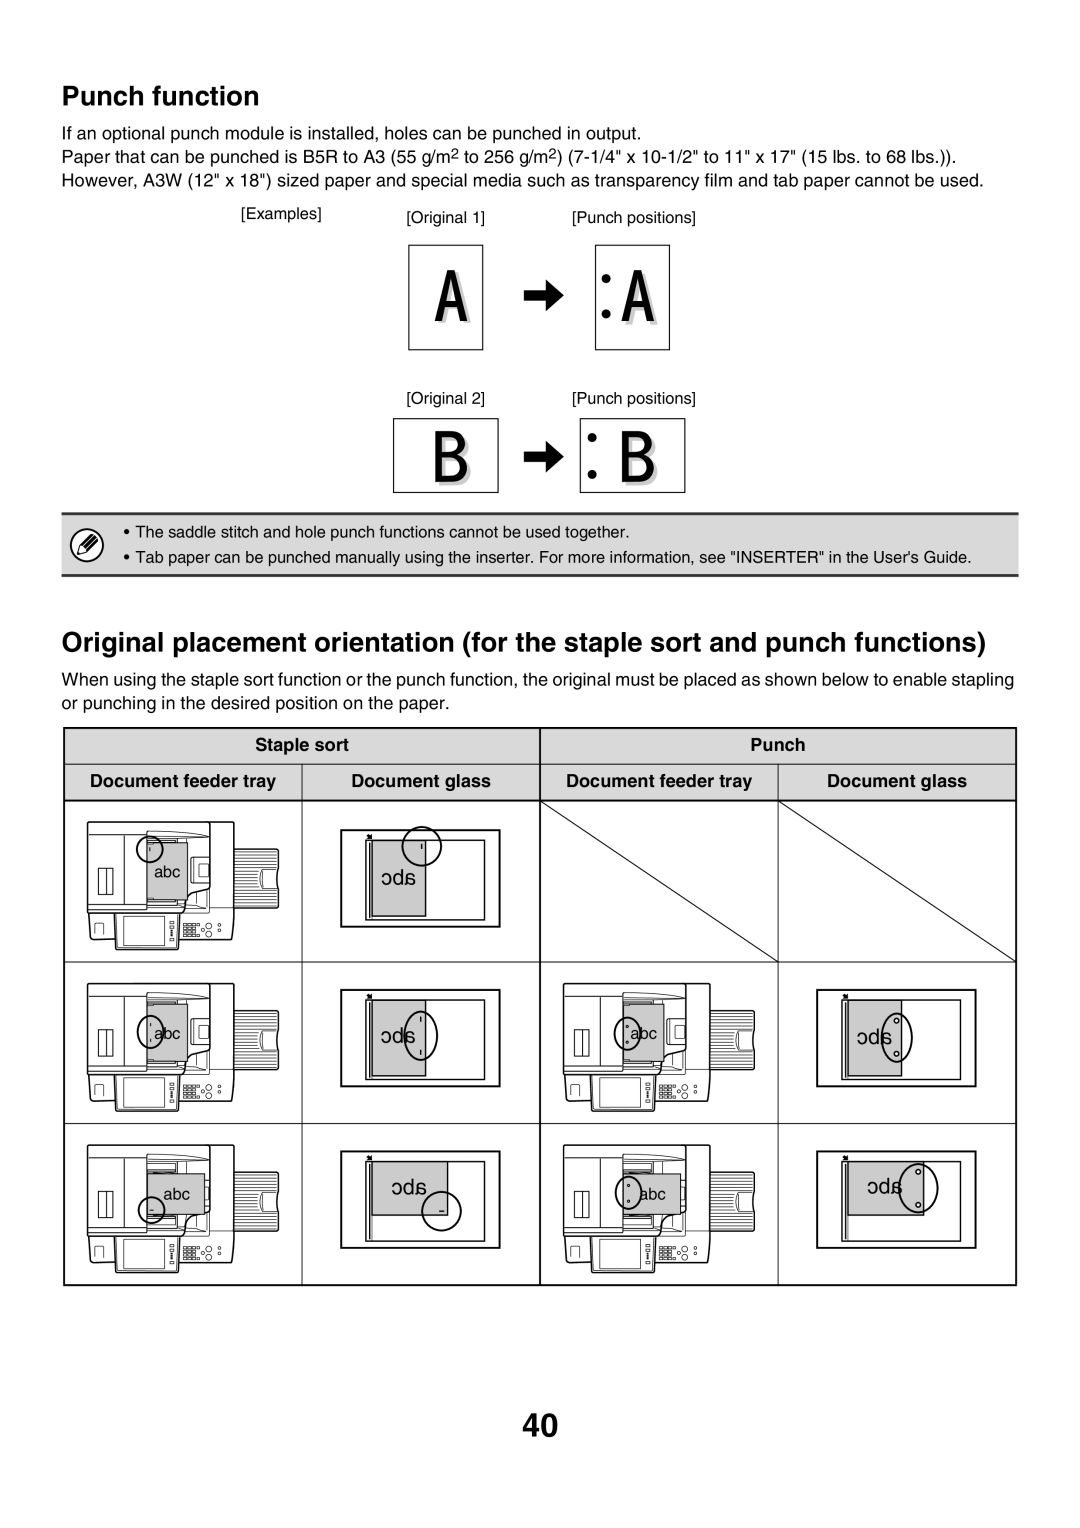
Punch function
Staple sort Punch Document feeder tray Document glass
Making Copies Using the Bypass Tray
Place paper in the bypass tray
Select the type of paper used in the bypass tray
Set the paper size
Auto-Inch key
Auto-AB key
Select the bypass tray
Press the Colour Start key Or the Black & White
Special Modes
Special modes menu 1st screen
Special modes menu 2nd screen
OK key and Cancel key
Select the special modes
Adding Margins Margin Shift
Set the margin shift
To cancel the margin shift setting
System Settings Administrator Initial Margin Shift Setting
Select the erase settings
Touch the desired erase mode
Erasing Peripheral Shadows Erase
Touch the Erase key
To cancel the erase setting
System Settings Administrator Erase Width Adjustment
Copying Each Facing page of a Bound Document Dual Page Copy
Place the original on the document glass
Select A4 8-1/2 x 11 size paper
Copying the facing pages of a book or bound document
To cancel dual page copy
Select Dual Page Copy
Touch the Pamphlet Copy key
Making Copies in Pamphlet Format Pamphlet Copy
Binding side
Select cover settings
Select pamphlet copy settings
To cancel cover settings
To cancel pamphlet copy
System Settings Administrator Automatic Saddle Stitch
Copying a Large Number of Originals AT Once Job Build
Insert the originals face up in the document feeder tray
Select Job Build
Highlighted
Originals
Press the Colour Start key
Colour Start key Black & White Start key
Before using tandem copy
Select tandem copy
Master machine and slave machine
Highlighted
To cancel tandem copying
After the message appears, tandem copying begins
When user authentication is enabled
To cancel tandem copy
System Settings Administrator Tandem Connection Setting
If a machine runs out of paper
Using a Different Paper Type for Covers Covers/Inserts
Preparations for using covers and inserts
Touch the Front Cover key
Inserting Covers in Copies Cover Settings
Touch the Covers/Inserts key
If you wish to insert a back cover, touch the Back Cover key
To cancel cover sheet insertion
To cancel scanning and copying
Start key
Touch the Insertion Type a key
Inserting Insert Sheets in Copies Insert Settings
Example Insert a after page 3 and insert B after
Select insert settings
Touch the Insertion Settings key
Specify the pages where inserts a and B will be inserted
Touch the Insertion Type a key or the Insertion Type B key
Touch the Enter key
Inserting Covers in Copies Cover Settings
Changing COVER/INSERT Settings Page Layout
Touch the Page Layout key
Touch the Special Modes key Touch the Covers/Inserts key
Changing insert a from page 4 to
Change the front/back cover settings
Touch the key of the page that you wish to delete or change
Example Touch insert a at
Icons
Change the settings for insert type A/B
Load the transparency film
Touch the Transparency Inserts key
To cancel the transparency inserts setting
Copying will begin
Touch the Multi Shot key
Copying Multiple Originals Onto ONE Sheet Multi Shot
2in1 copying 4in1 copying
To cancel a multi shot setting
Touch the 2in1 key or the 4in1 key
Select the layout
Select the border
How to place the original
Copying a Pamphlet Book Copy
Touch the Book Copy key
Place the original
Select book copy settings
Place the original face down on the document glass
Place the next pair of opened pages
To cancel book copy
Copying Captions Onto TAB Paper Tab Copy
Relation Between the Originals and the TAB Paper
Tab copying with a left binding
Placing the originals
Tab copying with a right binding
Set the tab width
Touch the Tab Copy key
Set the image shift width tab width with Keys
System Settings Administrator Initial Tab Copy Setting
To cancel tab copy
Load the tab paper
Select the paper to be used for card shot
Touch the Card Shot key
Select card shot settings
Enter the original size
To cancel card shot
System Settings Administrator Card Shot Settings
When used in combination with other special modes
Printing the Date and a Stamp on Copies Stamp
General Procedure for Using Stamp
Select the print position
Number Bottom centre
Print positions
When you have finished selecting stamp
Settings, touch Key
Select settings for the original
Select Stamp
To cancel Stamp
Set the date format
Adding the Date to Copies Date
Touch the Print Colour key and select the print colour
To cancel the date print setting
Change key
Stamping Copies Stamp
Touch the Stamp key in the stamp selection screen
Touch the key of the stamp that you wish to use
Printing Confidential in the top left corner of a copy
To cancel a stamp setting
Touch the Print Colour key and set the colour and density
Printing page Numbers on Copies Page Numbering
Touch the Page Numbering key in the stamp selection screen
Select a format for the page number
Printing the page number at the bottom centre of the paper
Select page number settings
Touch the Print Colour key
Stamp Number
To cancel the page numbering setting
Print settings
Side
Printing Text on Copies Text
Touch the Text key in the stamp selection screen
Touch the Recall key
Specify the text to be printed
To cancel a text setting
Select the pages to be printed on and touch the OK key
100
Storing, editing, and deleting text strings
Touch the Store/Delete key
Store a text string, or edit/delete a stored text string
101
Touch the Back key
Checking the Stamp Layout Layout
102
Touch the Layout key
If the layout is correct, touch the OK key
Touch the key of the desired destination
103
Position
104
Image Edit KEY
Image edit menu screen
Repeating Photos on a Copy Photo Repeat
105
Select Photo Repeat settings
Keys to switch through the screens
106
Touch
Creating a Large Poster Multi-Page Enlargement
107
Set the enlargement size and the original size
108
Enlargement size Original size
To cancel the multi-page enlargement setting
109
To cancel a mirror image setting
Reversing the Image Mirror Image
110
Select Mirror Image
Select A3 11x17 Full Bleed
111
A3 11 x 17 size original A3 12 x 18 full bleed copy
112
To cancel A3 11x17 Full Bleed
Load A3W 12 x 18 paper
Not using the centring function Using the centring function
Copying in the Centre of the Paper Centring
113
Select Centring
To cancel centring
114
Colour adjustments menu screen
Colour Adjustments KEY
115
Adjusting RED/GREEN/BLUE in Copies RGB Adjust
Adjust red, green, or blue
Adjust the selected colour
To cancel an RGB adjust setting
Adjust the image
To cancel the sharpness setting
117
Touch the Soft key or the Sharp key Touch the OK key
Select the suppress background setting
Adjust the background suppression level
Whitening Faint Colours in Copies Suppress Background
118
To cancel a suppress background setting
119
Adjusting the Colour Colour Balance
120
Adjust the colour balance
121
Adjusting the Brightness of a Copy Brightness
Adjust the brightness
Adjust the brightness
To cancel a brightness setting
Adjusting the Intensity of a Copy Intensity
Adjust the intensity
Adjust the intensity setting
To cancel an intensity setting
Select copy settings in the base screen
Checking Copies Before Printing Proof Copy
124
Select Proof Copy
125
Change the settings
Touch the key of the setting that you want to change
126
Touch the End key
When Same Width is used
When Different Width is used
Copying Originals of Different Sizes Mixed Size Original
127
Select Mixed Size Original settings
To cancel the mixed size original setting
System Settings Administrator Original Feeding Mode
128
Select Slow Scan Mode
Copying Thin Originals Slow Scan Mode
129
To cancel the slow scan mode setting
130
131
Interrupting a Copy RUN Interrupt copy
Touch the Interrupt key
132
JOB Status Screen
Example Pressing the key in copy mode
133
JOB Queue Screen and Completed JOB Screen
134
135
Cancelling a JOB That is Waiting in the Queue
Job key display
Giving Priority to a JOB in the Queue
Checking Information on a Copy JOB Waiting in the Queue
136
Paper Select key
Storing Copy Operations Job Programs
137
Storing EDITING/DELETING a JOB Program
138
Press the #/P key
Touch the Store/Delete tab
139
Symbols used for covers and inserts
Appendix
140
Examples of covers and inserts
Covers 1-sided copying of 1-sided originals
141
Resulting copies
142
Covers 2-sided copying of 1-sided originals
143
Covers 1-sided copying of 2-sided originals
Covers 2-sided copying of 2-sided originals
144
1st 2nd 3rd Cover copying condition Front cover Back cover
145
Inserts copying of 1-sided originals
Inserts copying of 2-sided originals
1st 2nd 3rd 4th 5th 6th Insert Copying Condition
Copier GuideMODEL MX-5500N MX-6200N MX-7000N