Part 1 General Information
Part 2 Copier Operation
Warranty
EMC this machine and peripheral devices
Part 1 General Information
Trademark acknowledgments
250-sheet paper feed unit AR-D35
Product Configurations
MX-M200D
Contents
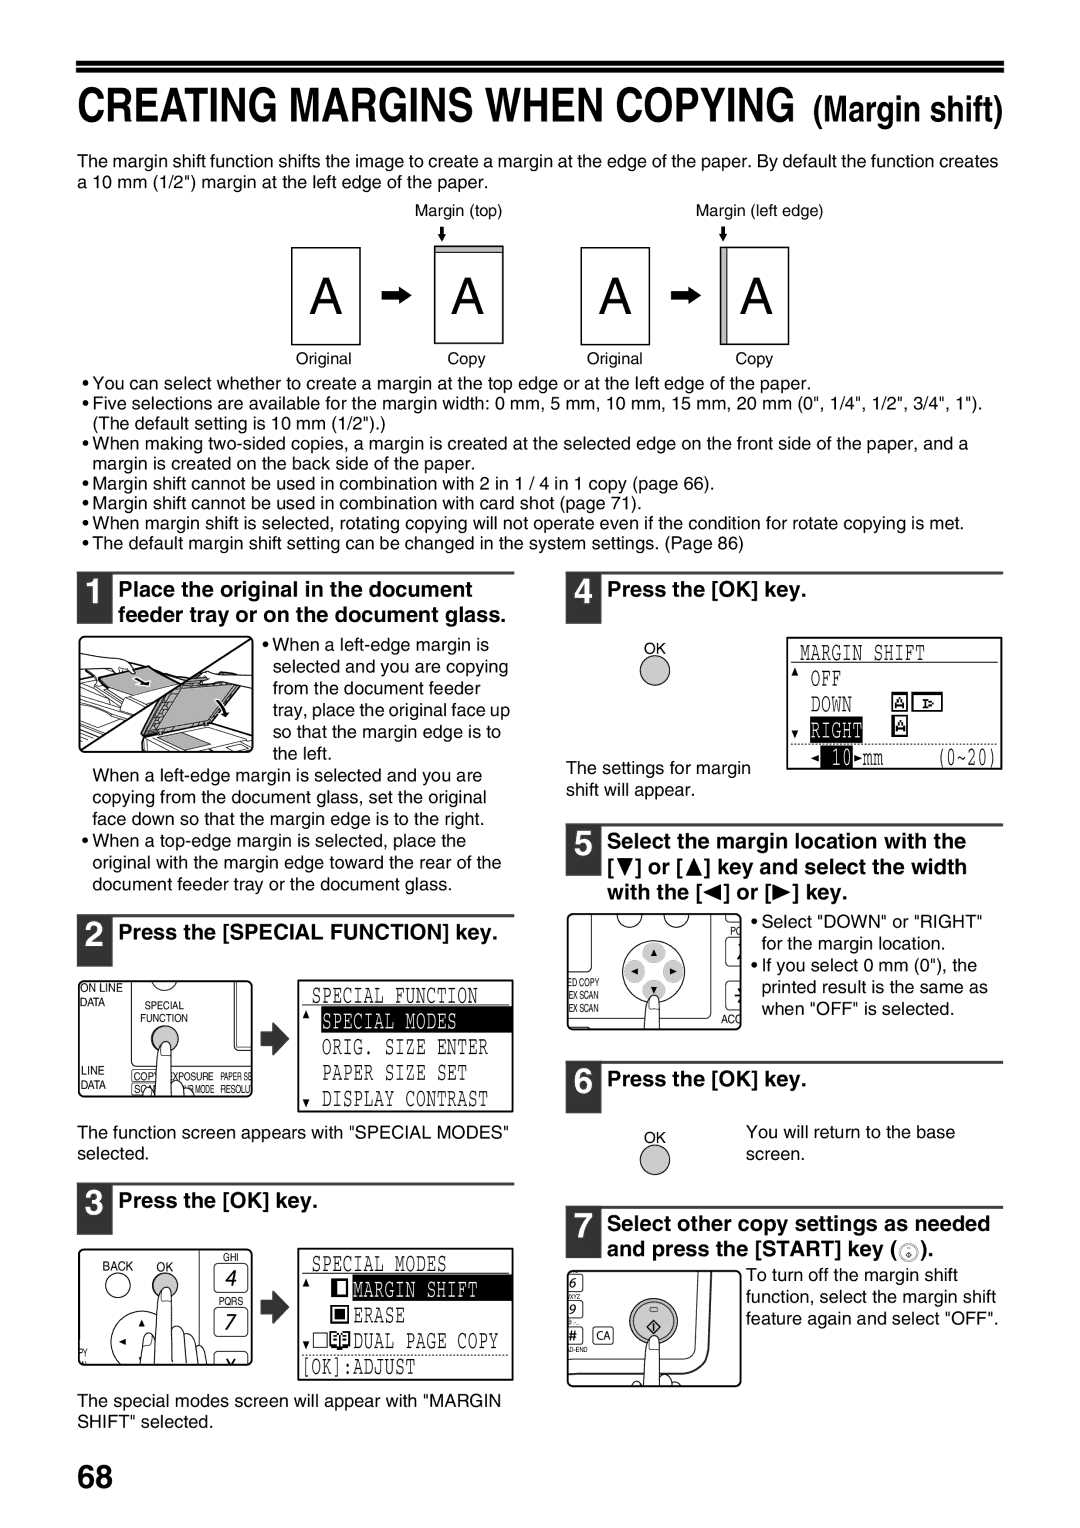
Margin shift
XY zoom copying
Rotation copy
A Copy Erase copy
Follow the cautions below when using this machine
Laser Information
For Europe
Installation Requirements
Environmental Information
Meaning of R in original and paper size indications
Software setup guide
Manuals Provided with the Product
Conventions used in this manual
Main Features
Network connection option
Fax function option
Environment and people friendly design
Part Names and Functions
Side cover
Document cover when installed
Fusing unit paper guide Open to remove misfed paper
Side cover handle
Operation Panel
Copy Ratio key
Start key / indicator
Paper Select key
Auto Image key
Display base screen
Example Copy mode
Operation in COPY, PRINT, SCAN, and FAX Modes
Icons appearing in the special function icon display
Power OFF
Turning the Power on and OFF
Power on
Power save modes
Paper
Default settings
Loading Paper
Paper that can be used for automatic 2-sided printing
Special paper
Loading Paper
Loading paper in a tray
Open the bypass tray
Envelopes
Modes
Changing the Paper Size Setting of a Tray
SET A4R
SET
Auto Tray Switching
Disabling Enabling Auto Tray Switching
Paper Size SET
Using Auditing Mode
Auditing Mode
Number of Accounts in Auditing Mode
When the copy job is finished, press the ACC.#-C key
Troubleshooting and Maintenance
Troubleshooting
MACHINE/COPYING Problems
Paper is not loaded properly
Selected paper size
Paper misfeed has occurred
Paper misfeed Too much paper is loaded in the tray
Automatically selected or
Original is curled or folded
Original has many solid black areas Original size is not
Original is smaller than A5 5-1/2 x 8-1/2 size
Message Action
Indicators and Display Messages
MB of expansion memory
Remove the misfed original
Removing Misfeeds
Original Misfeed in the SPF
Section a
Misfeed in the Bypass Tray
Section C
Open the front cover
Misfeed in the Machine
Misfeed in a
Close the front cover and the side cover
Misfeed in B
Misfeed in Tray
Misfeed in C
Gently close the side cover
Open the side cover Gently push tray 2 into the machine
Remove the misfed paper
250-sheet paper feed unit AR-D35
Replacing the Toner Cartridge
Close the front cover
Checking the Total Output Count
An A3 or 11 x 17 page is counted as two pages
Cleaning the Document Glass SPF/DOCUMENT Cover
Cleaning the Machine
Cleaning the Bypass Tray Paper Feed Roller
Cleaning the Transfer Charger
Position
Adjust the contrast with the or key
Adjusting the Display Contrast
Select Display Contrast with the or key
Optional Equipment
Reversing Single Pass Feeder / Single Pass Feeder
Specifications
Sheet Paper Feed Unit / 2 X 250-SHEET Paper Feed Unit
Store the supplies in a location that is
Storage of Supplies
Proper Storage
Store paper in the wrapper and lying flat
Part 2 Copier Operation
Page
Close the SPF
Normal Copying
Copying from the document glass
Make sure that the desired paper tray is selected
Press the Start key to begin copying
Stream feeding mode
Copying from the SPF
Copy will be delivered to
Copying books or originals with folds or creases
Auto paper select mode
Removing the document cover
Originals that can be used in the SPF
Text/photo
Making a Copy Darker or Lighter
Auto
Text
Important note when making a large number of copies
Setting the Number of Copies
Auto tray switching
Selecting the Tray
ORIG. Size Enter
Selecting the Original Size
ORIG. Size Enter Inch
Select ORIG. Size Enter from the menu with the or key
OKORIG. Size Enter
Enter
Extra
Extra
Press the Paper Select key to select the desired tray
Reducing or Enlarging a Copy
Automatic Ratio Selection
Press the Auto Image key
Key Decrease the ratio in increments of 1%
Key Select a larger preset ratio
Key Select a smaller preset ratio
Key Increase the ratio in increments of 1%
Special Function
Okadjust
XY Zoom
XY Zoom
Set the vertical ratio with the , , , or keys
Adjust
OFF
Vertical ratio can now be selected
Original → Paper
TWO-SIDED Copying
TWO-SIDED Copying
One-sided original → Two sides
Binding Change OFF
TWO-SIDED Copying of ONE-SIDED Originals
Copy
Mode
Copy Mode Binding Change on
Set the number of copies and press Start key
Select 2 to 2 with the or key, or with the 2-SIDED Copy key
To stop copying in the middle
Copy Mode
Select 2 to 1 with the or key, or with the 2-SIDED Copy key
Vertically-oriented
TWO-SIDED Copies Using the Bypass Tray
Place original B as shown below
Original
Okoff
Dual page Copy
Special
Checkmark appears
Press the Interrupt key
Interrupting a Copy RUN
Replace the previous originals and press the Start key
Copies of multiple original pages can collated into sets
Sort Mode
Rotating the Image 90 Degrees
Sort No sort
No Sort
Offset function enabled Offset function disabled
Sort
Press the Output key
Press the Paper Select key to select the desired paper tray
1 copy layouts
Pattern
Border
AN Okadjust
Dual
Erasing Shadows around Edges of a Copy
Erase
Edge
Select the erasure width with the or key
Card Shot
Card Shot
Modes
Card Shot
Front side of the card is scanned
Copies/min 2 x 11R A4, B5, A5 8-1/2 x
Specifications
Copies/min A4R 8-1/2 x 11R
25%, 50%, 64%, 77%, 95%, 100%, 121%, 129%, 141%, 200%, 400%
Output tray specifications
Appendix
Programs for Copy Mode
Purpose of the System Settings
Programming AN Administrator Password
Programming AN Administrator Password
Change Admin PW
System Settings List
Program name
Settings
Using the System Settings
Copier
Reset 1 ACC
Auditing Mode
Reset Account
Account Control
ACC. # Control
ACC. # Control
Delete Change
Single ACC. Limit
Cancel Jobs of Invalid Accounts
Account Limit
ACC. # Security
Device Control
Waiting Copy Lamp Setting
USB2.0 Mode
Offset Function
Operation Setting
KEY Touch Sound
Disable Auto KEY Repeat
Disable Paper Size SET
Keys Touch Sound AT Initial Point
Preheat Mode
Auto Power SHUT-OFF
Auto Power SHUT-OFF Timer
Energy Save
Copy Settings
Stream Feeding
Default Exposure Rotation Copy
Sort Auto Select
Disable Auto Paper Selection
Resolution in AUTO/TEXT Mode
Photo Mode Default
Disable 2-SIDED Copy
Material Safety Data Sheet
Exposure Controls / Personal Protection
Physical and Chemical Properties
Ecological Information
Supplier Identification
Hazards Identification
Physical and Chemical Properties
No data are available
Symbols / Numbers
Index
Reducing or enlarging a copy
Troubleshooting
Normal copying
13, 31
Copying, starting
Troubleshooting
Convenient copy functions
Two-sided copies of two-sided originals
100
Administrator Password Number Factory Setting
102
103
Other Countries outside the EU
Sharp Electronics Europe GmbH
Sonninstraße 3, D-20097 Hamburg
MX-M160D/MX-M200D

 A
A
 [OK]:ADJUST