Wolfcraft
Warranty
Table of Contents
Safety Instructions
Introduction
Unpacking and Checking Contents
6156 Router Table features include
Features and Specifications
Additional 6155 Router Table features include
Package Contents & Hardware Legend
Package Contents & Hardware Legend
Package Contents & Hardware Legend
Package Contents & Hardware Legend
Package Contents & Hardware Legend
Package Contents & Hardware Legend
Tools Required
Assembly
Assemble Metal Miter Guide
AF, zinc AG, black AH, black AJ, zinc
Assemble Plastic Miter Guide
Attach Switch Box to Tabletop
AG, zinc AH, black AJ, zinc
AK, black AL, black
Attach Extensions
Attach Square Nuts and Retainers
AM, zinc AJ, zinc
AN, black AP, black AQ, black
Attach Supports to Tabletop
Attach Height-Adjustable Legs
Attach Height-Adjustable Legs
Safety Sticker
Safety STICKERB-2
Attach Short Legs
Alignment of Tabletop and Extensions
Attach Optional, Second Shelf Router Table Model Only
Attach Tool Tray Router Table Model 6155 Only
AR, black AS, black AT, black
Assemble Jointing Fence to Router Table Fence
Assemble Push Shoe
AU 1 black AV 2 black AW 1 black
AX 1 zinc AH 1 black
Assemble Push Shoe to Fence
Attach Security Guard Fence
AY, zinc AZ, black
Hole Router Brand Specific Model
Mounting the Router
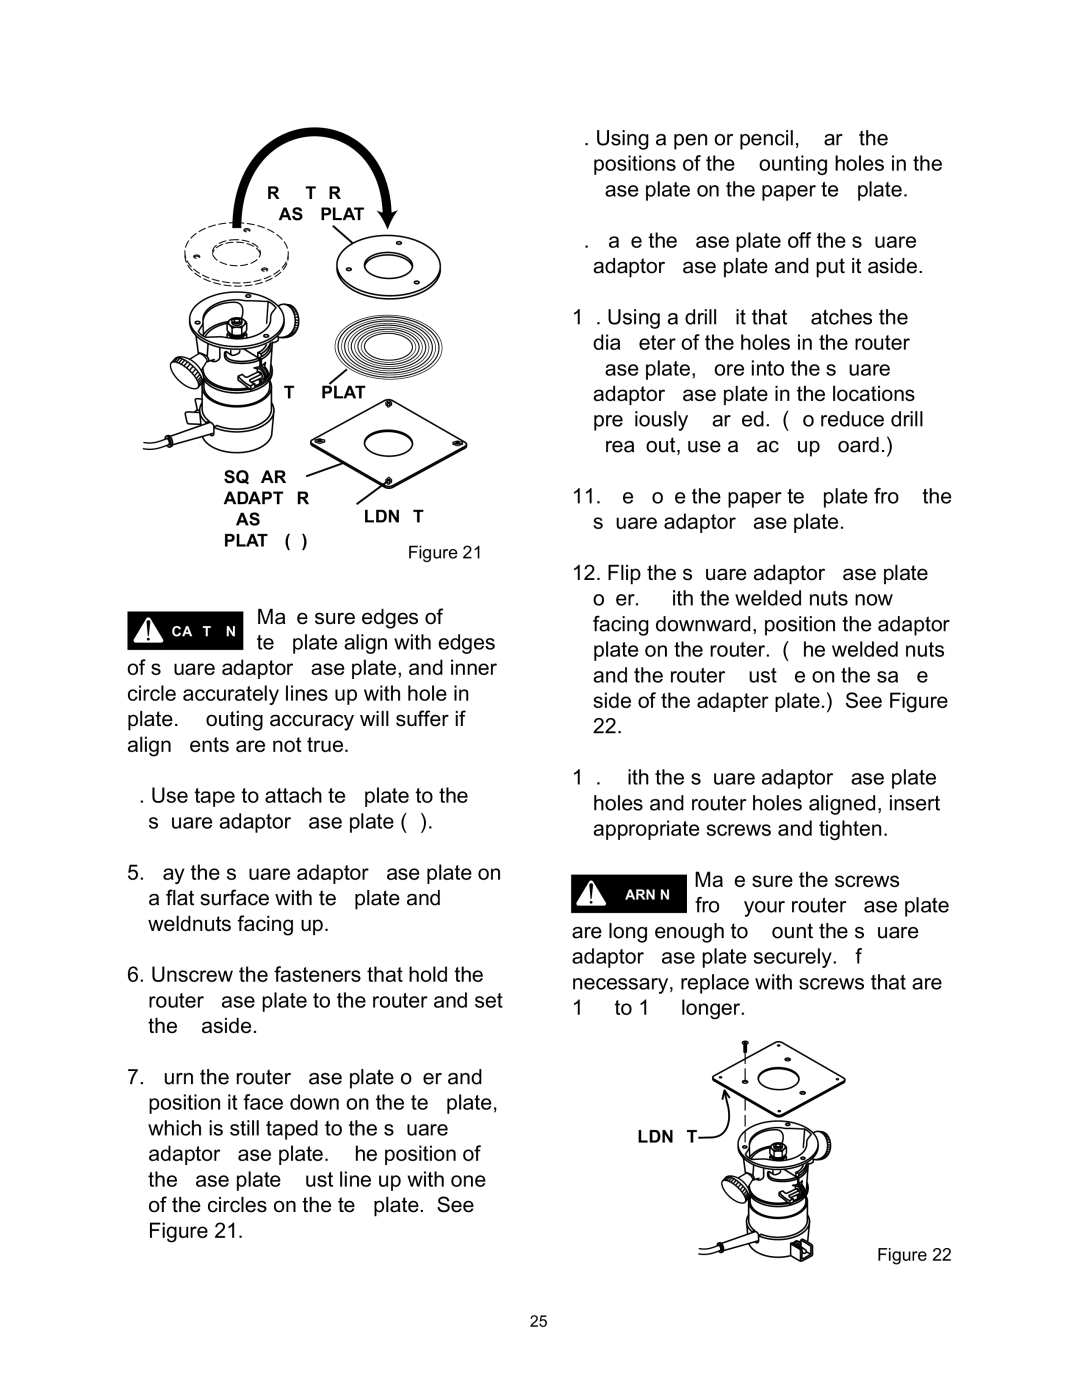
Mounting Routers with Square Adaptor Plate
Mount Router Directly to the Table
BA, black
Alinee CON EL Agujero EN LA Placa Adaptadora
5 6
Page
Router Base Plate Template Square Adaptor Weldnut Plate Z
Securing the Router Table Model 6156 Only
Introduction
Switch BOX
Electrical Hookup
Replace Damaged Cords
Risk of Electric Shock
Switch Box Familiarization
For Routers With LOCK-ON Feature
Operation of Switch Box and Router
Circuit Breaker
Assembling Fence to the Router Table
Insert Use
Assemble Inserts
Using your router/router table
Connecting a Vacuum
Setting Depth/Height of the Cut
Operation
Using the Router for Beading and Edge Cutting
Jointing
Push Shoe Clamp Plate
Fence Insert
Using the Router as a Jointer
Inside Routing
Using the Fence with Board for Larger Workpieces
Routing Irregular Workpieces
Outside Routing
BB, black
PIN Storage Starting PIN in Mounting Hole
BC, black BD, black BE, zinc BF, zinc
Using the Miter Guage and Fence
Spacer BAR BIT Dovetail Boxjoint
Mounting the Bar
Clamp Offset
Making Combination Joints
Box Construction
Using the Featherboard Flaps
Repair Parts 6155/6156 Router Table
KEY
All Parts
KEY
Hardware Bags
Description QTY
Repair Parts 6156 Router Table
Índice
Table DES Matieres
Consignes DE Sécurité
Déballer ET Vérifier LE Contenu
Caractéristiques ET Fiche Technique
Contenu DE Lemballage ET Légende DU Matériel
Article Description QTÉ Artículo Descripción Cant
Contenu DE Lemballage ET Légende DU Matériel suite
Contenu DE Lemballage ET Légende DU Matériel suite
Contenu DE Lemballage ET Légende DU Matériel suite
24 AS 24 AT
Contenu DE Lemballage ET Légende DU Matériel suite
Outils requis/Herramientas necesarias
ASSEMBLAGE/ARMADO
Assembler le guide à onglets métallique
Arme la guía de ingletes de metal
Arme la guía de ingletes de plástico
Assembler le guide à onglets en plastique
AG, zinc AH, noir/negro AJ, zinc
AK, noir/negro AL, noir/negro
Fente DE Guide À Onglets Ranura DE LA Guía DE Ingletes
Fixer les pieds à hauteur réglable
AN, noir/negro AP, noir/negro AQ, noir/negro
Fixer les pieds à hauteur réglable suite
Instale las patas cortas
Fixer les pieds courts
AJ, zinc AP, noir/negro AN, noir/negro AQ, noir/negro
Alignement de la table et des rallonges
Instale la bandeja de herramientas
Fixer le plateau à outils
AR, noir/negro AS, noir/negro AT, noir/negro
Fixer la deuxième étagère optionnelle
AU AV T
AX 1 zinc AH 1 noir/negro
Figura
Montage DE LA TOUPILLEUSE/CÓMO Montar LA Fresadora
Lets
Écrou À Tuerca Souder Soldada
Modelo 6156 solamente
Modèle 6156 seulement
Introduction / Introducción
Boîte DINTERRUPTEUR/CAJA DEL Interruptor
Avertissement
Para fresadoras con la característica de LOCK-ON
Pour les toupilleuses équipées dune fonction Verrouillage
Disjoncteur/Interruptor automático
Cómo Armar LA Barrera Guía a LA Mesa DE Fresadora
Assemblage DU Guide À LA Table À Toupie
Utilisation de linsert Uso de insertos
Assembler les inserts Arme los insertos
Branchement dun aspirateur
UTILISATION/OPERACIÓN
Cómo conectar vacío
Cómo usar la fresadora para corte de molduras y rebordes
Débrancher la toupilleuse pour
Poignées DE Guide Botones DE LA Barrera Guía
Toupiller à lintérieur/Fresado interior
BB, noir/negro
Toupiller à lextérieur/Fresado exterior
BC, noir/negro BD, noir/negro BE, zinc BF, zinc
Faire une queue daronde standard joints et joints à rainures
Montage de la barre Montaje de la barra
Bloc Arrière Bloque DE Empuje
Construcción de caja
Construction dune boîte
Cómo usar las aletas de las tablas de sujeción
Utilisation des rabats à lamelles
Piezas Para Reparación Mesa de fresadora
Descripción Cant
Toutes les pièces / Todas las piezas
CLÉ N Article
Sacs de matériel/Bolsas para
Description QTÉ
Descripción Cant
Clave No. Artículo
Wolfcraft
Name
Product Registration Card
Wolfcraft


 TEMPLATE