Emerson 200, 400KVA Bypass Supplies, System Control Philosophy, Normal operation, Mains failure

Page 12

2

Chapter 1 General Description

1.2.2 Bypass Supplies

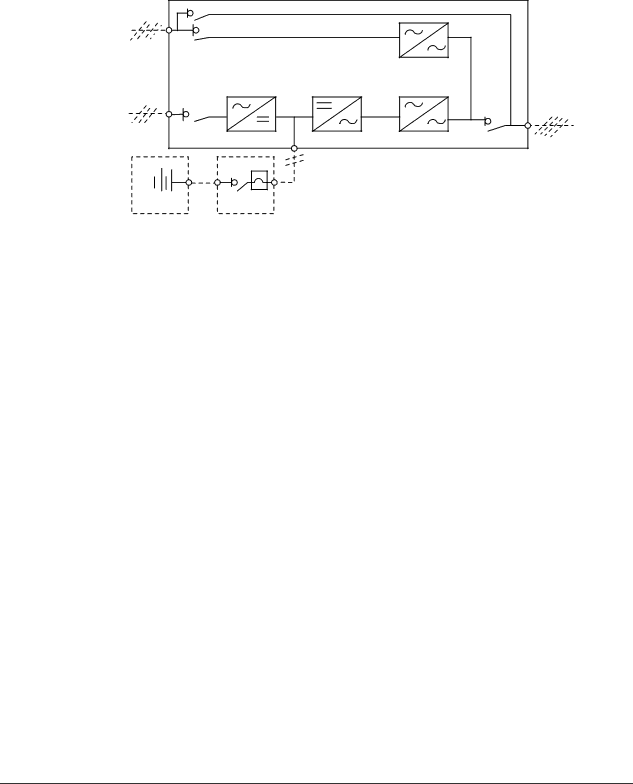
The circuit block annotated “Static switch” in Figure 1-2 contains an electronically controlled switching circuit, which enables the critical load to be connected either to the inverter output or to a bypass power source through the static bypass line. During normal system operation, the load is connected to the inverter, and the inverter-side of the static switch is closed. But in the event of a UPS overload or inverter failure, it is automatically transferred to the static bypass line.

Bypass


mains supply

Maintenance bypass switch Q3

UPS


Bypass switch Q2


Input mains

Rectifier

Inverter

Static switch


supply

DC bus


Input switch Q1


Output switch Q5

UPS output


C.B.


Battery

Battery circuit breaker

Figure 1-2 UPS power switches configuration

To provide a clean (no-break) load transfer between the inverter output and static bypass line, the static switch activates connecting the load to the bypass supplies. To achieve this, the inverter output and bypass supply must be fully synchronized during normal operating conditions. This is achieved through the inverter control electronics, which make the inverter frequency track that of the static bypass supply provided that the bypass remains within an acceptable frequency window.

A manually controlled, maintenance bypass supply is also incorporated into the UPS design. Its purpose is to enable the critical load to be powered from the mains (bypass) supply while the UPS is shut down for routine maintenance.

Note: The load equipment is not protected from normal supply aberrations when operating on bypass side or in the maintenance bypass mode.

1.2.3 System Control Philosophy

Normal operation

During normal operation, that is, when the UPS input supply is present and within specification, both the rectifier and inverter sections are active and the static switch is turned on to connect the inverter output to the critical load busbars. The battery circuit breaker (BCB) is also closed and the battery is therefore permanently float charged at the DC busbar voltage level.

(“1+N” parallel UPS system) Note: As the unit outputs are connected in parallel, the system checks that the inverter control circuits are perfectly synchronized with one another and with the bypass mains in terms of both frequency and phase and that they have the same output voltages. Current supplied to the load is automatically divided among UPSs. A warning message appears while synchronization is in progress.

A module's static switch cannot close until these conditions are satisfied.

Mains failure

If the power mains has a failure or is out of tolerance the rectifier will go off automatically, while the inverter will continue to operate on power from the battery for a period of time which depends on the load and the capacity of the battery. If the mains supply has not returned within this time, the inverter will go off automatically and an alarm message will appear on the operator control and display panel of the UPS.

Critical load will not be interrupted in the event of a drop or return of the AC power mains.

HIPULSE U UPS Single Module And “1+N” (Expandable) 160/200/300/400kVA User Manual

Image 12
Contents Version V1.0 Revision date April 29 31011661Page Page Manual Describes The Following Equipment Safety Precautions Page Contents Page Page Page Features General DescriptionDesign Concept Hipulse U Module DesignBypass Supplies System Control PhilosophyNormal operation Mains failureECO Mode For Single UPS Only Operation Mode UPS Power Switch ConfigurationBattery Circuit Breaker Battery Temperature CompensationAuto-restart mode Bypass modeMaintenance mode Source Share modeMechanical Installation Environmental ConsiderationsUPS Location Mechanical Considerations Installation Drawings Preliminary Checks1905 Front view Air inlet Top view AirTop view Air outlet 615 556 1061 1210 1251651 761 800 843 Front view 1903 Air 1641Side view Back view Top view Air outletTop view Air outlet 1685 1626 Cable access Base view 104 424 155415 556 1451 1600 1641 Front正view视图 RemovableGrille 2 pcs Removable Grille 2 pcsVentilation after being installed Front view 正视图Air inlet 进风口 Grille Electrical Installation Power CablingSystem Configuration Cable RatingSafety Earth General NotesCable Connections Protective DevicesCabling Procedure UPS batteryNm M10 bolts. Ensure Correct Phase Rotation Output of the systemAuxiliary Terminal block Rectifier Bypass EarthConnections Distance From Floor To Connection Point Distance from floor to connection pointControl Cabling Monitoring Board PortsDry contact input ports CardDescription of maintenance bypass cabinet port Dry contact output portAuxiliary DC power output port EPO input portCommunication ports Description of dry contact output portBattery Control Communication port resource deployment tableConnecting Main Cabinet And Side Cabinet Connecting Power CablesConnecting Signal Cables Port side cabinet Cable No. main cabinetW45 W41-5ULW36CSA8 LED Indicators Description of LED indicatorsOperator Control And Display Panel IntroductionBuzzer Control ButtonsLCD And Menu Keys Detailed Description Of Menu Items System information windowMenu window and UPS data window Adjusts the graphic LCD monitor contrast for best viewing 中文/English Press the Enter key F4Use the Shift key F1 and up and down arrow keys F2, F3 to Previously setExplanation This setting applies to RS485 communication Communication mode RS232 Reserved Callback timesBattery capacity test More OK or FaultLCD Screen Types EPO ButtonStart Screen Current record windowDefault Screen Primary ScreenHelp Screen Prompt Window UPS Alarm Message List Alarm message Description Ongoing update of rectifier firmwareOngoing update of inverter firmware Ongoing update of monitor firmwareCan also leads to the alarm Unit over load timeoutIs found to be in error Inverter overtempTo this Power Switches Operating InstructionsService socket Designed for use in UPS Service, cannot be used for other purposesStart-Up Procedure Into Normal Mode Start-Up Procedure Into ECO ModeLED status Battery Test Mode Procedures System Test ProcedureBattery test type and preconditions Test procedureMaintenance Bypass Procedure And UPS Shut Down Shutdown Procedure Complete UPS And Load ShutdownLoad equipment is not protected from AC supply aberration EPO Procedure UPS Reset ProcedureAuto Restart Language SelectionChanging The Current Date And Time Battery SafetyUPS Batteries Installation Design Considerations Battery Installation And MaintenanceTemperature Considerations Battery PopulationBattery Protection Battery ConnectionBattery Installation Connecting The BatteryBCB Box Optional 455738 654 1042Battery Temperature Sensor Optional 660Ф13 Knockout 1+N System Installation Procedures +N SystemGeneral Preliminary ChecksCabinet Installation Power Cables1+N System Operating Instructions Control CablesStart-Up Procedure Into Normal Mode Maintenance Bypass Procedure And UPS Shut DownInsertion Procedure Of One Module In a Parallel System Dual Bus System Installation Procedures Shutdown Procedure Complete UPS And Load ShutdownBypass suppl y Input rectifierDB9-DB9 0411533804115339 04116100 15m DB25-DB25LBS cable Parallel board Board LBS cableParallel cable UPS unit UPS parallel system Parallel并机board板Specifications Mechanical CharacteristicsElectrical Characteristics Input Rectifier Conformity And StandardElectrical Characteristics DC Intermediate Circuit Electrical characteristics DC intermediate circuitElectrical Characteristics Inverter Output Electrical Characteristics Bypass Input MainsElectrical characteristics inverter output Electrical characteristics bypass input mainsElectrical Characteristics System Performance Electrical Characteristics ECO ModeElectrical characteristics system performance Electrical characteristics ECO modeService & Maintenance UPS Key Components And Their LivesLives And Recommended Replacement Time Of Key Components Lifves and recommended replacement time of key componentsReplacing Fuses Key components Life expectancyAppendix 1 Transportation Restraints Removing Procedures 螺Screw钉 Amplified viewM10螺bolt栓 M12螺bolt栓 Restraint300kVA UPS Transportation Restraints Removing Procedures Output 输出变压器 transformer Phase-shifting aAmplifiedA处放大图view M10bolts螺栓 Output 输出变压器 transformerPhase 移相-shifting 变压 器 Open the front door RemoveOpen thebackdoorpanel400kVA UPS Transportation Restraints Removing Procedures Installation hole coversTransportation restraint Bolt Phase-shifting Bolt 2 pcsPhase-shifting transformer