Cisco MGX 8220 Installation and Configuration
Corporate Headquarters
Page
FIC 04DU9-ISN
Page
Page
Equipment Attachment Limitations
Document Information
General Information
Mailing Information
Business Reply Mail
Cisco WAN Switching Product Name Change
Audience
Organization
Overview
Power Entry Options
DC Power Drain and Circuit Protection
Spacer Unit Cooling Assembly Power
Core Module Overview
Service Configuration
Introduction
T1 Backcards
Upgrading Firmware
LMI Interface
Clearing Any Alarms Related to ds3
VPI/VCI Mapping
Unpacking
Power
Vertical Positioning
Dumb Terminal onto the Maintenance Port
Cabling for RJ-48 Connectors on T1 and E1 Ports A-5
Cabling Summary
T1 Cabling E1 Cabling
Specifications B-1
FRSM-8E1 Specification
Service Interface T1/E1 Virtual Circuits Matm Specification
Using the Procedure Tables Finding the Right Procedure
Introduction C-1
Virtual Circuits
Resetsys
Upgrade/Downgrade Save/Restore SM Configuration
Resetsys or clrallcnf
Compatibility C-46 Clrallcnf C-47
G U R E S
Xviii
Figure A-1
Figures Cisco MGX 8220 Installation and Configuration
B L E S
Table A-9
Objectives
Cisco WAN Switching Product Name Change
Audience
Organization
Chapter Title Description
Related Documentation
Conventions
World Wide Web
Obtaining Documentation
Documentation CD-ROM
Obtaining Technical Assistance
Ordering Documentation
Documentation Feedback
Cisco.com
Technical Assistance Center
Cisco TAC Web Site
Cisco TAC Escalation Center
Xxx
Cisco MGX 8220 System Overview
New in Release
A P T E R
Configuration Examples
Cisco BPX 8600 Series Switch
Service Interfaces
Remote Locations
Standalone Cisco MGX 8220 Edge Concentrator
ATM UNI/NNI
Scalability
Standards-Based Conversion to ATM
ATM Local Management Interface
Traffic Management
Cisco MGX 8220 Shelf
Frame Service Modules
Cisco MGX 8220 Cards
Cards Supported in the Cisco MGX
Broadband Network Modules
ATM UNI Service Modules
Service Resource Modules
Circuit Emulation Service Modules
Inverse Multiplexing for ATM Trunk Modules
Cisco MGX 8220 Management
Release 5.0, Part Number 78-6430-03 Rev. D0, November
Common Equipment Description
Overview
Cisco MGX 8220 Shelf
Front View of the Cisco MGX 8220 Shelf with Cards Installed
Cisco MGX 8220 Backplane
Typical Cisco MGX 8220 Hardware Weights
Power Entry Options
DC Powered Systems
AC Powered Systems
AC Power Assembly front without grill
Cooling Assembly
DC Power Drain and Circuit Protection
Main Cooling Assembly
Cisco MGX 8220 Shelf Configuration
Booster Cooling Assembly
Cooling Assembly Power
Plenum Exhaust Chamber
Spacer Unit
Optional Cisco-Supplied Cabinet
Cisco MGX 8220 Cabinet
Core Module Overview
10 Cisco MGX 8220 Top Level Block Diagram
Cisco MGX 8220 ASC Shelf Controller
11 ASC Cards
Console Ports
Ethernet Transceiver Extenders
ASC LED Indicators
Auto Card Restore
Broadband Network Modules
Type of LED Color Meaning of LED
BNM-T3/E3
ATM Trunk Interface
15 CC, FFCI, EFCI, Supv, PTI, and CLP Fields
Push Buttons
BNM-T3/E3 LED Indicators
Type of LED Color Meaning
BNM-155
16 BNM-155 Cards
ATM Trunk Interface Back Card
SMF-155 Back Card
BNM-155 LED Indicators
Service Resource Modules
AX-SRM-T1/E1 Features
Rules for Installation of SRMs
17 SRM-T1/E1 Card
1N RED
SRM-T1/E1 LED Indicators
Bert
18 AX-SRM-3T3 Cards
Release 5.0, Part Number 78-6430-03 Rev. D0, November
Summary of User Interface Connections
Functions of the User Interface
Protocols
Physical Connections
BNM
User Interface Access Ports
Maintenance Port
UI Function Physical Access Path TCP/IP Protocols Used
Matrix of User Interface Combinations
Maintenance Port Access
Control and LAN Ports
Control Port Access
In-Band Access
LAN Port Access to the Cisco MGX 8220 Shelf
Passwords
User Accounts and Privilege Levels
Accounts
Privilege Levels
Following prompt appears
Login Procedure
Connecting Using the Maintenance Port
Connecting a PC using the COM Port
Connecting Using the Control Port
Connecting a Terminal Server
Connecting using an In-Band Connection
Command-Line Interface
Connecting using the LAN Port
Cisco MGX 8220 Management Through Snmp
Establishing the Cisco MGX 8220 to Cisco BPX Connection
AxisSystem
Structure of the MIBs
CardGeneric
CardSpecific
AxisServices
AxisLines
Tftp User Interface
Upgrading Firmware
ASC Frsm Ausm Cesm Frasm Imatm MIB
Tftp destIPadd
Configuring Statistics
Configuring and Collecting Statistics
Collecting Statistics
Statistics Collection File Format
Configuration Save and Restore
Field Description Field Size
Save Tftp Command Format
Restore Tftp Command Format
Release 5.0, Part Number 78-6430-03 Rev. D0, November
MGX 8220 Service Modules
Introduction
Frsm Connection Types
Frame Relay Service Modules FRSMs
Frame-Relay-to ATM Network Interworking NIW
Congestion Indication
BPX 8620 Network with Networking Interworking Connections
PVC Status Management
Frame-Relay-to ATM Service Interworking SIW
Cell Loss Priority and Congestion Indication
Command/Response Mapping
Frame Forwarding
Frame-based User-to-Network Interface Funi
Translation and Transparent Modes
Loss Priority Indication
Fractional FRSMs
FRSMs for T1 and E1 lines
Channelized FRSMs
Example of T1/E1 Frsm Front Cards
AX-FRSM-HS1 and MGX-FRSM-HS1/B Features
FRSMs for High Speed Serial Lines
MGX-FRSM-HS2 Features
Example FRSM-HS1 Front Card
Frame Relay Access Service Module
Stun Connections
Using Frasm for a Stun Connection
Bstun Connections
Using Frasm for a Bstun Connection
Fras Connections
Using Frasm for a Fras BNN Connection
Example Frasm Front Cards
User Interface
Frame Relay to ATM Conversion
Cell Loss Priority
ATM UNI Service Module
Ausm Cards
Ausm LED Indicators
AUSM-8T1/E1
AUSM-8T1/E1 LED Indicators
Type of LED Color Description
10 AUSM-8T1/E1 Front Card
Inverse Multiplexer for ATM Trunk Module
An illustration of the Imatm cards is provided in Figure
IMATM-8T1
BNC
IMATM-8E1
SMB-E3E1
Imatm LED Indicators
Hsport
Circuit Emulation Service Modules
Circuit Emulation Service Module 4-port
14 Cesm Card
Cesm 4-Port LED Indicators
Port LED
Active LED
Standby LED
Circuit Emulation Service Module 8-port
T1/E1 Structured Data Transfer
T1/E1 Unstructured Data Transfer
AX-SMB-8E1-LM AX-R-SMB-8E1-LM
15 8-Port Cesm Cards
Cesm 8-Port LED Indicators
Service Module Back Cards
T1 Backcards
Back Cards
DB15-4X.21-BC
Hssi Back Cards
Redundancy Back Cards
T1/E1 Backcards
17 T1/E1 Redundancy Back Cards
Release 5.0, Part Number 78-6430-03 Rev. D0, November
Setting up a Frame Relay Connection
Via Cisco WAN Manager
Via the Command-Line Interface
Frsm Network Interworking Connections
Establish the Customer Equipment to BPX Segments
Frame Relay Connection through an MGX 8220 and BPX Network
Establish the BPX-to-BPX Segment
Frsm Service Interworking Connections
Funi and Frame Forwarding
Parameter Description
MCR
Ausm Connections
ATM to-ATM Connection Screen
Cesm Connections
BPX-to BPX-Segment
Frasm Connections
Fras BNN Connections
Stun Connections
Ffffffff
Bstun Connections
Chapter Frasm Connections
Configuring Imatm Connections
Download procedure
Adding the Line
Sample Display
Checking the Alarms on a ds1 Line
Clearing Any Alarms Related to ds3
LineNum LineAlarmState
Plcp Configuration for ds3
Sample Output
Example
Configuring the Clock Source
END a END B
Stratum 1/2
Commands Related to AIM Group
Configure the AIM Group
Add the Channel Route Entry
Addchrte
Display the AIM Group
UNI
Configuring the Port Queue
Sample Data
Display the Port Counters
Dspportcnt Aimgrp no
Release 5.0, Part Number 78-6430-03 Rev. D0, November
Using the Command-Line Interface
MGX 8220 in Stand-alone Applications
Out-of-Band Access
Configuring the BNM
LMI Interface
Setting Trap Managers
VPI/VCI Mapping
VC Connections
VP Connections
Interface Type
UNI NNI
Provisioning Frsm Channels
Provisioning Ausm Channels
Chapter Provisioning Ausm Channels
Installation and Start-Up
Safety Recommendations
Maintaining Safety with Electricity
Grounding
Site Preparation
Power
Rack Space
Unpacking
Cooling
Rack-Mounting the MGX 8220 Units
Parts Checklist
Unpacking Each Container
Horizontal Positioning
Vertical Positioning
Cooling Configuration Guidelines
Rack-Mounted MGX 8220-One- and Two-Shelf Configurations
17.750 Minimum Plenum or spacer Or 2 U
Rack-Mounting the Modules
Use the Angle Bracket to Secure the Module to the Rack
Limited Access
Center Mount
Rack-Mounting the Plenum or Spacer
Mounting the Electrostatic Wrist Strap
Colocating Cisco Units in the Same Rack
Electrostatic Wrist Strap Kit
Connecting Power for DC Systems
DC Power to the Shelf
10 PEM Cable Clamp
DC Power to the Fan Cooling Assembly
11 DC Power Cabling for One-Shelf and Two-Shelf Racks
12 DC Cabling for Three-Shelf and Four-Shelf Racks
Connecting Power for AC Systems
AC Input Power
Available Power
Monitoring Power Supply Status
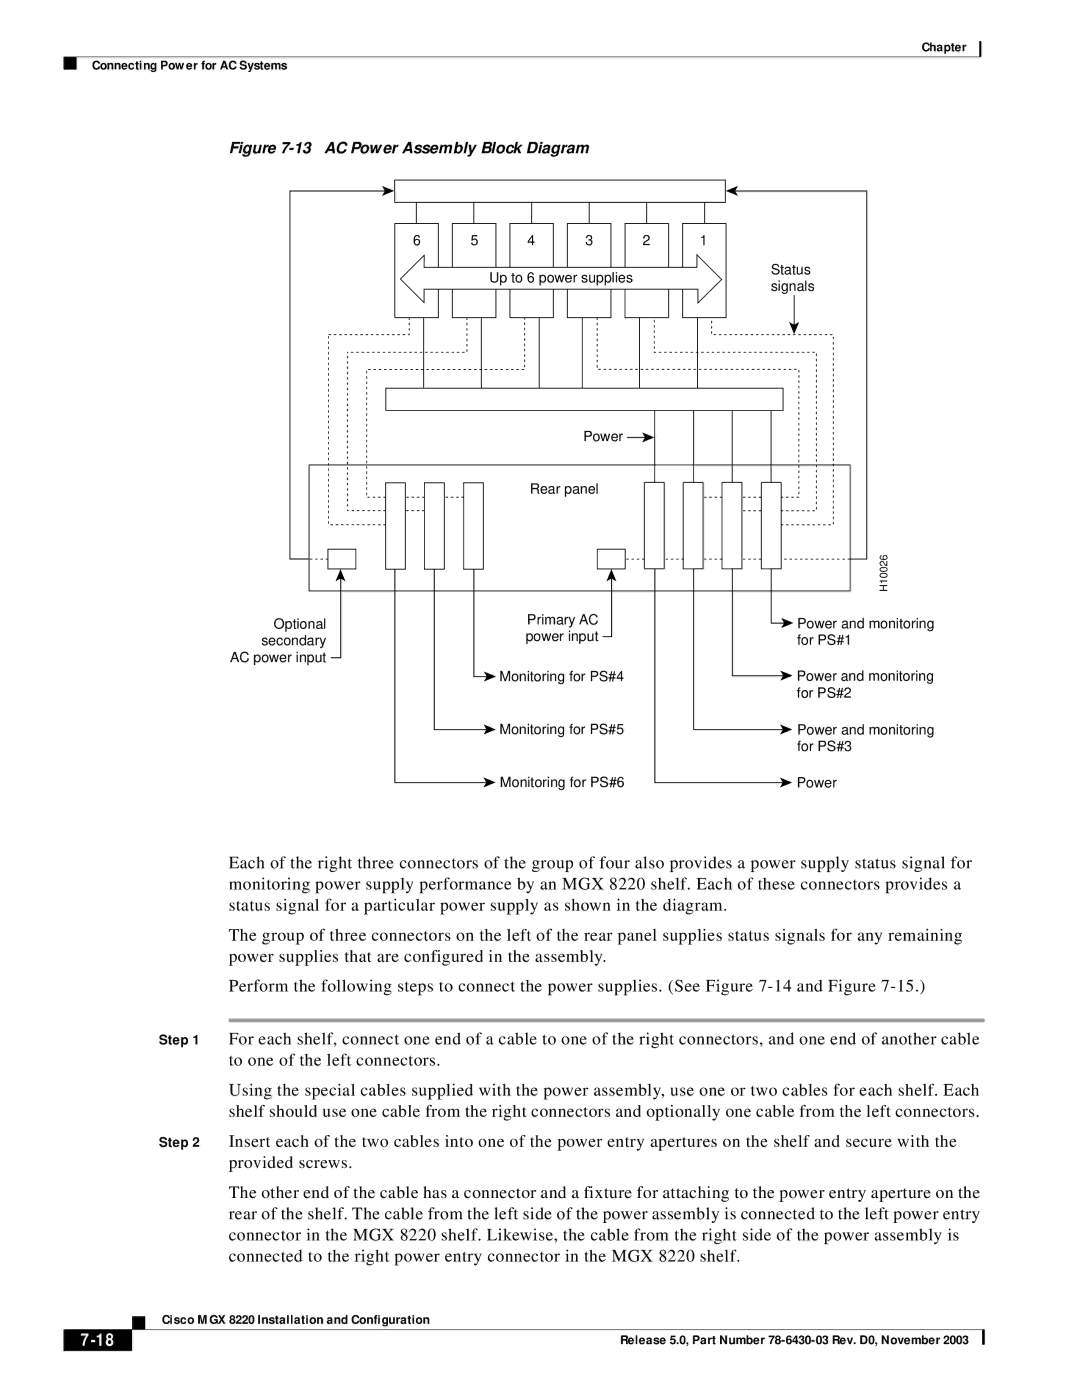
13 AC Power Assembly Block Diagram
14 AC Cabling for One-Shelf and Two-Shelf Racks
15 AC Cabling for Three-Shelf and Four-Shelf Racks
Plenum Chamber Kit
Cable Management
Description Quantity
Main Cooling and Booster Cooling Kit
16 Cable Management Kit on the Plenum Chamber
Cable support, attach with 10-32 thread forming screws
Power Cable Routing
Cable Routing
19 Routing Power Cables at the Cooling Assembly
Routing Data Cables
Removing and Installing the Front Cards
Readying the Cards
Removing and Installing the Back Cards
22 Connecting BNM-T3 or BMN-E3 Cables
Making the BNM Trunk Connection
Making the Service Interface Connections
23 Cabling for Redundant BNM Cards
Alarm Output Connection
Dumb Terminal onto the Maintenance Port
Making External Clock Connections
Attaching a Control Console
Initial Configuration
Initial Start-Up of the MGX 8220 Shelf
Step
Preventive Maintenance
Troubleshooting the MGX 8220 Shelf
Symptom Probable Cause Remedy
General Troubleshooting Procedures
ASC Fail LED
Procedure for All Errors
Dspcds
Displayed Log Message Format
Dsplog slot# slot# day offset
Error Number Display Log String Detail Description
Log Codes
ASC Log Codes
Log Code Range Module Logging Messages
Error Number Display Log String Detail Description
Null
Error Number Display Log String Detail Description
Error Number Display Log String Detail Description
Error
BNM Log Codes
Error Number Display Log String Detail Description
Fwready =
SRM Log Codes
Bram
Ausm Log Codes
PDU
Error Number Display Log String Detail Description
Error Number Display Log String Detail Description
Replacing Parts
Replacing a Front Card
Replacing a Back Card
Replacing a DC Power Entry Module
Chapter Replacing Parts
Release 5.0, Part Number 78-6430-03 Rev. D0, November
Connector Description
Imatm T1/E1 Connectors
T3 Trunk Cabling
Frame Relay Cabling
T1 Cabling
Cable Parameter Description
Pin No Description
DB-15 Connector
BNC Connector
E1 Cabling
Port Connectors
Hssi Port Connectors
Pin No Name Signal Function Polarity Signal Source
DTE
Cabling for RJ-48 Connectors on T1 and E1 Ports
DC Power Cabling
Figure A-2 RJ-48 Connectors
AC Power Cabling
Maintenance and Control Ports
Control and Clock Cabling
Pin No Name Source Description
Modem Cable
External Clock Input Cabling
DSR DCE
DTR DTE
E1 Clock Cabling
T1/E1 Clock Cabling
Pin No. Description
External Alarm Cabling
Pin No Alarm Description
Standard MGX 8220 Cables
Redundancy Y-Cables
Model No Description Usage
Cable Used On
Release 5.0, Part Number 78-6430-03 Rev. D0, November
BNM-T3 Specification
Intershelf Link
Card General
BNM-T3 Plcp
LCV, LES, %EFS, LSES, SEFS, PCV, PES, PSES, SEFS, UAS
BNM-E3 Specification
Ccitt
Card General
BNM-155 Specifications
Intershelf Link Specifications
Common Specifications
SMF Specific Specifications
General Card Specifications
ASC Specification
SRM-T1/E1 Specification
BNC-3T#
FRSM-4T1 Specification
Service Interface
System Interface
Virtual Circuits
Card General
FRSM-4E1 Specification
Transmit frames S
Virtual Circuits
ATM cells Number of cells transmitted to BNM
FRSM-8T1 Specification
Appendix B Specifications FRSM-8T1 Specification
Release 5.0, Part Number 78-6430-03 Rev. D0, November
FRSM-8E1 Specification
ATM Layer Per Ccitt I.361 and ATM UNI
Virtual Circuits
ATM cells Number of cells transmitted to BNM
Errors and Alarm Handling
FRSM-HS2 Specification
External Interface Specification
FRSM-HS2 Line
Statistics and Counters Specifications
Counters per line
Statistics
Ausm Specification 4 Port
Service Interface T1
Service Interface E1
LCV, LES, LSES, CV, ES, SES, SEFS, AISS, UAS
ATM Interface
VPI/VCI
CBR, VBR, VBR+
PCR, SCR VBR, Ccdv CBR
Card General
Service Interface T1/E1
CESM-4T1/E1 Specification
ESD
AAL1
Physical Layer Interface T1
Matm Specification
SMB-E3E1-LM
Physical Layer Interface T3
Physical Layer Interface E1
LOS, OOF, AIS, RDI
Physical Layer Interface E3
AIM Groups and Links
Card General
Release 5.0, Part Number 78-6430-03 Rev. D0, November
Firmware Upgrade and Downgrade Procedures
Using the Procedure Tables
Std. Upgrade Std. Downgrade Core Card Set From Rel Via
Finding the Right Procedure
Standard Upgrade and Downgrade Procedures
Procedure 1-Standard Upgrade, 1-Core Card Set
Enter the tftp put ASCFWfile AXISASCACTIVE.FW command
Procedure 2-Standard Downgrade, 1-Core Card Set
Enter the tftp put SMFWfile AXISSM1$slot.FW command
Procedure 3-Standard Upgrade, 2-Core Card Set
Enter the tftp put ASCFWfile AXISASCSTANDBY.FW command
Procedure 4-Standard Downgrade, 2-Core Card Set
Enter the tftp put ASCFWfile AXISASCACTIVE.FW command
Procedure 5-Standard Upgrade, 1-Core Card Set
Procedure 6-Standard Upgrade, 2-Core Card Set
Enter the tftp put SMFWfile AXISSM1$slot/0.FW command
Enter the tftp put ASCFWfile AXISASCSTANDBY.FW command
Procedure 7-Standard Downgrade, 1-Core Card Set
Enter the tftp put SMBTfile AXISSM1$slot.BOOT command
Procedure 8-Standard Downgrade, 2-Core Card Set
Enter the tftp put SMFWfile AXISSM1$slot.BOOT command
Enter the tftp put SMBTfile AXISSM!$slot.BOOT command
Procedure 9-Standard Upgrade, 1-Core Card Set
Procedure 10-Standard Upgrade, 2-Core Card Set
Procedure 11-Standard Downgrade, 1-Core Card Set
Step
Procedure 12-Standard Downgrade, 2-Core Card Set
Graceful Upgrade and Downgrade Procedures
Procedure 13-Graceful Upgrade, 1-Core Card Set SM only
Procedure 14-Graceful Downgrade, 1-Core Card Set SM only
Procedure 15-Graceful Upgrade, 2-Core Card Set
Enter the tftp put SMBTfile AXISSM1$slot.FW command
Procedure 16-Graceful Downgrade, 2-Core Card Set
Enter the tftp put SMFWfile AXISSM1$sl26 command
Procedure 17-Graceful Upgrade, 1-Core Card Set SM only
Procedure 18-Graceful Downgrade, 1-Core Card Set SM only
Enter the tftp put SMBTfile AXISSM1$slot.FW command
Procedure 19-Graceful Upgrade, 2-Core Card Set
Procedure 20-Graceful Upgrade, 2-Core Card Set
Release 5.0, Part Number 78-6430-03 Rev. D0, November
Procedure 21-Graceful Upgrade, 2-Core Card Set
Enter the tftp put SMBTfile AXISSM1$slot.FW command
Procedure 22-Graceful Downgrade, 1-Core Card Set SM only
Procedure 23-Graceful Upgrade, 2-Core Card Set
Enter the tftp put SMBTfile AXISSM1$slot.BOOT command
Procedure 24-Graceful Downgrade, 1-Core Card Set SM only
Procedure 25-Graceful Upgrade, 2-Core Card Set
Enter the tftp put SMBTfile AXISSM1$slot.BOOT command
Description of Upgrade/Downgrade Terminology
File Size
Tftp put
ASC.FW
Dspfwrevs
Slot-Specific and Card-Type-Specific SM Firmware
Softswitch
Resetsys
FlashStartAddr and flashEndAddr
Donotupdatestandby
Dspadrxlat
Dsptotals
Compatibility
Resetsys or clrallcnf
Save/Restore ASC Configuration
Upgrade/Downgrade
Clrallcnf
Save/Restore SM Configuration
D E
See CWM
ASC BNM
Firmware, upgrades Firmware Media Kit
CWM
ASC Ausm
PEM
Hssi
SIW
Snmp
FRSM-HS2 B-24
Tftp