407118-001
HP StorageWorks Enterprise File Services WAN Accelerator
Legal and notice information
Contents
Chapter
Wccp Deployments
Policy-Based Routing Deployments
Radius and TACACS+ Authentication
Proxy File Service Deployments
Serial Cluster and Cascade Deployments 107
Glossary 113 Index 117
About This Guide
Introduction
Organization of This Guide
Boldface
Document Conventions
Antivirus Compatibility
Hardware and Software Dependencies
Ethernet Network Compatibility
Additional Resources
Related Reading
HP Storage Web Site
Contacting HP
Introduction
Introduction to the HP EFS WAN Accelerator
Designing an HP EFS WAN Accelerator Deployment
Virtual Window Expansion
Transaction Acceleration
Transaction Prediction
Design and Deployment Overview
Designing AN HP EFS WAN Accelerator Deployment
Definition of Terms
Bypass Mode
Failover Mode
Designing AN HP EFS WAN Accelerator
Designing AN HP EFS WAN Accelerator Deployment
‹ In-Path,Server-Side, One to One Deployment on
In-Path Deployments
Basic Steps Client-Side
Introduction to Physical In-Path Deployments
In-Path, Failover Support Deployment
Setup Advanced Networking Failover Settings
Basic Steps Server-Side
In-Path, Two Routing Points Deployment
Basic Steps Client-Side Basic Steps Server-Side
In-Path, Server-Side Deployment
In-Path, Server-Side Deployment
In-Path, Server-Side, One to One Deployment
Following figure illustrates the server-side of the network
Setup Advanced Networking Failover Settings
Introduction to Virtual In-Path Deployments
Virtual In-Path Network Deployments
In-Path, Load Balanced, Layer-4 Switch
In-Path, Load-Balanced, Layer-4 Switch Deployment
Setup Optimization Service General Settings
Introduction to Out-of-Path Deployments
Out-of-Path Network Deployments
Physical Out-of-Path Deployment
Out-of-Path, Failover Deployment
Out-of-Path, Server-Side, Failover Support Deployment
Setup Optimization Service In-Path Rules
Static Cluster Deployment
Out-of-Path, Static Cluster Deployment
Setup Optimization Service In-Path Rules, Fixed Target
Basic Steps
Hybrid In-Path and Out-of-Path Deployment
Server-Side
Client-Side
Setup Optimization Service In-Path Rules
Basic Steps Server-Side
OUT-OF-PATH Network Deployments
Introduction to Connection Forwarding
Configuring Connection Forwarding
Connection Forwarding in an Asymmetric Network
Neighbors Connection Forwarding
One-to-One Failover Deployment
Configuring Connection Forwarding
Management Console
Configuring Connection Forwarding Using
‹ Click Update Settings
Forwarding
Configuring Connection Forwarding Using the CLI
‹ Symmetric Deployments with PBR, Autodiscovery, and CDP on
Policy-Based Routing Deployments
Overview of CDP
Introduction to PBR
Wccp PBR
How PBR works on a Cisco 6500 Platform Version 12.217d SXB1
Autodiscovery, and CDP on
Asymmetric HP EFS WAN Accelerator Deployments With PBR
Configuring PBR Using
Side router
To configure the client- side HP EFS WAN Accelerator
To configure the client
Configuring PBR Using Management Console
Setup Optimization Service General Settings
Setup Optimization Service In-Path Rules
Basic Steps Client-Side Basic Steps Server-Side
PBR Between VLANs
PBR Between VLANs
To configure the Cisco
To configure the HP
EFS WAN Accelerator
Router
EFS WAN Accelerators
Set of commands
POLICY-BASED Routing Deployments
POLICY-BASED Routing Deployments
Symmetric Deployments with PBR Autodiscovery, and CDP
POLICY-BASED Routing Deployments
Troubleshooting
Wccp Deployments
‹ Troubleshooting on
Introduction to Wccp
Basic Wccp Configuration
Failover Support on
‹ To configure a service group
Wccp CLI Commands
Service group
Accelerator
Basic Wccp Configuration
Connecting
Wccp router
Configuring Client-Side HP
To configure
Accelerator
Configuring Wccp Using the Management Console
To add the Wccp service group to
Enable Wccp on your router
Navigate to the Setup Advanced Networking Wccp Groups
Setup Service, Wccp Groups
To define in-path rules to reach the server- side appliance
Basic Steps Server-Side
Wccp 3640 router
Dual Wccp Deployment
Ip cef
No ip http server
Wccp 6209 router
To configure the server-side HP EFS WAN Accelerator
Additional Wccp Features
To set the password
Security
TCP Port Redirection
Multicast
To change the hashing scheme and assign a weight
To configure specific traffic redirection on the router
Load Balancing
Failover Support
Troubleshooting
Introduction to PFS
Proxy File Service Deployments
PFS Terms
Proxy File Service Description Term
PFS Operating Modes
How Does PFS Work?
PFS
When to Use
When to use Global Mode
To join a domain for
Configuring PFS Using the Management Console
Setup Proxy File Service PFS Configuration
Required
Setup Proxy File Service Shares
Mode Description
To map a share
To synchronize
Initialize a share
Information
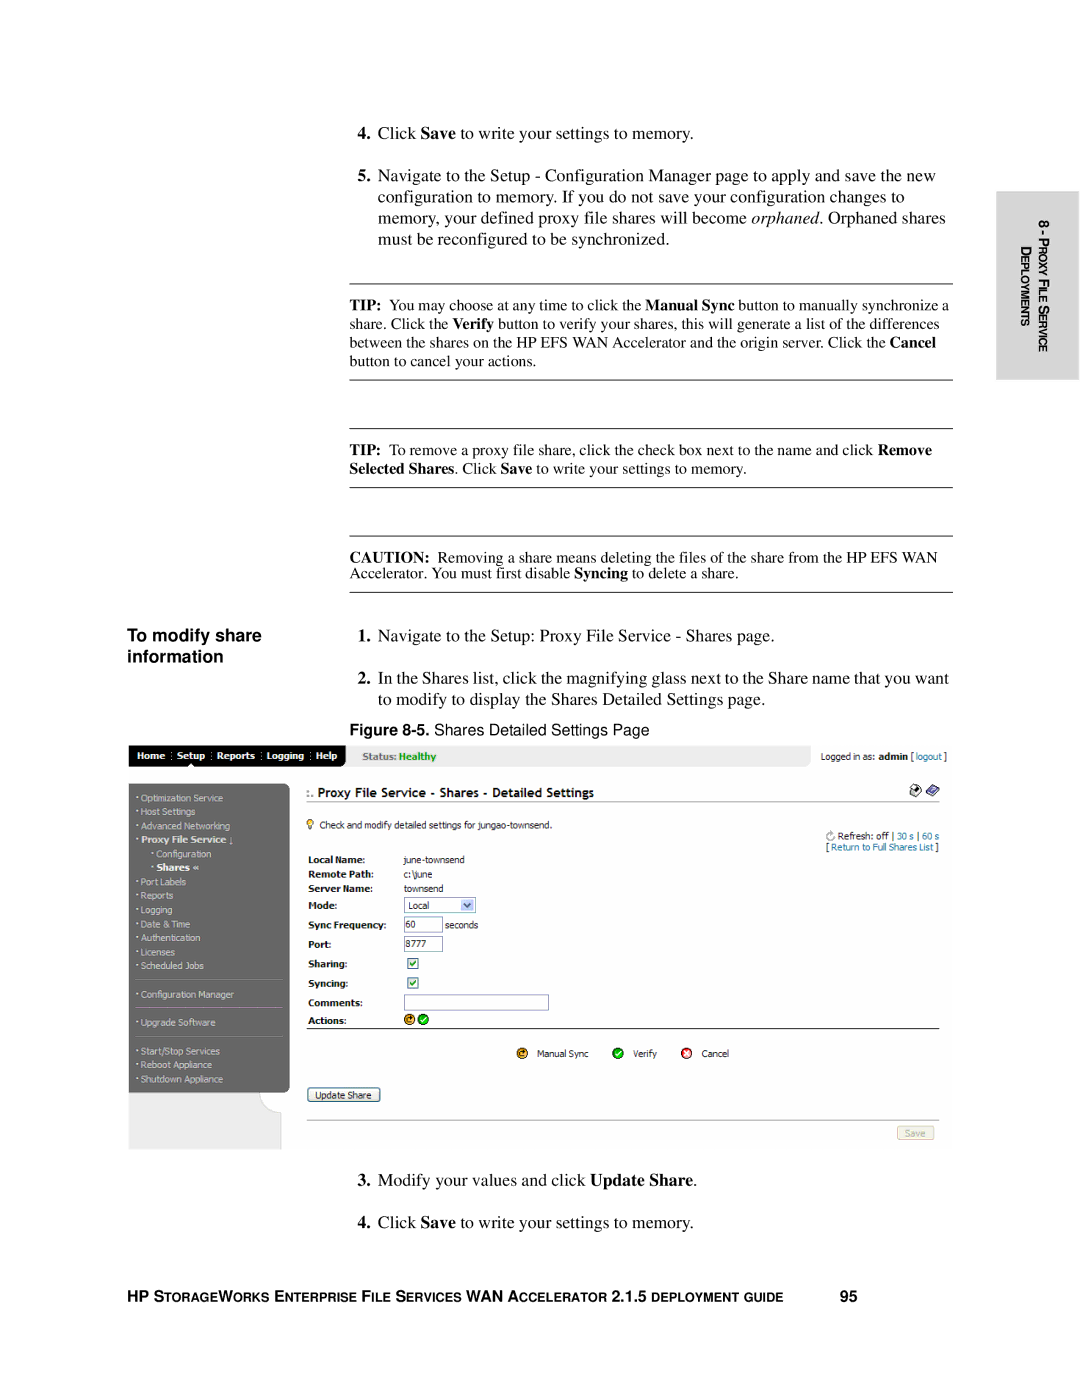
To modify share
Details
To view share status
Introduction to Authentication
Radius and TACACS+ Authentication
Configuring a Radius Server with FreeRADIUS
Radius server
To add acceptance
Requests on
To download
Configuring a TACACS+ Server with Free TACACS+
Authentication
Configuring
Setup Authentication General Settings
TACACS+
104
105
106
Serial Cluster Deployment
Serial Cluster and Cascade Deployments
Serial Cluster
Basic Serial Cluster Deployment
To configure HP EFS WAN Accelerator1
WAN Accelerator3
To configure HP EFS
WAN Accelerator2
Cascade Deployment
Cascade Deployment
Fixed-Target Rules
Glossary
114
115
116
PBR
Index
118

