Manuals
/
HP
/
Computer Equipment
/
Computer Drive
HP
vs80
manual
Understanding the Menu Structure, Operator’s Panel Menu Structure
Models:
vs80
1
28
90
90
Download
90 pages
40.53 Kb
25
26
27
28
29
30
31
32
Page 28
Image 28
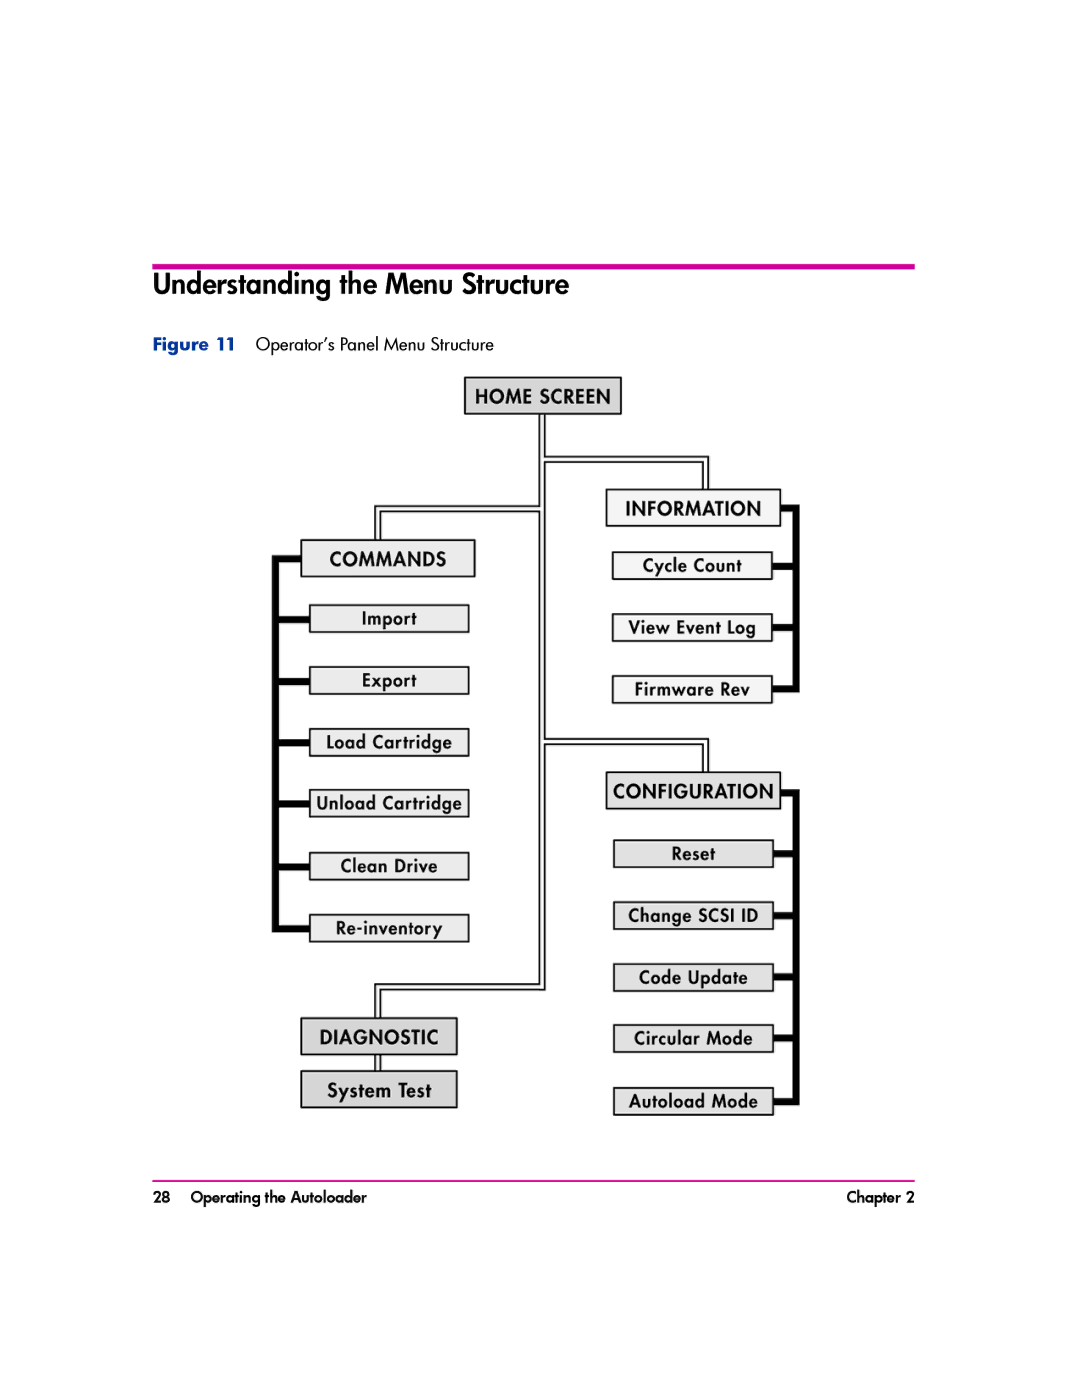
Understanding the Menu Structure
Figure 11
Operator’s Panel Menu Structure
28 Operating the Autoloader
Chapter 2
Page 27
Page 29
Page 28
Image 28
Page 27
Page 29
Contents
Hp StorageWorks Vs80 1/8 autoloader
Updates
Typographical Conventions and Terms
This Manual
Revision History
Contents
Autoloader Administration
Customer Support
Hp StorageWorks vs80 1/8 autoloader
Installing the Autoloader
Chapter Overview
Installation Overview
Understanding Autoloader Features
Scsi Requirements
Product Overview
Chapter Installing the Autoloader
Choosing a Location
On top of the autoloader
Unpacking the Autoloader
Accessories
Identifying Product Components
Rack Kit Components if rackmount unit
Rack Kit Components
Installing the Autoloader into a Rack
Installing Mounting Brackets left side shown
Installing Rails on Rack left side shown
Installing the Autoloader
Connecting the Scsi and Power Cables
Information
Turn on the server
Preparing the Host and Verifying the Connection
Installing the Autoloader
Operating the Autoloader
Operator’s Panel Overview
Home Screen, Drive Loaded
LED Indicators
LED
Operator’s Panel Control Buttons
Button Description
Understanding the Menu Structure
Operator’s Panel Menu Structure
Using Cartridges
Importing Cartridges
Exporting Cartridges
Importing a Cartridge
Loading Cartridges
Exporting a Cartridge
Unloading Cartridges
Indicator
Switch
Write Protected Write Enabled
Write-Protecting Cartridges
Maintaining Cartridges
Cleaning the Tape Drive
To clean the tape drive, follow these steps
Creating an Inventory of Cartridges
Autoloader Administration
Configuring the Autoloader
Resetting the Autoloader
Changing the Scsi ID
Setting the Autoloader Operating Mode
Random Mode
Circular Mode
Autoload Mode
Using HP Library & Tape Tools
Updating Firmware
Using a Firmware Upgrade Tape
Upgrade tape
Running the Autoloader System Test
Cycle Count
Retrieving Information About the Autoloader
View Event Log
Firmware Revision
Diagnostics Troubleshooting
Using HP Library & Tape Tools to Diagnose Problems
Troubleshooting Installation Problems
Scsi ID
Diagnostics and Troubleshooting
Troubleshooting Common Problems
Problem Solution
Media
Write a DLT 4000 formatted tape
Scsi ID
Cleaning
Media Attention LED Issues
See Operator’s Panel Overview on page 24 for more
Removing Stuck Cartridges
Chapter
Diagnostics and Troubleshooting
An extra bump on the outside of the loop. See Figure
Autoloader Error Codes
Error Code Description Details
Configuration menu. See page 38 or power
An empty slot that is expected to be full
Controller timer circuit
Diagnostics and Troubleshooting
Technical Specifications
Appendix Overview
Autoloader Specifications
Characteristic Specification
Environmental Specifications
Temperature/humidity
Tape Drive Specifications
Description DLT1 vs80
Media Specifications
Characteristic DLT Type IV Media
Media Specifications Appendix a
Customer Support
Registering Your Product
Service Options
Contacting HP Customer Support
Backup Software Support
European Customer Support Centers
Asia Pacific Customer Support Centers
Elsewhere
Warranty Information
Warranty Information
Index
DLT
Top
Page
Image
Contents