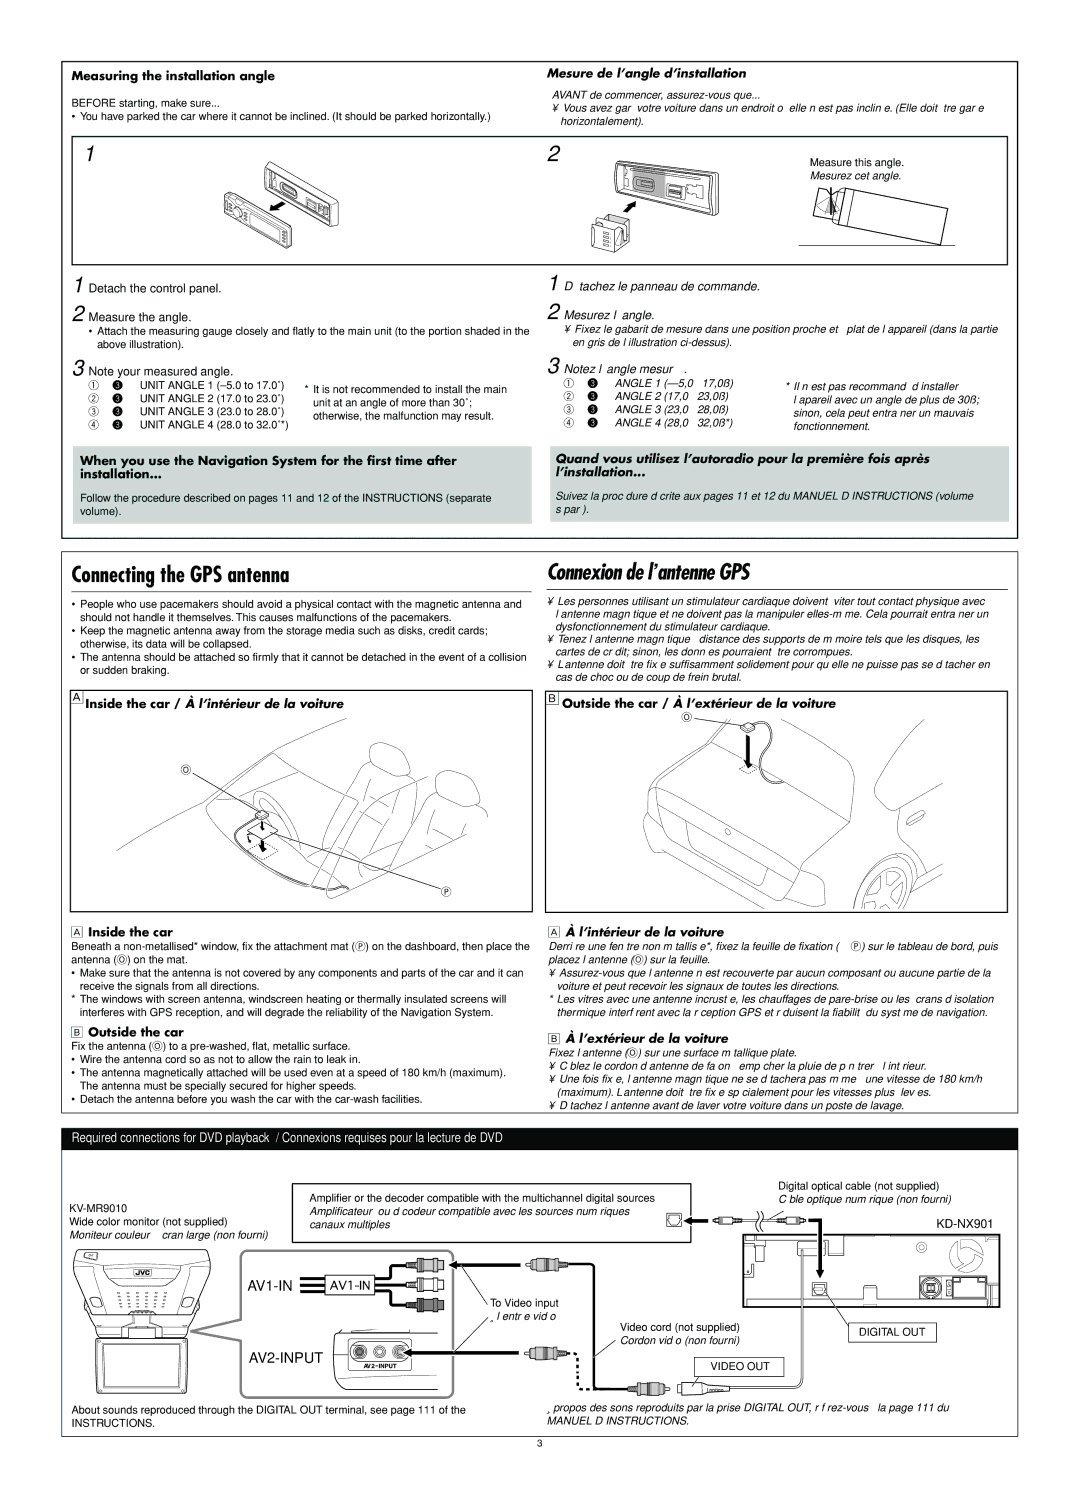
Measuring the installation angle | Mesure de l’angle d’installation |
| |
BEFORE starting, make sure... | AVANT de commencer, |
| |
• Vous avez garé votre voiture dans un endroit où elle n’est pas inclinée. (Elle doit être garée | |||
• You have parked the car where it cannot be inclined. (It should be parked horizontally.) | |||
horizontalement). |
| ||
|
| ||
1 | 2 | Measure this angle. | |
|
| Mesurez cet angle. | |
17˚ 23˚ 28˚ 32˚
![]() : 1 : 2 : 3 : 4
: 1 : 2 : 3 : 4
1
2
Detach the control panel.
Measure the angle.
•Attach the measuring gauge closely and flatly to the main unit (to the portion shaded in the above illustration).
1
2
Détachez le panneau de commande.
Mesurez l’angle.
•Fixez le gabarit de mesure dans une position proche et à plat de l’appareil (dans la partie en gris de l’illustration
3 Note your measured angle.
1\ UNIT ANGLE 1
2\ UNIT ANGLE 2 (17.0 to 23.0˚)
3\ UNIT ANGLE 3 (23.0 to 28.0˚)
4\ UNIT ANGLE 4 (28.0 to 32.0˚*)
*It is not recommended to install the main unit at an angle of more than 30˚; otherwise, the malfunction may result.
3 Notez l’angle mesuré.
1 | \ | ANGLE 1 | * Il n’est pas recommandé d’installer | |||
2 | \ | ANGLE 2 | (17,0 | à 23,0˚) | ||
l’apareil avec un angle de plus de 30˚; | ||||||
3 | \ | ANGLE 3 | (23,0 | à 28,0˚) | ||
sinon, cela peut entraîner un mauvais | ||||||
4 | \ | ANGLE 4 | (28,0 | à 32,0˚*) | ||
fonctionnement. | ||||||
|
|
|
|
| ||
When you use the Navigation System for the first time after
installation...
Follow the procedure described on pages 11 and 12 of the INSTRUCTIONS (separate volume).
Quand vous utilisez l’autoradio pour la première fois après
l’installation...
Suivez la procédure décrite aux pages 11 et 12 du MANUEL D’INSTRUCTIONS (volume séparé).
Connecting the GPS antenna
•People who use pacemakers should avoid a physical contact with the magnetic antenna and should not handle it themselves. This causes malfunctions of the pacemakers.
•Keep the magnetic antenna away from the storage media such as disks, credit cards; otherwise, its data will be collapsed.
•The antenna should be attached so firmly that it cannot be detached in the event of a collision or sudden braking.
ÅInside the car / À l’intérieur de la voiture
O
P
ÅInside the car
Beneath a
• Make sure that the antenna is not covered by any components and parts of the car and it can receive the signals from all directions.
*The windows with screen antenna, windscreen heating or thermally insulated screens will interferes with GPS reception, and will degrade the reliability of the Navigation System.
Connexion de l’antenne GPS
•Les personnes utilisant un stimulateur cardiaque doivent éviter tout contact physique avec l’antenne magnétique et ne doivent pas la manipuler
•Tenez l’antenne magnétique à distance des supports de mémoire tels que les disques, les cartes de crédit; sinon, les données pourraient être corrompues.
•L’antenne doit être fixée suffisamment solidement pour qu’elle ne puisse pas se détacher en cas de choc ou de coup de frein brutal.
ıOutside the car / À l’extérieur de la voiture
O
ÅÀ l’intérieur de la voiture
Derrière une fenêtre non métallisée*, fixez la feuille de fixation (P) sur le tableau de bord, puis placez l’antenne (O) sur la feuille.
•
*Les vitres avec une antenne incrustée, les chauffages de
ıOutside the car
Fix the antenna (O) to a
•Wire the antenna cord so as not to allow the rain to leak in.
•The antenna magnetically attached will be used even at a speed of 180 km/h (maximum). The antenna must be specially secured for higher speeds.
•Detach the antenna before you wash the car with the
ıÀ l’extérieur de la voiture
Fixez l’antenne (O) sur une surface métallique plate.
•Câblez le cordon d’antenne de façon à empêcher la pluie de pénétrer à l’intérieur.
•Une fois fixée, l’antenne magnétique ne se détachera pas même à une vitesse de 180 km/h (maximum). L’antenne doit être fixée spécialement pour les vitesses plus élevées.
•Détachez l’antenne avant de laver votre voiture dans un poste de lavage.
Required connections for DVD playback / Connexions requises pour la lecture de DVD
| Amplifier or the decoder compatible with the multichannel digital sources |
Amplificateur ou décodeur compatible avec les sources numériques à | |
Wide color monitor (not supplied) | canaux multiples |
Moniteur couleur à écran large (non fourni) |
|
AV1-IN 


To Video input À l’entrée vidéo
Digital optical cable (not supplied)
Câble optique numérique (non fourni)
AV2-INPUT
Video cord (not supplied) ![]() Cordon vidéo (non fourni)
Cordon vidéo (non fourni)
VIDEO OUT
DIGITAL OUT
About sounds reproduced through the DIGITAL OUT terminal, see page 111 of the | À propos des sons reproduits par la prise DIGITAL OUT, |
INSTRUCTIONS. | MANUEL D’INSTRUCTIONS. |
3