User’s Manual
Introduction
IBM Program License Agreement
Iii
Typeface Trademark Acknowledgement
FCC statement
Conforming to the Class B limits
Safety information
Interface connectors
Viii
Ozone concentration
Important Safeguards
Declaration of Conformity U.S.A
According to Council Directive 89/336/EEC and 73/23/EEC
CE Marking Directive
Declaration of Conformity Australia
Xiii
Canadian Department of Communications compliance statement
Safety & EMI Requirements
ISO
Moving the Printer
Disclaimer
Prolonged Non-Use and Moving the Printer
Prolonged Non-use
Xvi
Minutes 60 minutes
Initial sleep mode setting Power consumption
Energy Star program guideline
Kyocera ECO-PRODUCT
Amorphous silicon drum
Introduction
Superb print quality
Ultra long life modules
Scalable printing
High speed printing
Environmentally benign waste parts
Large paper capacity cassettes
Display of printer messages in any of three languages
Wide variety of internal symbol sets
Kpdl Kyocera Printer Description Language
Automatic rotation of fonts and graphics
Kyocera Print Monitor
Large memory capacity
Equipped with two expansion slots
Supports various network environments
Contents
Index
Mode Select Menu
Chapter Installing the Printer
Clearance
Positioning the Printer
Places to Avoid
Frequency
Basic requirements
Current capacity
Power Supply
List of shipped components
Unpacking and Inspection
Installing the Page Printer
Front View
Names of Parts
Interior View Rear View
Setting Up and Interfacing
Open the Top Cover
Install the Toner Container
Sealing strip
Close the Top Cover
Install the Waste Toner Bottle
Installing the Page Printer
Adjusting the Paper Guides of the Paper Cassette
Open the cassette cover
Paper stopper
Add Paper
Paper Cassette
Set the clips at the two corners as shown below
Close the paper cassette cover
Install the Face-up Output Tray sold separately
Connect the Printer to the Computer
Serial interface
Parallel interface
Serial Interface Connection
Print a Status
Attach the Power Cord
Test the Interface with the Computer
Install the Printer Driver
Set the Emulation Mode
Windows
Installing the Page Printer
Windows
Multi-Purpose Tray Feeding
Feeding from the Multi-Purpose Tray and Associated Settings
Withdraw the sub tray as shown in the diagram
Load the paper
First Mode Automatic Manual Feeding
Setting Each Mode
Cassette mode
Manual mode
Overhead Projection OHP Film
Feeding Envelopes
To insert and use a memory card
Memory Card
To remove the memory card
Handling Memory Cards
Printing condition Resolution 300 dpi 600 dpi
Memory Expansion Installation
Withdrawing the Main Circuit Board from the Printer
Removing the Main Circuit Board
Simm to be used
Installing SIMMs
Installing and Removing SIMMs
Removing SIMMs
Testing the Expansion Memory
Chapter Operating Laser Printer
Control Panel
Message Meaning
Message Display
Resolution Indicator
Interface Indicator
Copy Indicator
Paper Size Indicator
Indicator Name Description
Symbolic Indicators
Key Function
Control Keys
Selects the cassette feed or multi purpose tray feed
Operating Precautions
Operating Procedures
Switching Power On
Basic Printing Operations
Selecting the Output Tray
Feed Selection
Switching Online/Offline
Canceling Printing
Status Printout
Sample Status
Information
Installation Options
Software version
Hardware information
KIR test pattern
Fonts at startup for each interface
User font list
Form Feed
Mode Selection
Mode Selection Menu List
Mode Selection Menu
Menu Description Default Setting
Selects the print font Bitmap
Duplex mode
Display Description
Configuring Interfaces
Parallel Interface Mode
Parallel Interface Mode
KC-GL Emulation
Emulation Selection
DisplayDescription
Reduction Page Set
Source Size-Target Size Combinations
Sleep Timer Setting
Selecting Sleep Timer Mode
Dumping Received Data
Selecting Dump Received Data Mode
KIR Level
Status KIR Checking Lines
Selecting KIR Mode
Selecting Ecoprint Mode
Ecoprint Mode
Resource Protection
Selecting Resource Protection Mode
Selecting Print Density Mode
Adjusting the Print Density
Setting the Audio Warning Buzzer
Priority Error Message Alarm Frequency Remark
Type of Error and Corresponding Audio Alarm Buzzer
Selecting Buzzer Mode
Inserting Memory Cards
Memory Cards
Operating a Memory Card
Reading Fonts from a Memory Card
Reading Macros from a Memory Card
Reading Data Partitions from a Memory Card
Writing Data Partitions to a Memory Card
Operating the Laser Printer
Formatting Memory Cards
Deleting Data from a Memory Card
Operating the Laser Printer
Printing a List of Data Names Partitions
Chapter Fonts
Bitmap fonts
Resident Fonts
Scalable fonts
Kpdl Fonts
List of Fonts
Resident Scalable Fonts
Resident Scalable Fonts
Kpdl Fonts
Fonts
Symbol set
Symbol set
Bitmap Fonts Symbol sets
Sset value
Scalable Fonts Symbol sets
Sset ID
Chapter Maintenance
Toner kit replacement interval
Toner Kit Replacement
Supplying Toner
Toner Kit to be Used
To replace the toner container, proceed as follows
Plastic Bag
Developer
Maintenance
Replace the Waste Toner Bottle
Cap the waste toner bottle after removing from the printer
New Waste Toner Bottle
Cleaning the Charger Wire
Cleaning
Main Charger Unit
Cleaning the Grid
Main Charge Unit
Paper Feed Unit
Maintenance
Chapter Troubleshooting
If the printer does not print
General Guide
If the printing is abnormal
Call for the assistance of a service person
Power Problems
Check the power switch
Check the power cord
Check your file and software
Interface Problems
Try using a different cable
Check the interface network cable
Check the developer unit
Print Quality Problems
Completely blank printout
All-black printout
Check the control panel
Clean the charger wire
Dropouts, horizontal streaks, stray dots
Black or white vertical streaks
Image is smeared
Check the Ecoprint setting See Section
Faint or blurred printing
Grey background
Section Clean the main charger wire
Check the main charger unit installation
See Section Call for the assistance of a service person
Check the transfer roller
Dirt on the top edge or back of the paper
Characters out of position
Check the paper chute and the ramp
Indicators
Indicators and Messages
Symbolic Indicators Condition Corrective Action
Maintenance Messages Corrective Action
Maintenance Messages
Message Corrective Action
Mechanical error n=0, 1, 2, ...-Call a service person.
Error Messages Corrective Action
Error Messages
Cancel key
You have inserted the wrong memory card when the Insert
Section
Capacity of the memory card is insufficient. This error
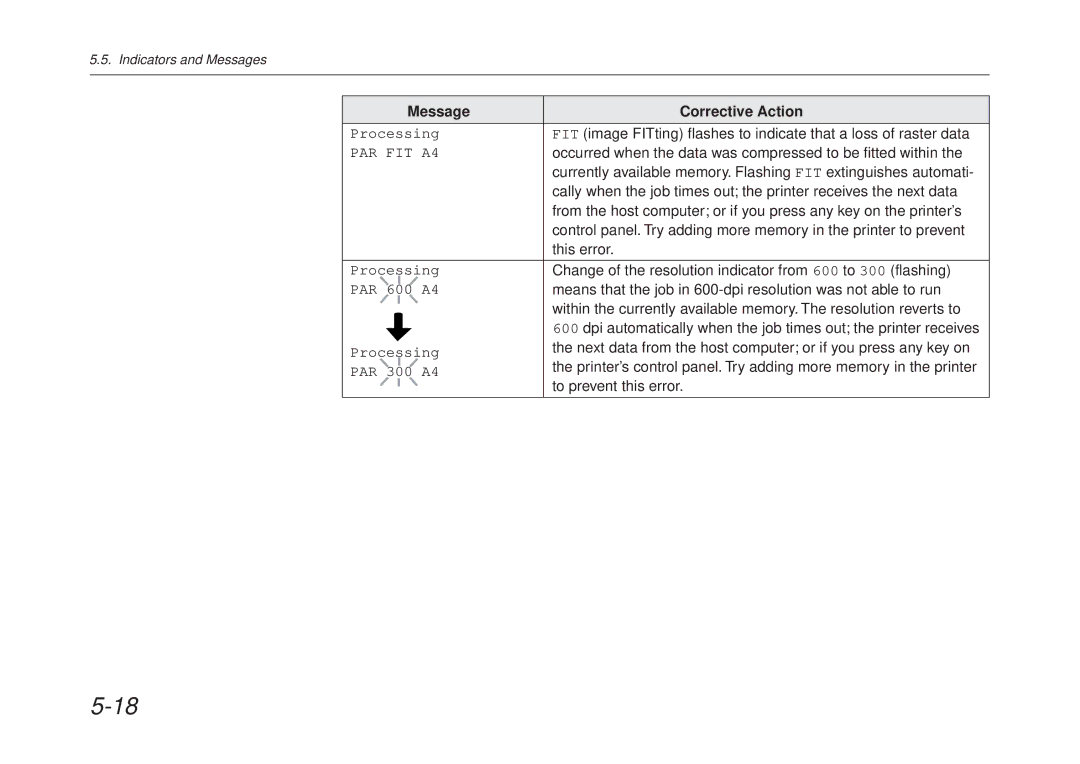
Occurred when the data was compressed to be fitted within
Return the paper feed unit to the printer
Correcting a Paper Jam
Correcting a Paper Jam
Paper Cassette
Correcting a Paper Jam
Chapter Symbol Set Tables
LaserJet 5M HP Roman-8 8U LaserJet 5M ECMA-94 Latin 1 0N
HP LaserJet 5M Symbol Sets
Symbol Set Tables
LaserJet 5M IBM PC-850 12U
LaserJet 5M IBM PC-8 D/N 11U
LaserJet 5M Dutch801-RomanSWM 6N LaserJet 5M PS Math 5M
LaserJet 5M PS Text 10J LaserJet 5M Math8 8M
LaserJet 5M Pi Font 15U LaserJet 5M MS publishing 6J
LaserJet 5M Windows 9U LaserJet 5M Desktop 7J
LaserJet 5M ISO Latin 2 2N LaserJet 5M ISO Latin 5 5N
HP LaserJet 5M Symbol Sets
Symbol Set Tables
HP LaserJet 5M Symbol Sets
LaserJet 5M PC-852 Latin 2 17U LaserJet 5M PC-Turkish 9T
Macintosh 12J
ISO-6 US Ascii ISO-4 UK
LaserJet 5M International Characters 123 124 125 126
Appendix a Printer Specifications
IPX/SPX, TCP/IP, DLC
Printer Specifications
Description
Appendix B Paper Selection
Usable Paper
General Guidelines
Table B.1. Paper Specifications
Paper Specifications
Condition of the Paper
Selecting the Right Paper
Composition
Table B.2. Paper Sizes for Paper Feeding
Paper Size
Smoothness
Basis Weight
Thickness
Moisture Content
Quality control
Stiffness
Curl
Electrostatic properties
Specially treated paper
Special Paper
Colored Paper
Table B.3. OHP Film Specifications
Preprinted Paper Overhead Projection OHP Film
Envelopes
Postcards
Labels
Table B.4 Adhesive Label Specifications
Appendix C Host Computer Interface
Parallel interface communication modes
Parallel Interface
Interface Signals
Strobe* nStrobe Pin
Pin In/out Description
Busy Busy Pin
Data 0 1 to Data 7 8 Pins 2 to
Paper Empty PError Pin
Acknowledge* nAck Pin
Prime nInit Pin
Error* nFault Pin
Power Ready Pin
+5V DC Pin
FG Frame Ground Pin
Interface Signals
Serial RS-232C/RS-422A Interface
RS-232C interface
CTS Clear To Send Pin DSR Data Set Ready Pin
SG Signal Ground Pin
RXD Receive Data Pin
RTS Request To Send Pin
Removing the Main Circuit Board
RS-422A interface
Withdrawing the Main Circuit Board from the Printer
Changing the Jumper Connector
Table C.3. RS-422A Signal Pin Assignments In/out Description
Verifying the Setting
RDA Receive Data Inverted Pin RDB Receive Data Pin
Overview of Signals RS-422A
Serial Connector
RS-422A interface voltage levels
H3 Stop bits
RS-232C/RS-422A Protocol
H1 Baud rate Parameter value
H2 Data bits
H5 Protocol logic Parameter value Meaning
H4 Parity Parameter value Meaning
H6 Buffer nearly-full threshold
H7 Buffer nearly-empty threshold
Prescribe IIe Frpo D0 command
Serial interface error
Error not handled
Preparing an RS-232C Cable
RS-232C Cable Connection
Connecting the Printer to the Computer
To test the interface, then enter
Index
INDEX-2
INDEX-3
Mode Selection
Mode Select Menu
Depending on the emulation selected, the following
From previous