OPERATION | ||
|
|
Return to Section TOC
Return to Section TOC
4.AUTO KEY: Press for automatic welding set up of recommended Wire Speed and Arc Voltage based on Metal Thickness selected.
ARROW KEY OPERATION WHEN USED WITH AUTO KEY:
See Table B.1.
Left Arrow Keys: Press to change the metal thickness displayed. Press the UP (![]() )arrow key to increase metal thickness. Press the DOWN (
)arrow key to increase metal thickness. Press the DOWN (![]() ) arrow key to decrease the metal thickness. Increasing or decreas- ing metal thickness automatically increases or decreases both wire feed speed (IPM) and arc voltage (VOLTS) simultaneously. See gauge chart on the instruction label on the inside of
) arrow key to decrease the metal thickness. Increasing or decreas- ing metal thickness automatically increases or decreases both wire feed speed (IPM) and arc voltage (VOLTS) simultaneously. See gauge chart on the instruction label on the inside of
Center Arrow Keys: Press to change wire feed speed setting. Press the UP (![]() ) arrow key to increase the wire feed speed setting displayed. Press the DOWN (
) arrow key to increase the wire feed speed setting displayed. Press the DOWN (![]() ) arrow key to decrease the wire feed speed setting displayed. Increasing or decreasing the wire feed speed simultaneously causes an increase or decrease in the arc voltage and can change the metal thickness setting.
) arrow key to decrease the wire feed speed setting displayed. Increasing or decreasing the wire feed speed simultaneously causes an increase or decrease in the arc voltage and can change the metal thickness setting.
ARROW KEY OPERATION WHEN USED WITH MANUAL KEY:
See Table B.1.
Left arrow keys: Do not function in Manual mode.
Center arrow keys: Press the UP (![]() ) arrow key to increase wire feed speed. Press the DOWN (
) arrow key to increase wire feed speed. Press the DOWN (![]() ) arrow key to decrease wire feed speed.
) arrow key to decrease wire feed speed.
Right arrow key: Press the UP ( ![]() ) arrow key to increase arc voltage. Press the DOWN (
) arrow key to increase arc voltage. Press the DOWN (![]() ) arrow key to decrease arc voltage.
) arrow key to decrease arc voltage.
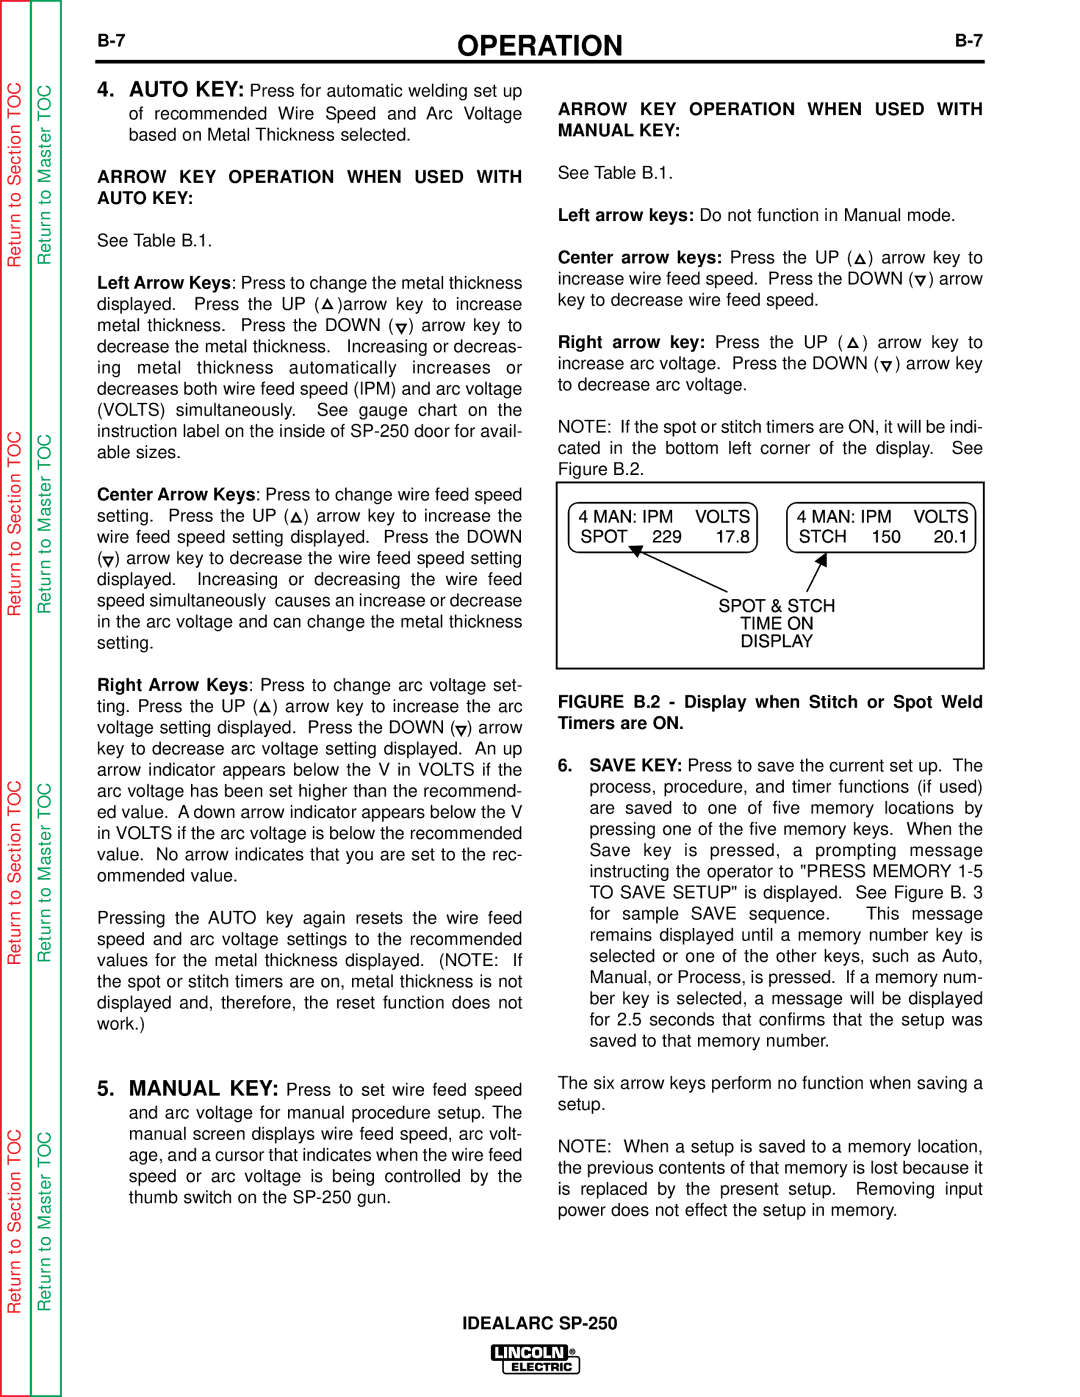
NOTE: If the spot or stitch timers are ON, it will be indi- cated in the bottom left corner of the display. See Figure B.2.
Return to Section TOC
Return to Section TOC
Return to Master TOC
Return to Master TOC
Return to Master TOC
Return to Master TOC
Right Arrow Keys: Press to change arc voltage set- ting. Press the UP (![]() ) arrow key to increase the arc voltage setting displayed. Press the DOWN (
) arrow key to increase the arc voltage setting displayed. Press the DOWN (![]() ) arrow key to decrease arc voltage setting displayed. An up arrow indicator appears below the V in VOLTS if the arc voltage has been set higher than the recommend- ed value. A down arrow indicator appears below the V in VOLTS if the arc voltage is below the recommended value. No arrow indicates that you are set to the rec- ommended value.
) arrow key to decrease arc voltage setting displayed. An up arrow indicator appears below the V in VOLTS if the arc voltage has been set higher than the recommend- ed value. A down arrow indicator appears below the V in VOLTS if the arc voltage is below the recommended value. No arrow indicates that you are set to the rec- ommended value.
Pressing the AUTO key again resets the wire feed speed and arc voltage settings to the recommended values for the metal thickness displayed. (NOTE: If the spot or stitch timers are on, metal thickness is not displayed and, therefore, the reset function does not work.)
5.MANUAL KEY: Press to set wire feed speed and arc voltage for manual procedure setup. The manual screen displays wire feed speed, arc volt- age, and a cursor that indicates when the wire feed speed or arc voltage is being controlled by the thumb switch on the
FIGURE B.2 - Display when Stitch or Spot Weld Timers are ON.
6.SAVE KEY: Press to save the current set up. The process, procedure, and timer functions (if used) are saved to one of five memory locations by pressing one of the five memory keys. When the Save key is pressed, a prompting message instructing the operator to "PRESS MEMORY
for sample SAVE sequence. This message remains displayed until a memory number key is selected or one of the other keys, such as Auto, Manual, or Process, is pressed. If a memory num- ber key is selected, a message will be displayed for 2.5 seconds that confirms that the setup was saved to that memory number.
The six arrow keys perform no function when saving a setup.
NOTE: When a setup is saved to a memory location, the previous contents of that memory is lost because it is replaced by the present setup. Removing input power does not effect the setup in memory.
