Adjusting the picture (continued)
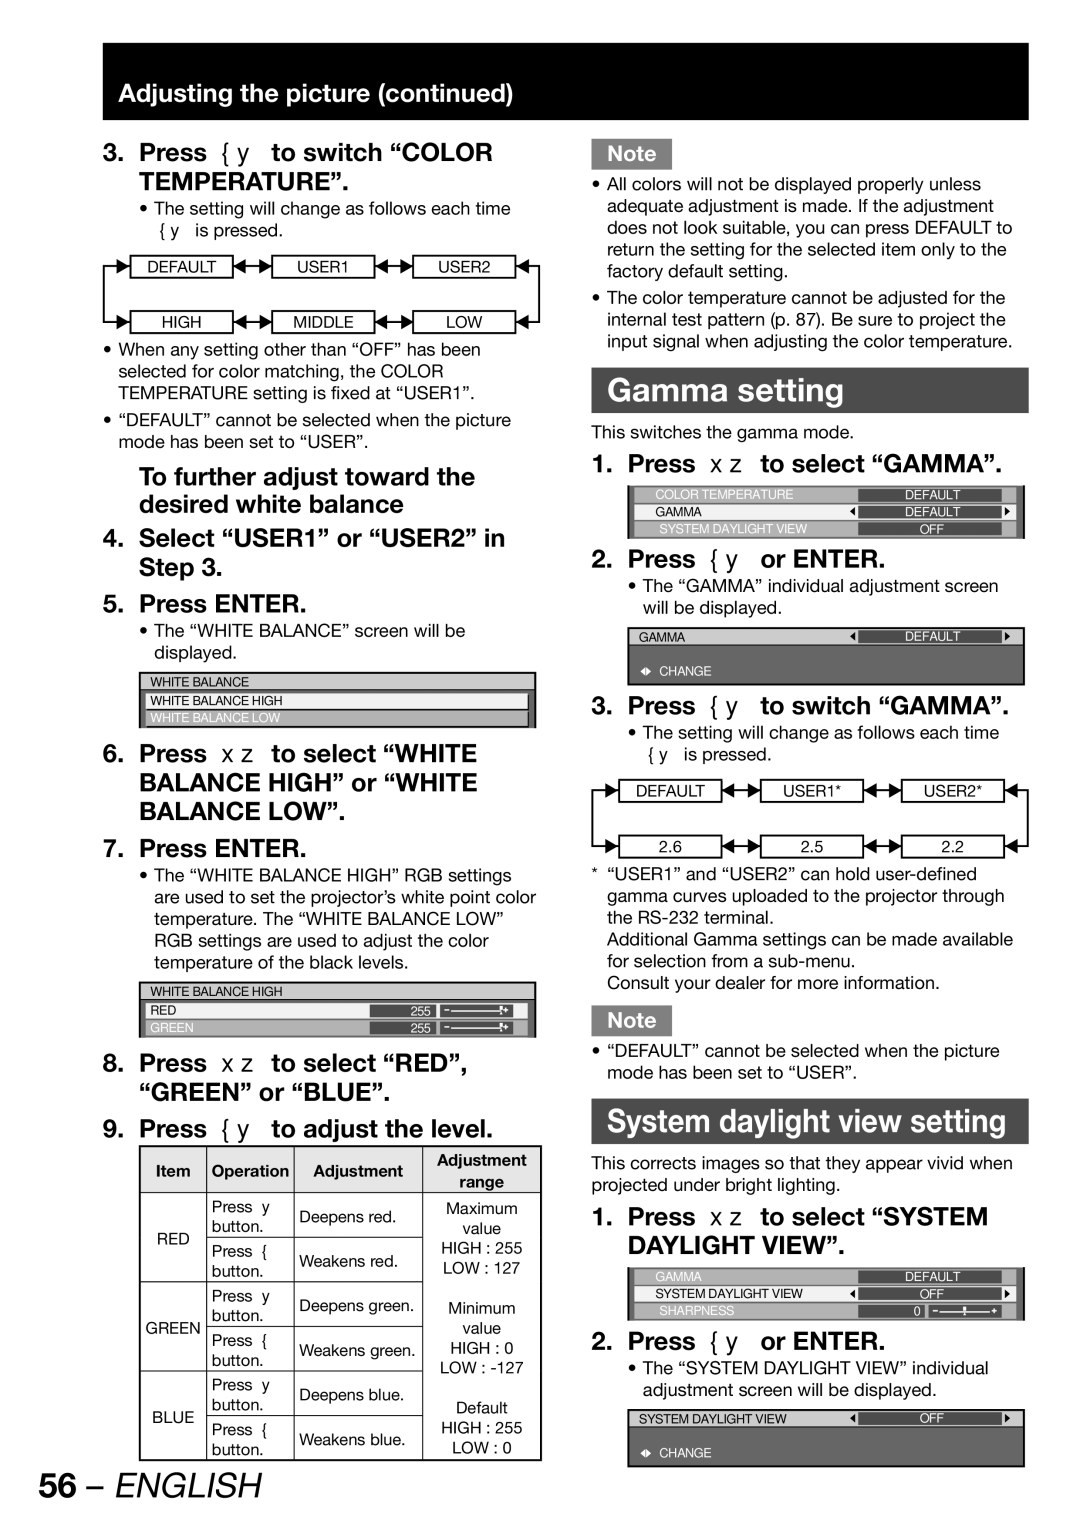
3.Press ◄► to switch “COLOR TEMPERATURE”.
•The setting will change as follows each time ◄► is pressed.
DEFAULT ![]()
![]() USER1
USER1 ![]()
![]() USER2
USER2
| HIGH |
| MIDDLE |
| LOW |
|
|
|
|
|
•When any setting other than “OFF” has been selected for color matching, the COLOR TEMPERATURE setting is fixed at “USER1”.
•“DEFAULT” cannot be selected when the picture mode has been set to “USER”.
To further adjust toward the desired white balance
4.Select “USER1” or “USER2” in Step 3.
5.Press ENTER.
•The “WHITE BALANCE” screen will be displayed.
WHITE BALANCE
WHITE BALANCE HIGH
WHITE BALANCE LOW
6.Press ▲▼ to select “WHITE BALANCE HIGH” or “WHITE BALANCE LOW”.
7.Press ENTER.
•The “WHITE BALANCE HIGH” RGB settings are used to set the projector’s white point color temperature. The “WHITE BALANCE LOW” RGB settings are used to adjust the color temperature of the black levels.
WHITE BALANCE HIGH
RED | 255 |
|
|
GREEN | 255 |
|
|
|
|
|
|
8.Press ▲▼ to select “RED”, “GREEN” or “BLUE”.
9.Press ◄► to adjust the level.
Item | Operation | Adjustment | Adjustment | |
range | ||||
|
|
| ||
| Press ► | Deepens red. | Maximum | |
RED | button. |
| value | |
Press ◄ | Weakens red. | HIGH : 255 | ||
| ||||
| LOW : 127 | |||
| button. |
| ||
| Press ► | Deepens green. | Minimum | |
GREEN | button. |
| value | |
Press ◄ |
| |||
| Weakens green. | HIGH : 0 | ||
| button. |
| LOW : | |
| Press ► | Deepens blue. | ||
| Default | |||
BLUE | button. |
| ||
Press ◄ | Weakens blue. | HIGH : 255 | ||
| ||||
| LOW : 0 | |||
| button. |
|
Note
•All colors will not be displayed properly unless adequate adjustment is made. If the adjustment does not look suitable, you can press DEFAULT to return the setting for the selected item only to the factory default setting.
•The color temperature cannot be adjusted for the internal test pattern (p. 87). Be sure to project the input signal when adjusting the color temperature.
Gamma setting
This switches the gamma mode.
1. Press ▲▼ to select “GAMMA”.
| COLOR TEMPERATURE | DEFAULT |
|
|
| GAMMA | DEFAULT |
|
|
| SYSTEM DAYLIGHT VIEW | OFF |
|
|
|
|
|
|
|
2.Press ◄► or ENTER.
•The “GAMMA” individual adjustment screen will be displayed.
GAMMA | DEFAULT |
|
![]() CHANGE
CHANGE
3.Press ◄► to switch “GAMMA”.
•The setting will change as follows each time ◄► is pressed.
DEFAULT ![]()
![]() USER1*
USER1* ![]()
![]() USER2*
USER2*
| 2.6 |
| 2.5 |
| 2.2 |
|
|
|
|
|
*“USER1” and “USER2” can hold
Additional Gamma settings can be made available for selection from a
Consult your dealer for more information.
Note
•“DEFAULT” cannot be selected when the picture mode has been set to “USER”.
System daylight view setting
This corrects images so that they appear vivid when projected under bright lighting.
1. Press ▲▼ to select “SYSTEM DAYLIGHT VIEW”.
| GAMMA | DEFAULT |
|
| |
| SYSTEM DAYLIGHT VIEW | OFF |
|
| |
| SHARPNESS | 0 |
|
|
|
|
|
|
|
|
|
2.Press ◄► or ENTER.
•The “SYSTEM DAYLIGHT VIEW” individual adjustment screen will be displayed.
SYSTEM DAYLIGHT VIEW | OFF |
|
![]() CHANGE
CHANGE