Iolan SDS/SCS/STS
EN 55022 1998, Class A, Note
Table of Contents
Configuration Methods
DHCP/BOOTP
Getting Started
Network Settings
Configuring Serial Ports
UDP Sockets Profile 132
Remote Access Slip Profile 179
Configuring Users
Configuring Security
Configuring I/O Interfaces
Channels
UDP
Configuring Clustering
Controlling the RPS, I/O Channels,
System Administration
Applications
Appendix B SSL/TLS Ciphers
Appendix E Setting Jumpers 361
Appendix G Utilities
Appendix I Troubleshooting
Index
Glossary
About This Book
Preface
Intended Audience
Documentation
Online Help
Typeface Conventions
About the Iolan
Introduction
Iolan Family Models
Hardware
Iolan Features
Software
Ldap
Security
Introduction
Connectivity
Iolan Components
What’s Included
Available Accessories
Power Supply Specifications
Power Over Ethernet PoE Models
Desktop Models
AC Power Requirements
DC Power Requirements
Getting to Know Your Iolan
Rack Mount Models
Serial Activity
Port
Port
End View
Top View
Console Port/LED View
Rack Mount
Serial/Ethernet View
Console Mode
Console/Serial Switch
Serial Mode
Dedicated Console Port Rack Mount Models
Desktop/Rack Mount Models
Powering Up the Iolan
Models
Earthing Wire
DC Power Models
Primary Supply
Secondary back-up Supply
Disconnecting 48V Power Supplies from the Iolan
Powering Up the Iolan
Configuration Methods Chapter
Configures an IP Address
Configuration Methods Overview
Requires a Configured IP Address
Easy Config Wizard
Unique Features
Access Platforms
Connecting to the Iolan Using DeviceManager
DeviceManager
DeviceManager
Using DeviceManager
WebManager
Iolan
Connecting to the Iolan Using WebManager
Using WebManager
Connecting to the Iolan Using the CLI
Command Line Interface
Through the Network
Connecting to the Iolan Using the Menu
Using the CLI
Menu
Through the Serial Port
Using the Menu
Using DHCP/BOOTP
Connecting to the Iolan Using DHCP/BOOTP
TACACS+ Securid
DHCP/BOOTP Parameters
Snmp
Connecting to the Iolan Using Snmp
Using the Snmp MIB
Using the IOLAN+ Interface
Connecting to the Iolan to Use the IOLAN+ Interface
IOLAN+ Interface
Changes to the IOLAN+ Interface
REMOTE-ADMIN
Opt HEX Rlogin/Telnet
Remote Access Systems Screen
Name Wchiewsds2 Debug mode IP address
IOLAN+ Interface
Getting Started
Easy Configuration Wizard
Setting Up the Network
Using a Direct Serial Connection to Specify an IP Address
Using a Direct Serial Connection to Enable BOOTP/DHCP
For an IPv6 Network
Using ARP-Ping
Setting Up the Serial Ports
Setting Up the Serial Ports
Setting Up Users
Using DeviceManager WebManager
DeviceManager
Navigating DeviceManager/WebManager
EasyPort Web
WebManager
Starting a New Session
Using DeviceManager to Connect to the Iolan
Assigning a Temporary IP Address to a New Iolan
Logging in to the Iolan
Adding/Deleting Manual IOLANs
Configuration Files
Using WebManager to Connect to the Iolan
Creating a New Iolan Configuration in DeviceManager
Logging into the Iolan
Importing an Existing Configuration File
Opening an Existing Configuration File
Managing the Iolan
Network Settings
IPv4 Settings
IP Settings
Overview
Field Descriptions
IPv6 Settings
IPv6
Autoconfiguration
DHCPv6
Custom IPv6
Adding/Editing a Custom IPv6 Address
Prefix Bits Range Default
Server Name.Domain Prefix.Domain Name
Advanced
Default 200 ms
Default 100 ms
Default Disabled Advertise DHCPv6
Configuration
Host Table
Advanced
Functionality
IP Filtering Data Options
Host Name
Adding/Editing a Host
Fully Qualified
Domain Name
Route List
Adding/Editing Routes
Default Default
Type
IPv4 Subnet Mask
DNS/WINS
Editing/Adding DNS/WINS Servers
RIP
Default None
Ethernet Mode
Authentication
Password
Overview Functionality
Dynamic DNS
End Time
Key
Default Dynamic
Account Settings
User Name
System Type
Cipher Suite Field Descriptions
Adding/Editing a Cipher Suite
Validation Criteria Field Descriptions
Common Name
IPv6 Tunnels
Adding/Editing an IPv6 Tunnel
Default Manual
Name
Mode
102 Iolan SDS/SCS/STS User’s Guide, Version
Functionality
Serial Ports
Editing a Serial Port
Copying a Serial Port
Serial Port Profiles
Resetting a Serial Port
Common Tabs
Hardware Tab Field Descriptions
Default Auto Flow Control
Default Full
Enable Inbound
Flow Control Default Enabled Enable Outbound
Email Alert Tab Field Descriptions
Packet Forwarding Tab Field Descriptions
Enable Trigger2
Enable Trigger1
Packet Definition
Packet Size
EOF1 Character
Default Trigger
EOF2 Character
Trigger
Default Client
SSL/TLS Settings Tab Field Descriptions
114 Iolan SDS/SCS/STS User’s Guide, Version
115
116 Iolan SDS/SCS/STS User’s Guide, Version
Console Management Profile
Default Telnet
General Tab Field Descriptions
Protocol
Advanced Tab Field Descriptions
Administrator
Enable Microsoft
Support Default Disabled Multisessions
Idle Timeout
Modem
TruePort Profile
Phone
Connect to remote
System Default Enabled Host Name
Connect to
Multiple Hosts
Adding/Editing Additional TruePort Hosts
Host and backup
Hosts to connect to
Define a primary
Adding/Editing a Multihost Entry
Backup Host
Primary Host
Day Motd Default Disabled Enable TCP
Signals high
When
Session Timeout
Enable Data
Logging
TCP Sockets Profile
Connection Workstation/Server on the network Default Enabled
Received on the serial port
Initiate Connection
Adding/Editing Additional Hosts
129
Day Motd Default Disabled Enable Data
131
UDP Sockets Profile
Start IP Address
UDP port Direction
End IP Address
Terminal Profile
Default 0 zero
UDP Port
VT100
Default Dumb
TVI925
VT320 specifically supporting VT320-7
Is received
Default Disabled Protocol
Data Range
138 Iolan SDS/SCS/STS User’s Guide, Version
Login Settings
User Service Settings
Interrupt
Telnet Settings
Quit
Erase
User is only prompted for a password
Rlogin Settings
Escape
SSH Settings
RSA authentication for the SSH session
Slip Settings
Authentication for the SSH session
Arcfour
VJ Compression
Routing
PPP Settings
IPv6 Remote
Default Chap
None
Remote User
Configure Req
Remote Password
Timeout
Default 3 seconds
Roaming Callback
Default 1 minute
Challenge Interval
Address/Control
Printer Profile
Serial Server Tunnel
Serial Tunneling Profile
Serial
Client Iolan Tunnel
Act As Tunnel
Client Default Disabled Host Name
Virtual Modem Profile
154 Iolan SDS/SCS/STS User’s Guide, Version
DCD
AT Command
DTR Signal Acts as RTS Signal Always On RTS Signal Acts as
Response Delay
Phone Number to Host Mapping
VModem Phone Number Entry
Control Signal I/O Profile
Phone Number
Host IP Address
Invert Signal
Input Signal Field Descriptions
Description
Latch
Mode Default Disabled
Auto Clear Mode
Manual Clear
Syslog
Failsafe Action
Output Signal Field Descriptions
Modbus Gateway Profile
Destination Slave
Settings Button UID Range
IP Mappings
Advanced Slave
Default 1000 ms
Default 30 ms
Advanced Field Descriptions
Modbus Slave IP Settings Field Descriptions
Default Host
Adding/Editing Modbus Slave IP Settings
UID Start
UID End
Default TCP
Modbus Slave Advanced Settings Field Descriptions
Range Default 50 ms
Data Options TCP or UDP
Power Management Profile
Default RSP820
Editing Power Management Plug Settings Field Descriptions
RPS Name
RPS Model
Default State
Remote Access PPP Profile
Default Off
Data Options On, Off
Negotiate IP
IPv6 Global
Authentication Tab Field Descriptions
174 Iolan SDS/SCS/STS User’s Guide, Version
DNS for this Serial Default Disabled Port Host
Enable Dynamic
Account Settings
Dynamic DNS Field Descriptions
176 Iolan SDS/SCS/STS User’s Guide, Version
Compression Default Enabled Enable Protocol
Configure Request
Enable VJ
Enable Magic
MS Direct Host
Dial In/Out
MS Direct Guest
Remote Access Slip Profile
180 Iolan SDS/SCS/STS User’s Guide, Version
181
General Tab Field Description
Custom Application Profile
Local Port Buffering
Port Buffering
Keyboard Buttons Hot Keys Direction
Remote Port Buffers
Field Definitions
Data Default Disabled Enable Key Stroke
Enable Port
NFS Host
NFS Directory
Signals
Advanced Serial Settings Tab
Process Break
Deny Multiple
Serial Port Menu
Default ~menu
String
Session Escape
Adding/Editing a Modem
Modems Tab
Name Name of the modem
Field Definitions
TruePort Baud Rate Tab
190 Iolan SDS/SCS/STS User’s Guide, Version
Configuring Users
User Settings
General Tab
Adding/Editing Users
Default Normal
Service
Services Tab
Default DSPrompt
Host IP
Indentifier
IPv6 Interface
Advanced Tab
Default English
Sessions Tab
Connect
Session 1, 2, 3
Serial Port Access
Serial Port Access Tab
Allow Access to
Clustered Ports
202 Iolan SDS/SCS/STS User’s Guide, Version
Authentication
Configuring Security
Method Default Local Secondary
Authentication
Primary
Method
Local
General Field Descriptions
Radius
NAS-IP-Address Default Enabled
Authenticator response Default Enabled Retry
Attributes Field Descriptions
NAS-Identifier
Realm
Kerberos
KDC Domain
KDC Port
Base
Enable TLS
TLS Port
Default None Authentication
Authentication Authorization Primary Host Secondary Host
Authorization Port Default Authentication
Primary Host Default None
SecurID
NIS
Device Server
Users Logging into the Iolan Using SSH
Lynn
Tracy
Lynn Sales Server
Users Passing Through the Iolan Using SSH Dir/Sil
HR Server
Field Descriptions
Interactive Default Enabled Password
Allow SSH-1
Keyboard
Output Default Disabled
Enable Verbose
Break String
Button For a valid SSL/TLS connection
218 Iolan SDS/SCS/STS User’s Guide, Version
Adding/Editing a Cipher
220 Iolan SDS/SCS/STS User’s Guide, Version
VPN
ESP Phase 2 Proposals
IKE Phase 1 Proposals
Authentication Algorithms-MD5, SHA1, SHA2
IPsec
Adding/Editing the IPsec Tunnel
Secret/Remote
Default Left
Validation Criteria
Local Device
Shared Secret Field Description
Remote Validation Criteria Field Descriptions
Allow L2TP/IPsec
L2TP/IPsec
Exceptions
Field Description
Adding/Editing a VPN Exception
Telnet Server
Services
TruePort Full
Syslog Client
WebManager
DeviceManager
SSH Server
Sntp Client
Keys and Certificates
Key Type
234 Iolan SDS/SCS/STS User’s Guide, Version
Configuring I/O InterfacesChapter
Access Functionality
Settings
Advanced Slave Modbus Settings
Request Queuing
Default 30 seconds
Failsafe Timer Functionality
Failsafe Action is triggered
Broadcast of I/O Default Disabled Status
Enable UDP
UDP Functionality
UDP Entry
UDP Settings
Default Celsius
Temperature Functionality
Analog
Channels
Monitoring Application A4D2
Analog I/O Analog
Alarm Settings
Default Current
Monitoring Application
Digital Input
Digital I/O
Input Mode
247
Digital Output
Default Sink
Output Mode
Output
Inactive Signal Width Active Signal Width
Pulse Mode
Delay
Pulse Count
Monitoring Application A4D2Relay
Relay
Relay I/O
Width
Inactive Signal
Digital I/O Extension
Active Signal
Front Door
Warehouse Perle Iolan Reception
Message type 1 Byte
Current Alarm State 1 Byte z 0 = Not in alarm
Input number 1 Byte
Extension
Enable I/O
Input TCP Port
Local connection
Hosts
Simultaneously
Communicate to the Primary Host
Temperature I/O Industrial Freezers
Temperature
Default RTD
Basic Analog Alarm Settings
Alarm Settings
Clear Mode
Advanced Analog Alarm Settings
Trigger Type
Clear
UDP Broadcast Packet
UDP Unicast Format
Analog Section
Length Enabled
Section Channel
Digital/Relay Section
Serial Pin Signal Section
Length Channel
Length Pin
UDP Unicast Example
Modbus Slave
Modbus Serial Application Connected to the Serial Port
Modbus Serial Application Connected to the Network
Modbus RTU Or Ascii Application Power Digital Output
Modbus I/O Access
Modbus TCP Application
Function Codes
Coil/Register Descriptions
A4/T4 Registers
Serial Port Coil/Register Descriptions
Data Model A1/T1 A2/T2 A3/T3 A4/T4 Holding Registers
Input Registers
Data Model D1/R1 D2/R2 Coils
A4D2/A4R2 Registers
D4/D2R2 Registers
Serial Pin Signals
Data Model D3/R1 D4/R2 Coils
Data Model Pin Coils
TruePort I/O
Modbus Serial Application TruePort Power Digital Output
TruePort/Modbus Combination
PC running Custom Application API TruePort
API Over TruePort Only
Setup
Accessing I/O Data Via TruePort
Introduction
Get Commands
Format of API Commands
Command Format
Response Format
Set Commands
Unsuccessful Response Format
Successful Response Format
Example 1 Turn on the first relay on a D2R2 unit
Example 2 Turn on the first and second relay on a D2R2 unit
Snmp Traps
Error Codes
280 Iolan SDS/SCS/STS User’s Guide, Version
Clustering Slave List
Configuring Clustering Chapter
Advanced Button
Adding Clustering Slaves
Advanced Clustering Slave Options
Editing Clustering Slave Settings
Port Name
Master TCP Port
Slave TCP Port
Option Card Settings
Configuring the Option Card
Configuring the Iolan Modem Card
Overview Field Descriptions
Configuring a Wireless WAN Card
Card
APN
288 Iolan SDS/SCS/STS User’s Guide, Version
Alerts
Configuring the System Chapter
Email Alerts
Alerts
Syslog
Contact
Management
Location
Community
Auth Password
Auth Algorithm Data Options MD5, SHA Default MD5
Default DES
Privacy Password
Privacy Algorithm Data Options DES, AES Default DES
Algorithm Data Options MD5, SHA Default MD5
Confirm Password Trap
Time
Network Time Tab Field Descriptions
Sntp Mode
Sntp Version
Time Zone/Summer Time Tab Field Descriptions
Custom App/Plugin
Login Tab Field Descriptions
Bootup Files Tab Field Descriptions
Tftp Host
Message of the Day Motd Tab Field Descriptions
Filename
Display Motd WebManager/Easy Port Web
Tftp Tab Field Descriptions
Default Flow Control
Console Port Tab Field Descriptions
Baud Rate
302 Iolan SDS/SCS/STS User’s Guide, Version
Controlling the RPS, I/O Channels, and IPsec Tunnels
State Button Management profile settings
RPS Control
OK Button Closes the window
Plug Control
Power Plug Status
Serial Port Power Control
Button Serial port
Deactivate Output Manually deactivates the channel output
IPsec Tunnel Control
308 Iolan SDS/SCS/STS User’s Guide, Version
Managing Configuration Files
System Administration Chapter
Saving Configuration Files
Downloading Configuration Files
Reboot Server
Downloading Configuration Files to Multiple IOLANs
Specifying a Custom Factory Default Configuration
Uploading Configuration Files
Less than 3 seconds-Reboots the Iolan
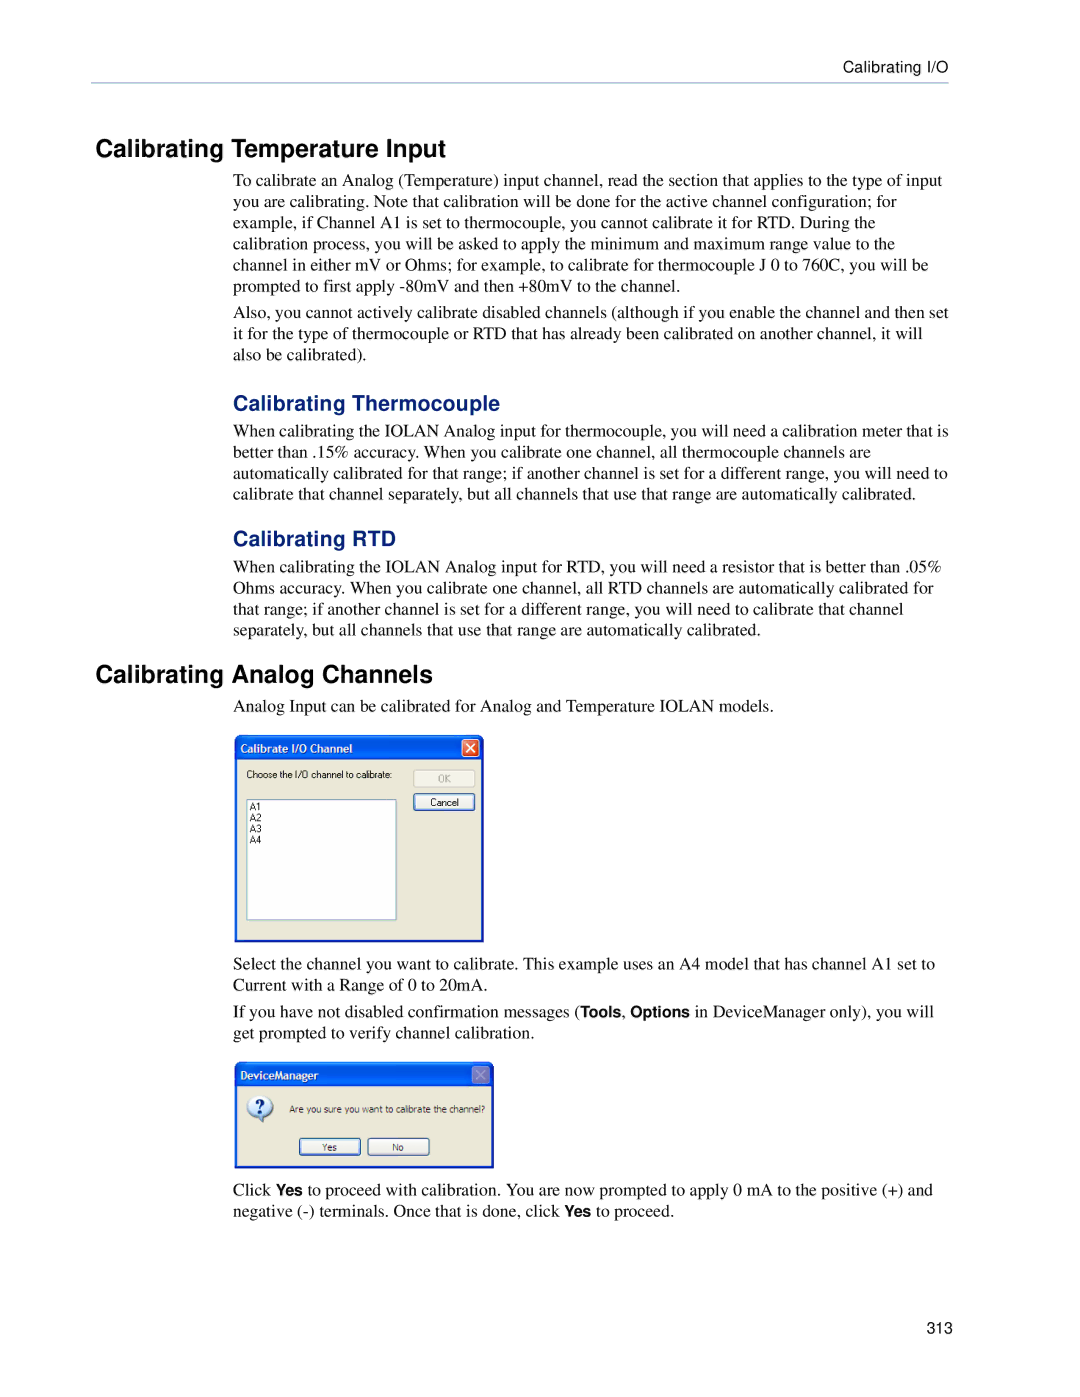
Calibrating I/O
Downloading Iolan Firmware
Calibrating Analog Input
Calibrating Voltage
Calibrating Analog Channels
Calibrating Temperature Input
Calibrating Thermocouple
Calibrating RTD
Resetting Calibration Data
Rebooting the Iolan
Setting the IOLAN’s Date and Time
Resetting the Iolan to Factory Defaults
Language Support
Resetting the SecurID Node Secret
Loading a Supplied Language
Translation Guidance
Software Upgrades and Language Files
Creating Terminal Definition Files
Downloading Terminal Definitions
For example
Resetting Configuration Parameters
Lost Admin Password
Configuring a Master Gateway
Configuring Modbus
Configuring a Slave Gateway
Applications
Modbus Master Gateway
Modbus Gateway Settings
Modbus Slave Gateway
Modbus Master Settings
Modbus Serial Port Settings
Modbus Slave UID
Master Gateway Serial EIA-232
Modbus Master Slave Gateway
Modbus Slave Settings
Serial Port EIA-422/485 Modbus Master Modbus Slave UID
172.16.0.0
Configuring PPP Dial On Demand
Remote Printing Using LPD
Setting Up Printers
Remote Printing Using Host-Based Print Handling Software
Remote Printing Using RCP
IOLAN-to-Host/Network
Configuring a Virtual Private Network
Or just
172.16.45.84 192.168.45.87 192.168.45.12
Network-to-Network
Left External IP Address Right
Host-to-Host
Gateway Router
172.16.45.99
332 Iolan Device Server User’s Guide, Version
VPN Client Initiate Communication Router Broadband Right
VPN Client-to-Network
334 Iolan Device Server User’s Guide, Version
Supported Radius Parameters
Radius and TACACS+ Appendix a
PPP
User level. See Perle Radius Dictionary Example
Accounting Message
Radius Parameter Iolan Parameter
Mapped Radius Parameters to Iolan Parameters
Perle Radius Dictionary Example
Value
TACACS+
Accessing the Iolan Through a Serial Port Users
Name Values Description
Slip
Accessing the Iolan from the Network Users
Accessing the Iolan from the Network User Example Settings
Valid SSL/TLS Ciphers
SSL/TLS Ciphers
DES-CBC-MD5
Virtual Modem Initialization Commands
Commands
AT&Rn
AT&Sn
AT&Cn
Serial Pinouts
Pinouts and Cabling Diagrams
DB25 Male
DB25 Female
RJ45
DB9 Male Serial Only
RJ45 SCS48C/SCS32C/SCS16C/SCS8C
DB9 Male I/O
Power Over Ethernet Pinouts
Terminal DB25 Connector
EIA-232 Cabling Diagrams
DB25 Male
DB25 Female
DB9 Male
RJ45
10-pin Pin
Iolan RJ45 DCE
Modem DB25 Connector
RxD TxD DTR 20 DTR GND
360 Iolan SDS/SCS/STS User’s Guide, Version
Port Iolan DB25 Male/Female
Setting Jumpers
Port Iolan RJ45
Port Iolan RJ45 P Power Over Ethernet
Port Iolan SDS1M Modem
Port Iolan DB9
Port Iolan
Port/Line # Line Termination 5V Output Input Volt Output
Port Desktop Iolan
Digital I/O Module
Analog Input Module
368 Iolan SDS/SCS/STS User’s Guide, Version
Digital I/O
Wiring I/O Diagrams
Digital Input Wet Contact
Digital Input Dry Contact
Digital Output Source
Digital Output Sink
Current
Analog Input
Voltage
RTD 2-Wire
Temperature Input
RTD 3-Wire
Thermocouple
Relay Output
RTD 4-Wire
Normally Open Contact
Normally Closed Contact
374 Iolan SDS/SCS/STS User’s Guide, Version
TruePort
Utilities
API Request Format
API I/O Access Over TruePort
API Response Format
Decoder
Error Codes
378 Iolan SDS/SCS/STS User’s Guide, Version
Installing a Perle PCI Card
Accessories
Installing a Perle PCI Card
Accessories
RJ45F to DB25M DTE Crossover Adapter
Starter Kit Adapters/Cable
RJ45F to DB25M DCE Modem Adapter
RJ45F DB25F
RJ45F to DB25F DTE Crossover Adapter
RJ45F to DB9M DTE Crossover Adapter
RJ45F to DB9F DTE Crossover Adapter
Sun/Cisco RJ45M Connector Cable for Rack Mount Models
SCS48C/SCS32C/SCS16C/SCS8C Starter Kit Adapters/Cable
GND DTR 20 DTR DSR
RJ45F to DB25F DTE Crossover Adapter
390 Iolan SDS/SCS/STS User’s Guide, Version
RJ45F
Sun/Cisco Roll-Over Adapter for Rack Mount Models
392 Iolan SDS/SCS/STS User’s Guide, Version
Hardware Troubleshooting
Troubleshooting
Power/Ready LED stays red after a boot
Power/Ready LED on a rack mount model flashes red
DeviceManager Problems
Communication Issues
General communication checks and practices are as follows
Radius Authentication Problems
Host Problems
Problems with Terminals
Login Problems
Callback Problems
DHCP/BOOTP Problems
Language Problems
You observe Tftp errors when the Iolan boots, for example
PPP Problems
Modem Problems
Printing Problems
Long Reboot Cycle
Models
Certificate did not match configuration
Could not obtain peers certificate
An A4R2 model is starting/stopping
IPv6 Issues
Making a Technical Support Query
Contacting Technical Support
Feedback on this Manual
Repair Procedure
Glossary
Authentication Protocol Radius Remote
PAP Password
Authentication Dial Users Services Reverse Connection
RIP Routing
API
Index
Ldap
Radius
Index W