AR-287 AR-337 AR-407
For Your Records
Contents
Introduction
Using this Manual
Chapter
Installation Requirements
Getting Started Cautions
Safety Precautions
Power save modes
Power on and OFF
Preheat mode
Power on and OFF
Auto power shut-off mode
Information Function
Press the Information key in the standby mode
Selection of function
Using the Touch Panel
How to use the touch panel
Can be easily called by pressing its icon
Function setting icons
If multiple special functions are selected, up to six icons
Will be displayed
Page
Special Papers manual feed
Making Copies
Auditing Accounts
For setting the auditing mode
Stream feeding mode
Using the Radf
Sided copies of 1-sided originals
Using the Radf
Use the 10-key pad to enter the desired number Copies
Press the Start key
Press the key on the touch panel
Sided copies from 1-sided originals
Press the 2-SIDED Copy key
Sided Copy
Sided copies from 2-sided originals
Ready to COPY.DOCUMENT Feeder Mode
Making Copies Copying from
Close the document feeder cover
Remove the first original with the next original after
Copying from the Document Glass
Auto
Automatic selection
REDUCTION/ENLARGEMENT/ZOOM
Manual selection
REDUCTION/ENLARGEMENT/ZOOM
129 %
Then select the bypass tray
Insert the copy paper all the way into the bypass tray
Set the number of copies
Press the Paper Select key on the touch panel
Make a copy
Two-sided copying with bypass tray
Close the document cover
Replace the first original with the second original
Text, text/photo, and photo
Exposure Adjustments
Automatic
Group mode
Sort mode
SORT/GROUP
Tray
Storing a job program
JOB Memory
Press the Program key
Press the STORE/DELETE key on the touch panel
Recalling a job program
JOB Memory
Deleting a stored job program
Press the Interrupt key
Interrupting a Copy RUN
Special Functions
Elect
XY Zoom
Press the Y key
XY Zoom
Use the reduction, enlargement, and Zoom
Keys to change the copy ratio in the vertical Y direction
Place the original in the document feeder tray or on
Margin Shift
Press the Special Modes key
Margin Shift
Select the desired shift amounts using the and 5 keys
Press the Margin Shift key on the touch panel
Select the shift direction
Press the Erase key on the touch panel
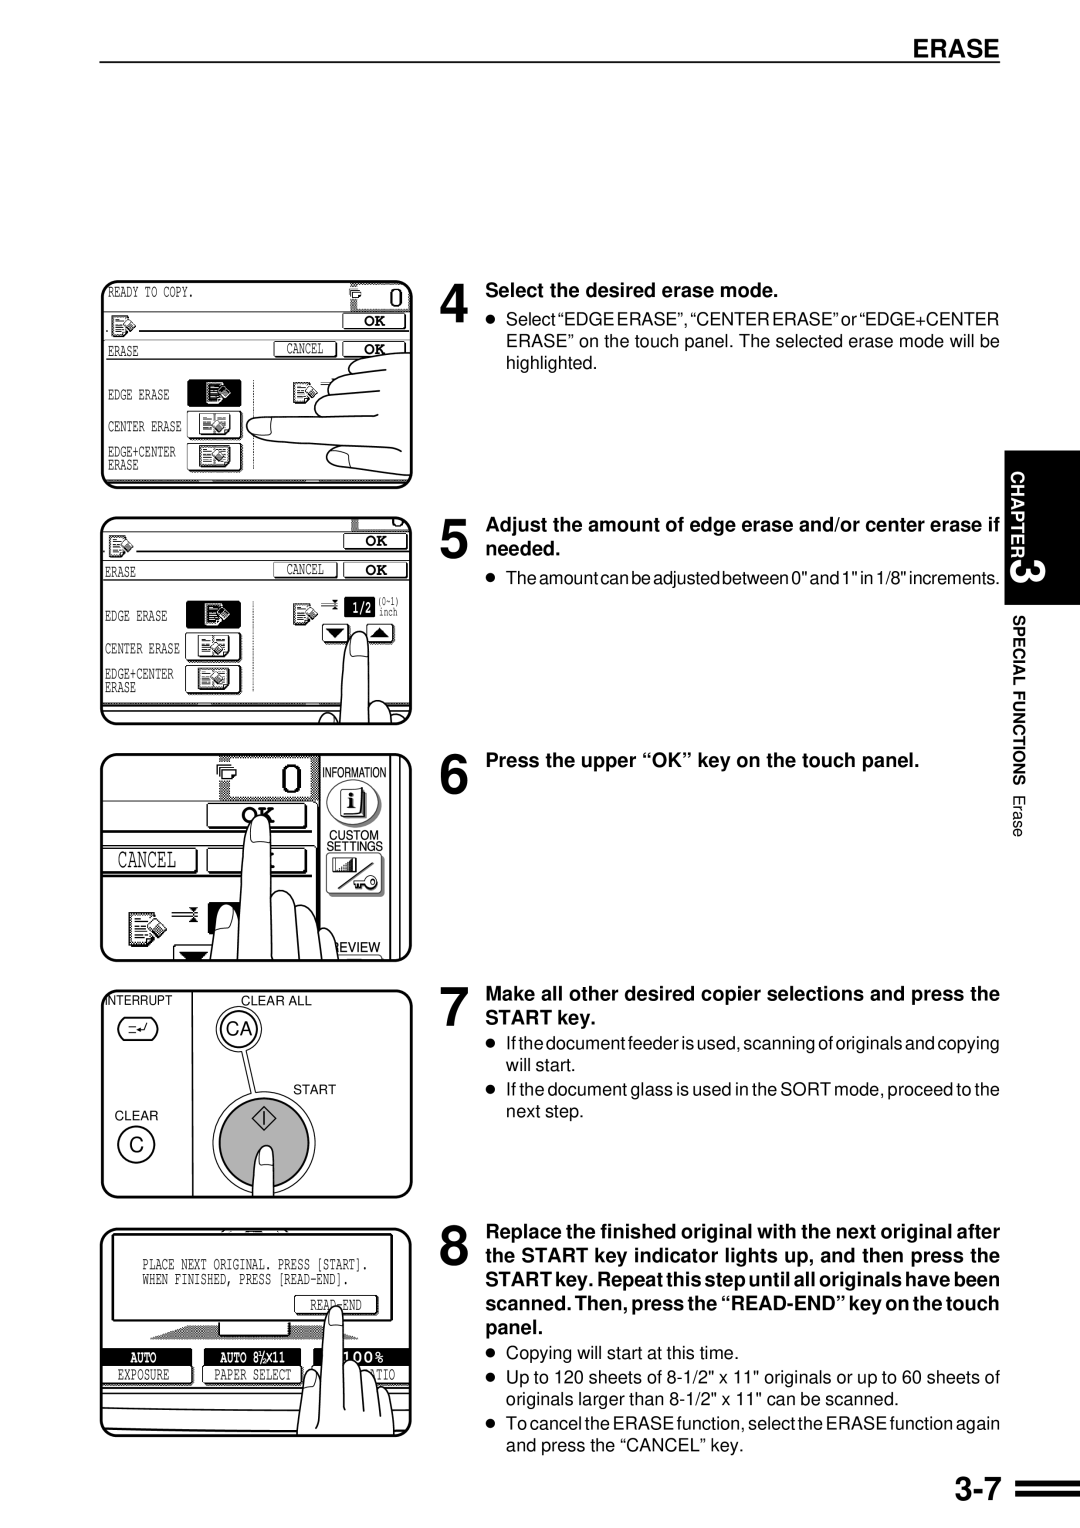
Erase
Adjust the amount of edge erase and/or center erase if
Select the desired erase mode
Erase
Needed
Dual Copy
Dual page Copying
Ensure that the desired tray is selected
Dual page Copying
Multi Shot
Multi Shot
Enter the desired number of copies
Press the upper OK key
Press the Covers key on the touch panel
Covers
Place the originals in the document feeder tray
Covers
Select cover placement
Press the upper OK key
Enter the desired number of copies and press the Start key
Press the Transparency Inserts key on the touch panel
Transparency Film with Insert Sheets
Ensure that the desired tray is selected for insert sheets
Transparency Film with Insert Sheets
Make all other selections and press the Start key
Place the originals in the document feeder tray or on
Pamphlet Copy
Press the Pamphlet Copy key on the touch panel
Pamphlet Copy
Select the type of originals
Select the binding position
Check the copy paper selection
URE
JOB Build
Image Editing Functions
Image Editing Functions
Make all other desired copy mode selections and enter
Press the Image Edit key
Press the JOB Build key
After the first section of original pages has been fed
Centering
Press the Image Edit key on the touch panel
Press the Centering key
Repeat Copy
Press the Repeat Copy key on the touch panel
Select the desired copy paper size
Sheet of copy paper
Cancel OK Border Line
Press the B/W Reverse key on the touch panel
Press the Image Edit key on the touch panel
Centering
E F
Press the Binding Change key on the touch panel
Desired number of copies
Date
Text Stamp
Press the Text Stamp key on the touch panel
Text Stamp
Select the desired date format on the touch panel
Select the pages to be stamped
Select the print direction
Press the Select Stamp key on the touch panel
Select the desired stamp to be printed
Adjust the darkness of the background of the stamp
Select the stamp position
Cancel OK Position
Draft
Adjust the darkness of the watermark
To adjust the exposure, press the Option key
Press the Watermark key on the touch panel
Select the desired watermark to be printed
11Press the upper OK key
Cancel OK
Number
Select the starting page number
Press the page Number key on the touch panel
Select the desired page number format
Replace the finished original with the next original after
OK 9 Press the upper OK key
Press the Tandem Copy key on the touch panel
Tandem Copy
On the main copier, press the Start key
Copier is installed in the sub copier
Tandem Copy
Press the Review key
Setting Review
Example
To exit the review screen, press the Exit key
Supplies
Loading copy paper
Paper
Types and sizes of copy paper
Push the paper tray firmly back into the copier
Paper
Loading paper in paper trays 1
Load copy paper into the tray
Changing the copy paper size in the tray
Adding Toner
Place the new toner cartridge with the tabs Notches as shown
Adding Toner
Disengage and remove the container from the copier
Used Toner Disposal
Open the toner collecting container cover
Proper storage
Storage of Supplies
Store the supplies in a location that is
Store copy paper in the wrapper and lying flat
Chapter
Misfeed Removal
Misfeed Removal
Misfeed in the bypass tray
Misfeed in paper trays 1
Misfeed in the transport area
Misfeed around the fusing unit and exit area
Close the exit area cover
Misfeed in the duplex module
Remove the misfed paper from the section below the exit area
Maintenance Required
Troubleshooting
Self-diagnostic function
Troubleshooting
Page
General Information
Part Names and Functions
Part Names and Functions
Start key and indicator
Interrupt key and indicator p
Function setting icons p.1-9
LCD touch panel
Initial settings
Custom Settings key
Sided Copy key
Output key
Document glass and document cover
User Maintenance
Press the Custom Settings key
Touch Panel Contrast Adjustment
Copier
Specifications
Document Feeder
Specifications
Page
Optional Equipment
System Configuration
Part Names
Specifications
Finisher AR-FN1N
NON-OFFSET mode
Offset mode
Finisher AR-FN1N
Offset stack
Sort and group
Staple Sort mode
Staple sort
Using the Radf
Select the desired stapling position
Staple Sort Sort Group
Using the document glass
Scanned
Start key indicator lights up, and then press
Remove the finished original with the next original after
Start key. Repeat this step until all originals have been
Staple cartridge replacement
10Push the finisher toward the copier and latch it in place
Remove the rear paper and tape from the cartridge
Staple jam removal
Push the finisher toward the copier and latch it in place
Misfeed in the upper transport area
Misfeed removal
Cover of the paper feed area and open the top cover
Close the top cover
Confirm that the misfeed display is cleared
Misfeed in the lower transport area
Close the transport
Close the paper transport area cover
Finisher AR-FN2
Finisher AR-FN2
See next page for details
Set the originals in the document feeder tray
Press the OK key
Using the document glass
Exposure Paper Select Copy Ratio
Stapler will strike three times without stapling and feed
Close the stapler cover
Push the new staple cartridge in until it clicks in place
Check that the first staple of the cartridge is at the tip
Cartridge
Misfeed removal
Push the finisher toward the copier and latch it 10place
Large Capacity Tray AR-LC1N
Large Capacity Tray AR-LC1N
When the button lamp goes out, pull the paper tray out
Fan the copy paper
Load the paper onto the feed table
Release lever
Gently push the tray back into place
STAND/500-SHEET Paper Drawer AR-DE1N
STAND/500-SHEET Paper Drawer AR-DE1N
Open the lower right side cover and remove any misfed paper
Dual Tray Output Unit AR-TR1
Dual Tray Output Unit AR-TR1
Page
Sharp Corporation