CHANGING THE FILE FORMAT
The file format (file type and compression method) for sending a scanned image is specified when the destination is stored in a
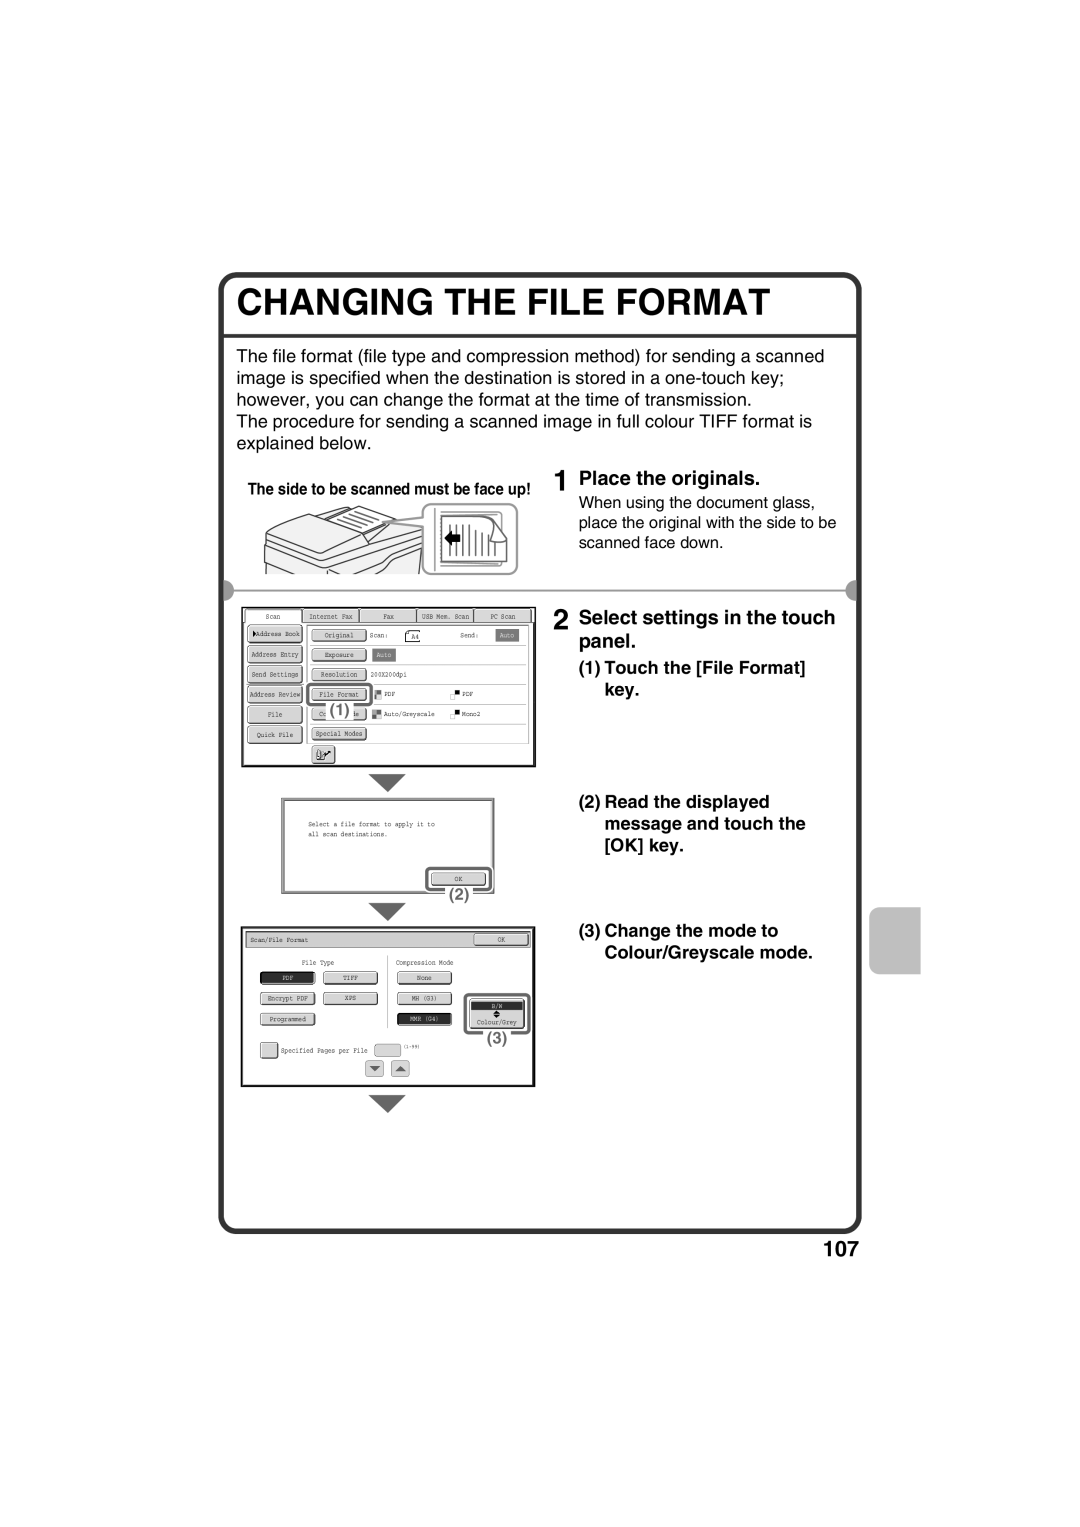
The procedure for sending a scanned image in full colour TIFF format is explained below.
The side to be scanned must be face up! 1 Place the originals.
When using the document glass, place the original with the side to be scanned face down.
Scan |
| Internet Fax |
| Fax |
| USB Mem. Scan |
| PC Scan |
Address Book | Original | Scan: | A4 | Send: | Auto |
Address Entry |
|
|
|
|
|
|
|
|
| Exposure |
| Auto |
|
| |||
|
|
|
|
|
|
|
|
|
Send Settings |
|
| 200X200dpi |
| ||||
| Resolution |
| ||||||
|
|
|
|
|
| |||
Address Review |
| File Format |
| |||||
|
|
|
|
|
|
|
|
|
|
|
| (1) |
|
| Auto/Greyscale | Mono2 | |
File |
| |||||||
|
|
| ||||||
|
|
|
|
|
|
|
|
|
|
|
|
|
|
|
|
|
|
Quick File |
| Special Modes |
|
|
|
| ||
|
|
|
|
|
|
|
|
|
Select a file format to apply it to all scan destinations.
|
|
|
|
|
|
|
|
|
|
|
|
|
| OK |
|
| |||
|
|
|
|
|
|
|
|
|
|
|
|
|
|
| |||||
|
|
|
|
|
|
|
| (2) |
|
|
|
|
| ||||||
|
|
|
|
|
|
|
|
|
|
|
|
|
|
|
|
|
|
|
|
|
|
|
|
|
|
|
|
|
|
|
|
|
|
|
|
|
|
|
|
| Scan/File Format |
|
|
|
|
|
|
|
|
|
|
|
| OK |
| ||||
|
|
|
|
|
|
|
|
|
|
| |||||||||
|
|
| File Type |
|
|
| Compression Mode |
|
| ||||||||||
|
|
|
|
|
|
|
|
|
|
|
|
|
| ||||||
|
|
|
|
|
|
|
|
|
|
|
|
|
|
|
|
|
|
|
|
|
|
|
|
| TIFF |
|
| None |
|
|
| ||||||||
Encrypt PDF | XPS | MH (G3) |
|
| B/W |
Programmed | MMR (G4) | Colour/Grey |
|
|
(3)
Specified Pages per File
2 Select settings in the touch panel.
(1)Touch the [File Format] key.
(2)Read the displayed message and touch the [OK] key.
(3)Change the mode to Colour/Greyscale mode.
