O P E R A T I O N


For Machines Mfg. Since 5/11

13" x 40" Heavy 13® EVS Lathe


7.Verify that the chuck fits the spindle properly by checking for any gaps between the mating surfaces.

If there are no gaps, proceed to Step 8.

If there is a gap, remove the chuck, re- clean the mating surfaces carefully, and re-install. If the problem persists, contact our Tech Support.

8.Verify that the chuck/spindle tapers are seated firmly together by removing the chuck, per the Chuck Removal instructions, and pay close attention to how easily the tapers release.

If it was necessary to bump the chuck or use a mallet to release the tapers, then they are seating together properly.

If the tapers released easily with little intervention, they are not seated together firmly as required. Remove the chuck, re- clean the mating surfaces carefully, and re-install. If the problem persists, contact our Tech Support.

Registration Marks

Lightly stamp registration marks across the mating seams of chuck components. These marks will help you re-install the chuck in the same position after removal, which ensures consistent chuck balance and turning results, and allows the same camlocks and studs to operate together for consistent locking and unlocking.

Camlock

Spindle & Chuck

Registration Marks

Spindle

Chuck


Halves

Marks

2-Piece

for Chuck

Direct Mount

Reassembly

Camlock Chuck


Figure 30. Registration mark locations.

Chuck Removal

To remove the chuck:

1.DISCONNECT LATHE FROM POWER!

2.Use an appropriate lifting, support, or protective device to protect the ways and support the chuck (refer to Installation & Removal Devices on Page 31).

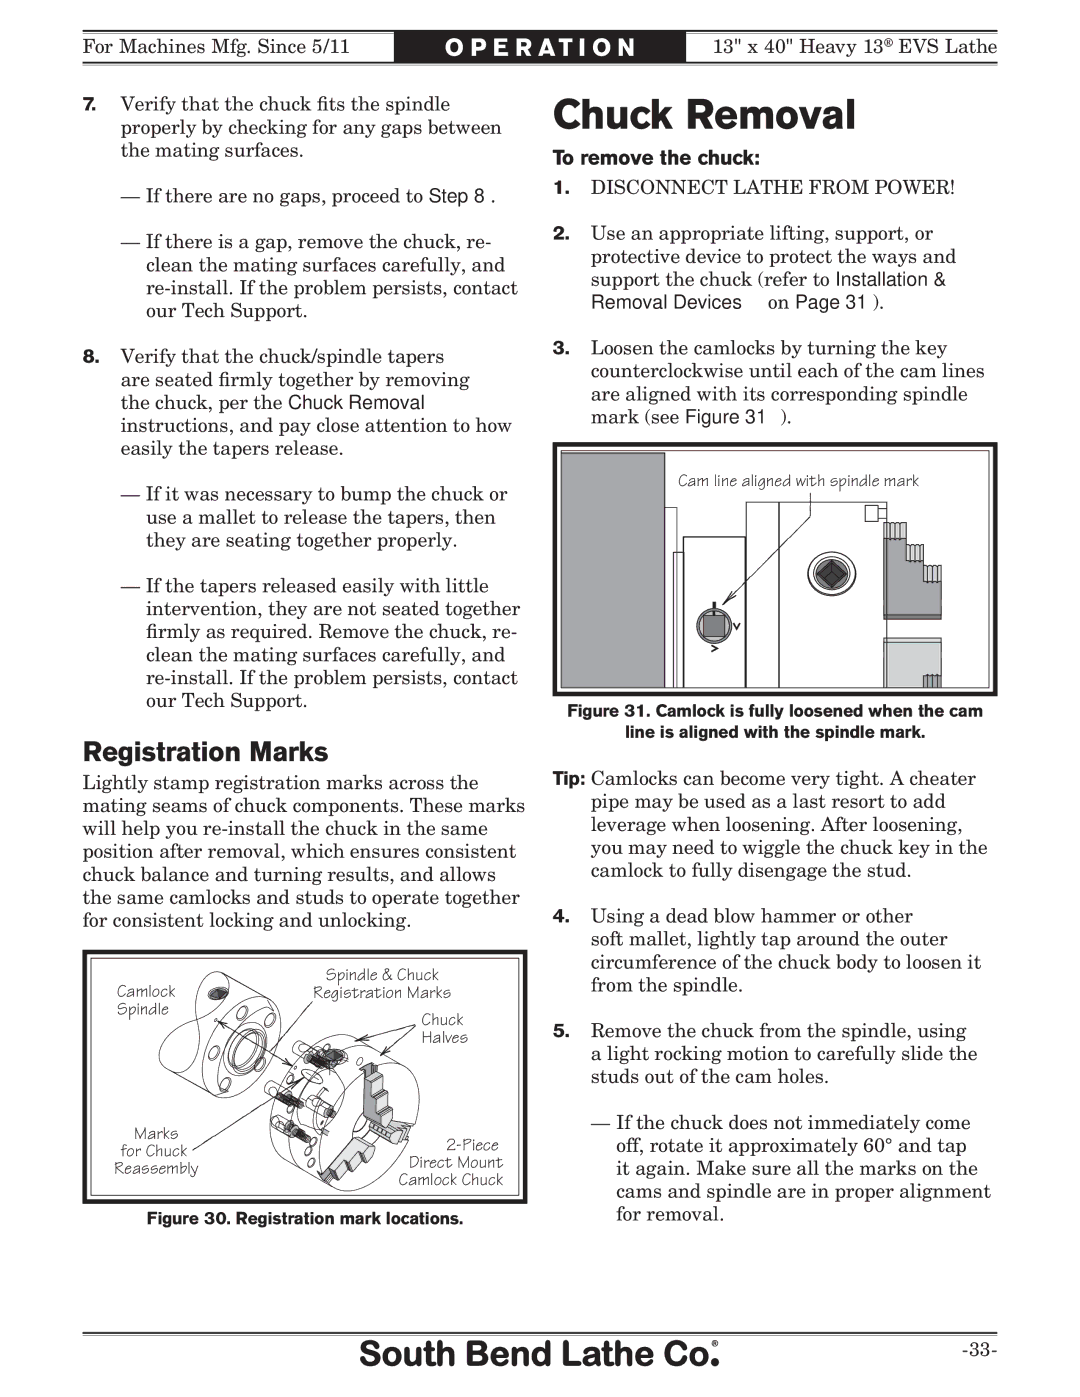
3.Loosen the camlocks by turning the key counterclockwise until each of the cam lines are aligned with its corresponding spindle mark (see Figure 31).

Cam line aligned with spindle mark

Figure 31. Camlock is fully loosened when the cam

line is aligned with the spindle mark.

Tip: Camlocks can become very tight. A cheater pipe may be used as a last resort to add leverage when loosening. After loosening, you may need to wiggle the chuck key in the camlock to fully disengage the stud.

4.Using a dead blow hammer or other soft mallet, lightly tap around the outer circumference of the chuck body to loosen it from the spindle.

5.Remove the chuck from the spindle, using a light rocking motion to carefully slide the studs out of the cam holes.

If the chuck does not immediately come off, rotate it approximately 60° and tap it again. Make sure all the marks on the cams and spindle are in proper alignment for removal.

-33-

Page 35
Image 35
Southbend SB1051 owner manual Chuck Removal, Registration Marks, To remove the chuck

SB1051 specifications

The Southbend SB1051 is a highly regarded gas range designed for commercial kitchens, embodying quality and efficiency in its construction and functionalities. This robust cooking appliance is specifically engineered to meet the high demands of professional chefs and food establishments, making it an ideal choice for restaurants, cafes, and catering services.

One of the standout features of the Southbend SB1051 is its powerful cooking capabilities. It boasts a total of five open gas burners, each delivering substantial heat output to ensure quick and consistent cooking results. The burners are designed for durability, featuring cast iron grates that provide excellent heat retention and stability for pots and pans. The heat output is generally rated at 30,000 BTUs per burner, making this range suitable for everything from boiling to sautéing and simmering.

In addition to its burners, the SB1051 integrates an impressive oven system. The range includes a standard oven capable of reaching high temperatures for baking and roasting. This oven is designed with heavy-duty construction and features a sturdy door that can withstand the rigors of daily use. Furthermore, it may come with adjustable racks, providing flexibility in cooking different types of dishes simultaneously.

The Southbend SB1051 places a strong emphasis on safety and ease of use. It includes an electronic ignition system that eliminates the need for matches or manual lighting, reducing the risk of accidents in busy kitchen environments. The range also features convenient heat controls, allowing chefs to adjust the temperature efficiently and precisely. The stainless-steel front and sides not only enhance the body’s durability but also make cleaning and maintenance simpler.

Moreover, this range is engineered with practical ergonomics in mind. Its height and depth are designed to optimize the workflow in the kitchen, ensuring that chefs can work comfortably without straining.

In summary, the Southbend SB1051 gas range stands out for its robust construction, powerful burners, and user-friendly features. With its combination of high-performance cooking technology and safety considerations, it is an exceptional investment for anyone looking to enhance their culinary operations. This range sets a high standard in commercial cooking equipment, delivering efficiency and reliability to meet the demands of any professional kitchen.