M A I N T E N A N C E


13" x 40" Heavy 13® EVS Lathe

For Machines Mfg. Since 5/11


Adding Fluid

1.DISCONNECT LATHE FROM POWER!

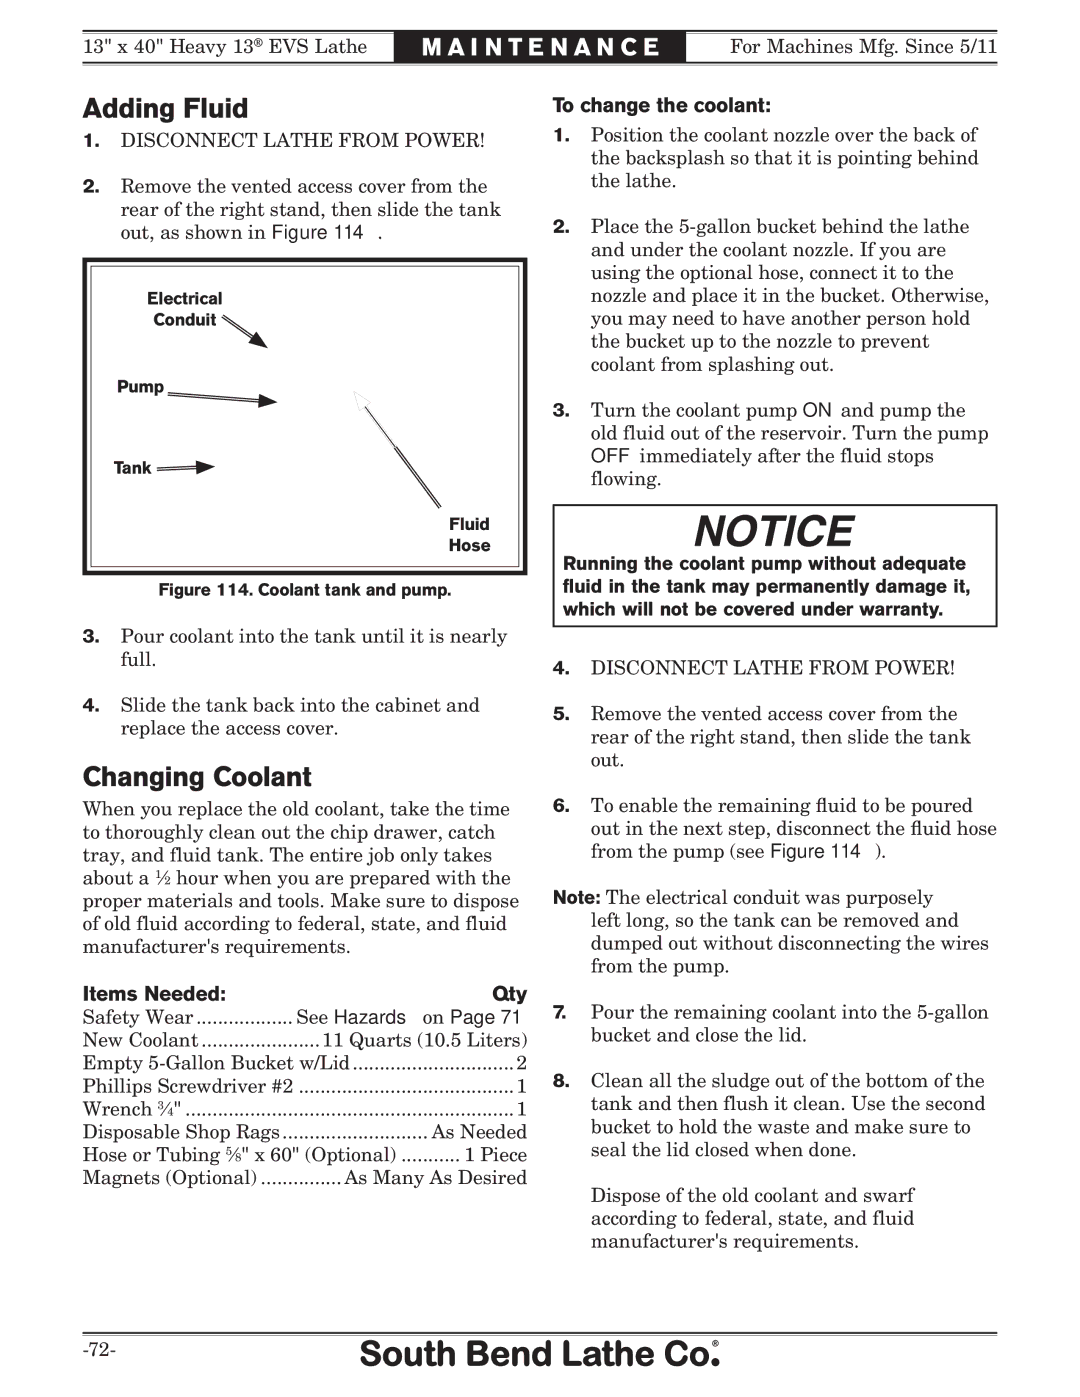
2.Remove the vented access cover from the rear of the right stand, then slide the tank out, as shown in Figure 114.

Electrical

Conduit

Pump

Tank

Fluid

Hose

Figure 114. Coolant tank and pump.

3.Pour coolant into the tank until it is nearly full.

4.Slide the tank back into the cabinet and replace the access cover.

Changing Coolant

When you replace the old coolant, take the time to thoroughly clean out the chip drawer, catch tray, and fluid tank. The entire job only takes about a 12 hour when you are prepared with the proper materials and tools. Make sure to dispose of old fluid according to federal, state, and fluid manufacturer's requirements.

Items Needed:


Qty

Safety Wear

See Hazards on Page 71

New Coolant

11 Quarts (10.5 Liters)

Empty 5-Gallon Bucket w/Lid

2

Phillips Screwdriver #2

........................................

1

Wrench 34"

1

Disposable Shop Rags

As Needed

Hose or Tubing 58" x 60" (Optional)

1 Piece

Magnets (Optional)

As Many As Desired

To change the coolant:

1.Position the coolant nozzle over the back of the backsplash so that it is pointing behind the lathe.

2.Place the 5-gallon bucket behind the lathe and under the coolant nozzle. If you are using the optional hose, connect it to the nozzle and place it in the bucket. Otherwise, you may need to have another person hold the bucket up to the nozzle to prevent coolant from splashing out.

3.Turn the coolant pump ON and pump the old fluid out of the reservoir. Turn the pump OFF immediately after the fluid stops flowing.

Running the coolant pump without adequate fluid in the tank may permanently damage it, which will not be covered under warranty.

4.DISCONNECT LATHE FROM POWER!

5.Remove the vented access cover from the rear of the right stand, then slide the tank out.

6.To enable the remaining fluid to be poured out in the next step, disconnect the fluid hose from the pump (see Figure 114).

Note: The electrical conduit was purposely left long, so the tank can be removed and dumped out without disconnecting the wires from the pump.

7.Pour the remaining coolant into the 5-gallon bucket and close the lid.

8.Clean all the sludge out of the bottom of the tank and then flush it clean. Use the second bucket to hold the waste and make sure to seal the lid closed when done.

Dispose of the old coolant and swarf according to federal, state, and fluid manufacturer's requirements.

-72-

Page 74
Image 74
Southbend SB1051 owner manual Adding Fluid, Changing Coolant, Items Needed Qty, To change the coolant

SB1051 specifications

The Southbend SB1051 is a highly regarded gas range designed for commercial kitchens, embodying quality and efficiency in its construction and functionalities. This robust cooking appliance is specifically engineered to meet the high demands of professional chefs and food establishments, making it an ideal choice for restaurants, cafes, and catering services.

One of the standout features of the Southbend SB1051 is its powerful cooking capabilities. It boasts a total of five open gas burners, each delivering substantial heat output to ensure quick and consistent cooking results. The burners are designed for durability, featuring cast iron grates that provide excellent heat retention and stability for pots and pans. The heat output is generally rated at 30,000 BTUs per burner, making this range suitable for everything from boiling to sautéing and simmering.

In addition to its burners, the SB1051 integrates an impressive oven system. The range includes a standard oven capable of reaching high temperatures for baking and roasting. This oven is designed with heavy-duty construction and features a sturdy door that can withstand the rigors of daily use. Furthermore, it may come with adjustable racks, providing flexibility in cooking different types of dishes simultaneously.

The Southbend SB1051 places a strong emphasis on safety and ease of use. It includes an electronic ignition system that eliminates the need for matches or manual lighting, reducing the risk of accidents in busy kitchen environments. The range also features convenient heat controls, allowing chefs to adjust the temperature efficiently and precisely. The stainless-steel front and sides not only enhance the body’s durability but also make cleaning and maintenance simpler.

Moreover, this range is engineered with practical ergonomics in mind. Its height and depth are designed to optimize the workflow in the kitchen, ensuring that chefs can work comfortably without straining.

In summary, the Southbend SB1051 gas range stands out for its robust construction, powerful burners, and user-friendly features. With its combination of high-performance cooking technology and safety considerations, it is an exceptional investment for anyone looking to enhance their culinary operations. This range sets a high standard in commercial cooking equipment, delivering efficiency and reliability to meet the demands of any professional kitchen.