RIDGID K6200 manual Loading The Machine On Vehicle, Operating Machine In Reclined Position

Page 12

K-6200 Drain Cleaning Machine

Loading The Machine On Vehicle

Loading Wheel

Optional loading wheel swivels up and down. Raise wheel for loading, lower wheel while transporting or op- erating machine.

With loading wheel raised, tip machine backwards and rest handle or loading wheel on truck bed. Lift up on front of machine and slide onto truck.

WARNING Use proper lifting technique – lift with your legs, not your back!!

NOTE! Take care not to damage electrical cord or air foot switch hose.

Lifting Hook

Optional lifting hook can be used to raise and lower the machine into a truck using a hoist. The Machine must be raised by hooking through the hole in the lifting hook.

WARNING Lifting the machine by the handle or any other part of the machine may result in the machine tipping and/or the part failing. This could result in the machine falling causing serious injury.

NOTE! Take care not to damage electrical cord or air foot switch hose.

Draining the Drum

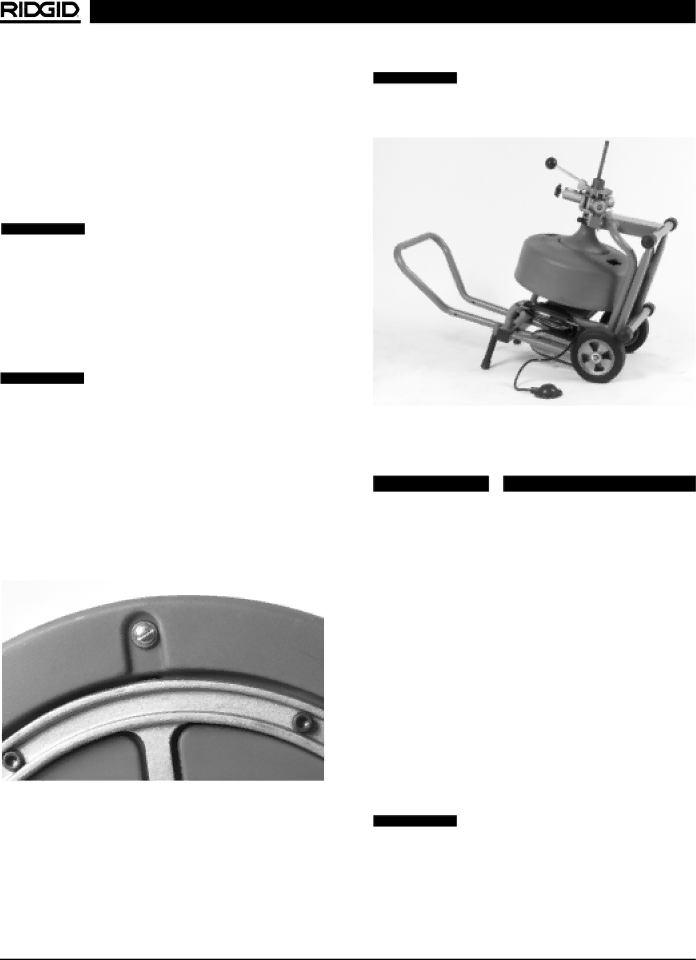
Water can be drained from the drum by removing the screw plug located in the rear of the drum (Figure 10) and resting the machine on its back as seen in Figure 11. Be sure the screw drain plug is replaced before transporting the machine.

Figure 10 – Drum Drain Hole

Operating Machine In Reclined Position

The K-6200 can be operated in the reclined position to ac- cess overhead waste lines. As shown in Figure 11, screw the two (2) support legs into the frame. With the kickstand bar in the forward position ahead of the wheels, place the machine so it rests on the support legs and the wheels.

WARNING If sewer inlet is greater than 3from the front off the machine, the cable will have a greater ten- dency to twist or kink. Use a front guide tube or properly support exposed cable.

Figure 11 – Machine In Reclined Position

Drum Assembly Removal & Installation

WARNING

Make sure FOR/OFF/REV SWITCH is in OFF position and machine is unplugged from power source.

Drum Removal

1.Set kickstand in the operating position to keep the ma- chine from moving.

2.Loosen the top autofeed knob to make sure the top bearing is not in contact with the cable and remove the cutter.

3.Loosen the two T-handle mounting knobs located on the drum side of the autofeed assembly. It is not necessary to remove the knobs, just loosen enough to allow the autofeed assembly to slide off the front support. Slide the assembly off the cable.

4.The drum assembly can be removed by grasping the drum via the center hole on the drum front and by lifting and sliding the shaft of the assembly out of the gear box.

WARNING Use proper lifting technique – lift with your legs, not your back!!

Drum Installation

1.Set the kickstand to keep machine from moving.

2.Grasp the drum assembly via the center hole on the drum front and lift the assembly onto the frame. Slide

10

Ridge Tool Company

Image 12
Contents 6200 Table of Contents 6200 Drain Cleaning Machine General Safety Information Work Area SafetyElectrical Safety Personal SafetySpecific Safety Information ServiceDrain Cleaner Safety Tool Use and CareDescription, Specifications and Standard Equipment Machine Assembly Instructions For Installing HandlesInstructions For Installing Cable Cables and Flexible Trap LeadersInstructions For Installing Loading Wheel Instructions For Installing Lifting HookMachine Inspection Setting Kickstand Bar Machine Set-UpOperating Instructions Proper Operating PositionSpecial Procedures Main Sewer Or Septic Tank OverrunReverse Operation Drum Assembly Removal & Installation Loading The Machine On VehicleOperating Machine In Reclined Position Installing Extra Drum Additional Cable Pigtail Removal and InstallationAccessories Installing K-3800 DrumUsing the K-3800 Drum Proper Tool SelectionMaintenance Instructions Machine Storage Service and RepairAutofeed Assembly LubricationChart 1 Troubleshooting Wiring Diagram115V/60Hz Dégorgeoir électrique K-6200 Table des matières Consignes générales de sécurité Sécurité du chantierSécurité électrique Sécurité individuelleService après-vente Consignes de sécurité particulièresUtilisation et entretien de l’appareil Description, spécifications et équipements de base Sécurité du dégorgeoirSpécifications MoteurAccessoires de base Accessoires optionnelsEquipements de base Câbles et guides souplesInstallation du manche Installation des câblesAssemblage de la machine Montage de la roue de chargementInstallation du crochet de levage Inspection de la machinePréparation de la machine Déploiement de la béquilleUtilisation de la machine Position de travail appropriéeProcédés spéciaux Fonctionnement du levier d’avancementUtilisation de la marche arrière Chargement de la machine sur véhiculeUtilisation de la machine en position couchée Dépose et installation du tambour Dépose et installation du raccord flexibleInstallation du tambour Dépose du tambourAccessoires Installation du tambour K-3800Sélection des outils appropriés Tambour K-3800 optionnelEntretien Système d’avancement automatiqueLubrification CâblesService après- vente et répara- tions Stockage de la machineProbleme Raisons Possibles Solution Tableau 1 DépannageSchéma électrique Limpiadora de desagües K-6200 Indice Información general de seguridad Seguridad en la zona de trabajoSeguridad eléctrica Seguridad personal Uso y cuidado de la máquinaServicio Información específica de seguridad Descripción, especificaciones y equipo estándarSeguridad de la Limpiadora de Desagües DescripciónEspecificaciones Equipo estándarAccesorios estándar Accesorios opcionalesMontaje de la máquina Instrucciones para montar el mango del soporteInstrucciones para instalar el cable Instrucciones para instalar la rueda de transporteRevisión de la máquina Instrucciones para instalar el gancho de levantamientoPreparación de la máquina Instrucciones para el funcionamiento Figura 8 Postura correcta para trabajarFigura 9 Funcionamiento de la palanca de autoali- mentación Procedimientos especiales Instrucciones para el funcionamiento en reversaCómo cargar la máquina en un vehículo Funcionamiento de la máquina en posi- ción reclinadaExtracción e instalación del tambor Instalación de cable adicionalExtracción del tambor Instalación del tamborAccesorios Extracción e instalación de la colita de cerdoSelección de barrenas Instrucciones para el mantenimiento Tambor K-3800 opcionalAutoalimentación LubricaciónAlmacenaje de la máquina Servicio y reparacionesProblema Posibles Causas Solucion Tabla 1 Detección de averíasDiagrama de cableado Limpiadora de desagües K-6200 Limpiadora de desagües K-6200 Ridge Tool Company