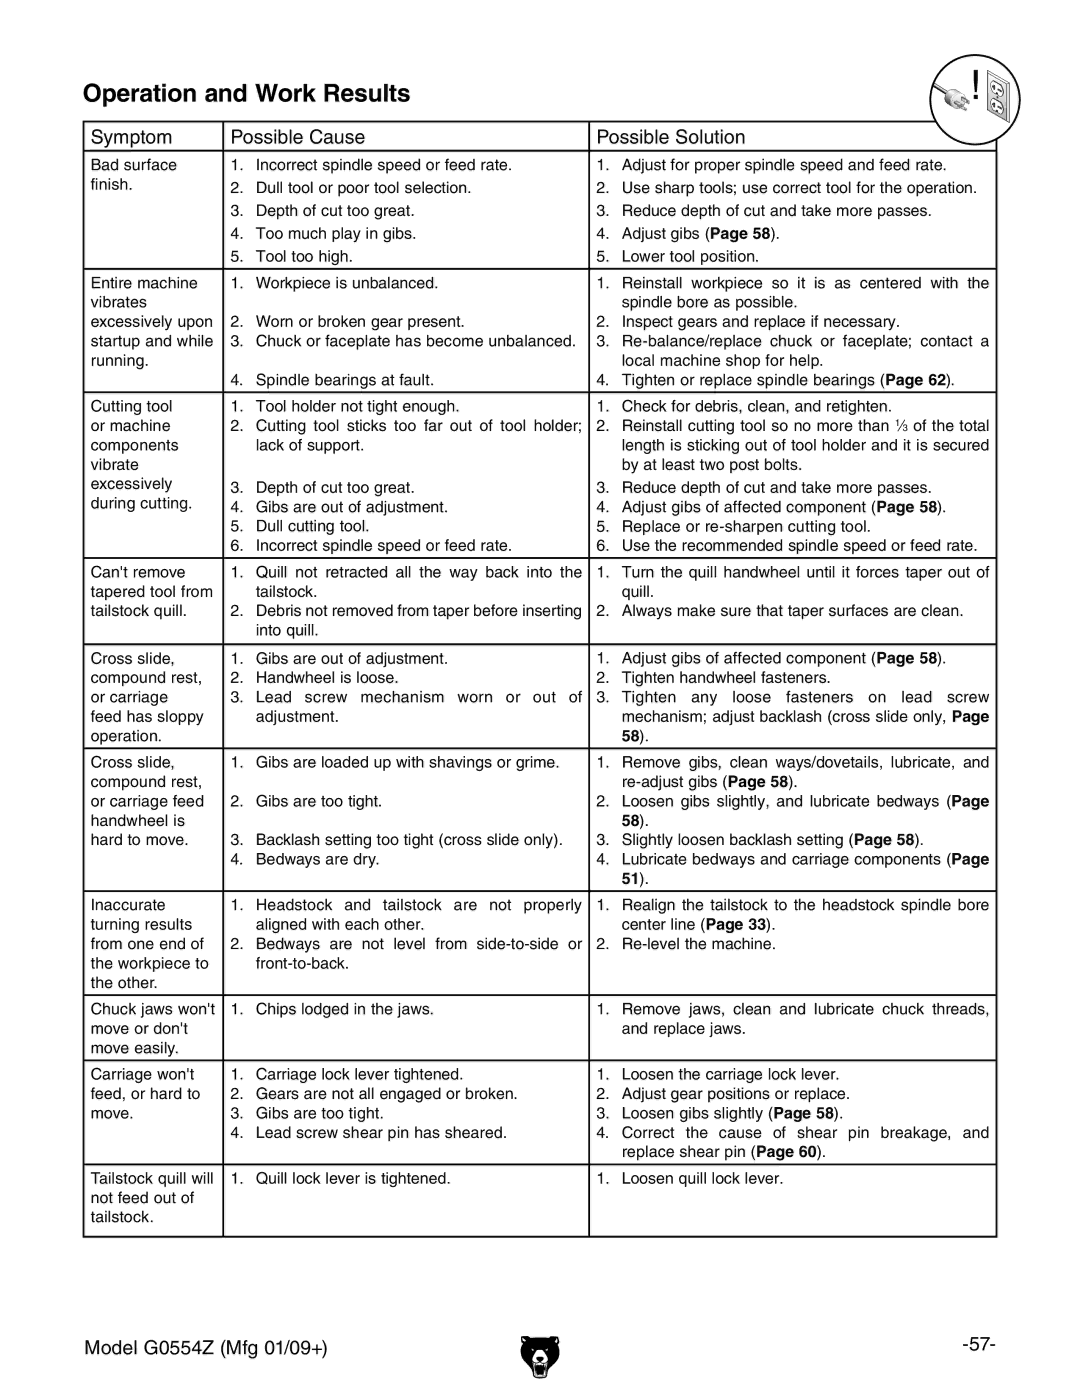
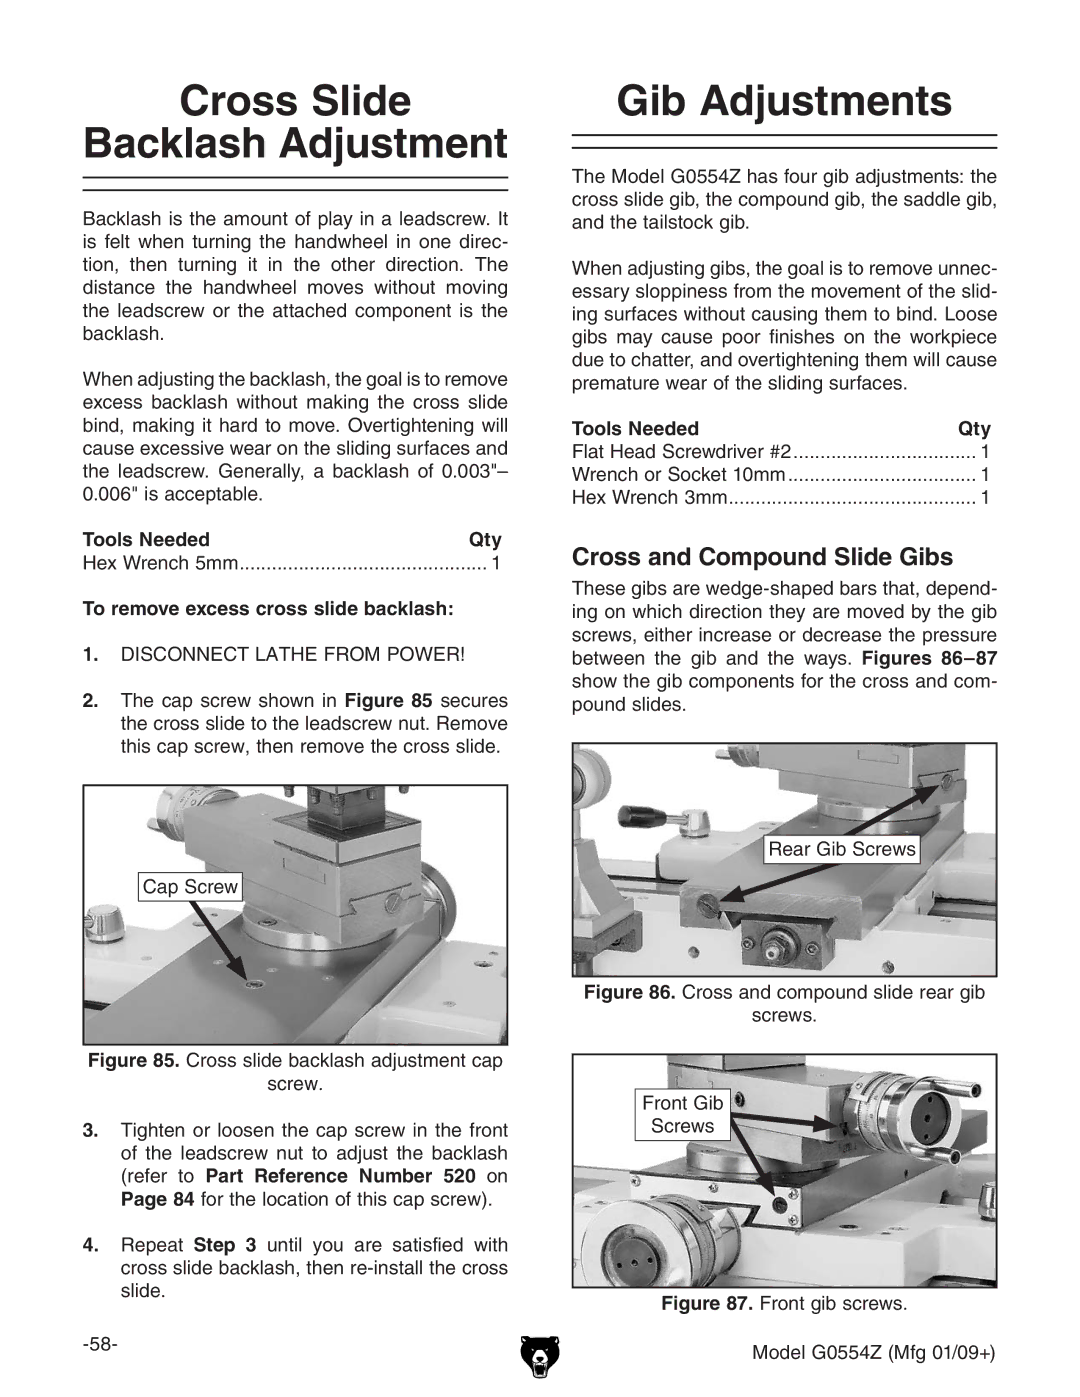
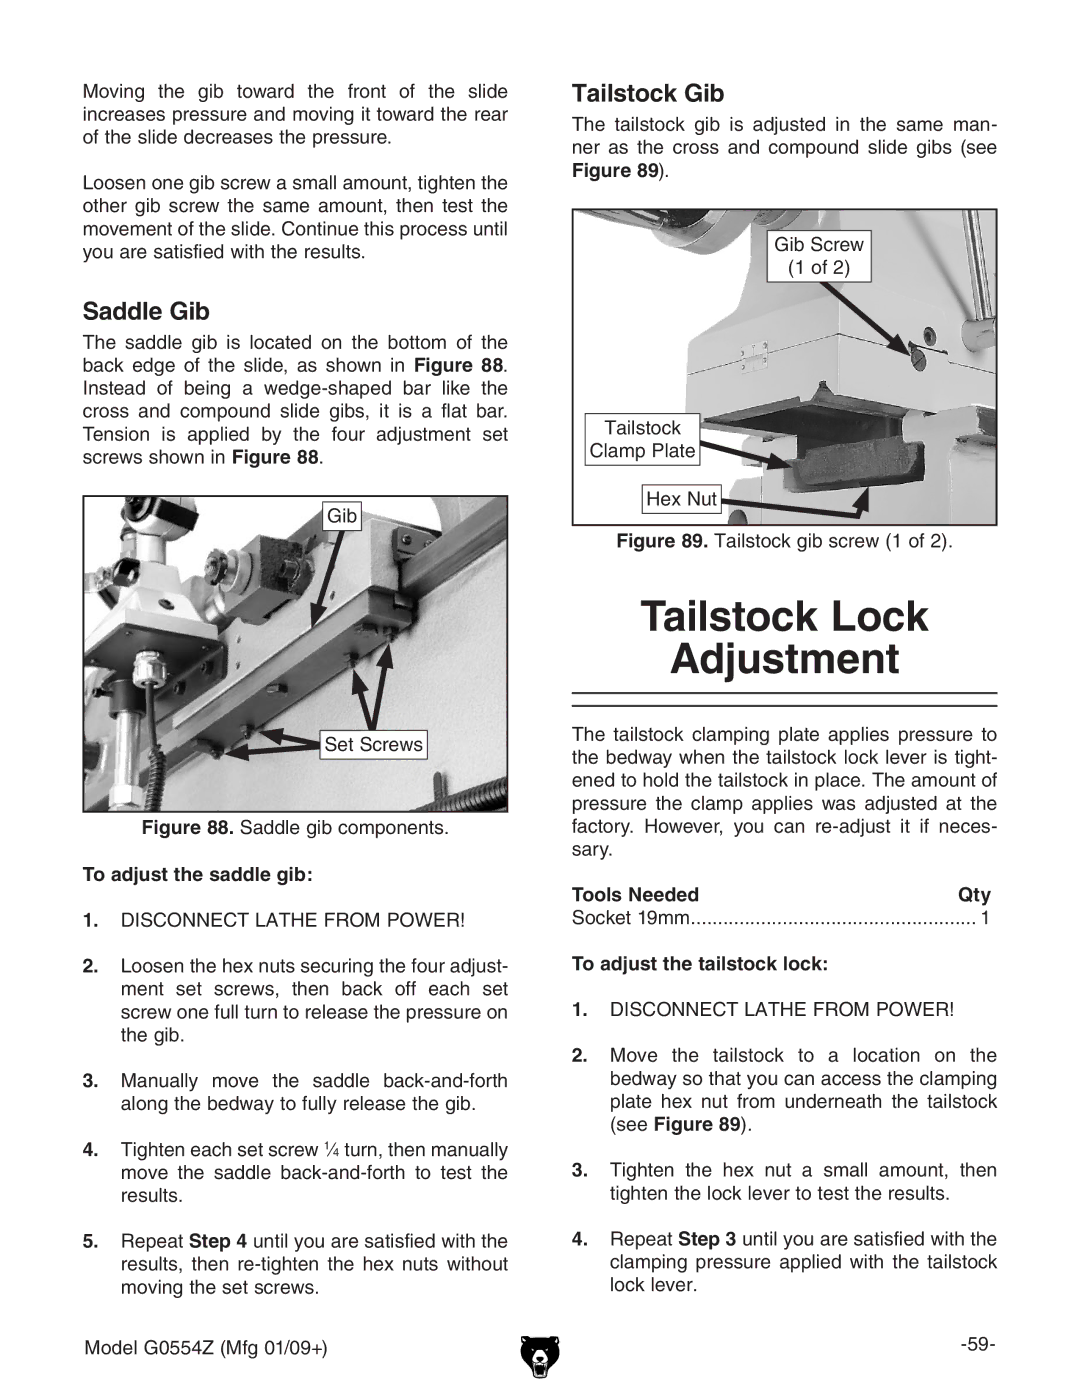
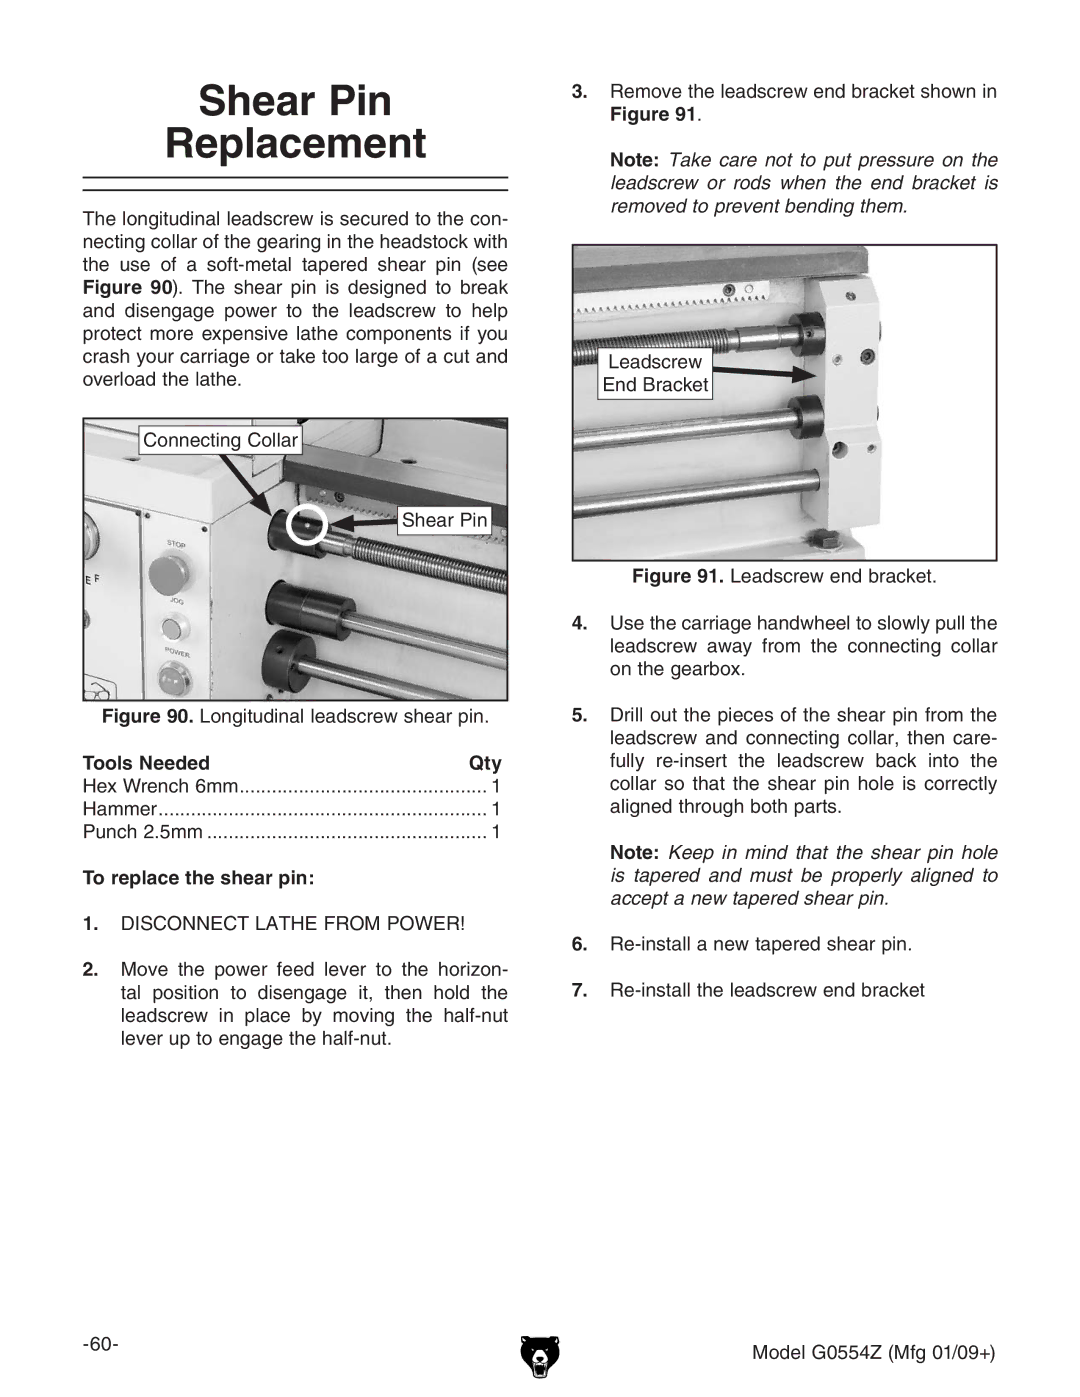
Grizzly G0554Z owner manual Spindle Bearing Preload, To adjust the spindle bearing preload

Page 64

Spindle Bearing

Preload

Your lathe is shipped from the factory with the preload of the spindle tapered roller bearings properly adjusted.

Over time, the bearings will wear and reduce the preload, causing excessive spindle end-play, which is one cause for poor workpiece finish.

If the spindle becomes hotter than you can com- fortably leave your hand on after an operation, there may be too much preload and premature wear of the spindle bearings and components could occur.

If your lathe exhibits either of these symptoms, you can adjust the spindle bearing preload.

Tools Needed

Qty

Hex Wrenches 4, 5 mm

1 Each

Spanner Wrench 75-84mm

1

Spindle Lock Key

1

Dial Indicator with Magnetic Base

1

Heavy Dead Blow Hammer

1

Wooden Block

1

Sealant for Headstock Cover

As Needed

To adjust the spindle bearing preload:

1.Run the lathe for approximately 20 minutes at a medium speed to bring the spindle compo- nents to their normal working temperature.

2.DISCONNECT LATHE FROM POWER!

3.Remove the headstock cover to enable the use of the spanner wrench in later steps.

Note: Do not allow any debris to fall into the headstock when removing the cover.

Tip: Tightly cover the headstock with clean plastic, such as plastic food wrap, to prevent foreign objects dropping into the headstock during this procedure.

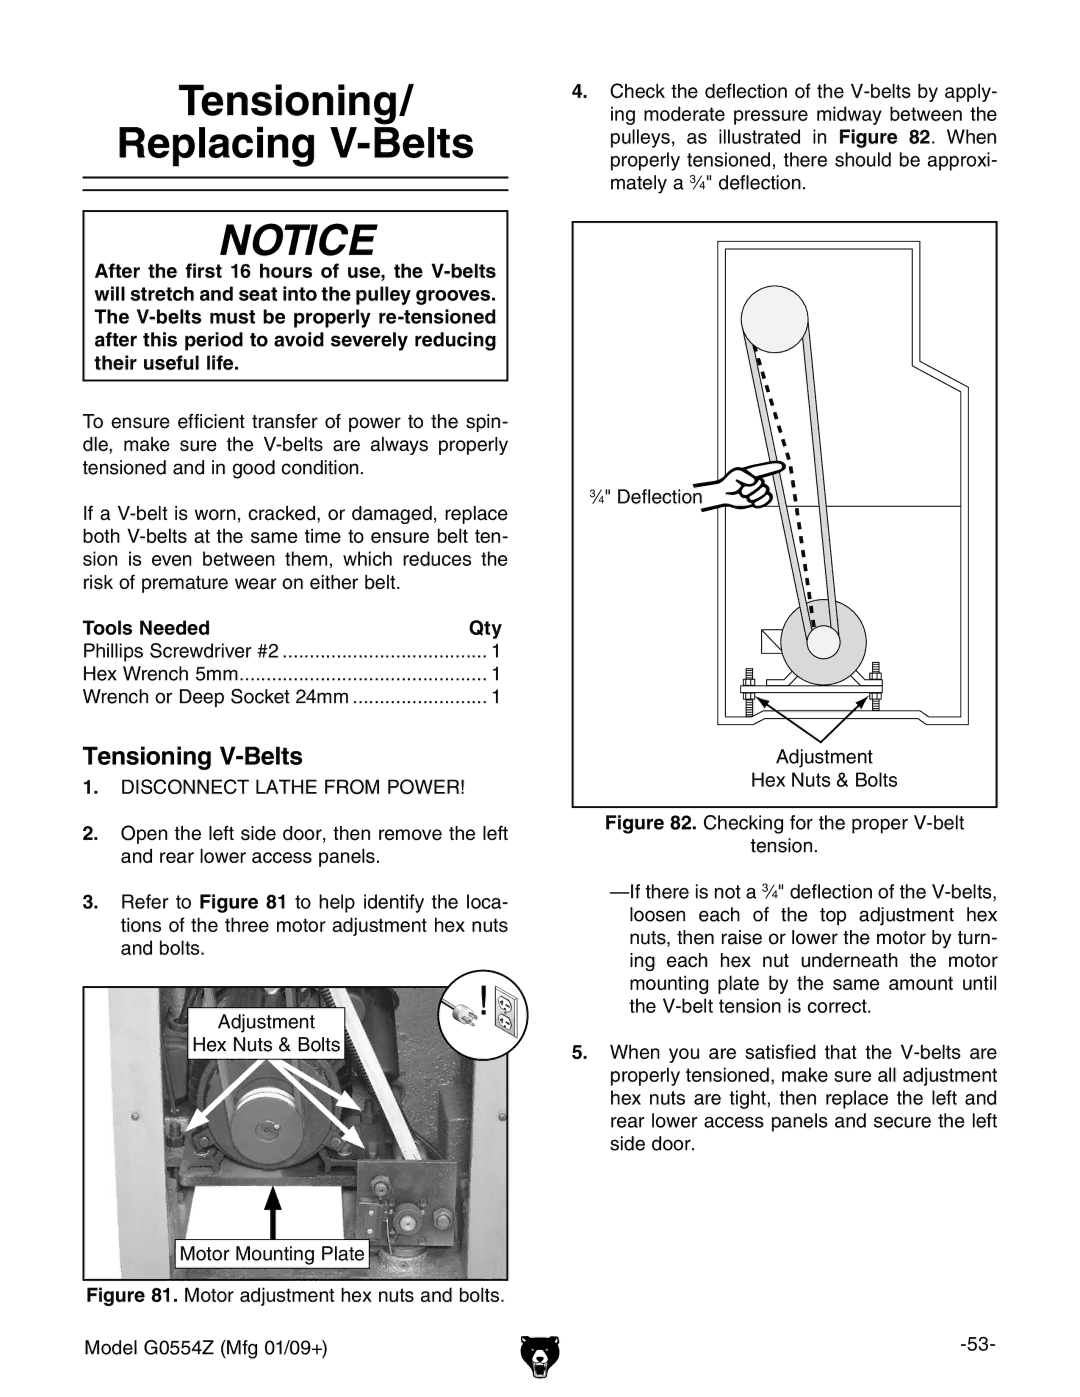
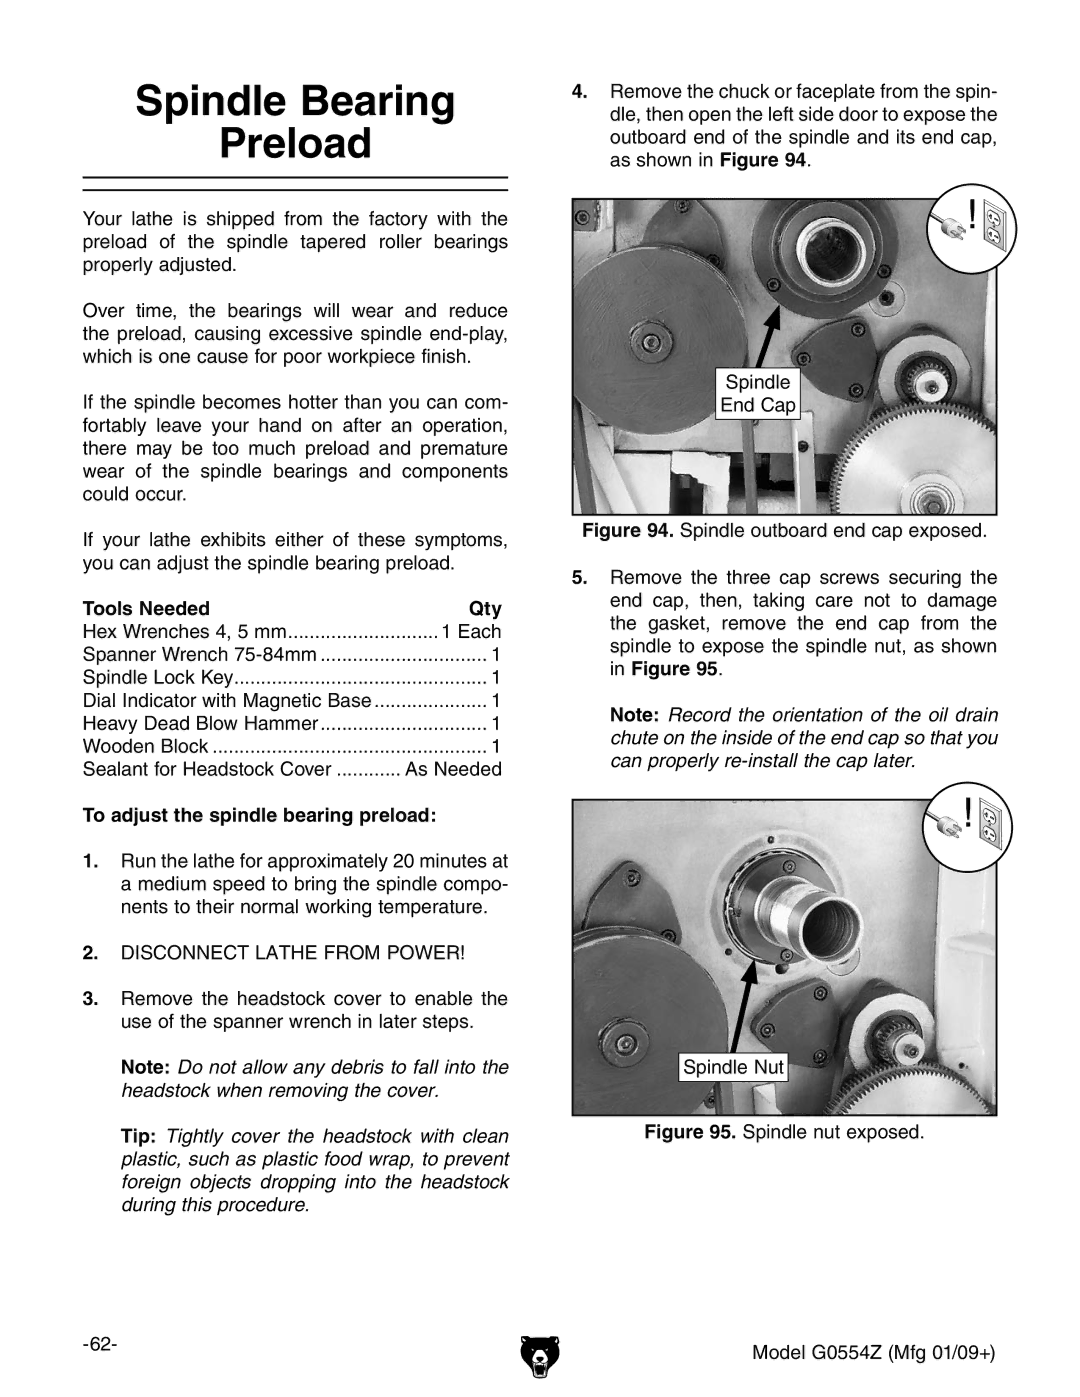
4.Remove the chuck or faceplate from the spin- dle, then open the left side door to expose the outboard end of the spindle and its end cap, as shown in Figure 94.

Spindle

End Cap

Figure 94. Spindle outboard end cap exposed.

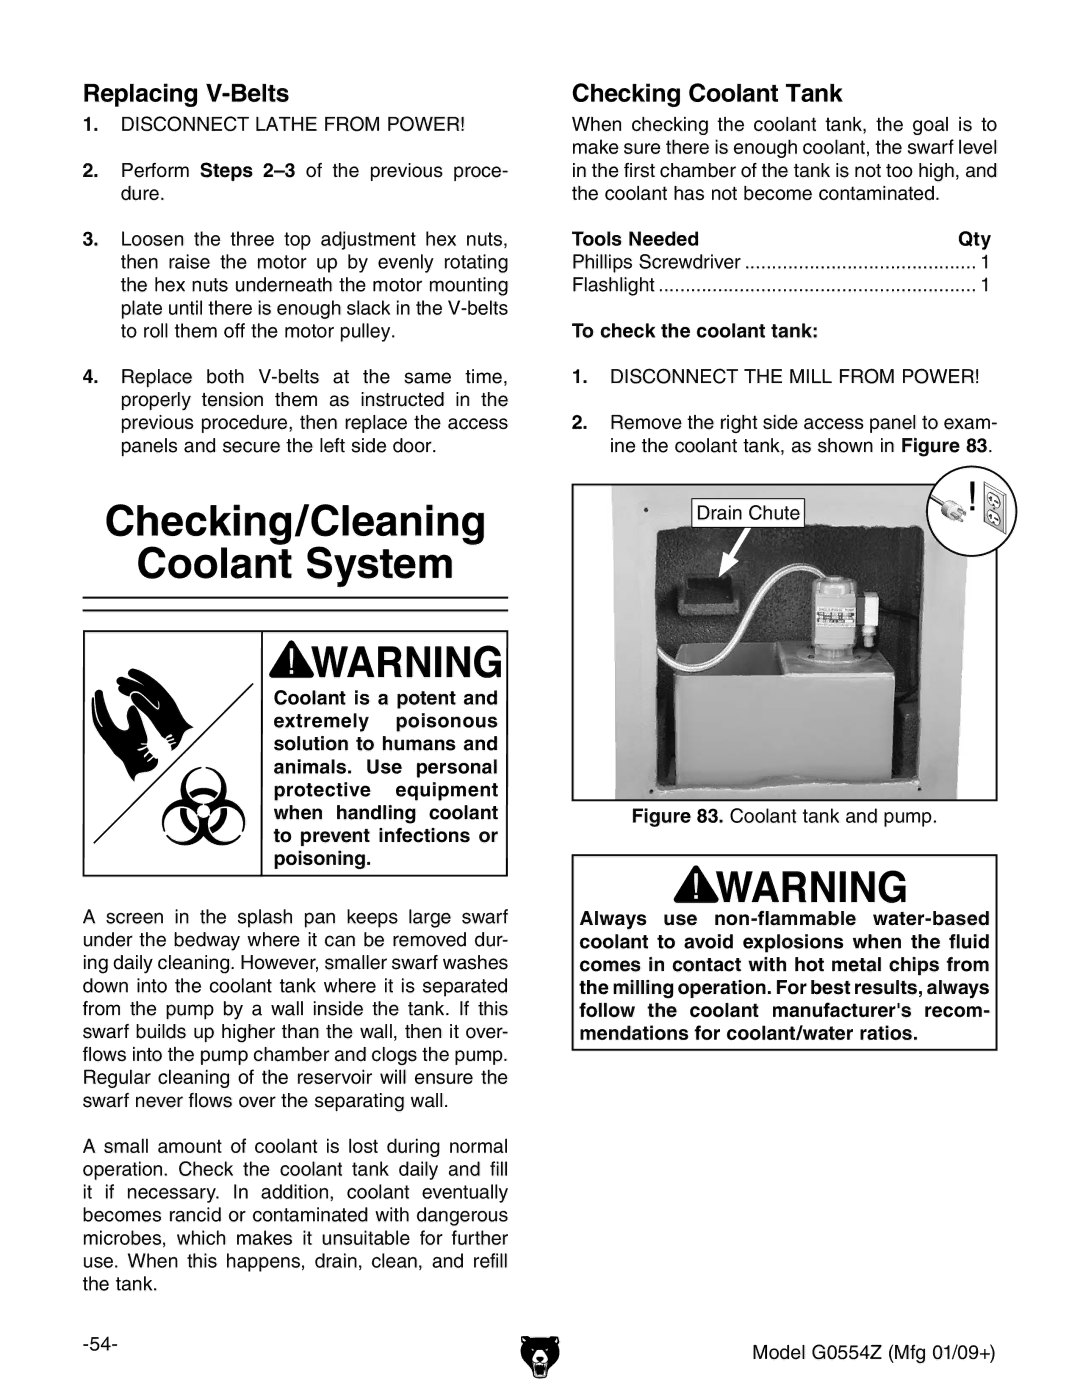
5.Remove the three cap screws securing the end cap, then, taking care not to damage the gasket, remove the end cap from the spindle to expose the spindle nut, as shown in Figure 95.

Note: Record the orientation of the oil drain chute on the inside of the end cap so that you can properly re-install the cap later.

Spindle Nut

Figure 95. Spindle nut exposed.

-62-

Model G0554Z (Mfg 01/09+)


Image 64
Contents Model G0554Z Page Table of Contents Introduction Manual AccuracyContact Info Machine DescriptionIdentification Machine Data Sheet Tailstock Info Safety Safety Instructions for MachineryWearing Proper APPAREL. Do not wear Hearing PROTECTION. Always wear hearSafety Instructions for Machinery Additional Safety for Metal Lathes 220V Single-Phase Operation Circuit RequirementsSetup Needed for SetupUnpacking Description QtyInventory Inventory Figures QtyCleanup Before cleaning, gather the followingSite Considerations Placing Assembling Lathe Floor refer to Mounting to Shop Floor onCarriage and cross slide handles Installed Mounting to Shop Floor Checking Gear OilTest Run Bolting to Concrete FloorsTo test run the machine Test RunPage Factory adjustments that should be verified Recommended AdjustmentsSpindle Break-In Operations Operation OverviewMain Power Switch Spindle Speed Configuration ChartBasic Controls Headstock ControlsGearbox Controls Carriage Controls & Components ON/OFFTailstock Controls Tools Needed for Removing/Installing Qty Chuck & Faceplate MountingFoot Brake Removing Chuck or FaceplateMounting Chuck or Faceplate Jaw Chuck Installing Cam-Lock StudsReversing Jaws Mounting Workpiece To mount a workpiece onto the 3-jaw chuckTo mount a workpiece onto the 4-jaw chuck Faceplate Loading WorkpieceUsing Dead Center in Spindle CentersDead Centers Live CentersTo mount a workpiece onto the spindle dead center Using a Center in the TailstockTo mount a workpiece onto the tailstock dead center Offsetting Tailstock To set up the tailstock to cut a shallow taperTailstock Alignment To align the tailstock offset to the spindle cen- ter lineTo install an MT#3 drilling tool into the tailstock Drilling with TailstockCoolant System To use the coolant system on your latheTo install/use the steady rest Steady RestFollow Rest To adjust the carriage stopCarriage Stop Four-Way Tool Post Spindle Speed Calculating Spindle SpeedTo load the tool post Recommended Cutting SpeedsExample a StepResult Example BPower Feed Understanding the Feed Rate & Threading ChartsAnnealed Allow Steel Alloys Rough10 11 11 1⁄ 1⁄ 2 5 5 1⁄ 2 5 3⁄ Setting Feed Rate Controls To set the feed controlsQuick Change Gears To configure the quick change gearsSide Front View Engaging Power Feed To engage the power feed for non-threading operationsPower Feed Lever Thread Dial & ChartThreading Controls Half-Nut LeverThread Dial G1075-52-PC. Clamping Kit AccessoriesG1070-MT3 Live Center Set G9610-Test Indicator G9611-Test IndicatorG9612-Test Indicator H6879-Lathe Operation & Maintenance BookCleaning Protecting MaintenanceSchedule Lubrication Daily LubricationHeadstock, Gearbox, & Apron Oil Reservoirs Tensioning Replacing V-Belts Tensioning V-BeltsChecking/Cleaning Coolant System Replacing V-BeltsChecking Coolant Tank To check the coolant tankCleaning Coolant Tank To replace the coolantTroubleshooting ServiceMotor & Gearbox Operation and Work Results Gib Adjustments Cross Slide Backlash AdjustmentCross and Compound Slide Gibs Tailstock Lock Adjustment To adjust the saddle gibTo adjust the tailstock lock Saddle GibShear Pin Replacement To replace the shear pinTo check/replace the brake pads Brake PadsSteps To adjust the spindle bearing preload Spindle Bearing PreloadPage Gap Removal To remove the gapWiring Wiring Safety InstructionsElectrical Overview BoxElectrical Cabinet Identification Electrical cabinet identification Model G0554Z Mfg 01/09+Cabinet wiring diagram Electrical Cabinet Wiring Diagram 71 Page 70Electrical Components a Side Door Safety SwitchHalogen Lamp Brake Switch Power SourceElectrical Components B MotorSpindle Switches Electrical Components CCoolant Pump Control PanelParts Headstock Shifting BreakdownHeadstock Shifting Parts List DescriptionHeadstock Gearing Breakdown Headstock Gearing Parts List Headstock Spindle Breakdown Headstock Spindle Parts List Gearbox Shifting Breakdown Gearbox Shifting Parts List Gearbox Gearing Breakdown Gearbox Gearing Parts List Apron Controls Apron Gearing 458 CSaddle & Cross Slide Breakdown Cap ScrewSaddle & Cross Slide Parts List Compound Slide & Tool Post Tailstock Leadscrew Thread Dial 703 754 756 704 705 706707 708 709 710Adjustment Knob Change & End Gears Bed & Shaft Breakdown Bed & Shaft Parts List Stand & Brake Breakdown Stand & Brake Parts List Motor FANElectrical Breakdown Electrical Parts List Motor FANAccessories Label Placement Warranty Card CommentsGrizzly INDUSTRIAL, INC BOX BELLINGHAM, WAWarranty and Returns Warranty and ReturnsOrder Hours a DAY