MultiPASS C3000
Disclaimer
Copyright
Trademarks
Location
Power Requirements
Order Information
Case of Equipment Malfunction
Users in Canada
Canon Canada INC Hours a DAY, Seven Days a Week
Setup Guide
Using Your Documentation
Conventions
Viii
Contents
Automatic Dialing Sending a Document Using Group Dialing
High Resolution Paper HR-101
Using the MultiPASS Desktop Manager
Closing the Desktop Manager
Receiving Faxes
Sending a PC Fax From a Windows Application
Editing an Existing Cover
Scanning a Document into the MultiPASS Desktop Manager
Uninstalling the Desktop Manager in Windows
Setting Up Send Fax Options
Working With Documents in the Desktop Manager
Appendix a Specifications
BJ Cartridge and BJ Tank Maintenance Using Ink
Troubleshooting
Maintaining the MultiPASS C3000
Appendix B Using the MultiPASS C3000 as a Stand-alone Fax
Entering Your User Information
Introduction
Getting Help From Canon
Canon Canada
Servicing the MultiPASS C3000
Main Components of the MultiPASS C3000
Front View
Back View
Inside the Printer Area
Using the Operator Panel
Press when you want to resume printing
Loading Paper in the Sheet Feeder
Preparing Documents for Faxing Copying, or Scanning
Loading the Document
Document on a flat surface to even the stack
Feed
Adjust the document guides to the width of the document
ADF until you hear a beep
Printing With MultiPASS C3000
Selecting Paper Types
Paper Handling
Shirt Transfers Greeting Cards
Chapter Printing With the MultiPASS C3000
Installing a Printer Driver
Paper Guidelines
Printing a Document
Printer Setup Within Windows
Opening the Printer Properties Dialog Box in Windows
Using the Printer Driver in Windows
Accessing the Printing Options Within Windows
Using the Windows Tabs
Chapter Using the MultiPASS C3000 as a Printer
Specifying Your Printing Options
Recommended Graphics Settings
Driver settings To achieve Print Quality Color Model Results
Using the Setup Analyzer
For Quick Color Printing
Printing Speed Versus Color
For High Quality Color Printing
For Monochrome Printing
Other Ways to Improve Print Speed in Windows
Chapter Printing With the MultiPASS C3000
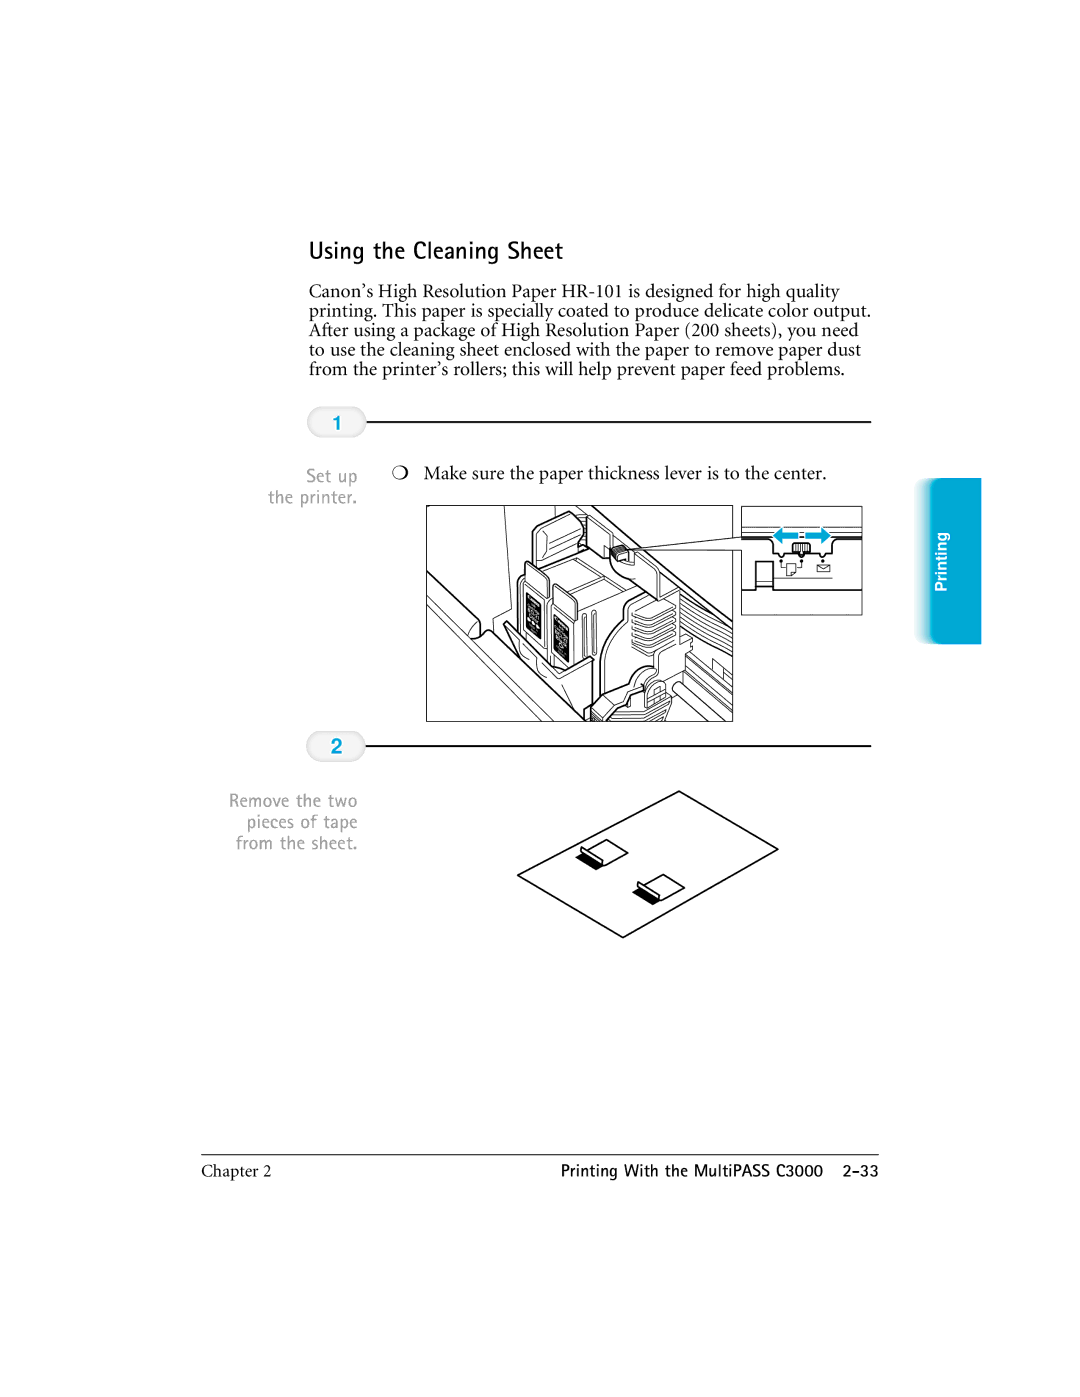
Setting the Paper Thickness Lever
Follow these steps to set the paper thickness lever
Set the paper thickness lever Complete the operation
Paper Thickness lever
Printer Settings for Various Print Media
Media BC-21 BC-20 Method Limit Sheets
Loading Paper
Automatically Feeding Paper
Pull the paper support up until it stops Fan the paper
Auto Feed Guidelines
Paper Limit
Manually Feeding Paper
Start your print operation
When you are prompted, insert the single sheet
Printing On Envelopes
Make sure that the paper thickness lever is set to the right
Curls and expel air from inside the envelopes
Make sure the flaps of the envelopes are flat and not curled
Stops
Insert
Now you can start your print operation
Using Canon’s Specialty Papers
Specialty Paper Guidelines
Uncurling Back Print Film
Rolled up for About five Minutes
High Resolution Paper HR-101
Using the Paper Output Guides
Using the Cleaning Sheet
Set up
Sheet
Down going into the sheet feeder
Printing On a Fabric Sheet
Fabric Sheet FS-101
Printer
Set up the MultiPASS Printer Driver for Windows
Dry and then wash the fabric sheet
Setting up speed dialing
Using the Desktop Manager folders
Setting up the Address Book
Using the Fax Log
Starting the MultiPASS Desktop Manager
Windows 95 Users
Exploring the MultiPASS Desktop Manager Window
Windows 3.1 Users
Menu Bar
Toolbar
Closing the Desktop Manager
Save AS -SA VES
Using the Desktop Manager Folders
System-defined Folders
User-defined Folders
Viewing Documents in the Desktop Manager
Setting Up the Address Book
Sorting the Documents in the List
Address Book Entries
Working With Address Book Entries
Sorting the Address Book
Adding and Editing an Individual Entry
Space
Adding and Editing a Group Address
Beginning of a number
Using a Group Address
To import
Importing an Address Book
Text file, click on
Click Import
Column, click Import
To export
Exporting the Address Book
Click on
Column, click Export
Setting Up Your Speed Dial Assignments
Click Export
Then click OK
Assigning an Individual Recipient to a Speed Dial Code
Defining a Group Speed Dial Code
Using the Fax Log
Displaying the Fax Log
Printing the Fax Log
Viewing a Fax Listed in the Fax Log
Fax Log dialog box, double-click the fax document listed
Sending Faxes With
Regular Dialing
Sending a Document
Party’s fax Number
MultiPASS C3000 begins
Number
Use automatic
Automatic Dialing
Load
Number you wish to fax to
Sending a Document Using Group Dialing
Choose the group you wish to send to
Manual
Redialing
Automatic
To Cancel Automatic Redialing
Resending a Fax After an Error
Unit then prints an error report
Manual Sending
Pick up the telephone and dial the other party’s fax number
Messages Displayed During Sending
Cancel Sending
Press Stop
See
Transmitting the Document
To open the operator panel to remove the document see
Feed the Place the document face-down in the ADF
START/COPY
Setting the Resolution
Adjusting the Quality of Your Faxes
You press only one button even if you do not press
MultiPASS C3000 has three resolution settings
Follow these steps to set the resolution
Setting the Contrast
After about five seconds, the LCD returns to Standby mode
Create a PC
Sending PC Faxes
Sending a PC Fax From a Windows Application
Open the Print window in the application
Print your
Printer driver
Defining Send Fax Options
Attaching a Cover
Sending Faxes With the MultiPASS C3000
Creating a Fax Memo in the MultiPASS Desktop Manager
Designing a Fax Cover
Preparing the Cover Page Background
Create and print your background Specify and hold the fax
Save
Opening the Cover Page Designer
Locate the held fax document and open it
Document Viewer
Using the Cover Page Designer
Creating a New Cover
Have your background template ready
Inserting Variable Fields
To select all fields, on the Edit menu, click Select All
Adjusting the Appearance of the Fields
Desired fields
To move a field, drag the selected field to a new location
Sending Faxes With the MultiPASS C3000
Editing an Existing Cover
Printing a Fax Cover
Deleting a Cover
To save the changes under the same name
Preview before printing
Print the cover
Receiving Faxes
Receiving Documents
Receiving Documents Automatically-Fax Only Mode
How Fax/Tel Mode Works
Receiving Documents Manually-Manual Mode
Using the Telephone to Receive a Fax
Using an Answering Machine-Ans. Machine Mode
Using the MultiPASS C3000 With an Answering Machine
Printing Documents Received in Memory
Receiving While Registering, Copying, or Printing
Receiving Faxes to the MultiPASS Desktop Manager
Receiving a Fax into the In Box
Printing a Received Fax When Your Computer Is Off
C3000, press Function key
MultiPASS C3000 begins printing the document
Using the Distinctive Ring Pattern Detection Drpd Feature
Speed dialing
Keypad
Types of Ring Patterns
How Drpd Responds to Calls
Without ringing Machine Tel Rings to alert you to pick
Incoming Call Your Setting From Fax From Telephone
Answers as a fax
Does not ring
Copying Documents
If you want to change the copying resolution, press
Enter the number of copies
Scanning a Document into the MultiPASS Desktop Manager
Using the MultiPASS Desktop Manager to Scan Documents
Click
To start the scan, click the Scan button
Scanning From a Windows Application
Resolution
Advanced Scanning Options
Copying and Scanning With the MultiPASS C3000
Working With Documents
Selecting Documents in the Desktop Manager
Managing Your Documents Desktop Manager
Printing a Document in the Desktop Manager
Working With Jobs in the Out Box Folder
Print dialog box, specify the number of copies and click OK
Job Status
Each job in the Out Box folder is assigned a status Active
Error
On Hold
Needed
Stopping an Active Job
Sending a Scheduled, Held, Failed, or Stopped PC Fax
Now
Moving a Document
Creating a Folder
From the File Menu, click New Folder
Renaming a Document or Folder
Deleting a Document or Folder
Emptying the Trash Folder
Importing a Document
Exporting a Document
Attaching a Document to Electronic Mail E-mail
Annotating a Document
Viewer
On the File menu, click Exit
To do so
Features of the Document Viewer Window
Annotation Panel
Adjusting Your View of the Document
Changing the Document Orientation
Adjusting the Display Size
Adjusting the Image Display
Reviewing Information About the Document Image
Paging Through Your Document
Click the page on the Page Panel
Adding Annotations to Your Document
Adding a Sticky-Note
Concealing a Region
Inserting a Stamp
Highlighting Your Document
Creating a Drawing Graphic
Showing and Hiding Your Annotations
Revising Your Annotations
Selecting One or More Annotations
Resizing the Annotation
Moving an Annotation
Copying and Pasting an Annotation
Saving All or Part of a Base Page of Your Document
Exporting the Document
Removing an Annotation
On the File menu, click Export
Printing the Document
Adjusting the Document Viewer Default Options
Working With Documents in the Desktop Manager
Setup and Other Utilities
Setting Up MultiPASS C3000 Options in the Desktop Manager
Setting Up Preferences
Date Format and Display Language
Fax Information
Setting Up Send Fax Options
Volume
Phone Line
Restoring the Default Settings
Setting Up Advanced Send Fax Options
Error Correction ECM
Setting Up Receive Fax Options
Setting Up Advanced Receive Fax Options
Ring Time
Ink Saver Mode
Speed
Ring Tone You set the tone of the ring
Default Action if No Answer to Telephone
Setting Up Speed Dial Assignments
Making a Phone Call From the Desktop Manager
Phone dialog box, enter the phone number you
Using the Status Monitor
Opening the Status Monitor
Using the Minimized Status Monitor
Using the Status Monitor Window
Status Messages
Closing the MultiPASS Background
When you start the Desktop Manager again at a later time,
When you open Windows
Background first, you avoid receiving error messages when
C3000 has been reconnected to the port. You can also open
Removing MultiPASS Background From StartUp
Restarting the MultiPASS Background
Adding MultiPASS Background to StartUp
Disconnecting the MultiPASS C3000
Using MultiPASS Diagnostics
Uninstalling the Desktop Manager
Uninstalling the Desktop Manager in Windows
Uninstalling the Desktop Manager in Windows
Maintaining
MultiPASS C3000 Guidelines
Routine Maintenance
Cleaning Inside the MultiPASS C3000
Platen
Press Function
Printing the Nozzle Check
Buttons until
Cleaning the BJ Cartridge Print Head
Press the or
BJ Cartridge Guidelines
BJ Cartridge and BJ Tank Maintenance
Using Ink
Replacing the BJ Cartridge
Cartridge holder moves to the center of the unit
Open
Damage the unit. If the cartridge holder does not move
Do not try to move the cartridge holder manually this may
Cartridge holder to the center of the unit
Remove the protective material from the BJ cartridge
Close the printer cover, and press
Cartridge holder then moves to the center of the unit
Replacing a BJ Tank in the BC-21 Color BJ Cartridge
Grasp both sides and lift it up
Unit
Take the new BJ tank out of its packaging
Slide the new BJ tank into the empty slot
Storing a BJ Cartridge
Open Ink Cartridge Storage Box
Close
All cables
Transporting the MultiPASS C3000
Make sure the BJ cartridge is in the home position
Pack the unit
Troubleshooting
NO. X X X X X X X
Stops the operation
Paper Jams
Jams in the Automatic Document Feeder ADF
Gently pull the operator panel toward you
Start your operation again
Jams in the Sheet Feeder
Gently pull any jammed paper out of the unit
LCD Messages
Message Error Code Cause Action
Information Messages
Is full
Error Messages
Contact the other party and have them check their fax
Cartridge mechanism
Printing Problems
Application may not be set up properly
Problem Cause Solution
Ink does not appear
Print jobs vanish or you
Occur Be causing the jams It in the sheet feeder. This
Envelopes do not load
Try turning the paper over
To Coated Paper
Faxing Problems
For the feature you want To use
Cannot receive a
Quality. Be sure the other
Telephone Problems
Copying Problems
MultiPASS Hardware Cannot Initialize
Technical Notes
Windows Printing System Users
Make the changes, contact the computer manufacturer
Troubleshooting
Memory Clear Report
Color Bubble Jet Printer
17 to 24 lb 64 to 90 g/m2
LC-301
Jet printers
Automatic feed
Mm b 3.4 mm c 297 mm d 3.0 mm
11.0 14.0
Ieee 1284-compatible, bi-directional parallel interface
BJ Cartridges
Facsimile
Copier
Monochrome Scanner
Document sizes
42 214 mm
MultiPASS Desktop Manager for Windows
Scanned image
General Specifications
Receiving Faxes and Phone Calls Automatically Fax/Tel Mode
Type of call
LCD Menu System
Entering Information MultiPASS C3000
Entering Your User Information
Enter today’s
Time using
Speed dialing Keypad Then press Button
Date
Set the time using the 24-hour clock system Example
0730 = 730 a.m = 505 p.m
Press START/COPY
When the fax
After a few seconds, the LCD display changes to
MultiPASS C3000 returns to standby mode
Glossary G
CCITT/ITU-TS
Drpd
Glossary
Glossary
One-touch speed dialing keypad
Printer driver
Pulse See Rotary pulse
Registering
Transmit Terminal ID. See Sender ID
See Sending Typeface
Glossary
Exporting 29, A-2 Importing Uncurling Setting up
Assorted Paper Starter Kit SK-101 Bulletin Board Service BBS
Date format Default settings 8-5 Delete fax, after sending
CD ROM A-8
Printing, MultiPASS Desktop Manager
Problems 10-17-19 Feeding paper
Magnetic fields
Jams, paper Job status Layout area
Display 1-6, A-5 Menu system B-1
Memory sending Menu bar 3-3-4, 4-22 Messages, LCD
Print spooler Printable area A-3 Printer cover 1-4-5
Receiving telephone calls Recommended graphics settings
Receive Mode 5-1-5, 5-10
Receive conditions
Spilled ink Spool settings
Technical notes Technical support 1-2
Print Manager Printing options