Print
Background
Preface
Table of Contents
220
218
221
222
Primer
General introduction
What is 123 Print
Print
Purpose
Sample labels
Sample Labels
Primer October
User Interface
Project Flow
Labels
Project
Labels
User input is required on screens at a and B
User Interface
Getting Started
Getting Started
Is C\123Print
This section describes how to install 123 Print
Copyright 2007 MCL Technologies All Rights Reserved
Copyright 2007 MCL Technologies All Rights Reserved
Desktop
Once 123 Print is installed, start it by
Starting 123 Print
Activation
Activation
Click Next October
Enter the License Number found on your License Certificate
Proceeding, you must read and accept these license terms
Agreement
Software versus
Copyright 2007 MCL Technologies All Rights Reserved
Enter the Password found on your License Certificate
Copyright 2007 MCL Technologies All Rights Reserved
Main 123 Print window is displayed as shown here October
Cut on the Windows desktop
Click 123 Print Settings
General Setup
Setup
DPL Connection
Setup dialogue box
DPL Connection
Click on the DPL Connection tab
MCL Connection
MCL Connection
Click on the MCL Connection tab
MCL Connection options screen is displayed as shown here
Local Settings
Local Settings
Click on the Local Settings tab
Local Settings screen is displayed as shown here
Getting Started Assign Com 2 Printer Port To
Others
Labels. In the Setup window
Others
Click the Others tab
Copyright 2007 MCL Technologies All Rights Reserved
Creating a Project
What is called a label program
Creating a Project
Programs for your Datamax printers
Project Description
Click Project Click Project Description
On the Project Description screen
Click Project Click User Interface
User Interface
General introduction User Interface
User Interface for a text display printer is as shown here
Text Display
Status Toolbar
Welcome Screen
Welcome Screen
You entered in the Project Description in Section
Shown here
Graphical Display Elements
Large
About Printer Status see .2 User Interface Graphical
Display Status Toolbar
Copyright 2007 MCL Technologies All Rights Reserved
Copyright 2007 MCL Technologies All Rights Reserved
Select Label Screen
Than those supplied by default by 123 Print
Select Label screen
Click on the Select Label screen, or
Click the Select
Copyright 2007 MCL Technologies All Rights Reserved
Screen
Quantity to Print Screen
Click on the Quantity to Print screen, or
Click the Quantity
Click on the Select Quantity screen, or
Display Quantity to Print Screen
Copyright 2007 MCL Technologies All Rights Reserved
Appropriate here for your environment
Print Error Message Screen
Copyright 2007 MCL Technologies All Rights Reserved
Creating a Project October
Associate a label
As a label program
File Name
Nbr
Label Name
Quantity to
Dynamic label
Static label
ƒ See .3.1 Edit
ƒ See .3.2 Variables
Click the Edit
Edit
Edit
Variables
Variables
Copyright 2007 MCL Technologies All Rights Reserved
Program
Procedure is identical for graphical displays
Purchase
Text displays are used in the following example. However,
Input Methods
Copyright 2007 MCL Technologies All Rights Reserved
Click OK October
Location
Copyright 2007 MCL Technologies All Rights Reserved
Copyright 2007 MCL Technologies All Rights Reserved
Copyright 2007 MCL Technologies All Rights Reserved
Copyright 2007 MCL Technologies All Rights Reserved
Button at the bottom of the Process list to add a
Set the Condition field to Equal to
Select A2 Confirmation in the If Value field
Set the Then Goto field to Continue
Methods are available for your screen prompts
Front Panel Up/Dw Numeric
External Keyboard
Characters from the input
Creating a Project Extract To
For example, if you set Extract From 4
Extract To 6, you will extract 555 out
Read
External Barcode Reader
User will not be able to input a value that
Does not match the pattern
Input from the external barcode reader. Several
Weight Scale
Be received from the weight
From the weight scale. The following
Validation Mode Set the mode with which the data
Measurements from the weight scale
Copyright 2007 MCL Technologies All Rights Reserved
Creating a Project
List by typing entries directly
Select Value from List
List. To select a variable, click
Variables Icon beside the table
Creating a Project October
Select Value from File
Described above
Example
That is used for browsing and searching
That entry as the input
Display Data
You need to set up when you select this input type
Mapping
Mapping
Copyright 2007 MCL Technologies All Rights Reserved
Copyright 2007 MCL Technologies All Rights Reserved
Copyright 2007 MCL Technologies All Rights Reserved
Example looks as follows
Result Labels
Two different ways-as a list or as thumbnails
Labels List
Added for your label
Deleting a label
Adding more labels
To add a new label, simply click on
Modify the properties as appropriate
Lookup Files
Click Project Click Lookup Files
Lookup Files window Click on the Data Button
Lookup File Data
To delete a Lookup File from your project
Select the file you want to delete
Add Lookup file
Add Lookup File
File. The file you create is of type *.dat
Are saved
Copyright 2007 MCL Technologies All Rights Reserved
Copyright 2007 MCL Technologies All Rights Reserved
Add Lookup File from Scratch Add Lookup File from Import
Import file
Add Lookup File from Import File
Several file types are valid for import
Dat, *.txt, *.xls, *.cvs
Copyright 2007 MCL Technologies All Rights Reserved
Check the checkbox beside First line = Column Title
Double Click on the field to be edited
4 Edit Lookup File Data
Scratch
Add Lookup File from Scratch
123 Print, you can create a Lookup File from Scratch
Copyright 2007 MCL Technologies All Rights Reserved
To save the Lookup File
Save Lookup File
Creating a Project October
Add Lookup file from Import File
Edit Lookup File Data
Edit Data
Columns Right click any of the column headers
To add a record Click the Add
Add record
To insert a record
Insert a record
Delete record
Modify a record
Creating a Project October
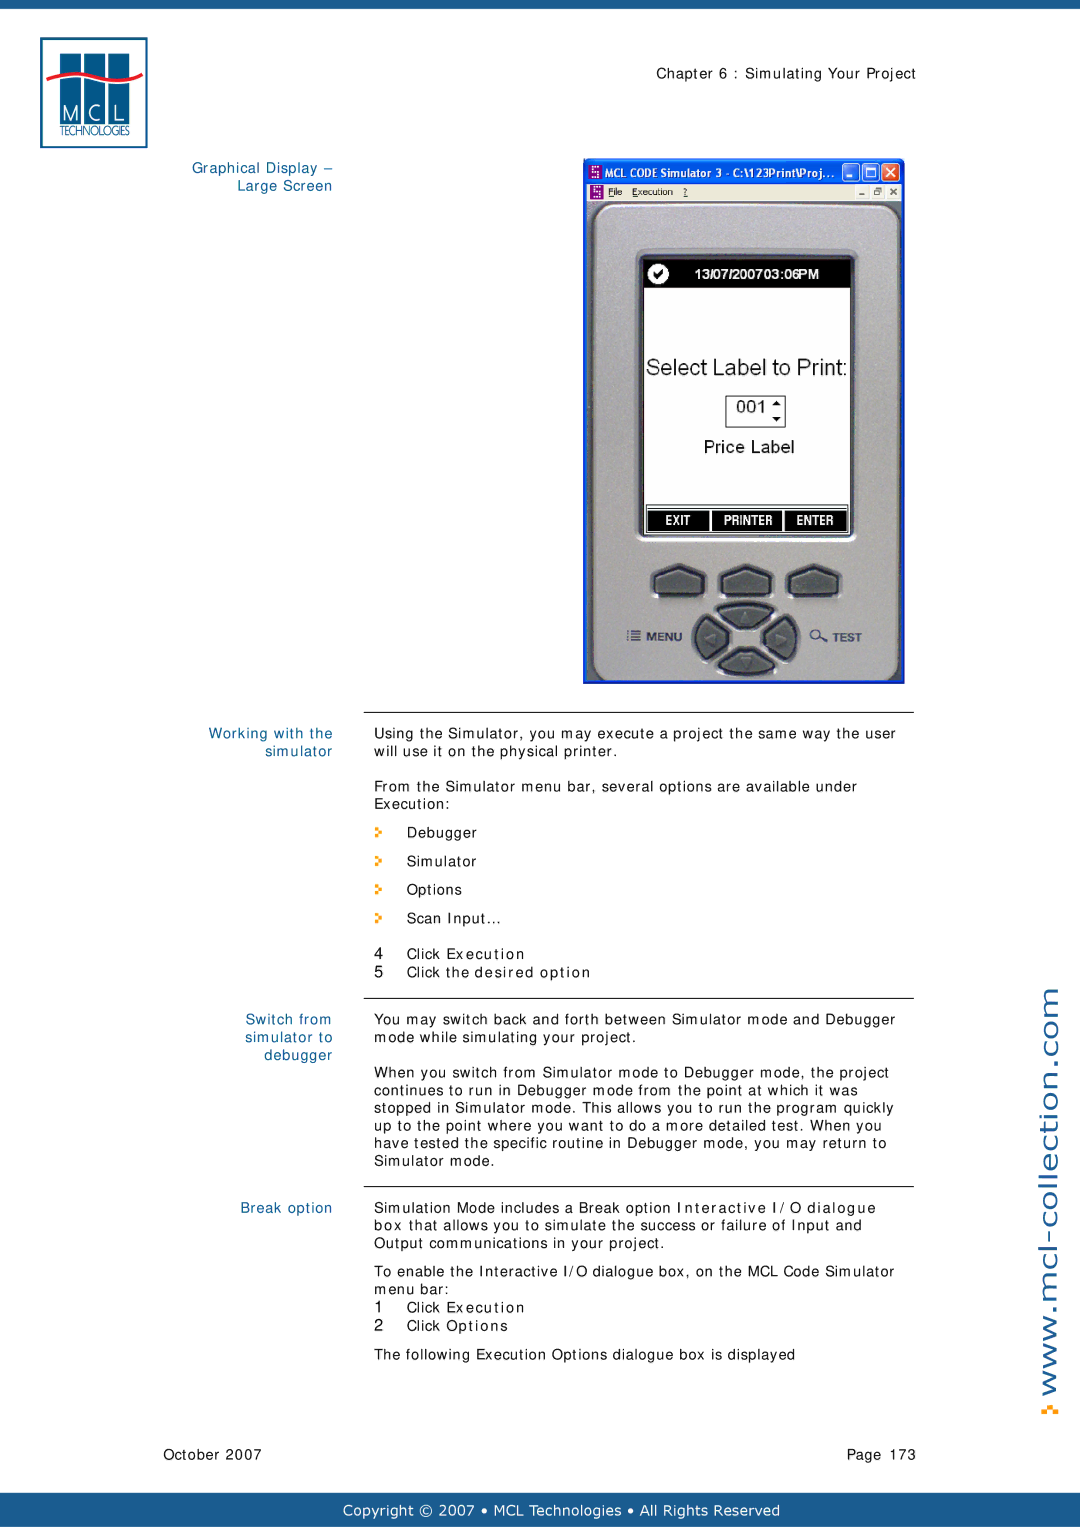
Graphical Display
System Setup
Click System Setup
Copyright 2007 MCL Technologies All Rights Reserved
Soft Keys Setup
Soft Keys Setup Graphical Display Only
Click Project Click System Setup
Datamax printer keys
Copyright 2007 MCL Technologies All Rights Reserved
Copyright 2007 MCL Technologies All Rights Reserved
Small Screen
Large Screen
Connected serially to your Datamax printer
Auxiliary Communications
Copyright 2007 MCL Technologies All Rights Reserved
ƒ Never The input buffer is never cleared October
Designing a Label
Run 123 Print
BarTender Integration
Click Save As…
Launch BarTender
Click BarTender
Label
Designing a Label Click on the browse icon
Set the Label Properties as per .3- Labels
Copyright 2007 MCL Technologies All Rights Reserved
…\BarTender\Formats as seen in above,
Master copy in BarTender’s default label location
Project\Labels
Red as shown below
Label Graphic Elements
Using Processes
Using Processes
This chapter covers the following topics and processes
Introduction to 123 Print Variables 131
Add a process Process window is displayed as shown here
Click Variables
Click the arrow
Copyright 2007 MCL Technologies All Rights Reserved
Label programs
Introduction to 123 Print Variables
Introduction to
Print variables
Price Label
User local
All local
For definition as user local variables
System
Global
Variables may be used by any label program
You can perform in your label program
Branch
Branch Processes
Box to see the list of available branching processes
Case and Branch
Case and Branch
Hardware
Control and Branch
Following variable contents give the following results
Variable against a specific pattern
Defined destination-a screen, label or code line
Goto Label
What is a label
Reference
Goto Label
Goto Screen
Goto Screen
Add the process Goto Screen to your label program
Goto Screen dialogue box is displayed
Key & Branch process allows you to request a program stop
Key and Branch
Branch if a time-out occurs without user input
Key and Branch
Set Label
Set Label
Test and Branch
Test and Branch
Select the comparison criteria
String or numeric?
Date Operation
Date Operation
Date Add/Subtract
Date Conversion
Date Difference
File Search
File Search
Description, and B0 Manufacturer
Respectively into the variables A4 Product Code, A5 Product
Operation
Mathematic Operation
Mathematic
Perform in your label program
Other
Other Processes
Box to see the list of other available processes
Delay
Delay
MCL Code
MCL Code
Type your comment
To insert a comment, proceed as follows
Add the process Note to your label program
Print label
Print Label
That you can perform in your label program
Serial Communications
Serial communication
Communications
Checkbox beside Extract from Received Data
Serial
Serial
Abbreviations
Serial Out
Serial Out
Variables in your label program
Processes on Variables
Variable Processes
Box to see the list of available processes for variables
Variable Assign
Variable Assign
Initialized with the system date, System Variable 73 Date
This example, the first three variables E0, E1, and E2 are
Existing variables or constants into a new variable
Variable Concatenate
To concatenate variables, proceed as follows
Add the process Variable Concatenate to your label program
Variable Extract
Variable Extract
Variable Substring process
Their contents to variables B1 and B3 respectively
Examples
Variable Format
Variable Format
Copyright 2007 MCL Technologies All Rights Reserved
Variable Length
Variable Length
Beside the Result Variable box
Variable Position
Variable Position
Replace
Variable Search and Replace
General introduction Variable Substring Examples
Variable Substring
Simulating Your Project
Using the simulator
Simulation Mode
Running on the printer
With a mouse click
Click Options
Click Execution
Click the desired option
Check the checkbox beside Interactive I/O dialogue box
Click Execute Click Scan Input… F12
Click Execution Click Debugger
Debugger Mode
Text Display Printer
MCL Code Viewer
Using the Viewer
MCL Screen View
Local Files Viewer
Variable Viewer
Click Execute Click Options
Options
Copyright 2007 MCL Technologies All Rights Reserved
Large graphical display printer
Deploying a Printer Project
Deploying a Printer Project
Affect one printer at a time
Available in 123 Print
A given printer
Connect / Disconnect Printer
Before proceeding with this section
Connect
Copyright 2007 MCL Technologies All Rights Reserved
Following sections
Printer controls
To disconnect 123 Print from your printer
Disconnect
Information shown on these screens
Printer Status
Printer Status
Click on the Printer Status
Deploying a Printer Project Activated
Deploying a Printer Project October
To control a printer, on the 123 Print menu bar
Printer Control
Following printer controls are available in 123 Print
Control execution
Cancel Printing
Feed Label
Pause Printer
Load File / Control
Load File / Control
Load firmware and MCL system menu options
Load Firmware
Load firmware action
Copyright 2007 MCL Technologies All Rights Reserved
Download Process
Load font action
Load Font
Select Load Font
Load font options
Load graphic action
Load Graphic
Select Load Graphic
Load graphic options
Copyright 2007 MCL Technologies All Rights Reserved
Load label action
Load Label
Select Load Label
Load label options
Load lookup action
Load Lookup
Select Load Lookup
Load lookup options
Load any file action
Load Any File
Select Load Any File
Load any file options
Load profile action
Load Profile
Select Load Profile
Load profile options
Action
Load MCL-Project
Select Load MCL-Project
Load project options
DPL Control action
Load DPL Control
Copyright 2007 MCL Technologies All Rights Reserved
Choose the User MCL Agent Command option
Remote printer management using DMXNet Manager
MCL Agent Control
MCL Agent Control
Click Load Project
Into your printer using the Load Project function
Load Project
General introduction Create script
Scripts
Script actions
Script Actions
You want this script to execute. On the Script menu bar
Click Add
Pause options
Described in .4 Load File / Control
Pause
Script edit action
Script Building
Script add action
Select the action you want to delete
Script delete action
You have previously inserted in the script
Script save
Script Save
Click Save, or
Click Save as…
At any time. On the Script menu bar
Script Open
Script open
Script execution
Script Execution
Downloaded with the project load
Progress
Indicating the progress of the script execution
License Certificate
Appendix a Sample License Certificate
Sales Order
Go to the Datamax Menu Mode
Appendix B Datamax Printer Setup
Supports
Appendix C Supported Datamax Printers
Class
Appendix D System Requirements
Replace By 3 Mapping states the following
Appendix E Mapping Label Graphic Elements
Understanding
Restrictions
= Invalid option
Appendix F Connectivity / Function Matrix
Receive an Operation Failed dialogue box as shown here
System Menu together will not succeed
MCL Technologies UK Competence Centre
MCL Technologies US Competence Centre
MCL Technologies Ireland Competence Centre
MCL Technologies NL Competence Centre