Model LR16
Safety Instructions
Important Safety Instructions
Table of contents
Adjusting the input level Low-cut filter Limiter Equalizer
Signal flow of the mixer Connecting sources
Recorder functions Recording/Playback
Setting on the memory play setup screen
Performing memory play
Adding a mark Adding a mark on-the-fly
Specifications
Recorder functions File transfer to/from a computer
Recorder functions Other functions
About power supply
Precautions on installation
Introduction
About copyrights
About version upgrade
Cleaning the exterior
Condensation
Overview
Main features
Recorder section main unit features
Unpacking the carton
Before using the unit
Mounting the main unit and control unit on the rack
Setting the main unit and control unit separately
Usage examples of LR16
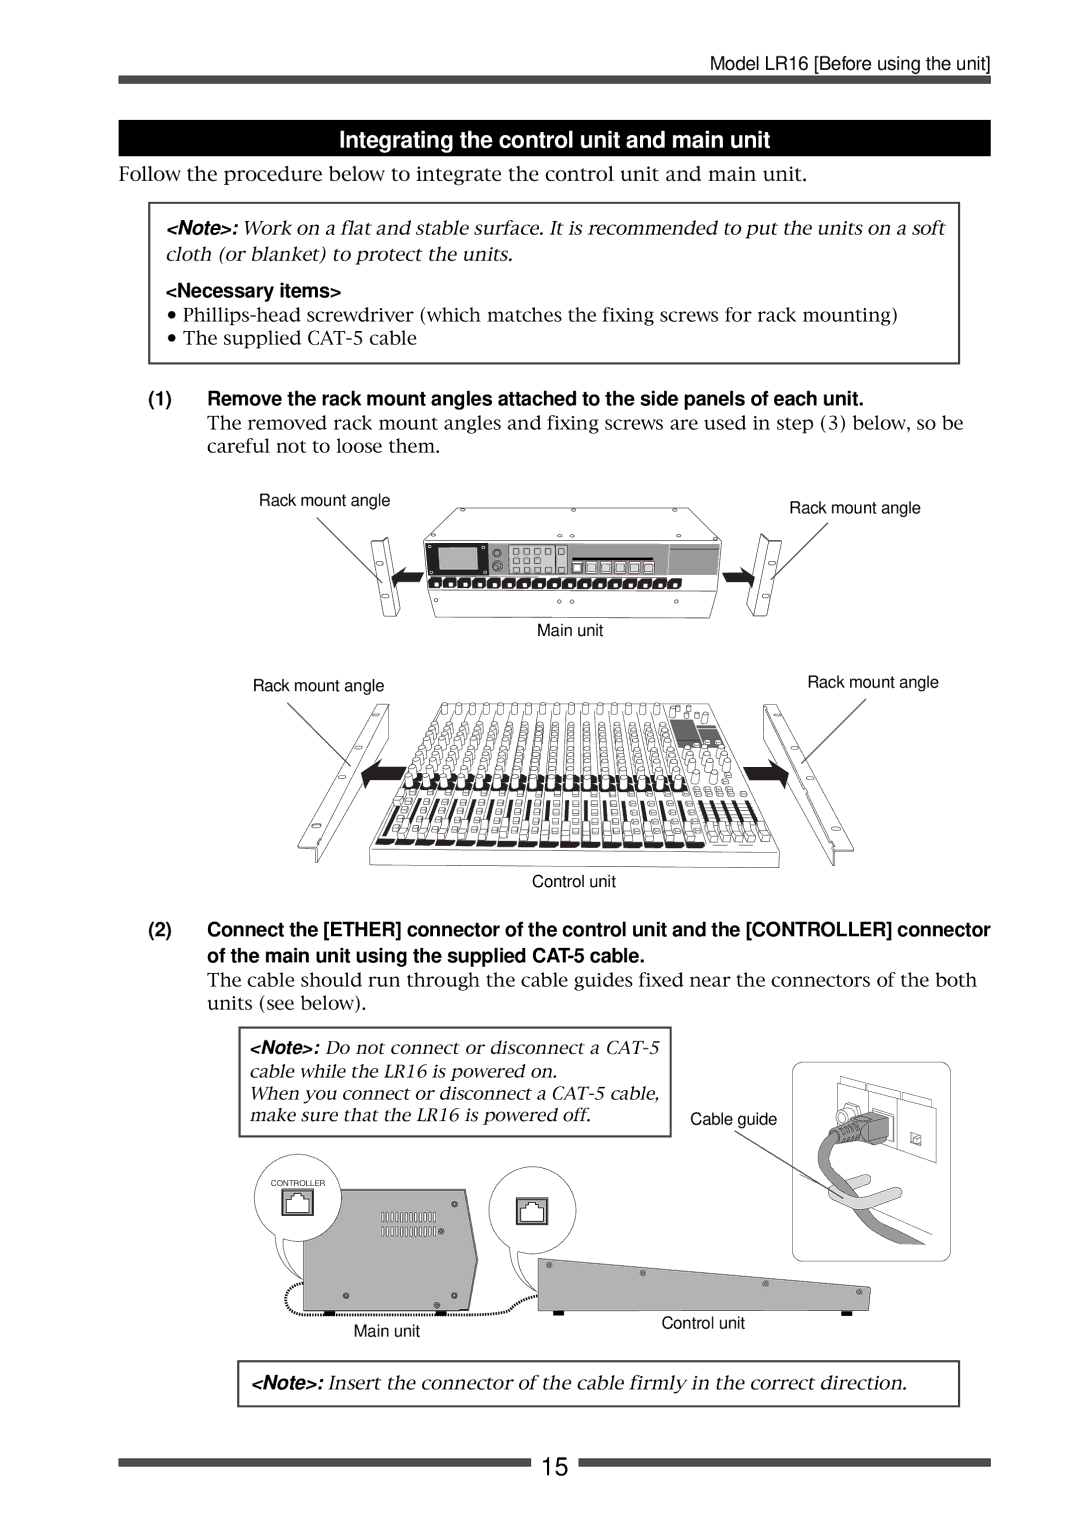
Integrating the main unit and control unit
Necessary items
Integrating the control unit and main unit
Rack mount adaptor After attaching the adaptor
Connecting the power cord
Turning on the power
Preparation of power supply
Connection example live recording
Connection to external devices
MTR
Connection example home recording
Balanced
Balanced and unbalanced inputs/outputs
Names and functions
Control unit input channel 1 through
Solo switch
POST/PRE switch
Mute switch
14 ST/1-2/3-4 assign switches
Control unit Master channel
SUB in jacks and control
Monitor section
Phantom 1-8, 9-16 indicators
Internal effects section
Recorder control section
Output Limiter switch
AUX Send controls / Solo switches
24 27 EFF Send control / Solo switch
Assign to Stereo OUT switches
Main unit front panel
Control unit rear panel
REC Track Select 1-16 keys
NEW Project key
Transport keys
ST MIX key
Main unit rear panel
Display details
Home screen
Memory play setup mode screen
Menu mode screen
Model LR16 Names and functions
Mixer functions
Mixer basics
Signal flow of the mixer
Phantom power supply setting
Connecting sources
Adjusting the input level
Connecting sources to the input connectors
Limiter
Gain adjustment while monitoring
Equalizer
Low-cut filter
Post-fader
Using an external effect processor
Using AUX 1, 2
Pre-fader
Using the internal effects processor
Using Insert
Applying the internal effects
About the effect types
Monitoring
Solo monitor
Channel grouping
Set the Source switches on channels 15 and 16 to TRK
Using SUB
Block diagram
Recorder functions
Recording/playback
Recording format
Recorder basics
Project
Recording mode
Bass
Live recording
Recording to tracks 1 through
Preparation
Adjusting input level =recording level of each mixer channel
Recording
Adjusting the channel output levels sent to the stereo buss
Playing back a project
Locate to the beginning of the project
Press the Play key in the recorder or mixer section
Multitrack recording
Connecting a sound source
Adjusting the input level while playing back tracks 1
Overdubbing
Performing overdub
Mixdown
Starting mixdown recording
Adjusting level and sound of each track
Punch in/out
Punch in/out using the transport control keys
At the punch out point, press only the Play key
Punch in/out using a footswitch
Model LR16 Recorder functions / Recording/playback
Memory play
Numeric key number 0 through 9
Memory Setup key in the recorder
Press the Enter key
Section of the main unit
Selecting the memory play mode
After you complete assignment,press EXIT/NO key
Selecting a channel pair for memory play
Press an illuminated numeric key
Performing memory play
Adding a mark via the mark list screen
Mark function
Adding a mark
Adding a mark on-the-fly
Press the Enter key to bring up the Menu screen
Locating to a mark point
Editing a mark
Editing a mark label
Editing a mark position
Example of label editing
Edit the time data in the following manner
Deleting a mark
While Select is highlighted, press
Project management
Selecting a project
Creating a new project
Use the Menu dial to highlight Rename press the Enter key
Editing a project name
Use the 3 key to enter a
Rolling back a project
Name editing example
Right
Use the Menu dial to highlight Roll back press the Enter key
Saving a project to an external medium
Use the Menu dial to highlight Export press the Enter key
Export screen details
Editing the duration
Selecting tracks
Press any operation key
Copying a stereo mix file to an external medium
Selecting a desired file
Selecting all files
Select the files to be exported
Deleting a project
Protecting a project
Display now shows the project list screen
Use the Menu dial to highlight USB and press the Enter key
Enabling USB connection
LR16 E
Protecting the internal hard disk
While USB to PC is highlighted, press the Enter key
While ? is flashing on the screen, press the Enter key
Copying data from the LR16 to a computer
Press the Enter key to bring up
Adjusting the display contrast
Setting the footswtich function
Other functions
While holding down the Record key, press the Enter key
Setting items Default
Formatting the internal hard disk
Initializing the system memory
Use the Menu dial to highlight Input and press the Enter key
To assign the destination channels of SUB
Method
Software version upgrade
Turn on the LR16 Press the Enter key to bring up Menu screen
Midi connection
Setting frame rate
Midi synchronization
Midi message supported by the LR16
While Default FS menu is highlighted, press the Enter key
Setting FS/Bit of project
Inputs/Outputs
Specifications
Input and Output Main unit
Input and Output Controller unit
Main unit
Physical dimensions
Power Consumption approx W
General
Model LR16
Midi Implementation Chart
Affect of Immunity on This Equipment
Declaration of EC Directive
Forthe US Customers only
Fostex America Limited Warranty Shipping
45, 52
Index
Page
Fostex CO