User’s Guide
Page
Warranty Time Period
Warranty Repair Coverage
Kodak Professional DCS 600 Series Cameras
Limitations
How to obtain service
Outside the United States
Product Support Options
Page
Table of Contents
Page
Powering Your Camera
Configuring Your Camera
Controlling Exposure
10-1
11-1
12-1
14-1
Appendix B Troubleshooting
Appendix F Remote Control Accessories
Information
System Requirements for your Computer
Macintosh
Windows
PC Card icon
Important Safeguards and Precautions
Important Info
Page
Electromagnetic Emissions
Vcci Statement
Features
About Your Camera
Page
Nomenclature
Camera Front
Camera Back
Camera Top
Camera Bottom
Camera Sides
Open Battery/PC Card Door
Viewfinder
Navigate Switch
Using the Navigate switch to Navigate the Image LCD Panel
Using the Navigate switch to Select the Focus Area
Selector button
Digital Function Buttons
Display Button
Record/Tag Button
LCD Panels
Top Status LCD Panel
Back Status LCD Panel
Image LCD Panel
Menu Bar
Menu icon
Icon Function Dropdown Menu
Folder icon
Display icon
Navigation Techniques
To Display the Menu bar and select a Menu bar icon
To Display a Dropdown menu
To Choose an item from a dropdown menu
To Choose an item from a menu screen
Status Bar
AE-L AF-L AF-ON
Rotating the Main-Command Dial While Pressing Buttons
Sub-Command-Dial
Rotating the Sub-Command Dial by itself
Rotating the Sub-Command Dial While Pressing Buttons
Drive Mode/Self-Timer Selector
To set a Drive mode
To set the Self-timer
Lens
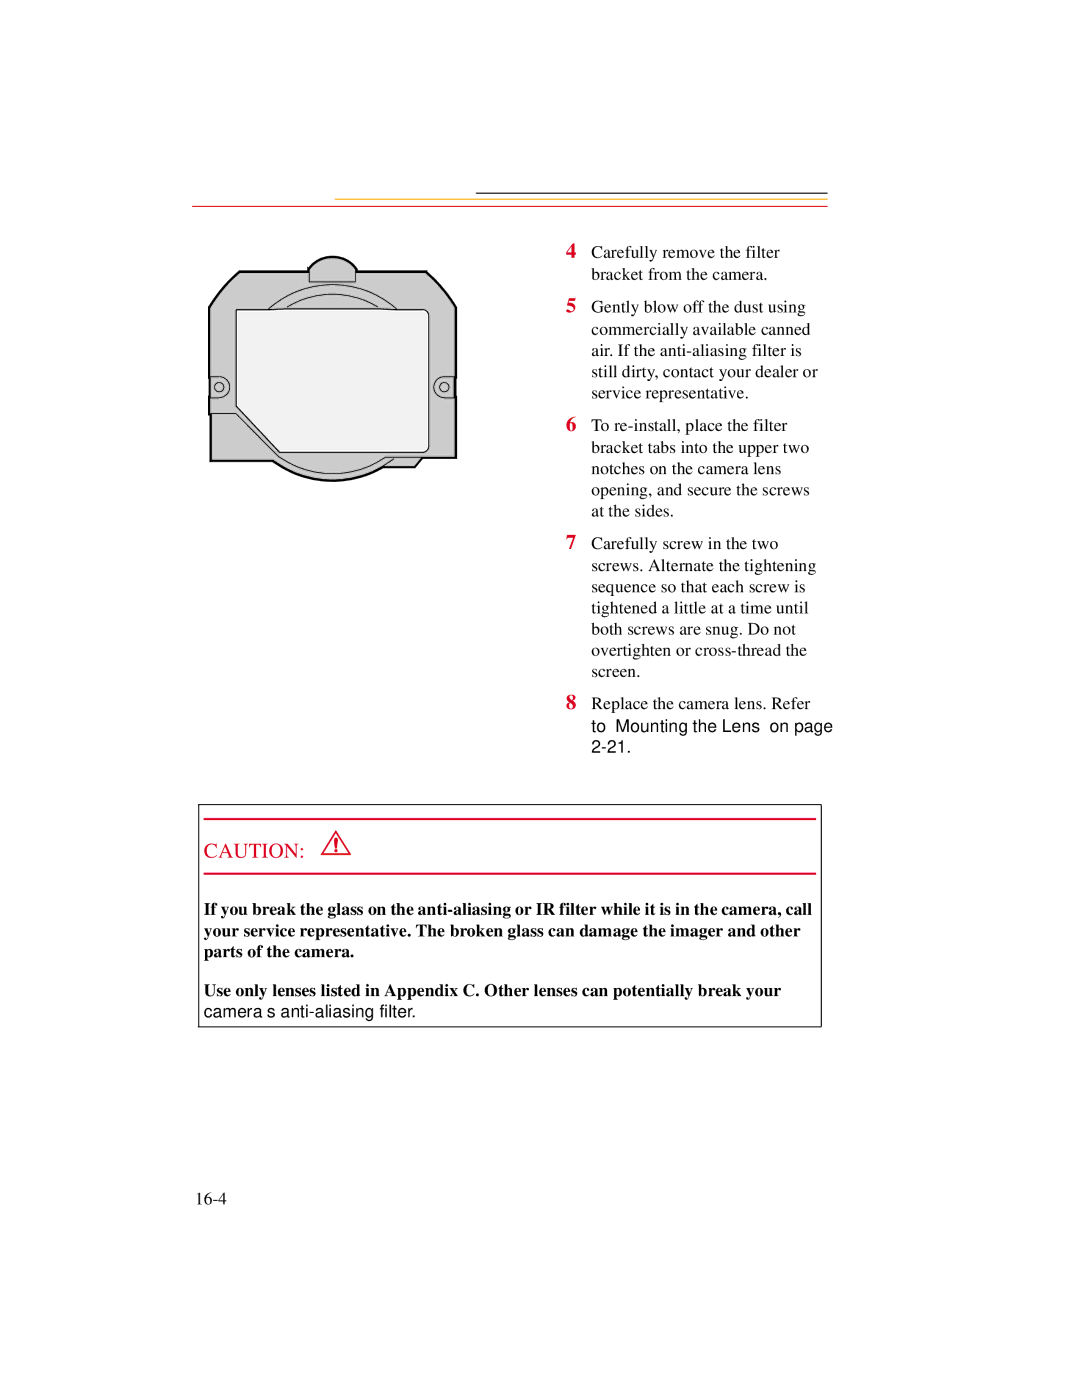
Mounting the Lens
Setting the Lens to the Minimum Aperture
Your Camera
Removing the Lens
IR Filter
Imager
Anti-aliasing filter
Camera Imager Size
Viewfinder Diopter
Illumination Switch
Mirror Lockup Lever
Depth-of-Field Preview Button
Accessory Shoe
Sync Terminal
Self-Diagnostic Shutter System
Changing Viewfinders
Removing the Finder
Attaching the Finder
Changing Focusing Screens
Camera Straps
Attaching the Neck Strap
Attaching the Hand Strap
Name Plate
Camera
Turning the Camera On and Off
Camera NiMH battery NiCd battery
Batteries
Inserting/Removing Batteries
Be sure that the Card Busy LED is Off before you continue
Power
Checking Battery Status
Icon indicates whether the battery needs changing
Battery Charger
Yellow light Green light Battery Status
Charging Batteries
ISO
Conditioning Discharging Batteries
Battery Conservation
PowerSave Mode
Waking your Camera from PowerSave Mode
Image LCD Panel Timeout
Meter Timeout
Situations Using Extra Battery Power
AC Adapter for Camera
Tips
Connecting the AC Adapter for Camera
Power
Camera
Date and Time
Page
Camera Properties
Setting Display Off Time
Setting PowerSave Time
Display Off Time screen appears
Enabling Sharpening
Sharpening screen appears
If you select Resolution, Resolution screen appears
Setting File Resolution
Image Resolution screen appears
If you select Units, the Resolution Units screen appears
Determining Total Actuations
Use Folder
This Use Folder 1 screen appears
Custom Settings
Selected Custom Setting screen appears
Using a PC Card
PC Cards
Dual Slots for PC Cards
Inserting/Removing PC Cards
Be sure that the Card Busy LED is Off before continuing
PC Card
Formatting a PC Card
Card menu appears
Confirmation screen appears
Selecting a PC Card or Folder
Jpeg and Tiff File Processing
Processing with Two PC Cards
Processing Images
Choice Images Processed
Processing confirmation screen appears
Condition Screen Your Action
Condition Screen Your Action
Changing Processing Settings
Processing Screen Defaults Result Settings Underlined
Processing Screen Defaults Result Settings Underlined
Working with Tiff Custom Files on your Computer
File Format Module
DCS Acquire Module or DCS Twain Data Source
Iptc Data Management
Loading Iptc Data from a PC Card
Quick Start
Before You Start
Page
Quick Start
Mode
Connecting the AC Adapter for Camera
AC Adapter for Camera
Page
Select a PC Card or Folder
Optional Settings Before You Start
Set the Date and Time
Date/Time screen appears
Basic Shooting
Press and hold the AF Area
Appears in the Top Status LCD panel and viewfinder
Lightly press the Shutter Release button
Page
Reviewing Images on Your Camera
Setting Display Contrast
Setting Display Options
Page
Tagging Images
Tag icon appears at the right of the Menu Bar
Deleting Images
Deleting a Single Image
Deleting More Than One Image
Delete Images menu appears
Associating a Sound File with an Image
ISO BKT
Page
Exposure
White Balance
White Balance Color Temperature Setting Degrees Kelvin
Selecting Custom White Balance
Exposure
Using White Balance Settings
Options- The White Balance Settings menu appears. You can
Selecting White Balance Settings
Deleting White Balance Settings
Delete White Balance Setting menu appears
Loading White Balance Settings
Rule Error Message
Page
Saving White Balance Settings using your Camera
Saving White Balance Settings using the Computer
Exposure Metering System
3D Color Matrix Metering
Center-Weighted Metering
Custom
Spot Metering
Setting the Metering System
Exposure Mode
Programmed Auto Exposure Mode
Shutter-Priority Auto Exposure Mode
Aperture-Priority Auto Exposure Mode
Manual Exposure Mode
High Shutter Speed
Slow Shutter Speed
Setting Exposure Mode
Page
Focus Area
Selecting the Focus Area
Focus Area Top Status LCD panel Viewfinder
Focusing
Locking the Focus Area
Selecting AF Area Mode
Subject. If the subject moves,
Focus Mode
Autofocus
Single Servo AF with Focus-Priority Stationary Subject
Single Servo AF with Focus-Priority Moving Subject
Continuous Servo AF with Release-Priority
Manual Focus
Manual Focus with the Electronic Rangefinder
Mode
Special Focusing Situations in AF
Manual Focus Using a Clear Matte Field
Page
Antialiasing Filter or IR Filter Effect on Focus
Sharpening
Preparing for Sharpening in the DCS Host software
Capturing Images
Preparing to Capture an Image
Seconds, or 32 seconds, use Custom Setting #15. Refer to
Basic Shooting
AF-L
Capturing
Frame number on the Back Status LCD panel increases by one
10-7
Two-Button Reset
Mode Set To Reference
Mode Effect
Setting appears in the Back Status LCD panel
Camera
Drive Mode
Choosing a Drive Mode
Single-Frame Shooting
Continuous Shooting
Using the Vertical Controls
Intervalometer
Intervalometer screen appears
Intervalometer Screen Your Action Result Settings
Hhmmss
Flash Photography
Recommendations for Flash Photography
Auto Aperture Mode
Attaching the SB-28D or SB-28DX
Turning on the SB-28D or SB-28DX
Standby Mode
Enabling/Disabling Standby Mode
Waking the SB-28D or SB-28DX from Standby mode
Setting Up Your Camera for Flash Photography
Page
Setting Up the SB-28D or SB-28DX
Mode indicator on the Speedlight’s LCD panel shows a
SEL
Test Firing
Using the SB-28D
Auto Flash Distance Range
Page
Making a Dark Background More Visible
Flash Sync Mode
Slow Sync
To avoid image blur, attach the camera to a tripod
Slow Sync
Rear Curtain Sync
Creating a Natural-looking Stream of Light
11-16
Calculating the Shooting Distance
Guide Numbers for Determining the Correct Aperture
Calculating the Correct Aperture
Guide Number Table
ISO Setting Multiplier
Image Review Mode
Working with Images on Camera
Setting the Review Mode
Navigating in Single Image Review Mode
Navigating in Four or Nine Image Review Mode
Reviewing Images
Navigating Horizontally
Navigating Vertically
Adjusting Display Contrast
Selecting an Image
Setting Display Options
Display Options screen appears
12-9
Tagging Images
Associating Sound Files With Images
ISO BKT
Image is not
Deleting More Than One Image
Recovering Deleted Images
Capturing Images in Each Exposure Mode
Shutter-Priority Auto Exposure Mode
13-2
Locking Shutter Speed
Aperture-Priority Auto Exposure Mode
13-5
13-6
Locking the Aperture
Manual Exposure Mode
Different Procedures for Different Lenses
Lens Type Procedure
13-9
Examples
Locking Shutter Speed/Aperture
Lens Type Procedure
Flexible Program
Focus Lock For Off-center Subjects
Pressed. Refer to Custom Settings on
AE/AF Lock
About AE Lock
Either focus or exposure not both, as with the default
Exposure Compensation
Obtaining the Meter Reading in Manual Exposure Mode
13-21
Exposure Compensation Function
13-23
Auto Exposure/Flash Exposure Bracketing
While pressing the BKT button
ISO BKT
Auto Exposure/Flash Exposure bracketing mode, you can set
Self-Timer
13-29
Long Time Exposure
Manual Exposure mode
Press and hold the Mode
Command dial to select M for
Button and rotate the Main
Making a Custom Setting
Number appears in the Back Status LCD panel
Reset Factory Settings
Custom appears in the Back Status LCD panel
Custom Settings Table
Number Function Your Option
AE Lock when Shutter Release button is
Autofocus activated when the Shutter
Direction of Command Dial rotation
Release button is lightly pressed
Panel
Bracketing in Manual Exposure mode
Focusing screen compensation
Prolonged shutter speed
Flash Sync speed
Aperture setting using the Sub-Command
Focus indicators
3oo
Auto Exposure/Flash Exposure bracketing
Advantages to using an Ieee 1394 Connection
Advantages to using a Card Reader
Connecting Your Camera to the Computer
To Connect to the Computer
14-3
Quitting-Disconnecting from the Computer
Using the Card Reader
Connecting a Device to the Serial Port
Transmitting Data
Serial Port menu appears
Accessing Serial Port Options
Setting the Baud Rate
Baud Rate menu appears
Serial In Mode
Serial In Mode menu appears
Menu Action Comments Choice
Serial In Status
Serial Out Mode
Serial Out Mode menu appears
Menu Choice Action Comments
Image Transmit
Camera Care
Handling
Cleaning
Anti-aliasing Filter and IR Filter
16-4
Determining if the Imager is Dirty
Examining a Test Image
Visually inspecting the Imager
Close Shutter screen appears in the Image Display
Cleaning the Imager
Reassembling the Camera
Storing
Top and Back Status LCD panels
Installing Camera Firmware on Your Computer
Updating Camera Firmware
If you choose Cancel, the firmware will not be updated
Updating From the PC Card
Firmware screen appears
Appendix a Specifications
Shooting Mode DCS
Reflex mirror
Appendix B Troubleshooting
Top Status Viewfinder Shutter Cause and Remedy LCD Panel
BKT
Other symptoms, causes and remedies
Symptom Cause Remedy
Works with Works without Lens Name Lens Type
Compatible Lenses
Manual Single Focal Length Lenses
Filter
Works with Works without Lens Name Lens Type
Ai 200/4S Micro Ai 300/2S Ai 300/2.8
Works with Works without Lens Name Lens Type
Manual Zoom Lenses
Appendix C
Autofocus Single Focal Length Lenses
Autofocus Zoom Lenses
Page
Compatible Viewfinders
Viewfinder Number
Antialiasing filter
Drive mode
AE Automatic Exposure lock
CCD Charge coupled device
Exposure bracketing
Exposure compensation
Exposure control
Focus-Priority for autofocus
Number
Flexible Program
Focus Tracking
Guide number
Histogram
PC Card Pcmcia card
Manual flash
Matrix Metering system
Rear-Curtain Sync
Vignetting
Release-Priority for autofocus
Slow Sync
White balance
Appendix E Problem Report
Appendix F Remote Control Accessories
Nikon Name Compatibility Adapter Code
AC-1WE
Numerics
Page
Index
Page
Index-5
Kodak and Kodak Professional are trademarks 4E1627