Instructions
EDITED/PUBLISHED/PRODUCEDBY
Date of publication September
Table of Contents First Section
Page
Environmental Recycling
Safety Precautions
Consulting the Manual
To dispose of our devices correctly
Improper USE
About the Installation and Setup Parameters
Operating Precautions
About the Product
FAX MACHINE’S Console
Gives access to the Phone book
Cordless Phone Keypad
Function key F2
Cordless Phone Display
Or Communication icon
Components
Maximum capacity 5 sheets of A4
Installation Conditions
Connecting to the Telephone Line Power Supply
Package Contents
Rows
Remove the lid of the battery com
Partment as indicated by the ar
Fax machine a
Lingua Italiano
Menu Installation
Installation Station Name
Lingua English
Menu SET DATE/TIME
Installation Language
Language English
SET DATE/TIME XX-XX-XX
To switch from the public line to the private line
Installation TEL.LINE Setup
This procedure may only be carried out from the fax machine
Key
Dial Mode Tone
TEL.LINE Setup Line Type
TEL.LINE Setup Dial Mode
To modify the dialling mode
Various Sett ECM
Installation Station Number
FAX SET-UP Various Sett
FAX Header Inside
Setting UP the FAX Machine
Various Sett FAX Header
FAX Header Outside
Change Cartridge
Date and Time Settings
Cartridge LOW
SET Date
To Print the Menu and ITS Functions
Menu Print FUNC.LIST
Document Ready
Transmission
Reception
RECEPT. SET-UP Reception Mode
Reception Mode Automatic
To start receiving a document from the cordless phone, see
On Line
Using the Telephone
Reception in PHONE/FAX Mode
Put a telephone call on hold by pressing
Do not place the document in the ADF
Incoming Calls Û Outgoing Calls Ü
Call Transfer Please Wait
Zoom
Remote Access On Line
Quality High
Contrast Normal
If you want to abort the copy in progress, press
Table of Contents Second Section
Page
To Send a Document
Contrast Normal
To Adjust the Resolution
Various Sett Contrast
To start sending the document, press the key
From the display, press the key
On Line
To hear the dialling tones, press the key The display shows
Confirm Settings YES
TX from Memory NEW Setting
Print Settings
Menu TX from Memory
TX from Memory Edit
RECEPT. SET-UP Reception Mode
Reception Mode Automatic
To Receive a Document
Phone Book
Connecting
If, when a call is received, you pick up the call before
Menu Phone Book
01TYPE Name
Phone Book NEW Number
Type Position
Enter Name
Phone Book Delete
To confirm the setting, press function key F2
Phone Book Edit
DELETE?
Phone Book Print Phone B
To confirm the setting, press function key F1 Display shows
Delete Entry ?
To Print Reports and Lists
Menu Print Report
Various Sett TX Report
TX Report For Failed TX
Print Report Last TX Report
Installation Print Install
Menu Installation
Installation Station Name
FAX SET-UP Print Config
Addition, from the cordless phone, you can
To Turn on the TAD
TAD Console
To delete messages and memos that have already been played
Menu TAD SET-UP
Security and Access Functions
Security SET Access Code
TAD SET-UP ICM on Speaker
Outgoing Messages and Memos
Playing
Record OGM #1 Lift Handset
Record OGM #1 To Record
To SET the Length of Memos Incoming Messages
TAM Messages
To Listen to Incoming Messages Memos
TAD/FAX
To Delete Messages and Memos YOU have Already Listened to
Delete OLD MESSAGES?
Type the access code on the remote telephone keypad
Delete OLD MSG?
Number of messages remaining after deletion. In this case
TAD SET-UP Announce only
Special Functions of the Telephone Answering Device
TAD SET-UP Toll Saver
Toll Saver
Record OGM To Record
To Print the TAD Configuration Parameters
Record OGM Lift Handset
TAD SET-UP Print SET-UP
Printer Param Reduction
Other Useful Reception Settings
FAX SET-UP Printer Param
Printer Param Surplus
Press the key Until the display shows
To ENABLE/DISABLE Silent Reception
RECEPT. SET-UP Silent RX
Number or name of the correspondent who called you
TEL.LINE Setup Caller ID
Installation TEL.LINE Setup
TEL.LINE Setup Line Type
RECEPT. SET-UP Ring Volume
DISTINCT. Ring SET Option
Ring Volume Level
Installation DISTINCT. Ring
Autodetect Ring
To Change the Length of the Acoustic Signal
TEL.LINE Setup FAX/TEL Timer
TEL.LINE Setup Silence Lapse
To Change the Silence Lapse
RECEPT. SET-UP Black List
TEL.LINE Setup Remote Control
Remote Control YES
Black List NEW Number
Black List Delete Number
0TYPE Number
Black List Modify Number
To Modify the Black List
Various Sett FAX Header
Other Useful Transmission Settings
Black List Print List
FAX Header Inside
To raise or lower the volume of the speaker, press the key
TEL.LINE Setup Line Monitor
Various Sett Buzzer Volume
To Regulate the Speaker Volume
To ENABLE/DISABLE the Flash Function
Buzzer Volume Level
TEL.LINE Setup PBX Flash
To ENABLE/DISABLE ECM
ECM YES
Receiving a Document in Polling Mode
Polling RX NEW Setting
Menu Polling RX
To Change a Polling Reception That has Been SET
Polling RX Change
Polling RX Delete
To Delete a Polling Reception That has Been SET
External Volume
Handset Settings
Handset Ringer Volume
Handset Ringer Melody
To exit from programming mode, press function key F1 twice
Handset Name
KEY Tones
SET Alarm
Settings
Restore Settings
Alarm Repeat
Register Base
Registration Please WAIT…
Registration
Search for Basex
Internal Call to Handset
DE-REGISTER Handset
Transfer to Handset
External party is put on hold
What Happens if the Paper or INK has RUN OUT
What Happens When a Document is
Problems on the FAX Machine
If the Transmission is Unsuccessful
Error Codes
Code Message Cause of Error What to do
Signals and Messages on the FAX Machine
RX Error
Illegal Setting
Paper ERROR, Press
TX Error
Line on HOLD, Press Hold
Dialling
DOC.N
NEW Print CART.?, 1=YES 0=NO
Problems on the Cordless Phone
Problem Solution
To Replace the Print Cartridge
Menu CART. Mainten
CART. Mainten Clean Cartridge
Cleaning the Print Cartridge Testing the Nozzles
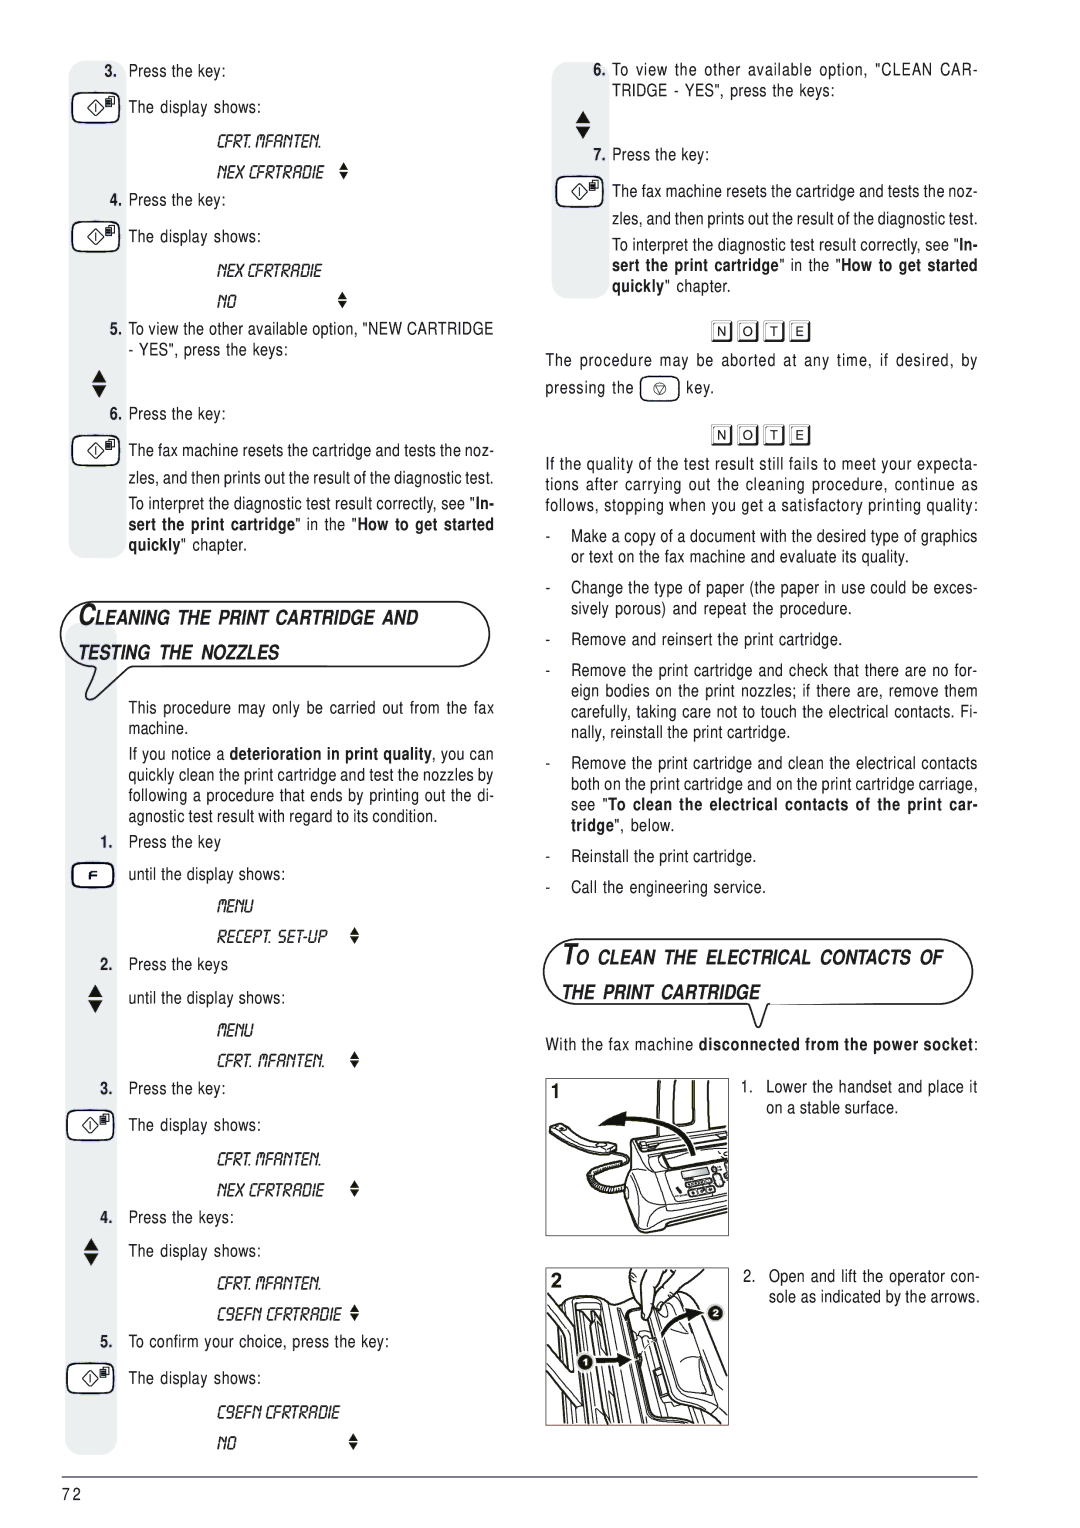
To Clean the Electrical Contacts Print Cartridge
With the fax machine disconnected from the power socket
Cated by the arrow
To Clean the Optical Reader
Optical reader with a cloth
Lever, as indicated by
To Clean the Casing To Remove Jammed Sheets of Paper
To Remove Jammed Documents
To Change the Batteries Cordless Phone
Customer Service
Manufacturer
Battery charger
Fax machine
Customer Service
Cleaning Casing
Setting up
Connection
Power supply
Maintenance
Troubleshooting
Paper or ink has run out
Safety
Resolution
Ring volume
Setup
To set the black list
2006/95/EC dated 27th December
Page
Page
FJ31
259749B-01