Packet Reference Manual
Trademarks
Table of Contents
Mpclii Packet Reference Manual
Table of Contents
Mpclii Packet Reference Manual
Table of Contents
Mpclii Packet Reference Manual
Chapter Getting Started
Audience
Feature 9494 9490 9446 1460
Overview of Printer Differences
Before You Begin
Creating an Mpclii Format Packet
25,A,R,M,508,508,FMT-25 p
250,80,0,1,1,1,W,C,0,0,MONARCH MARKING,0 p
12,F,110,115,1,2,120,5,L,0 p
18,V,30,30,1,1,1,1,B,C,0,0,0 p
25,N,1 p
12345678901 p
Daily Startup Procedures
Sample Batch Packet
Mpclii Packet Reference Manual
Designing a Format
Starting with a Design
Determining Format Contents
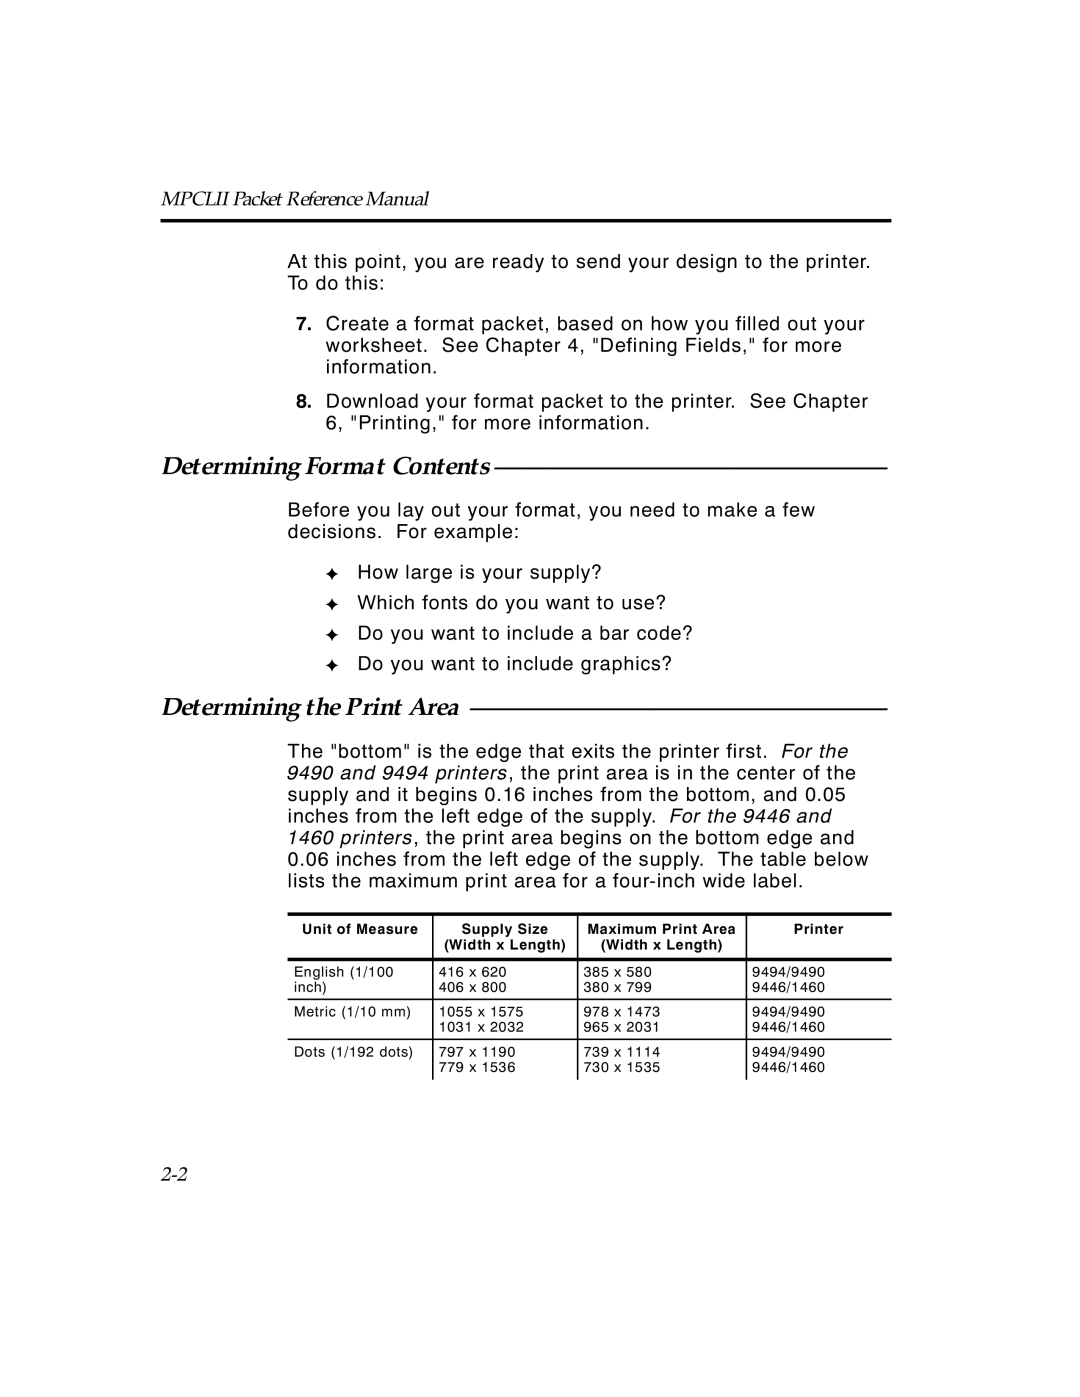
Determining the Print Area
Drawing Rough Sketches
Using Supply Layout Grids
ConsideringFieldTypes
Considering Fonts
Designing a Format
Format Worksheet
Filling in the Format Worksheet
Setting Communication Parameters
Configuring the Printer
Mode COM19600,N,8,1
Example @A@A@A@A@A@A@A@A@A@A@A@A@A@A@A@A@A@A
Using Autobaud
Example I,F,,,,,3 p
Using Mpclii Conventions
Mpclii Punctuation
Standard Syntax Guidelines
‘comment‘
Mpclii Packet Reference Manual
Using Online Configuration Packets
Configuration Packet Header
Configuration Syntax Guidelines
Syntax
Syntax I,A,powupmode,language,sepon,slashzero symbolset p
Defining the System Setup Packet
Example I,A,0,0,1,1,0 p
Defining the Supply Setup Packet
Example I,B,0,0,1,10 p
Defining the Print Control Packet
Example I,C,0,-20,-10,0,768,1 p
Defining the Monetary Formatting Packet
Cursym,secondary,decimals p
Example I,D,1,1,2 p
Defining the Control Characters Packet
ANSIcd,string1,string2 p
Example I,E,~123~063~034~124~125~126~094 p
~126
Resetting Control Characters
Defining the Communication Settings Packet
?E?~123~044~034~124~125~126~094 p
Example I,F,3,1,0,0,1,ABC123 p
CTS XON/XOFF
Defining the Memory Configuration Packet
Buffer,device,buffersize p
Example I,M,I,R,1530 p
Buffer Min Max in K 9494 9490 9446 1460
Checking Current Buffer Sizes
About Memory Buffers
RAM
19.13K x Length
19.13K x 6 = 114.78K
114.78K x 10 =
1147.8 =
Buffer Worksheet
Buffer Allocation Considerations
R,N,20 p M,T,N,60 p
Enabling Immediate Commands
Using Immediate Commands
Optional RAM Buffer Sizes
Sending Immediate Commands
Syntax control characterimmediate command
DD or
Syntax header,packet#,action,device p
Clearing Packets from Memory
Example F,1,C,R p
Using the Font Packet
Font#,action,device p
Example W,0,M,R p
M,R p Number of bytes free, Number of bytes used p
Spacing
Type
Baseline
Cell Width
Using Configuration Upload Packet
Example I,0,U,N p
Defaults
For the 9494 printer
For the 9490 printer
For the 9446 printer
For the 1460 printer
Defining the Format Header
Chapter Defining Fields
Syntax F,format#,action,device,measure,length, width,name p
Defining Text Fields
Example F,1,A,R,E,300,200,TEXTILES p
Defining Fields
Dot
Defining Fields
T12. alignment
Defining Bar Code Fields
Example T,2,10,V,250,50,0,1,1,1,B,C,0,0,0 p
B4. fix/var Fixed F or variable V length field
Left/Center/Right-Justified Fields Balanced Fields
End-Justified Fields
Metric 0 Dots 0
2710
Barcode Density Narrow Data Appearance Char
Defining Non-Printable Text Fields
Example B,3,12,V,150,40,1,2,80,7,L,0 p
Field#,# of char p
Field Data Field Type
20 p
Defining Constant Text Fields
English 399 Metric 1015 Dots 767
Defining Fields
Defining Line Fields
Example C,30,10,0,1,1,1,B,L,0,0,MADE in USA,0 p
Segments
Line Types
Vectors
L5. angle/ If Using Segments end row
Defining Box Fields
Example L,S,110,30,110,150,10, p
Syntax Q,row,column,end row,end col,thickness, pattern p
Example Q,240,30,270,150,3, p
Mpclii Packet Reference Manual
Applying Field Options
Defining Field Options
Combining Field Options
3,1,3,1,1 p
Option#,parameter...parameter p
Option 1 Fixed Data
Fixed char p
%$ p
Monarch p
Option 4 Copy Data
Example R,4,3,1,3,1,1 p
Merging Fields
Sub-Fields
Option 30 Padding Data
Sample Use for Padding
30,L/R,character p
Example R,30,L,X p
31,gen/ver,check digit # p
Option 31 Calculate Check Digit
Example R,31,G,5 p
42,appearance code p
Option 42 Price Field
42,1 p
50,narrow,wide,gap,narspace,widespace p
Option 50 Bar Code Density
50,4,8,4,4,8 p
51,security,stand/default p
51,2,S p
52,row/column,dimension p
Example R,52,C,10 p
Option 60 Incrementing/Decrementing Fields
Fixing the First Number in the Incrementing Sequence
60,I/D,amount,l pos,r pos p
60,I,5,1,6 p
Option 61 Reimage Field
Example R,61 p
Using Check Digits
Field Weight string Products
Sum of Products Calculation
Sum of Digits Calculation
10 8 =
+ 0 + 2 + 6 + 6 + 1 + 6 + 5 + 4 + 3 + 3 + 6 =
10 4 =
Mpclii Packet Reference Manual
Chapter Printing
Defining the Batch Header
Batch header
Batch control
Batch data
Format#,N/U,quantity p
N,1 p
Defining the Batch Control Field
Example E,0,1,4,2,0,0 p
Using Special Characters in Batch Data
Defining Batch Data Fields
Syntax field#,data string p Continuation p
Example 1,Size 12 p 2, p 3,Blue p This would be appended. p
Downloading Methods
Merged or Sub-Fields
Incrementing Fields
Sequential Method
Batch Quantity Zero Method
Batch Method
Batch Packet
Creating DOS Batch Files for Downloading
Modifying Formats
Optional Entry Method
Inquiry Request ENQ
Chapter Status Polling
Inquiry Response
Example E AB
ENQ Reference Table Byte #2
Dec
ENQ Reference Table Byte #3
ENQ Reference Table Byte #3
Job Request
Syntax J,#
Job Response
Status1
Status2
FMT-1/BCH-2
Example J,2,612
Syntax J,Status1 A,B,Status2 C,D,E,FMT-1,BCH-2
Packet Type
Error Number
Field Number
Parameter
B,4,6,33,FMT-1,BCH-2
Syntax J,printed,total,FMT-1,BCH-2
Printed
Total
Example J,8,25,FMT-3,Bch-2
Job Status 0, 1, 2 Response Table Status 1 Codes
Number Meaning
Job Status 0, 1, 2 Response Table
Mpclii Packet Reference Manual
Using the 9494 or 9490 printer
Chapter Diagnostics
Printing a Test Label
Using a 9446 or 1460 printer
Using Data Dump
Troubleshooting Information
If You Receive an Error Message
Resetting Printers
If the PC and Printer Aren’t Communicating
Additional Diagnostics Information
Calling Technical Support
Data Errors
Chapter Errors
Error Description Code
Error Description Code
Errors
Error Description Code
Error Description Code
Error Description Code
Error Description Code
Error Description Code
Error Description Code
Error Description Code
Error Description/Action Code
Communication Failures
Error Description Code
Error Description Code
Data Formatting Failures
Error Description Code
Machine Faults
Error Description Code
Error Description Code
Error Description Code
Error Description Code
Hard Printer Failures
Printer Description Display
RAM checksum test failed. All formats
Adjusting the Print Quality
Printer Optimization
Dark
Light
Reducing Imaging Time
Example B,1,N,0 p
U,0 p 3,BROADWAY p B,1,U,0 p West OAK AVE. p
Example B,1,U,0 p Rodger Dist CTR p B,1,U,0 p 8292 p
Example B,1,U,10 p 5,DAYTON, Ohio p
General Format Tips and Hints
With Formats
Advanced Use of the Optional Entry Method
With Bar Codes
Standard Format
Optimized Format
Mpclii Packet Reference Manual 10-8
Appendix a Samples
Sample Upca Format Packet
Mode Description Printer
Sample MaxiCode Packets
Mode 0 Obsolete Sample
450660000 p
Mode 2 Sample
Mode 3 Sample
Sample Compliance Packet
Sample Batch Packet
Mpclii Packet Reference Manual
Sample Zero Batch Packet
Terms
Sample Batch Packet
Sample Fixed Character Format Packet
Mpclii Packet Reference Manual
Appendix B Fonts
Standard Fonts
Standard Font
Bold Font
CG Triumvirate Bold Font
Monospaced Font Magnification
Width Mag Standard Reduced Bold
Font Magnification
Standard
Proportional Font Magnification
CG Triumvirate Bold 9 pt
CG Triumvirate 6 pt
Scalable Font Information
CG Triumvirate Bold 9 pt `
72pt Sample1
Using Font Numbers in Formats
Additional Fonts
Locating the Font Number in a Font Packet
Example W,200,A,N,68 p
Appendix C. Symbol Sets/Code Pages
Supported Symbol Sets and Code Pages
Selecting a Symbol Set or Code
Selecting the Internal Symbol Set
Selecting the Ansi Symbol Set
Entering Extended Characters
Internal Symbol Set
Code Char
Ansi Symbol Set
These are the printable characters using the Bold font
Bold Character Set
These are the printable characters using the Ocra font
Ocra Character Set
Code
Code
Ascii to Hexadecimal Conversion Chart
Char Hex Decimal
Ascii to Hexadecimal Conversion Chart
105
Mpclii Packet Reference Manual
Appendix D. Format Design Tools
Online Configuration Worksheet
Batch Worksheet
Batch Continuation
Check Digit Worksheet
Supply Layout Inches
Supply Layout Metric
Supply Layout Dots
Format Worksheet
Sample
Addressing the Printer
Appendix E. Addressing a 9490 Printer
Define the Printer Address
Example I,F,,,,,,ABC123 p
Select a Printer
Select the Battery Voltage
Example ADABC123
Using Non-Addressed Mode
Example I,C,0,0,0,0,768,1 p
Example I,C,,,,,,1 p
Example I,F,,,,,, p
Switching Between Addressed Printers
Returning to Addressed Mode
Troubleshooting
Problem Action
Glossary
Monospaced Fonts
Non-volatile RAM
Option
6,1,3,1 p
Index
Mpclii Packet Reference Manual
ENQ
Mpclii Packet Reference Manual
IMD
Mpclii Packet Reference Manual
Index
Mpclii Packet Reference Manual
Ansi C-2
Mpclii Packet Reference Manual
Page
Toll Free