Polycom RealPresence Capture Server, Virtual Edition
Page
Contents
Page
Fault Management
Upgrade, Backup, Restore, and Migrate
Record and Playback
Live Streaming/VoD
Manage Archives and Live Streams Using the User Portal
Appendix a Console Commands
Appendix B Configure External Servers
Appendix C Configure the Server Working with VCS 102
Polycom, Inc
System Overview
Capacity
Feature Description Port license
Maximum Record Port
Conference Call or Endpoint Call
Live Streaming Resources Usage
Video Call Playback
Multi-user Login Capacity
Local Media Storage Capacity
People Video Content Video
MP4
128,000 103 700 33,950
User Permissions through Admin Portal
Web-based Admin Portal
User Interfaces
To log in to the Admin Portal
Web-based User Portal
Search and Refresh Lists
To search for a target item in the list
TV user interface also called the Tvui
Understand the Main Menu
TV User Interface
Fecc and Dtmf Operation Keys Scenario
Console
Hardware Requirements
Hardware Installation
VMWare vSphere 5.5
Polycom, Inc
Software Requirements
Software Installation
Resource and License Management
Web Browser and OS Requirements
Set up RealPresence Capture Server in a Virtual Environment
Licence of Capability License
Make sure the NFS service has been installed and is running
Configure NFS Required
Examples
Restart the NFS service
Go to Licensing & Product Registration Activation/Upgrade
Product Activation
Obtain the Product Activation Key from Polycom
To view the system activation status
To download Capture Server software and VE version
Parameter Description
Fast Configuration Wizard
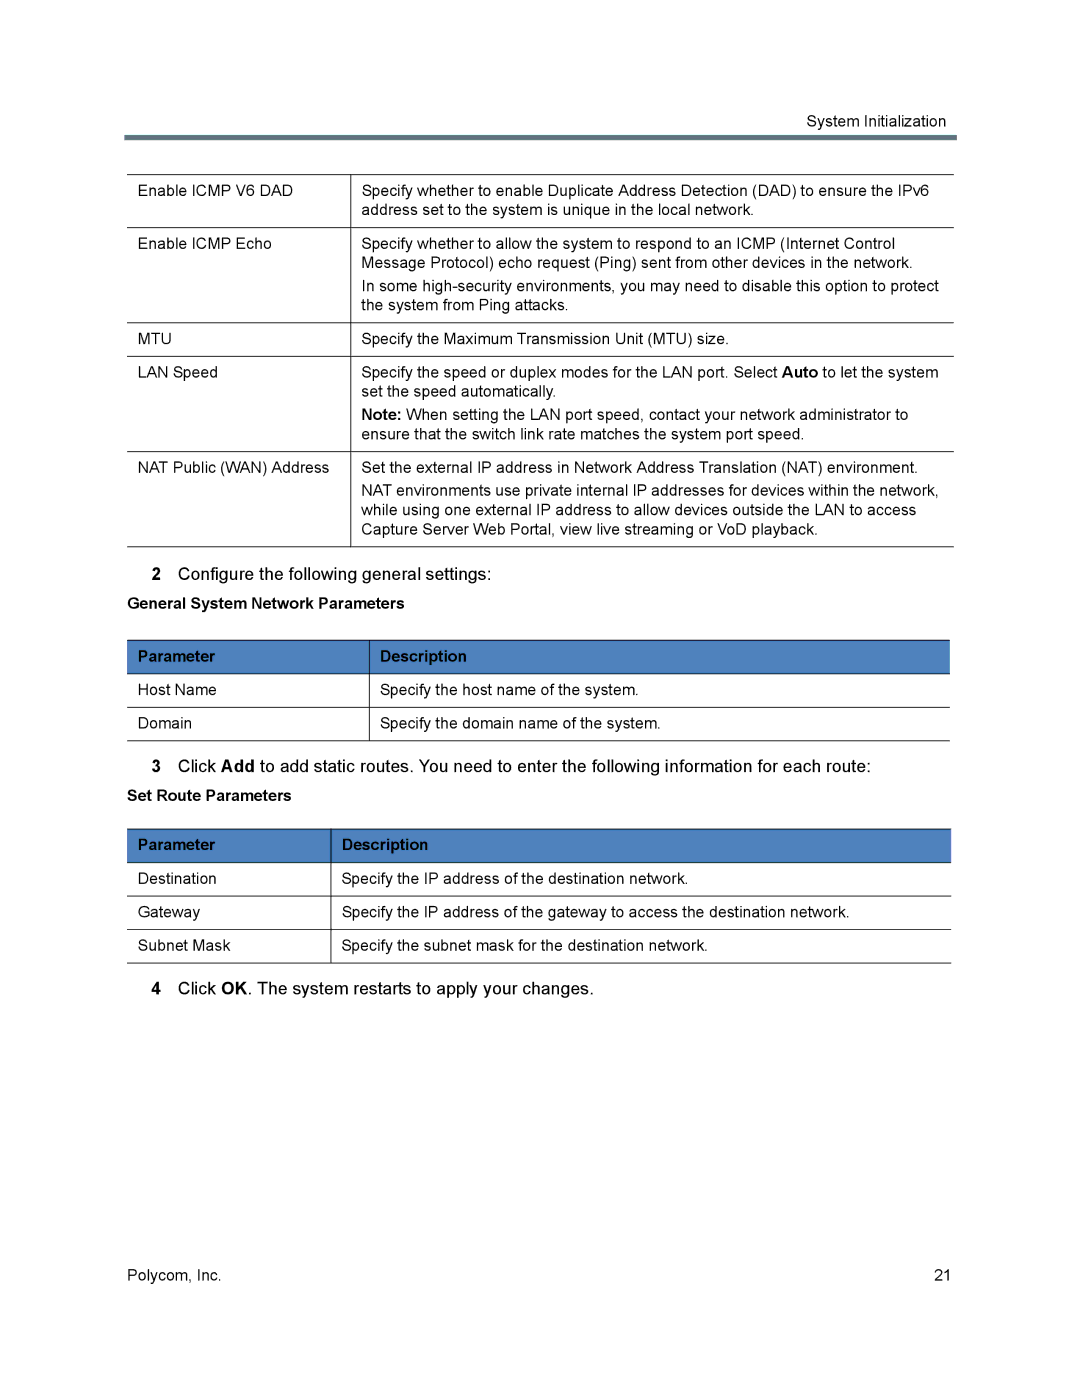
System Initialization
Configure IP Settings through Console
Configure System Time
To set IP
Configure IP Settings through Admin Portal
Set IP Parameters Description
Configure the following general settings
Click OK. The system restarts to apply your changes
General System Network Parameters Description
Set Route Parameters Description
System Configuration
Signaling Connection
Signal Connection Parameters Description
Check System Status on Home
Signaling Server Status
System Information
System Alerts
Hardware Status
Manage Users and Groups
Web Connections
External Server Status
User Roles
To modify user password local user only
Click Change Password
Modify User Information
To modify user information
Set Recording Parameters
Create and Manage Groups
Configure the following settings
Record Parameters Description
Configure Signaling Settings
323
To register the system to a gatekeeper to make H.323 calls
Gatekeeper Parameters Description
To configure the SIP settings
Go to Configuration Signaling Settings SIP
Configure Port Settings
To configure the port
Go to Configuration System Time
Set the System Time
Click Configuration Media Storage Settings
Configure Media Storage Settings
To save your files on a network file system
Configure Multicast Settings
Configure Multicast
To configure multicast parameters
Go to Configuration Multicast Settings
To start a multicast when multicast is disabled
Multicast
Multicast of a Live Streaming
To view a multicast streaming
Certificate Management
Install the Certificate in the System
Certificate Types
Install a Certificate Authority’s Certificate
To install a certificate for a trusted root CA
Create a Certificate Signing Request
To create a certificate signing request
You can review installed certificate details
View Certificate Details
To view the certificate details
Enter certificate information
To enable the client certificate validation
Remove a Certificate
Client Certification
Use Ocsp to Obtain Revocation Status
Configure QoS
Use Http protocol to access website
To configure Ocsp
To enable Http protocol for server website
Configure Snmp
Configure the following agent parameters
To configure Snmp settings
Configure the following security settings
Diagnostics
To configure an Active Directory server
Go to Configuration Active Directory
Active Directory
Password Settings
Security Policy Parameters Description
Valid password
Go to Configuration Customization
UI Customization
Customize IVR Information
To customize the IVR information
Where Start Recording Immediately
Default IVR Messages Message Type Message Text When Played
Customizing UI Logo
Portal Settings
Setup E-mail
Admin Email Settings
Service Email Settings
Session Idle Timeout specifies the number
Portal Setting Configuration Parameter Description
Session Maximum Number Per Application
Configure Templates
Configure Recording Templates
Record and Playback
To view a recording template
Same as configured under Configuration Call Settings
Configuration Call Settings on Admin Portal
Video
Max Call Length
To edit or delete a recording template
To set max call length for recording and streaming calls
Click the recording template you want to change
Configure Transcoding Templates
To set max call length for streaming only calls
To define a transcoding template
Go to Template Transcoding Templates
Only when content is absent
To configure a transcoding template for IIS media server
To view a transcoding template
» Go to Template Transcoding Templates
Select ISM for Media Type
Configure VRRs
To configure a transcoding template for Wowza media server
To edit or delete a transcoding template
To define a VRR
To edit or delete a VRR
Start a Recording
Click the VRR entry you want to edit or delete
Dial in from Endpoint
To start a recording from the Admin Portal
Dial Out Parameters Description
Record from RMX via Recording Link
Change Conference Layout for RMX Hosted Calls
To start recording by dialing RealPresence Capture Server
To set conference layout type in a recording template
To start point-to-point recording from Admin Portal
Point-to-point Recording
To change conference layout type for an ongoing call
1x2 Dual view to recording server
Video Call Play Back when Dialing in from Endpoint
To view the quick code of an archive from Admin Portal
To play back archives using the quick code
Video Call Playback
Video Call Playback when Dialing out from Capture Server
RMX Playback RMX 8.5 or higher
To start a playback call
SIP
Go to Signaling Connection and click
To configure live streams in recording template
Live Streaming
Multi-bitrate Live Streaming
Select a recording template Click Edit
Configure External Media Servers
Configure IIS or Wowza Media Server
Start Live Streaming
View Live Streaming Information
Configure Windows Media Server
To configure Windows Media Server
Configure the following basic settings
Click Windows Media Server under Server
Configure Akamai CDN
To configure Akamai Media Server
Enable Live Streaming Parameter
Publish Manage Streams
Pre-link Event
To create a pre-link event
Go to Template Events
Streams
Pre-link Event Parameters Description
To edit a pre-link event
To obtain the pre-link URL extension
Select the event you want to change Click Edit
Select an event from the list
Signaling Connection area, click Dial out to record
To start the pre-link recording
Go to Home
Copy prelink information
Media Management
Manage Archives
View Archive Details
Play Back and Download Archives
To play back archives through the Admin Portal
Manage Archives
To download one or several archives from Archives
To download one or several media files from Media Files
Dynamic Archiving
To delete one or several archive files
To add new media files
Archives list, select an archive
Transcoding Task Control
To delete a media file
To view transcoding status
To stop an ongoing transcoding
To restart a transcoding
System Administration
System Upgrade and Fallback
To update your system software to the latest version
To fall back the image, configuration and IVR messages
System Log Configuration
Configure Log Settings
To configure the log settings
Go to Admin Log Settings
Restart and Shut Down the System
Backup and Restore System Configuration
Log Management
Back Up and Restore Media Files
Configure an FTP Server for Backup
To back up current system configuration
Go to Admin Config Backup/Restore
Finish Alternate FTP Server Configuration if needed
FTP Server Parameters Description
Manage Archives and Live Streams Using the User Portal
To switch to the Admin Portal from the User Portal
To log in to the User Portal
RealPresence Capture Server User Portal
To search archives
To view archive details
To play back archives through the User Portal
View Live Streaming
Call
To view your live streaming from the User Portal
To start point-to-point recording from User Portal
Dial out from Capture Server through User Portal
Configure the relevant settings Click OK
Click Call Dial out to record
Login Console
Appendix a Console Commands
To log in to Console via SSH
Console Command Descriptions
Network Settings
To configure Static IP Address for LAN 1 or LAN
Select Static Address Setup, click OK or type Enter
Reset Console Password
Reset Portal Admin Password
Reset Config
To configure Dhcp IP Address for LAN 1 or LAN
Ping
Reboot
Windows Media Server
Shutdown
Fallback
Show
Exit
Appendix B Configure 3rd Party Media Servers
Configure the Wowza Media Server
Click Add Configure the following basic settings
Go to Server Wowza
Wowza Server Parameter Description
Choose between Rtsp streaming and Rtmp streaming
Enable VoD Parameter Description
Configure the IIS Media Server
To configure the IIS media server
Double click Authentication
To create a VRR for use with an external server
Go to Server IIS
Enable VoD for IIS Parameter Description
Enable IIS for Live Streaming Parameter Description
IIS Media Server Parameters Description
Configuring the Windows Media Server
To configure the Windows Media Server
Go to Server Windows Media Server
On the Action panel, click Add
External Media Servers Parameters Description
Parameter Description
Appendix C Configure the Server Working with VCS
Configure VCS for H.323 Calling
Configure VCS for SIP Calling
To configure VCS calling
VCS Zone Parameters Settings
TCP
Set search rule parameters