AR-M351N AR-M451N
Mains Plug Wiring Instructions
Warranty
Part 1 General Information
Page
Model Product configuration AR-M351N/AR-M451N Laser printer
Product Configurations
Installation Requirements
Battery Disposal
Laser Information
For North America
For Europe
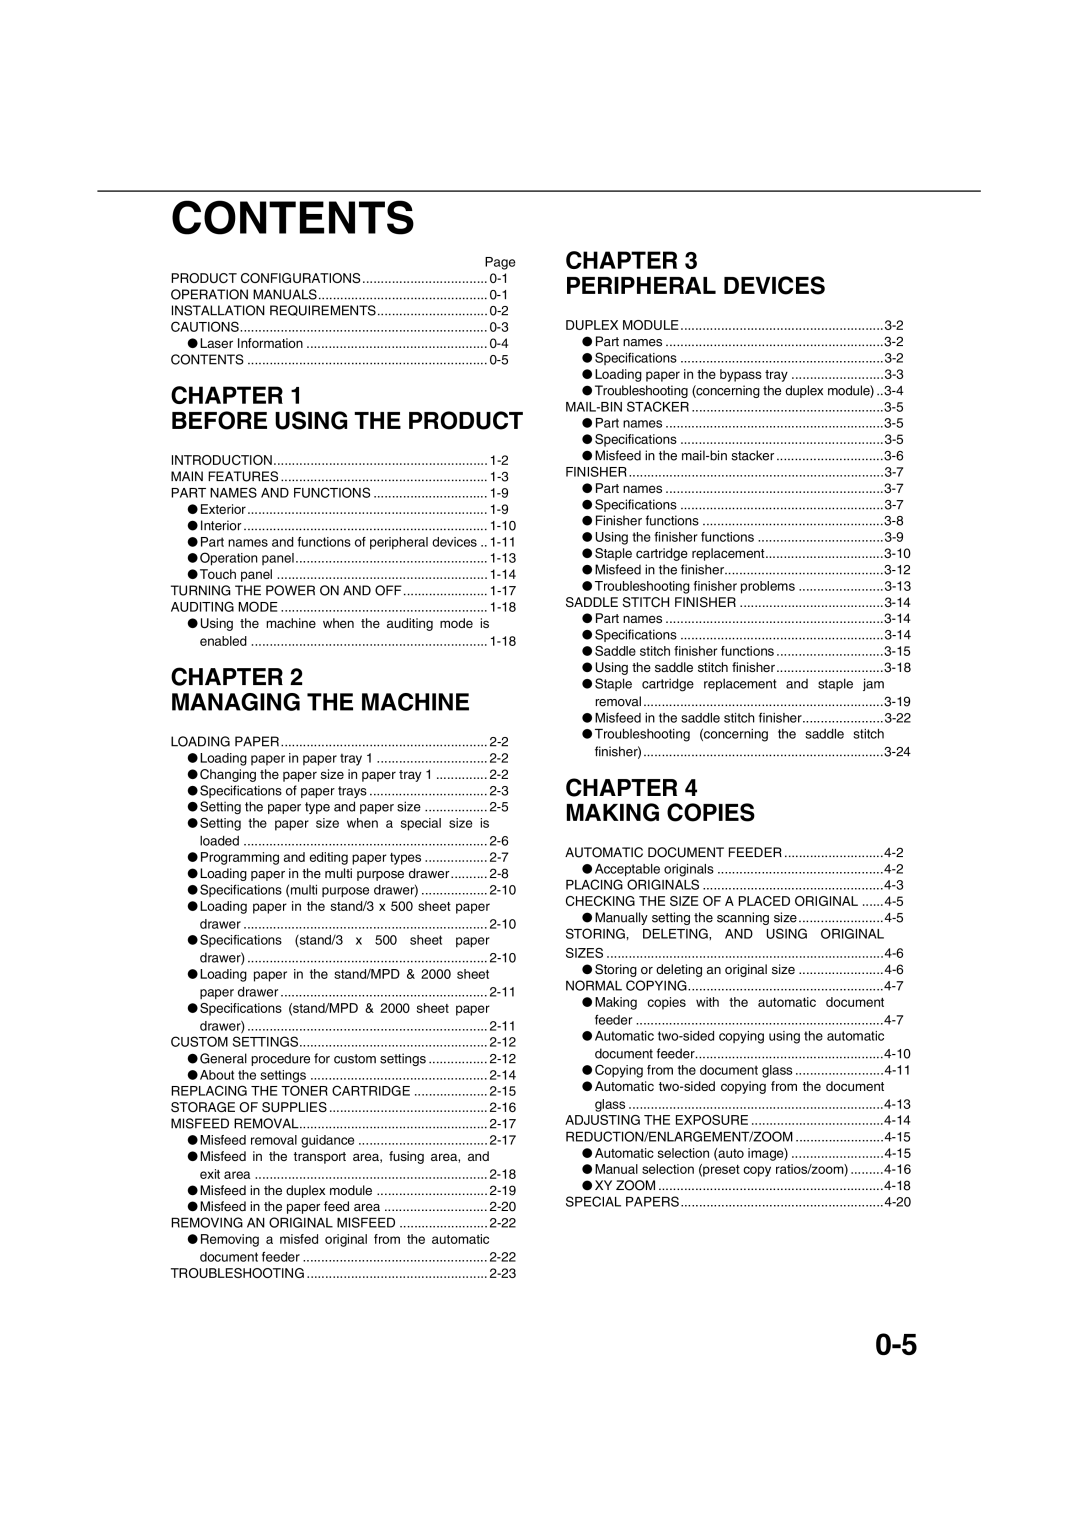
Contents
Chapter Convenient Copy Functions Specifications
Chapter
Introduction
Original and paper sizes
Meaning of R in original and paper size indications
Pamphlet Copy See Staple sort mode Job Build
Main Features
Sort mode
Copies can be collated
XY Zoom
Size Books or thick originals can be erased
Dual Page Copy
Margin Shift
Originals 1-sided Copy Sheets Originals 2-sided
Job programs
Card Shot
Mirror Image
Reverse
Interrupting a copy run
Text See Staple sort mode
Copy job in progress can be interrupted for a rush job
Saddle stitch
Auto power shut-off mode
Preheat mode
Hole punching
Copies can be punched to add holes
Part Names and Functions
Press to turn power on and off
Exterior
Module for two-sided printing
Interior
Part names and functions of peripheral devices
Barcode font kit AR-PF1
Other optional equipment
Data security kit AR-FR21, AR-FR21U
PS3 expansion kit AR-PK6
Operation panel
Using the touch panel
Touch panel
Selecting a function
Complete
Mode select key
Job screen
Job list Paper Empty in the job status display
Print JOB key
Display switching keys
MAIL/FTP key
FAX JOB key
Turning the Power on and OFF
Using the machine when the auditing mode is enabled
Auditing Mode
When the copy job is finished, press the key ACC.#-C key
Enter your account number 5 digits with the numeric keys
Managing the Machine
Loading Paper
Loading paper in paper tray
Changing the paper size in paper tray
Weight
Specifications of paper trays
Applicable plain paper
Applicable special paper
Paper that can be used for automatic two-sided printing
User type
Setting the paper type and paper size
Tray 2 and the bypass tray
Setting the paper size when a special size is loaded
Select the paper type that you wish to program or edit
Programming and editing paper types
Touch the Type Name key
Set the attributes of the paper tray
Loading paper in the multi purpose drawer
Printing onto envelopes
Fusing unit pressure adjusting levers
Unlatch the duplex module and slide it to the left
Gently close the duplex module
Specifications multi purpose drawer
Specifications stand/3 x 500 sheet paper drawer
Loading paper in the stand/3 x 500 sheet paper drawer
Specifications stand/MPD & 2000 sheet paper drawer
Loading paper in the stand/MPD & 2000 sheet paper drawer
Lower paper tray
Custom Settings
General procedure for custom settings
Touch the Clock key
More information on setting procedures
Touch the OK key To exit the settings, touch the Exit key
You will return to OK date and time setting screen
Touch the Date Format key
Default settings
About the settings
Paper tray settings
Total count
Gently remove the sealing tape from the cartridge
Replacing the Toner Cartridge
Return the cartridge lock lever Close the front cover
Push the cartridge in until it locks securely into place
Storage of Supplies
Proper storage
Supply and Consumables
Misfeed removal guidance
Misfeed Removal
Remove the misfed paper as shown in the illustrations below
Misfeed in the transport area, fusing area, and exit area
Misfeed in the duplex module
Misfeed in the bypass tray
Remove the misfed from the bypass tray
Misfeed in the paper feed area
Installation of trays in the stand/3x500 sheet paper drawer
Misfeed in paper tray
Remove the misfed paper
Misfeed in the stand/MPD & 2000 sheet paper drawer
Open the left cover of the stand/paper drawer
Gently close the duplex unit
Gently close the large capacity tray
Removing AN Original Misfeed
Check location a
Check location B Misfeed in the transfer unit
Problem Check Solution or cause
Troubleshooting
Use SHARP-recommended paper.
Sharp
Paper Other Than
PRE-PUNCHED or Using Disabling of Duplex in the key
Printed
Letter Head
Page
Peripheral Devices
Specifications
Duplex Module
Part names
Open the bypass tray
Loading paper in the bypass tray
Set the type and size of the loaded paper
Loading paper in the bypass tray is now complete
Troubleshooting concerning the duplex module
Check the list below before calling for service
Missing May be cut off or the image may not print
2 x 11R, 7-1/4 x 10-1/2
MAIL-BIN Stacker
Open the top cover
Misfeed in the mail-bin stacker
Close the paper guide
If the misfed paper is not found in step
Finisher
Supplies
Do not put pressure on the finisher particularly each tray
Offset mode
Sort mode
Group mode
Staple sort mode
Using the finisher functions
Push the staple box in until it clicks into place
Staple cartridge replacement
Open the finisher compiler
Checking the staple unit
Raise the lever at the end of the staple box
Remove the misfed paper from the stapler compiler
Removearea. the misfed paper from the output
Misfeed in the finisher
Raise the paper guide and remove the misfed paper
Open the finisher top cover Close the finisher compiler
Check Stapler Position or
Troubleshooting finisher problems
Check the staple unit. See
Staples
Saddle Stitch Finisher
Or larger sizes 80 g/m2 or 20 lbs
Sets
Sort mode Group mode
Saddle stitch finisher functions
AR-PN1A AR-PN1B*2 AR-PN1C*3 AR-PN1D*3
11R, and up to 25 sheets for
Saddle stitch function
Hole punching only if a punch module is installed
Offset Tray key
Using the saddle stitch finisher
Centre Tray key
Saddle Stitch key See
Staple cartridge replacement
Staple cartridge replacement and staple jam removal
Insert a new staple cartridge into the staple box
Push the stapler section back into the finisher
Staple jam removal
Disposal of hole punch scrap
13Reinstall the staple box
Front
Turn roller rotating knob a in the direction
Rotating roller rotating
Misfeed in the saddle stitch finisher
Knob B knob B releases Caught paper
Remove the paper gently, taking care not to tear it
12Remove any misfed paper from the saddle stitch tray
Troubleshooting concerning the saddle stitch finisher
Part 2 Copier Operation
Page
Making Copies
Size and weight of acceptable originals
Automatic Document Feeder
Acceptable originals
Using the document glass
Using the automatic document feeder
Placing Originals
Original size detection function
Standard original placement orientations
Automatic copy image rotation rotation copying
Example
Checking the Size of a Placed Original
Manually setting the scanning size
Touch the Original key
Touch the desired original size key
Storing or deleting an original size
STORING, DELETING, and Using Original Sizes
Touch the Custom Size key
Touch the STORE/DELETE key
Making copies with the automatic document feeder
Normal Copying
Sided copies of 1-sided originals
Touch the 2-SIDED Copy key
To cancel copying
Select the desired output mode
Use the numeric keys to set the desired number of copies
If needed, touch the File key or the Quick File key
Copy output sort and group
Sorting copies into sets
Grouping copies by
Equipment installed
Select the desired copy mode
Display Will Vary
Depending
Ensure that the 1-sided to 1-sided copy mode is selected
Copying from the document glass
Display. If an Icon
Touch the READ-END key
Select9. the desired output mode. Press the Start key
Automatic two-sided copying from the document glass
Touch the 2-SIDED Copy key.4 Touch the OK key
Perform steps 3 to 8 on pages 4-11
Adjusting the Exposure
Automatic exposure adjustment
Touch the Exposure key
Automatic selection auto image
REDUCTION/ENLARGEMENT/ZOOM
Touch the Copy Ratio key
Manual selection preset copy ratios/zoom
To return the ratio to 100%
Auto paper select display
Touch the XY Zoom key
Touch the X key
Touch the Y key
To cancel an X or Y zoom setting
Load the special paper in the bypass tray
Special Papers
Touch the Paper Select key
Set the type and size of paper loaded in the bypass tray
Convenient Copy Functions
Special Modes
General procedure for using special functions
Touch the Special Modes key
Touchmode. the key for the desired special
Touch the Margin Shift key on the special modes screen
Margin shift
Select the shift direction
Set the shift amount as needed and touch the OK key
Adjust the amount of erase and touch the OK key
Select the desired erase mode
Erase
Touch the Erase key on the special modes screen
Ensure that 8-1/2 x 11 A4 size paper is selected
Dual page copy
Touch the Dual page Copy key on the special modes screen
Place the originals on the document glass
Pamphlet copy
When using the document glass
12Whenfeeder using the automatic document
Select the paper tray for the cover
Job build
Touch the JOB Build key on the special modes screen
JOB Build
Touch the Tandem Copy key on the special modes screen
Tandem copy
Set the number of copies with the numeric keys
Server machine and client machine
Press the Start key
Covers/inserts
Preparations for using covers and inserts
About the explanations of covers and inserts
Example of adding covers and inserts
To cancel covers/inserts settings
Procedure for inserting front and back cover paper
Touch the Cancel key in the screen of step
Selectpaper. the tray used for the front cover
Procedure for adding inserts
Select the tray used for insertion type a
Set the insertion conditions for insertion type a
13Press the Start key
Checking, editing, and deleting cover/insert pages
When you have finished checking Pages, touch the OK key
Touch the page Layout key
Set covers/inserts pages are shown
Examples of covers and inserts
Symbols used for covers and inserts
Covers One-sided copying of one-sided originals
Covers Two-sided copying of one-sided originals
Covers One-sided copying of Two-sided originals
Covers Two-sided copying of two-sided originals
Inserts One-sided copying of one-sided originals
Inserts One-sided copying of two-sided originals
1st 2nd 3rd
Transparency film with insert sheets
Touch the key to display the tray settings screen of tray
Load transparency film into the tray
Touch the TYPE/SIZE key
Select the tray
Multi shot
Paper
Step
Touch the OK key in the special modes screen
Select the layout
Scan the original pages
Book copy
Opened last page and inside of back cover
You will return to
Card shot
Place the original on the document glass
Touch the outer OK key
Follow steps 4 through 6 of Copying from the document glass
10Touch the READ-END key
Mirror image
Reverse
Reverse
Date print
Print menu
Stamp
Numbering
To display the special modes screen
Common operation procedure for using the print menu
Select the print position
Select the print menu
To cancel print menu
Printing in combination with other special functions
Check the print layout if needed page 5
Printing the date on copies
To cancel a date print setting
Select the date format
Check the date and format
To cancel a stamp setting
Adjust the exposure as needed Select the desired stamp size
Printing a stamp reverse text on copies
Select the stamp that you wish to print
Select the page number format
Printing the page number on copies
Touch the Manual key
Selected format is
10Touch the OK key
Examples of page number printing
Number printing during one-sided copying 5 originals
Number printing during two-sided copying 9 originals
1st 2nd 3rd 4th 5th Setting Value Insert Front Back
Printing entered text on copies
To cancel a text setting
Editing and deleting stored text
Storing text sequences
Touch the Back key
Touch the text key that you wish to edit or Delete.5
Up to 14 characters of the print text appears in the key
Checking and changing the print layout
Storing a job program
STORING, Using and Deleting JOB Programs
Number Keys Which
Job Programs Are Already Stored Highlighted
Deleting a stored job program
Calling up a job program
Document glass
Interrupting a Copy RUN
Page
Machine Maintenance For Copying
User Maintenance
Cleaning the main charger of the photoconductive drum
Close the front cover and switch on the power switch
Troubleshooting
Page
Document Filing Function
Document filing function
Overview
Data flow
Main Folder
Main folder
Quick File folder
Custom folder
Attributes of saved files
Look at the operation panel
Mode select keys
Saving files
Touch panel see the next
Document filing icons
Quick File
Saving a Document Image File
Touch the Quick File key in the main screen
Presspanel. the Start key on the operation
Touch the File key in the main screen
Filing
Touch the User Name key
Touch the File Name key
12Enterkeys. a 5-digit password with the numeric
11Touch the Password key 15Touch the OK key
16Presspanel. the Start key on the operation
13Touch the OK key
Touch the key of the folder that contains the desired file
Print jobs
Touch the key of the operation that you wish to perform
Property Change key see
Scan Save
Touch the File Information key
You will return to the screen of step
12Touch the key of the desired resolution
11Touch the Resolution key
16Touch the OK key
17Placekey. the original and touch the Start
Erase key see
Using special functions for scan save
JOB Build key see
Card Shot key see
Procedure for searching for a file
Calling UP and Using a File
Searching for and calling up a saved file
Searching by user name
Operation using the file, go to on
To perform an operation using the file, go to on
Touch the Search Start key
Calling up and using a saved file
General procedure for using a saved file
Touch the desired file key
Print
Send
Property change
Send Settings key SUB Address key or Address Entry key
Touch the key of the desired attribute
Restrictions on changing the attribute
Move
Touch the Cancel key
Delete
Detail
Press the JOB Status key
Touch the key of the desired file
Touch the Call key
Creating, editing, and deleting user names and folders
Press the Custom Settings key Touch
Control key
Go to the page indicated below for the selected operation
Programming a user name
Touch the Password key
Touch the Initial key
Touch the Exit key
Editing and deleting a user name
Touch the Folder Name key
Creating a custom folder
Editing/deleting a custom folder
Entering alphabetical characters
Entering Characters
Enter the desired number or symbol
Entering numbers and symbols
Numbers and symbols that can be entered are as follows
Screen 1/2
Different folder or set it to Protect
Selecting Half Tone after setting
Property
Change page 7-18 to change
This chapter contains useful information about the machine
Specifications
Specifications
Automatic document feeder
Machine tray tray
Specifications
List of Combination of Peripheral Devices
Numerics
Index
Mode select keys
General procedure for using special functions
26 to
5-2, 5-4
Part names
5-29, 5-34 to
29 to
Saving a document image file
13, 1-14, 7-4
Troubleshooting
Transparency film 2-4, 2-10, 2-16, 4-20
General information 23 to
Page
Page
Page
2004J KS1 TINSE2797FCZZ
Sharp Corporation