UX-P710 UX-A760
EU Only
English
Yields approx A4 pages
Specifications Imaging film
Replacement roll not included
Scanning resolution Horizontal 8 pels/mm Vertical
Dimensions without
Power requirements
Power consumption
Operating temperature
Important safety information
Look at the Operation Panel
Mode Select key
Monitoring phone conversations
On the UX-P710, or
When number entry mode is selected
Entering letters
Again. ABC appears at
Points to keep in mind when setting up
Unpacking Checklist
Unpacking Checklist
Setup
Checking the pre-loaded sample roll
Connecting the phone line
Imaging Film
Imaging Film
Do not Discard the TWO Green Gears
Imaging Film
When not using the machine
Loading Paper
Loading Paper
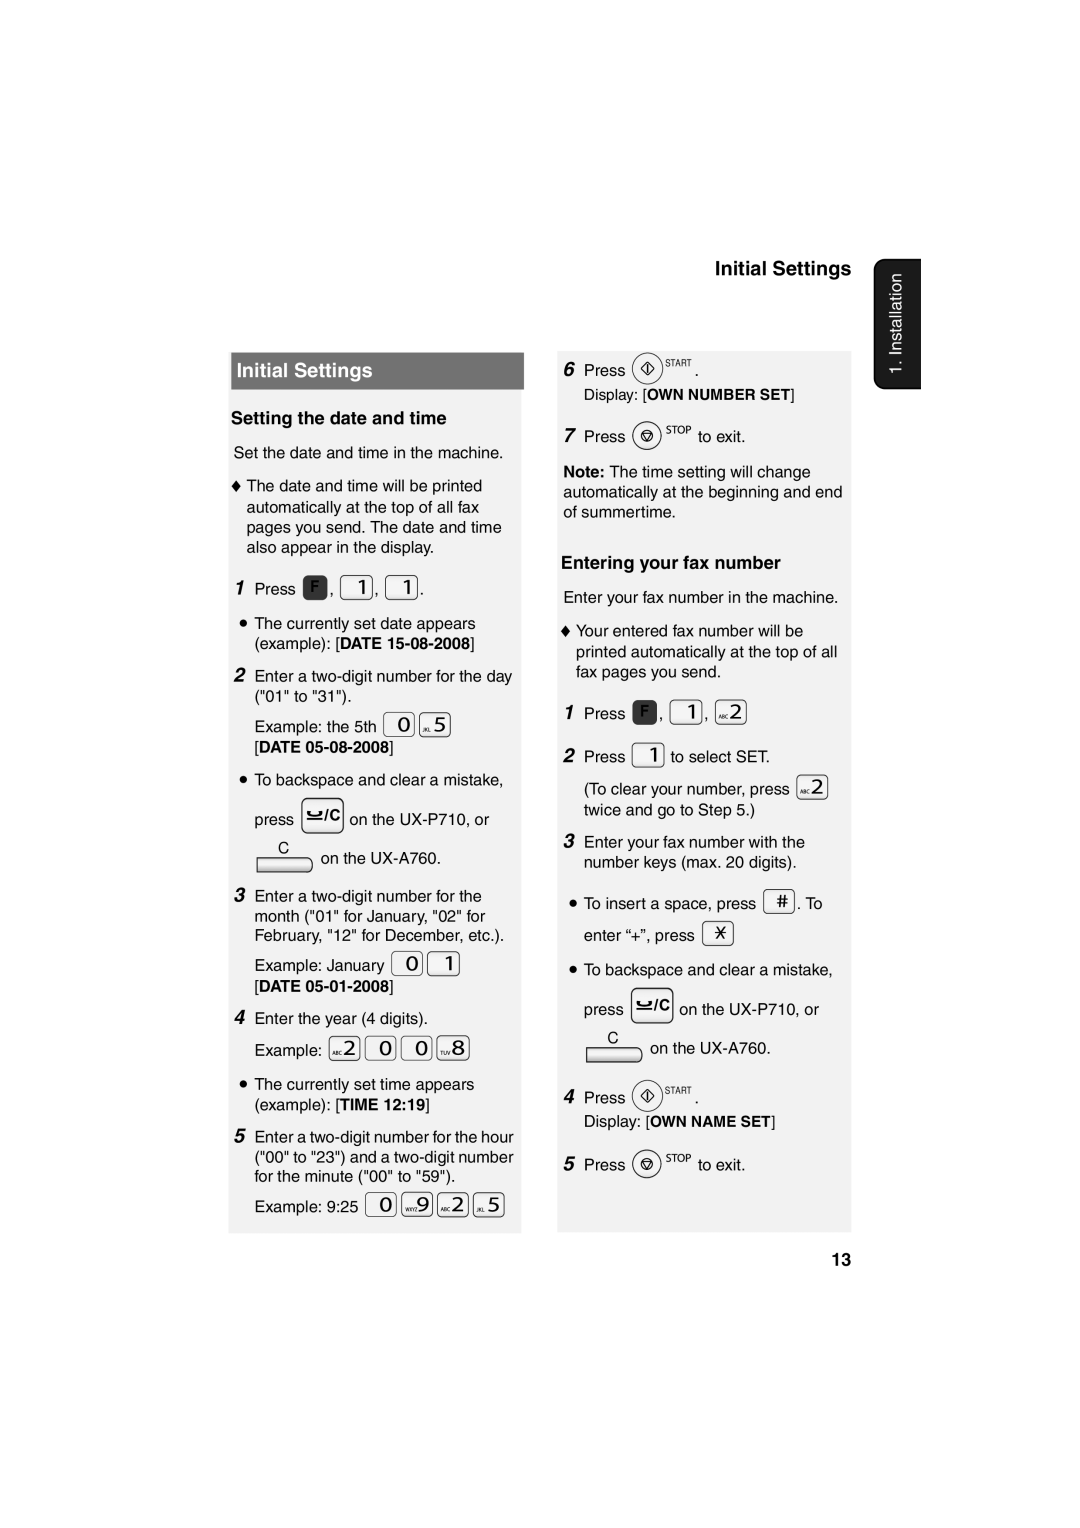
Entering your fax number
Initial Settings
Initial Settings
Setting the date and time
Setting the Reception Mode
Setting the Reception Mode
Entering your name
Speaker volume
Volume Adjustment
Volume Adjustment
Setting the reception mode
Key Tone setting
Flash Select Setting For PBX
Flash Select Setting For PBX
Language Select Setting
Transmittable Documents
Transmittable Documents
Loading the Document
Removing a document from the feeder
Resolution and Contrast
Resolution and Contrast
Resolution settings
Sending a Fax Normal Dialling
Contrast settings
Storing Numbers
Storing Numbers
Storing fax and phone numbers in the phonebook
Assigning a number in the phonebook to a Rapid Key
Printing the TEL # List
Changing the number assigned to a
UX-A760 Press
Editing numbers in the phonebook
Deleting numbers from the phonebook
Deleting a single number
Redial
Using an auto-dial number to send a fax
Sending a Fax Auto Dialling
Sending a Fax Auto Dialling
Dial Tone Check
Deleting redial numbers
Storing a redial number in the phonebook
Automatic redialling
Making Phone Calls
Making Phone Calls
Pseudo ring duration
Using TEL/FAX T/F Mode
Using TEL/FAX T/F Mode
Silent fax reception
Number of Rings setting
Using FAX Mode
Using FAX Mode
Using TEL Mode
Putting a call on hold
Using TEL Mode
Fax Remote Reception setting
Answering a call on a phone connected to the same line
Fax Remote Number setting
Fax Signal Receive setting
Receive Ratio setting
Using A.M. Mode UX-A760
Using A.M. Mode UX-A760
Reception to Memory
Checking how much memory is currently in use
Fax Receive setting
Reception to Memory
Erasing received faxes from memory
Checking the outgoing message
Using the Answering System
Recording an OGM
Recording an OGM
Using the Answering System
Call screening
Answering System Settings
Answering System Settings
OGM Only mode
Overriding the answering system
Override Ringing
Override Ringing
Programming the override code
Toll Saver
Remote Operations
Remote Operations
Remote code
Skip forward Press
Play new messages only First stop
Comments
Recording a memo p
Other remote commands
OGM Only mode p Turning on OGM Only mode
Turning off OGM Only mode
Making Copies
Display messages
Activating Caller ID
Activating Caller ID
Caller ID List
Storing a number in the Caller ID list in the phonebook
Caller ID List
Deleting calls from the list
Printing the Caller ID list
Blocking OUT of Area calls
Blocking Calls
Blocking Calls
Blocking Private Calls
Printing the Junk number list
Storing the Key Lock code
Key Lock Function
Activating the Key Lock function
Releasing the Key Lock
Clearing changing the Key Lock code
Cleaning the Machine
Cleaning the Machine
Cleaning the scanning glass and rollers
Cleaning the Print Head Rollers
Cleaning the Print Head and Rollers
Press green release
About the lithium battery
Cleaning the housing
Dialling and transmission problems
Problems and Solutions
Problems and Solutions
Line error
Reception and copying problems
ADD Paper
General problems
Messages and Signals
Messages and Signals
KEY Lock
Recalling
Audible signals
Clearing Paper Jams
Clearing Paper Jams
Clearing a jammed document
Clearing Paper Jams
Clearing jammed printing paper
Require the same key, press After entering the first letter
Quick Reference Guide
Index
Index
Index
Remote Operation Card
Remote Commands
Spis treści
Wprowadzenie
Dokumentów Regulacja kontrastu
Linia telefoniczna
Tryby odbioru
Automatyczny podajnik
Ważne informacje dotyczące bezpieczeństwa
Przycisk Wybór Trybu
Pulpit sterowniczy
Monitorowanie rozmów telefonicznych
Wprowadzanie liter
Konfiguracja
Instalacja
Dostarczone wyposażenie
Dostarczone wyposażenie
Sprawdzanie zainstalowanej fabrycznie rolki próbnej
Folia kopiująca
Folia kopiująca
Podłączanie kabla telefonicznego
Zwolnij blokadę i otwórz zespół drukujący
Będą Jeszcze Potrzebne
Folia kopiująca
Takiej sytuacji należy zamknąć podajnik papieru
Wkładanie papieru
Wkładanie papieru
Postępowanie przy wyłączonej maszynie
Wprowadzanie własnego numeru faksu
Ustawienia początkowe
Ustawienia początkowe
Ustawianie daty i godziny
Ustawianie trybu odbioru
Ustawianie trybu odbioru
Wprowadzanie nazwy użytkownika
Głośność głośnika
Regulacja głośności
Regulacja głośności
Ustawianie trybu odbioru
Ustawienia dźwięku klawiszy
Ustawianie języka
Ustawianie systemu Flash w centrali PBX
Ustawianie języka
Wkładanie dokumentu
Wysyłanie dokumentów
Akceptowane dokumenty
Akceptowane dokumenty
Ustawienia Rozdzielczości
Regulowanie rozdzielczości i kontrastu
Regulowanie rozdzielczości i kontrastu
Wyjmowanie dokumentu z podajnika
Ciemny
Wysyłanie dokumentu Standardowe wybieranie numeru
Ustawienia kontrastu
Auto
Zapisywanie numerów
Zapisywanie numerów
Istnieje możliwość przypisania
Drukowanie Listy # TEL
Usuwanie wszystkich numerów
Edytowanie numerów w książce telefonicznej
Usuwanie numerów z książki telefonicznej
Usuwanie pojedynczego numeru
Naciśnij przycisk F . Na koniec Naciśnij przycisk Start
Wysyłanie dokumentu Automatyczne wybieranie
Ponowne wybieranie ostatniego numeru
Wysyłanie dokumentu przy użyciu automatycznego wybierania
Usuwanie ostatnio wybieranych numerów
Automatyczne wybieranie ostatniego numeru
Sprawdzanie dostępności linii
Wykonywanie rozmów telefonicznych
Wykonywanie rozmów telefonicznych
Cichy odbiór dokumentu
Odbieranie dokumentów
Praca w trybie TEL/FAKS T/F
Praca w trybie TEL/FAKS T/F
Ustawienia liczby sygnałów
Praca w trybie Faks
Praca w trybie Faks
Praca w trybie TEL
Praca w trybie TEL
Zawieszanie rozmowy
Ustawienia zdalnego odbioru faksu
Obcinane. Funkcję można wyłączyć
Ustawienia kodu aktywacji zdalnej
Ustawienia sygnału odbioru faksu
Ustawienia rozmiaru odbieranego dokumentu
Praca w trybie AUT. ZGŁ. UX-A760
Praca w trybie AUT. ZGŁ. UX- A760
Odbiór do pamięci
Sprawdzanie bieżącej ilości zajętej pamięci
Odbiór do pamięci
Ustawienia odbioru dokumentu
Usuwanie odebranych dokumentów z pamięci
Sprawdzanie zapowiedzi
System zgłoszeniowy tylko UX-A760
Nagrywanie zapowiedzi OGM
Nagrywanie zapowiedzi OGM
Korzystanie z systemu zgłoszeniowego
Maksymalny czas nagrywania
Ustawienia systemu zgłoszeniowego
Ustawienia systemu zgłoszeniowego
Odtwarzanie wiadomości przez głośnik
Wyłączenie automatu zgłoszeniowego
Wymuszenie dzwonka
Wymuszenie dzwonka
Programowanie kodu odblokowującego
Tryb oszczędny
Funkcje zdalne
Funkcje zdalne
Kod zdalny
Wykonać inne czynności Możesz
Zatrzymaj odtwarzanie Naciśnij
Usunąć wszystkie wiadomości
Odtwórz ponownie Naciśnij
Nagrywanie notatki str
Inne polecenia zdalne
Przycisk , , a następnie wprowadź polecenie
Praca w trybie TEL/FAKS Nagrywanie nowej zapowiedzi
Po zakończeniu przygotowań Naciśnij przycisk Copy
Kopiowanie
Aktywowanie funkcji identyfikacji dzwoniącego
Lista identyfikacji dzwoniących
Komunikaty wyświetlacza
Lista identyfikacji dzwoniących
Usuwanie rozmów telefonicznych z listy
Drukowanie listy identyfikacji dzwoniących
Blokowanie rozmów „POZA
Blokowanie rozmów
Blokowanie rozmów
Blokowanie „TELEFONÓW Prywatnych
Drukowanie listy niechcianych numerów
Zapisywanie kodu blokady klawiatury
Funkcja blokady klawiatury
Mogą pojawić się także następujące komunikaty
Uruchamianie funkcji blokady klawiatury
Wyłączanie funkcji blokady klawiatury
Kasowanie zmienianie kodu blokady klawiatury
Czyszczenie szyby skanera i rolek
Konserwacja
Czyszczenie urządzenia
Czyszczenie urządzenia
Czyszczenie głowicy drukującej i rolek
Czyszczenie głowicy
Drukującej i rolek
Wymień folię kopiującą Umieść prawe końce szpuli na osiach
Ostrzeżenie
Bateria litowa
Czyszczenie obudowy
Problemy związane z wybieraniem numerów i wysyłaniem
Rozwiązywanie problemów
Problemy i rozwiązania
Problemy i rozwiązania
Upewnij się, że kabel telefoniczny jest prawidłowo
Problemy z odbiorem i kopiowaniem
Papier Nacisnij Start
Problemy ogólne
Komunikaty i sygnały
Komunikaty i sygnały
Komunikat NR
Brak Folii
BLOK. Klaw
Pamięc Pełna
Kopiowania
Sygnały dźwiękowe
Wybieranie
Dźwięk ciągły Sekundy
Usuwanie zacięć papieru
Usuwanie zacięć papieru
Usuwanie zaciętego dokumentu
Usuwanie zacięć papieru
Usuwanie papieru zaciętego podczas drukowania
Naciśnij przycisk
Skrócony opis obsługi
Indeks
Indeks
Indeks
Instrukcja zdalnej obsługi telefaksu
Karta Zdalnej Obsługi
Polecenia Zdalne
Ýçindekiler
Giriþ
Fotokopi iþlevi
Cevaplama modlarý
Otomatik doküman
Besleyici Kontrast kontrolü
Önemli güvenlik bilgileri
Ýþletim Paneline bir Bakýþ
Mode Select tuþu
Telefon görüþmelerinin izlenmesi
Örnek Sharp = 7777 44 2
Harflerin girilmesi
Kurulum
Paketinden çýkarma Kontrol listesi
Paketinden çýkarma Kontrol Baðlantýlar Listesi
Önceden yüklenmiþ örnek rulonun kontrol edilmesi
Görüntüleme Filmi
Görüntüleme Filmi
Telefon hattýnýn baðlanmasý
ÝKÝ Adet Yeþýl Dýþlýyý Çöpe Atmayiniz
Makaralarýn sað uçlarýný pimlere oturtun
Kaðýt Yüklenmesi
Kaðýt Yüklenmesi
Faks numaranýzýn girilmesi
Baþlangýç Ayarlarý
Baþlangýç Ayarlarý
Tarih ve saatin ayarlanmasý
Cevaplama Modunun Ayarlanmasý
Cevaplama Modunun Ayarlanmasý
Adýnýzýn girilmesi
Hoparlör sesi
Ses Ayarý
Ses Ayarý
Cevaplama modunun ayarlanmasý
Tuþ Tonu ayarý
PBX için Flaþ Seçme Ayarý
PBX için Flaþ Seçme Ayarý
Dil Ayarý
Doküman Yükleme
Faks Gönderme
Gönderilebilir Dokümanlar
Gönderilebilir Dokümanlar
Çözünürlük ayarlarý
Çözünürlük ve Kontrast
Çözünürlük ve Kontrast
Besleyiciden bir dokümanýn alýnmasý
Koyu
Faks Gönderme Normal Arama
Kontrast ayarlarý
OTO
Hata oluþursa makine üç kere bip sesi verecektir
Numaralarýn Kaydedilmesi
Numaralarýn Kaydedilmesi
Diðer kiþi cevaplarsa Start tuþuna
Telefon rehberindeki bir numaraya Hýzlý Arama Tuþu atama
UX-A760
Telefon rehberindeki numaralarýn düzenlenmesi
Telefon rehberindeki numaralarýn silinmesi
Tek bir numaranýn silinmesi
Telefon rehberini kullanma F
Faks Gönderme Otomatik Arama
Faks göndermek için otomatik aramalý bir numara kullanma
Yeniden ara
Çevir Sesi Kontrolü
Yeniden arama numaralarýnýn silinmesi
Yeniden arama numarasýnýn telefon rehberinde saklanmasý
Otomatik yeniden arama
Telefon Görüþmeleri Yapma
Telefon Görüþmeleri Yapma
Sessiz faks alýmý
Faks Alma
TEL/FAKS T/F Modunu Kullanma
TEL/FAKS T/F Modunu Kullanma
Zil Sayýsý ayarý
Faks Modunun Kullanýlmasý
Faks Modunun Kullanýlmasý
TEL Modunun Kullanýlmasý
Ayný hatta baðlý bir telefon üzerinden çaðrý cevaplama
TEL Modunun Kullanýlmasý
Çaðrý bekletme
Uzaktan Faks Alma ayarý
Uzaktan Faks Alýmý Numarasý ayarý
Faks Sinyali Alma ayarý
Alma Oraný ayarý
Modunun Kullanýlmasý UX-A760
Modunun Kullanýlmasý UX-A760
Hafýzaya Alma
Hafýzaya Alma
Faks Alma ayarý
Alýnan fakslarýn hafýzadan silinmesi
Telesekreterin Kullanýlmasý
Telesekreter Sadece UX-A760
Giden Mesaj Kaydetme
Giden Mesaj Kaydetme
Alýnan mesajlarýn silinmesi
Telesekreterin Kullanýlmasý
Mesajlarýnýzýn dinlenmesi
Mesaj listesinin yazdýrýlmasý
Ýzin verilen en uzun kayýt süresi
Telesekreter Ayarlarý
Telesekreter Ayarlarý
Çaðrý izleme
Telesekreterin devreden çýkarýlmasý
Devreden Çýkarma Zil Sesi
Devreden Çýkarma Zil Sesi
Devreden çýkarma kodunun programlanmasý
Ýndirimli Saat
Uzaktan Çalýþtýrma
Uzaktan Çalýþtýrma
Uzaktan kumanda kodu
Uzaktan kumanda kodunuzu giriniz Ve ardýndan tuþuna basýnýz
Için , tuþlarýna basýnýz
Açýklamalar
Bir not kaydetme sayfa
Diðer uzaktan kumanda komutlarý
Cevaplama modunun deðiþtirilmesi Modu Faks modu TEL modu
TEL/FAKS modu Yeni bir giden mesaj kaydetme
Dokümanlarý yükleyin. En fazla 10 A4 sayfasý
Fotokopi Çekme
Arayan No Listesi
Arayan No Caller ID Servis gerektirir
Arayan Nonun etkinleþtirilmesi
Arayan Nonun etkinleþtirilmesi
Ekran Tekrar Arama
Arayan No Listesi
Listeden çaðrýlarýn silinmesi
Arayan No listesinin yazdýrýlmasý
Alan Disi çaðrýlarýn engellemesi
Çaðrýlarý Engelleme
Çaðrýlarý Engelleme
Gizli NUMARAlarý Engelleme
Ýstenmeyen numaralar listesinin yazdýrýlmasý
Tuþ Kilidi Ýþlevi
Tuþ Kilidi kodunun kaydedilmesi
Önemli Tuþ Kilidi kodunu not
Yazdýrmak için Start tuþuna basýn
Tuþ Kilidi iþlevinin etkinleþtirilmesi
Tuþ Kilidinin devreden çýkarýlmasý
Tuþ Kilidi kodunun silinmesi deðiþtirilmesi
Tarama camý ve makaralarýn temizlenmesi
Bakým
Makinenin Temizlenmesi
Makinenin Temizlenmesi
Baský Kafasý ve Makaralarýn Temizlenmesi
Baský Kafasý ve Makaralarýn Temizlenmesi
Dikkat
Lityum pil hakkýnda
Mahfazanýn temizlenmesi
Hat hatasý
Sorun giderme
Sorunlar ve Çözümleri
Sorunlar ve Çözümleri
Alma ve kopyalama sorunlarý
Start Tusuna BAS
Genel sorunlar
Kopyalama için otomatik
Doküman besleme Çalýþmýyor
Mesajlar ve Uyarýlar
Mesajlar ve Uyarýlar
Mesaj #
Film Bitti
TUS Kilidi
Hafiza Full
Yeniden Arama
Sesli Uyarýlar
Görüntüleniyorsa önce F tuþuna
Kaðýt Sýkýþmasýnýn Giderilmesi
Kaðýt Sýkýþmasýnýn Giderilmesi
Sýkýþan bir dokümanýn çýkarýlmasý
Ýþletim panelini kapatýnýz
Kaðýdý çýkarýnýz
Sýkýþmýþ baský kaðýdýnýn çýkarýlmasý
Girilmesinden sonra
Hýzlý Baþvuru El Kitabý
Dizin
Dizin
Dizin
Uzaktan Kullanma Kýlavuzu
Uzaktan Kumanda Karti
Uzaktan Kumanda Komutlari
Cuprins
Cuprins
Rezoluţie de scanare Orizontală 8 pixel/mm Verticală
Introducere
Specificaţii Rola de film
Apelarea automată
Controlul contrastului
Linie telefonică
Modurile de recepţie
Alimentator de documente
Informaţii importante referitoare la siguranţa in exploatare
Tasta Mode Select
Panoul de operare
Tastele cu cifre Utilizaţi-le pentru a tasta numere de fax
Este dezactivat
Monitorizarea conversaţiilor telefonice
Exemplu Sharp = 7777 44 2 777
Introducerea literelor
Setarea aparatului
Elemente de reţinut când efectuaţi configurarea
Instalare
Listă de verificare la despachetare
Verificarea rolei initiale preîncărcată
Rola de film
Rola de film
Conectarea liniei telefonice
NU Aruncaţi Mecanismele DE ACŢIONARE, Verzi
Rola de film
Când nu utilizaţi aparatul, ţineţi tava închisă
Încărcarea hârtiei
Încărcarea hârtiei
Când nu utilizaţi aparatul
Introducerea numărului de fax
Setările iniţiale
Setările iniţiale
Setarea datei şi a orei
Setarea modului de recepţie
Setarea modului de recepţie
Introducerea numelui
Volumul difuzorului
Ajustarea volumului
Ajustarea volumului
Setarea modului de recepţie
Setarea tonului tastelor
Setări ale PBX-ului
Setări ale PBX-ului
Setările pentru selectarea limbii
Trimiterea faxurilor Documentele de transmis
Documentele de transmis
Alimentarea documentului
Setările de rezoluţie
Rezoluţia şi contrastul
Rezoluţia şi contrastul
Scoaterea unui document din tavă
Trimiterea unui fax Apelarea normală
Setările de contrast
Inchis
Dacă apare o eroare, aparatul va emite trei semnale sonore
Stocarea numerelor
Stocarea numerelor
Stocarea numerelor de fax şi telefon în agenda telefonică
Când un număr este atribuit unei taste
Apăsaţi Start Apăsaţi pentru a ieşi
Imprimarea Listei cu numere de telefon
Agendă, apăsaţi F , se Şi apoi pentru a selecta DA
UX-A760 Apăsaţi
Editarea numerelor din agendă
Ştergerea numerelor din agendă
Ştergerea unui singur număr
Încărcaţi documentele Dacă doriţi, apăsaţi
Trimiterea unui fax Apelarea automată
Trimiterea unui fax Apelarea automată
Reapelare
Verificarea tonului de apel
Ştergerea numerelor cu reapelare
Stocarea unui număr cu reapelare în agendă
Reapelarea automată
Efectuarea de apeluri telefonice
Efectuarea de apeluri telefonice
Durata pseudo soneriei
Primirea faxurilor
Utilizarea modului TEL/FAX T/F
Utilizarea modului TEL/FAX
Setarea numărului de sonerii
Utilizarea modului FAX
Utilizarea modului FAX
Utilizarea modului TEL
Din nou pentru a continua conversaţia
Utilizarea modului TEL
Punerea unui apel în aşteptare
Setările de recepţie a faxurilor la distanţă
Doriţi, puteţi dezactiva această funcţie şi
Setarea numerelor de fax la transmisie Remote
Setări pentru semnalul de recepţie a faxurilor
Setarea zoom-ului de recepţie
Start pentru a imprima faxurile
Utilizarea modului R.T. UX-A760
Utilizarea modului R.T. UX- A760
Recepţionarea în memorie
Verificarea memoriei utilizate în mod curent
Recepţionarea în memorie
Setări pentru primirea faxurilor
Ştergerea faxurilor primite din memorie
Utilizarea robotului telefonic
Robotul telefonic doar UX-A760
Înregistrarea unui MI
Înregistrarea unui MI
Ştergerea mesajelor primite
Utilizarea robotului telefonic
Ascultarea mesajelor
Imprimarea listei de mesaje
Timpul maxim de înregistrare admis
Setările robotului telefonic
Setările robotului telefonic
Afişarea apelului
Ignorarea robotul telefonic
Ignorarea soneriei
Ignorarea soneriei
Programarea codului de omitere
Economisire
Operaţii la distanţă
Operaţii la distanţă
Codul la distanţă
Repetarea redării Apăsaţi Efectuarea altor operaţii Puteţi
Introduceţi codul de distanţă şi Apăsaţi
Redarea mesajelor noi Mai întâi
Ştergerea tuturor mesajelor
Doar modul MI p Activarea modului MI
Alte comenzi la distanţă
Modul TEL/FAX Înregistrarea unui nou mesaj de întâmpinare
Înregistrarea unui memo p
Când sunteţi pregătit să începeţi Copierea, apăsaţi Copy
Copierea
Mesaje afişate
Listă de identificare apelant
Stocarea unui număr în ista de ID-uri din agenda telefonică
Listă de identificare apelant
Ştergerea apelurilor din listă
Imprimarea listei cu Identităţi apelant
Blocarea apelurilor DIN Afara Zonei
Blocarea apelurilor
Blocarea apelurilor
Blocarea Apelurilor
Ştergerea tuturor numerelor UX-P710 Apăsaţi UX-A760 Apăsaţi
Imprimarea listei cu numere nedorite
Stocarea codului de blocare a tastelor
Funcţia de blocare a tastelor
Apoi apăsaţi Start pentru a imprima faxul
Activarea funcţiei de blocare a tastelor
Deblocarea tastaturii
Introducerea schimbarea codului de blocare a tastaturii
Curăţarea geamului de scanare şi a rolelor
Întreţinere
Curăţarea aparatului
Curăţarea aparatului
Rotiţi pârghia înapoi Închideţi panoul de operare
Curăţarea capului de imprimare şi a rolelor
Curăţarea capului de imprimare şi a rolelor
Înlocuiţi capătul stâng al rolei albe în suportul său
Atenţie
Despre bateria cu litiu
Curăţarea carcasei
Depanarea
Probleme şi soluţii
Probleme şi soluţii
Probleme de apelare şi de transmisie
Hârtia pentru imprimat nu
Probleme de recepţie şi de copiere
Apelarea nu este posibilă
La o sursă de energie
Adauga Hartie
Probleme generale
Nu apare niciun mesaj pe
Câteva secunde mai târziu
Mesaje şi semnale
Mesaje şi semnale
Nici UN NR MEM
Film Terminat
BLOC. Taste
Memorie Plina
Secunde oprit
Semnale perceptibile
Reapeleaza
Furcă
Eliberarea blocajelor de hârtie
Eliberarea blocajelor de hârtie
Eliberarea unui document blocat
Eliberarea blocajelor de hârtie
Scoateţi documentul
Eliberarea hârtiei de imprimat blocate
După ce aţi introdus prima Literă
Ghid de referinţe rapide
Index
Index
Ştergerea, 22 Editarea, 22 Stocarea, 20 Utilizarea
Index
Card DE Operare LA Distanţă
Comenzi LA Distanþã
Български
Γράµµατος πιέστε
Οδηγός γρήγορης αναφοράς
Page
Other Countries outside the EU
Kraje pozaunijne
Σε άλλες χώρες εκτός της ΕΕ
În alte þãri din afara Uniunii Europene
ÏÈ˘Ê ÁÚÏÍ˝Ê ÊÙËû˝ ›Ã
Page
Koszt połączenia impuls/minuta
Sharp Electronics Europe Gmbh