Manuals
/
Star Micronics
/
Computer Equipment
/
Printer
Star Micronics
NB-15
user manual
Sprocket cover
Models:
NB-15
1
25
114
114
Download
114 pages
4.7 Kb
22
23
24
25
26
27
28
29
Connecting the Printer
Setting UP Your Printer
NEW Lprint Testing RUN
While trrnirrgon the power
Special Features Printer
Self-test DIP switch 2-2 on
Using Commercial Software
Page 25
Image 25
17
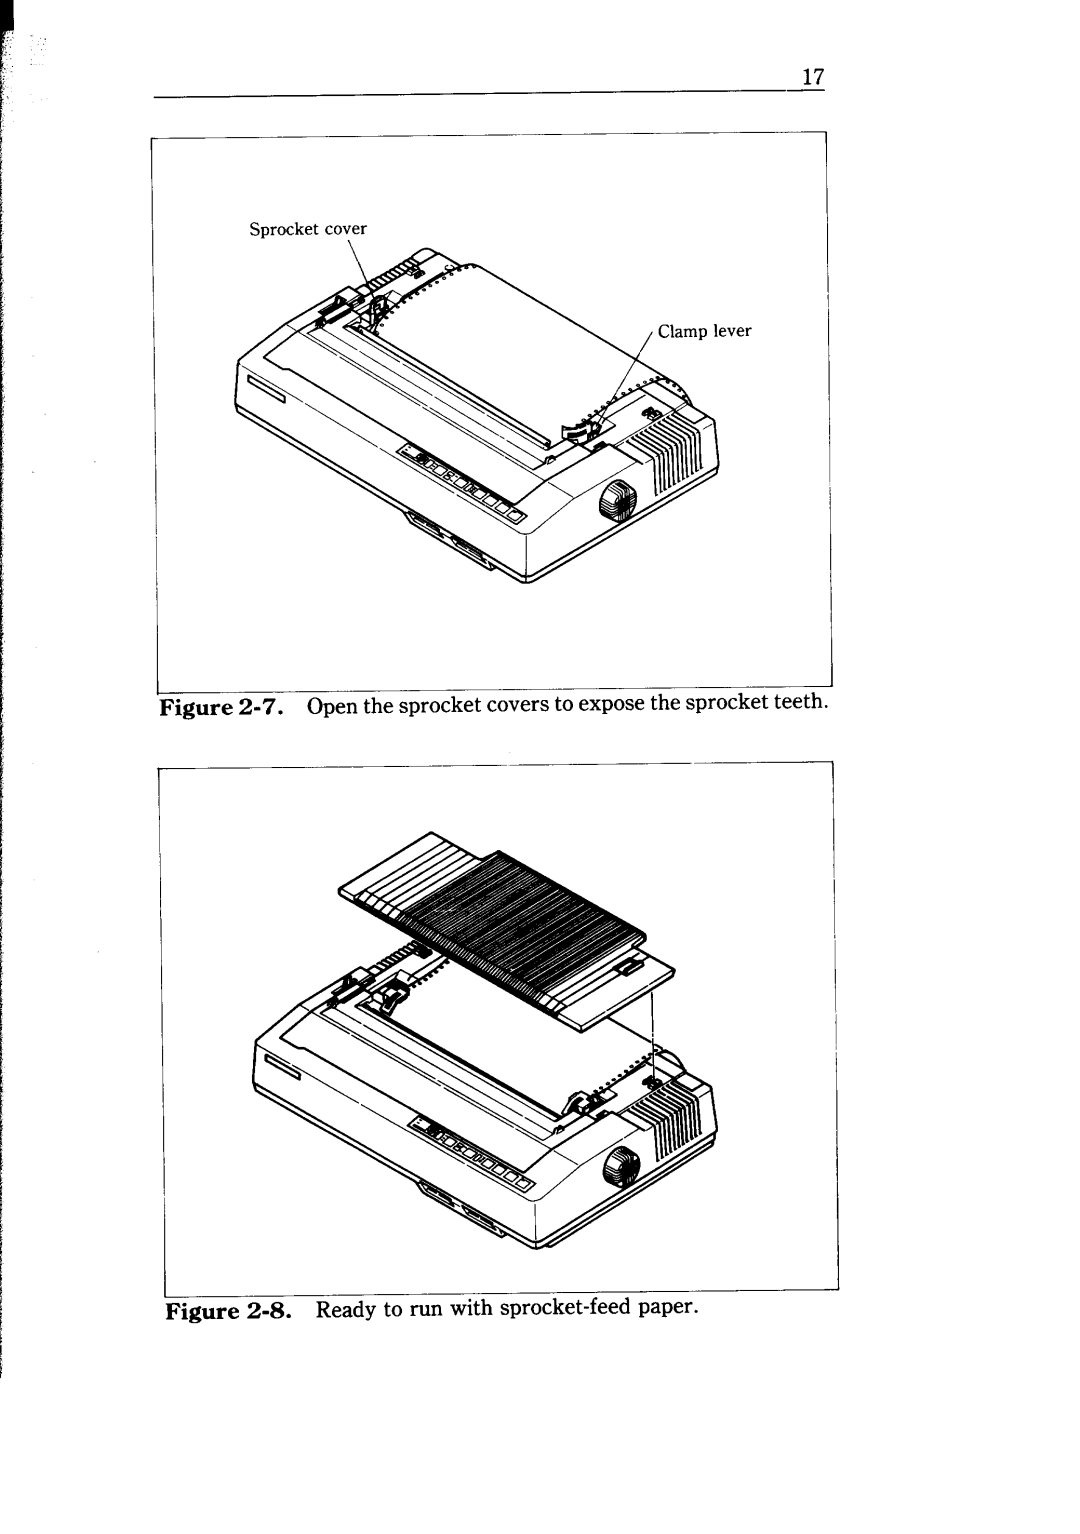
Sprocket cover
I
Figure
2-7.
Open the sprocket covers to expose the sprocket teeth.
pigure
2-8.
Ready to run with
sprocket-feed
paper.
Page 24
Page 26
Page 25
Image 25
Page 24
Page 26
Contents
USER’S MANUAli
Tatement
Special Message to the New Owner
Table of Contents
CHR$
Chapter Controlling with Basic
Chapter Special Features of the Printer
Functions of the Connector Signals
TRS-80 Basic
Appendix G Serial Interface Specifications
Setting UP Your Printer
Page
Tion and movement for both removing and replacing the cover
Page
Print head
Printer
Slide the I/F board into the slot
Page
Getting to Know Your Printer
Page
Page
Page
Selecting and Loading Paper
‘igure 2-4. Raise the paper guide for loading single sheets
You can insert a sheet of paper by using the release lever
To align paper that is not in straight
Sprocket cover
You can raise
While trrnirrgon the power
Self-test DIP switch 2-2 on
Efgh!jklmnopqr¶tuvwxyz~ ?lSS&‘
TOF
During normal operation
Connecting the Printer
Page
Memo
Using Commercial Software
Page
Ascii
Using Your Printer with Word Processors
Page
Memo
Controlling With Basic
List
PR#O
NEW Lprint Testing RUN
ESC W
Lprint CHR$27WCHR$l Lprint CHR$27WCHR$49 Lprint CHRS27Wl
Memo
Printing Text
Lprint CHR$27 xl
ESC
Lprint Undelined
OFF ESC
Lprint Overlined
Boldface on
Escso
When you run this program you should get this
Demonstration
Condensed
Here’s what you should get from this program
OFF
Elite mint
Summary notes
Memo
Formatting Text
This is what you will get
This Line Spacing is SET to
Run the program again. Now the results will look like this
Here is what your printer will produce
Lprint CHRS12
Line Number
IOI
ESCNCHR$n
Lprint this is LINE1 Next
This is Line
Return
TWO Three Four ONE
This command sets the horizontal tab to every eight columns
Next
Try thisprogram tosee how this works
Lprint CHR$11 First TAB
Lprint CHR$llFIFTH TAB
CHR$O
Lprint 2ND TAB of CHANNEL’
Memo
Special Features Printer
Lprint CHR$7
ESCVCHR$O
Here is what this program will print
Lprint CHR$27il
Printing direction commands Function Control code
Next Lprint Lprint
Eighth bit controls
Next J
129
LPRINTCHR$27 LPRINTCHR$27=
Lprintlprint
Double
This is Double Sized Printing
Lprint CHR$I
Next Lprint
Page
Creating Your OWN Characters
Print Matrix
Defining Your OWN Characters
Usethisgridoronesimilartoittodefineyourown draftcharacters
Wrong
128
Assigningavalueofcharacterspace
Characterdesignsforthetwographsymbols
Page
Read MM LPRINTCHR$MM Next M Next N Lprint
LPRINTCHR$I Next
Lprint CHR$I Next
Lprint
Lprint LPRINTGERMANYCHR$9
Lprintscales
Read MM Lprint CHR$MM Next M
Data 1, 9, 2, 31,253,64, 32, 1,128,80
MO+ml +m2
105
106
Top
Page
Image
Contents