Contents | Index |
| 19 |
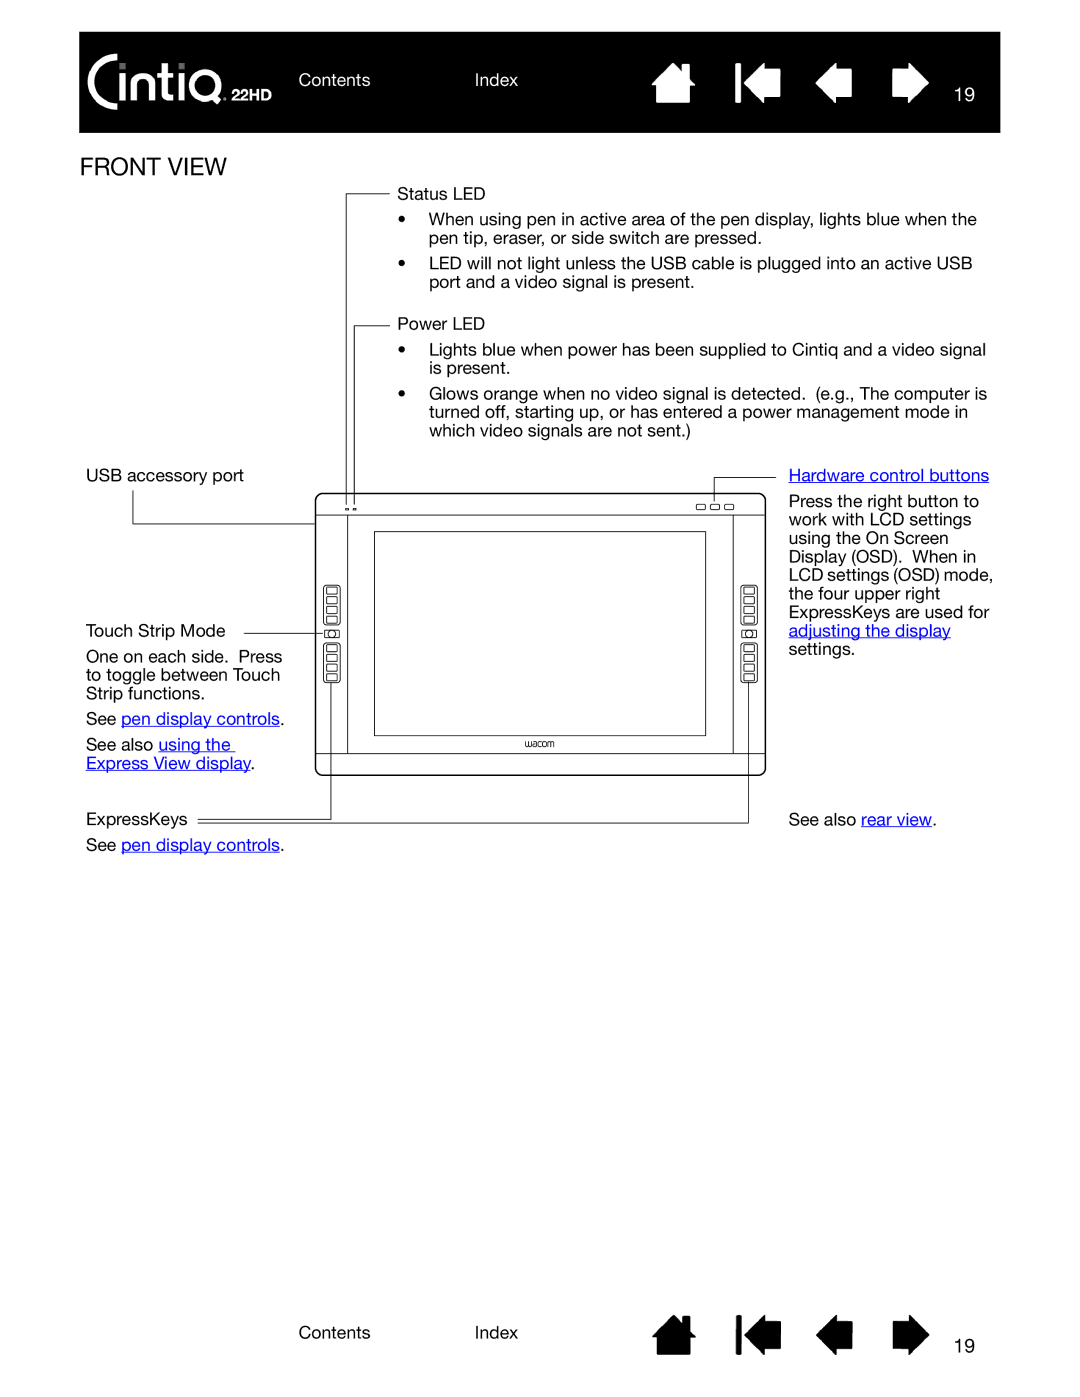
FRONT VIEW
|
|
|
|
|
|
|
|
|
|
|
| Status LED | ||||||
|
|
|
|
|
|
|
|
|
|
| ||||||||
|
|
|
|
|
|
|
|
|
|
|
| • When using pen in active area of the pen display, lights blue when the | ||||||
|
|
|
|
|
|
|
|
|
|
|
| pen tip, eraser, or side switch are pressed. | ||||||
|
|
|
|
|
|
|
|
|
|
|
| • LED will not light unless the USB cable is plugged into an active USB | ||||||
|
|
|
|
|
|
|
|
|
|
|
| port and a video signal is present. | ||||||
|
|
|
|
|
|
|
|
|
|
|
| Power LED | ||||||
|
|
|
|
|
|
|
|
|
|
|
| |||||||
|
|
|
|
|
|
|
|
|
|
|
| • Lights blue when power has been supplied to Cintiq and a video signal | ||||||
|
|
|
|
|
|
|
|
|
|
|
| is present. | ||||||
|
|
|
|
|
|
|
|
|
|
|
| • Glows orange when no video signal is detected. (e.g., The computer is | ||||||
|
|
|
|
|
|
|
|
|
|
|
| turned off, starting up, or has entered a power management mode in | ||||||
|
|
|
|
|
|
|
|
|
|
|
| which video signals are not sent.) | ||||||
USB accessory port |
|
|
|
|
|
|
|
|
|
| Hardware control buttons | |||||||
|
|
|
|
|
|
|
|
|
|
| ||||||||
|
|
|
|
|
|
|
|
|
|
|
|
|
|
|
|
|
| Press the right button to |
|
|
|
|
|
|
|
|
|
|
|
|
|
|
|
|
|
| |
|
|
|
|
|
|
|
|
|
|
|
|
|
|
|
|
|
| |
|
|
|
|
|
|
|
|
|
|
|
|
|
|
|
|
|
| work with LCD settings |
|
|
|
|
|
|
|
|
|
|
|
|
|
|
|
|
| ||
|
|
|
|
|
|
|
|
|
|
|
|
|
|
|
|
|
| |
|
|
|
|
|
|
|
|
|
|
|
|
|
|
|
|
|
| using the On Screen |
|
|
|
|
|
|
|
|
|
|
|
|
| ||||||
|
|
|
|
|
|
|
|
|
|
|
|
|
|
|
|
|
| Display (OSD). When in |
|
|
|
|
|
|
|
|
|
|
|
|
|
|
|
|
|
| LCD settings (OSD) mode, |
|
|
|
|
|
|
|
|
|
|
|
|
|
|
|
|
|
| the four upper right |
|
|
|
|
|
|
|
|
|
|
|
|
|
|
|
|
|
| ExpressKeys are used for |
Touch Strip Mode |
|
|
|
|
|
|
|
|
|
|
|
|
| adjusting the display | ||||
|
|
|
|
|
|
|
|
|
|
|
| |||||||
One on each side. Press |
|
|
|
|
|
|
|
|
|
| settings. | |||||||
|
|
|
|
|
|
|
|
|
|
| ||||||||
to toggle between Touch |
|
|
|
|
|
|
|
|
|
|
| |||||||
Strip functions. |
|
|
|
|
|
|
|
|
|
|
|
| ||||||
See pen display controls. |
|
|
|
|
|
|
|
|
|
|
|
| ||||||
See also using the |
|
|
|
|
|
|
|
|
|
|
|
| ||||||
|
|
|
|
|
|
|
|
| ||||||||||
Express View display. |
|
|
|
|
|
|
|
|
|
|
|
|
|
|
| |||
ExpressKeys |
|
|
|
|
|
|
|
|
|
|
|
|
| See also rear view. | ||||
|
|
|
|
|
|
|
|
|
|
|
| |||||||
|
|
|
|
|
|
|
|
|
|
|
|
|
|
| ||||
See pen display controls. |
|
|
|
|
|
|
|
|
| |||||||||
ContentsIndex
19