Using the Radial Menu Application-specific settings FAQs
Cintiq 22HD Setting up Using the display stand Using the pen
Customizing the pen Using the pen display Customizing the pen display
Troubleshooting
ContentsIndex
TABLE OF CONTENTS
ContentsIndex
Contents
Index
ABOUT THE MANUAL
topic
UNPACKING YOUR CINTIQ
Removing Cintiq from the display stand
USING THE CINTIQ DISPLAY STAND
Display stand features Display stand location
DISPLAY STAND FEATURES
DISPLAY STAND LOCATION
MOUNTING CINTIQ ON THE DISPLAY STAND
ADJUSTING THE DISPLAY INCLINE
ADJUSTING ROTATION
See using an alternate mount or stand
REMOVING CINTIQ FROM THE DISPLAY STAND
Step 2 Software installation
SETTING UP YOUR CINTIQ
System requirements Step 1 Hardware installation
SYSTEM REQUIREMENTS
STEP 1 HARDWARE INSTALLATION
Cintiq cabling diagram
ContentsIndex
For troubleshooting tips, see troubleshooting
STEP 2 SOFTWARE INSTALLATION
GETTING TO KNOW YOUR CINTIQ
PEN DISPLAY FEATURES
Pen display features Pen features
Front view Rear view
adjusting the display
FRONT VIEW
Contents
Index
See pen display controls
REAR VIEW
ContentsIndex
PEN FEATURES
Using the Grip Pen Pen display controls
SETTING UP YOUR WORK AREA
Setting up your work area Configuring Cintiq for handedness
Working with multiple monitors Adjusting the display
Change your position if you feel any discomfort
Holding the pen Positioning Clicking Dragging Using the side switch
CONFIGURING CINTIQ FOR HANDEDNESS
USING THE GRIP PEN
Working with pressure sensitivity Drawing with tilt Erasing
HOLDING THE PEN
POSITIONING
CLICKING
DRAGGING
USING THE SIDE SWITCH
To adjust tip feel, see adjusting tip feel and double-click
WORKING WITH PRESSURE SENSITIVITY
DRAWING WITH TILT
ERASING
See also using the Express View display
PEN DISPLAY CONTROLS
ContentsIndex
USING THE HARDWARE CONTROL BUTTONS
USING THE EXPRESSKEYS
Tips Use the Radial Menu to expand the functionality of your Cintiq
Manage your control panel settings Control panel overview
Customizing the ExpressKeys
USING THE TOUCH STRIPS
ContentsIndex
Manage your control panel settings Control panel overview
Customizing the Touch Strips
Default settings are the same for both Touch Strips
WORKING WITH MULTIPLE MONITORS
Factory presets, auto-sync, and user settings
ADJUSTING THE DISPLAY
FACTORY PRESETS, AUTO-SYNC, AND USER SETTINGS
On Screen Display OSD settings Power saving
ON SCREEN DISPLAY OSD SETTINGS
Menu options are available when you open the On Screen Display
POWER SAVING
CUSTOMIZING YOUR CINTIQ
Using and customizing the Radial Menu Working with Display Toggle
Application-specific settings Working with multiple tools
Calibrating the pen display Customizing the pen
MANAGE YOUR CONTROL PANEL SETTINGS
Settings may vary depending on your product model ContentsIndex
CONTROL PANEL OVERVIEW
Displays advanced options
See also working with multiple tools
CALIBRATING THE PEN DISPLAY
Customizing tool buttons Adjusting tip feel and double-click
CUSTOMIZING THE PEN
Adjusting eraser feel Customizing tilt sensitivity
Advanced tip and eraser pressure settings
ContentsIndex
ADJUSTING TIP FEEL AND DOUBLE-CLICK
To adjust the tip sensitivity of your pen, select the PEN tab
ADJUSTING ERASER FEEL
ADVANCED TIP AND ERASER PRESSURE SETTINGS
CUSTOMIZING TOOL BUTTONS
ContentsIndex
CUSTOMIZING PEN DISPLAY FUNCTIONS
CUSTOMIZING TILT SENSITIVITY
See using the ExpressKeys for more information
CUSTOMIZING THE EXPRESSKEYS
ContentsIndex
See using the Touch Strips for more information
CUSTOMIZING THE TOUCH STRIPS
ContentsIndex
BUTTON FUNCTIONS
Important Because the ENTER Windows and RETURN Mac keys
ContentsIndex
See application-specific settings
You must use your pen to click on the OK button
FUNCTION NAME
ContentsIndex
SWITCH APPLICATION
DESCRIPTION
DESCRIPTION
ContentsIndex
FUNCTION NAME
DESCRIPTION
ContentsIndex
FUNCTION NAME
PRECISION MODE
DESCRIPTION
ContentsIndex
FUNCTION NAME
MODE TOGGLE
DISABLED
ContentsIndex
SETTINGS
DEFAULT
USING AND CUSTOMIZING THE RADIAL MENU
PEN DISPLAY TO OTHER DISPLAYS toggles
WORKING WITH DISPLAY TOGGLE
PEN DISPLAY TO DESKTOP toggles the
Changing application-specific settings
APPLICATION-SPECIFIC SETTINGS
Creating an application-specific setting
Removing application-specific settings
CREATING AN APPLICATION-SPECIFIC SETTING
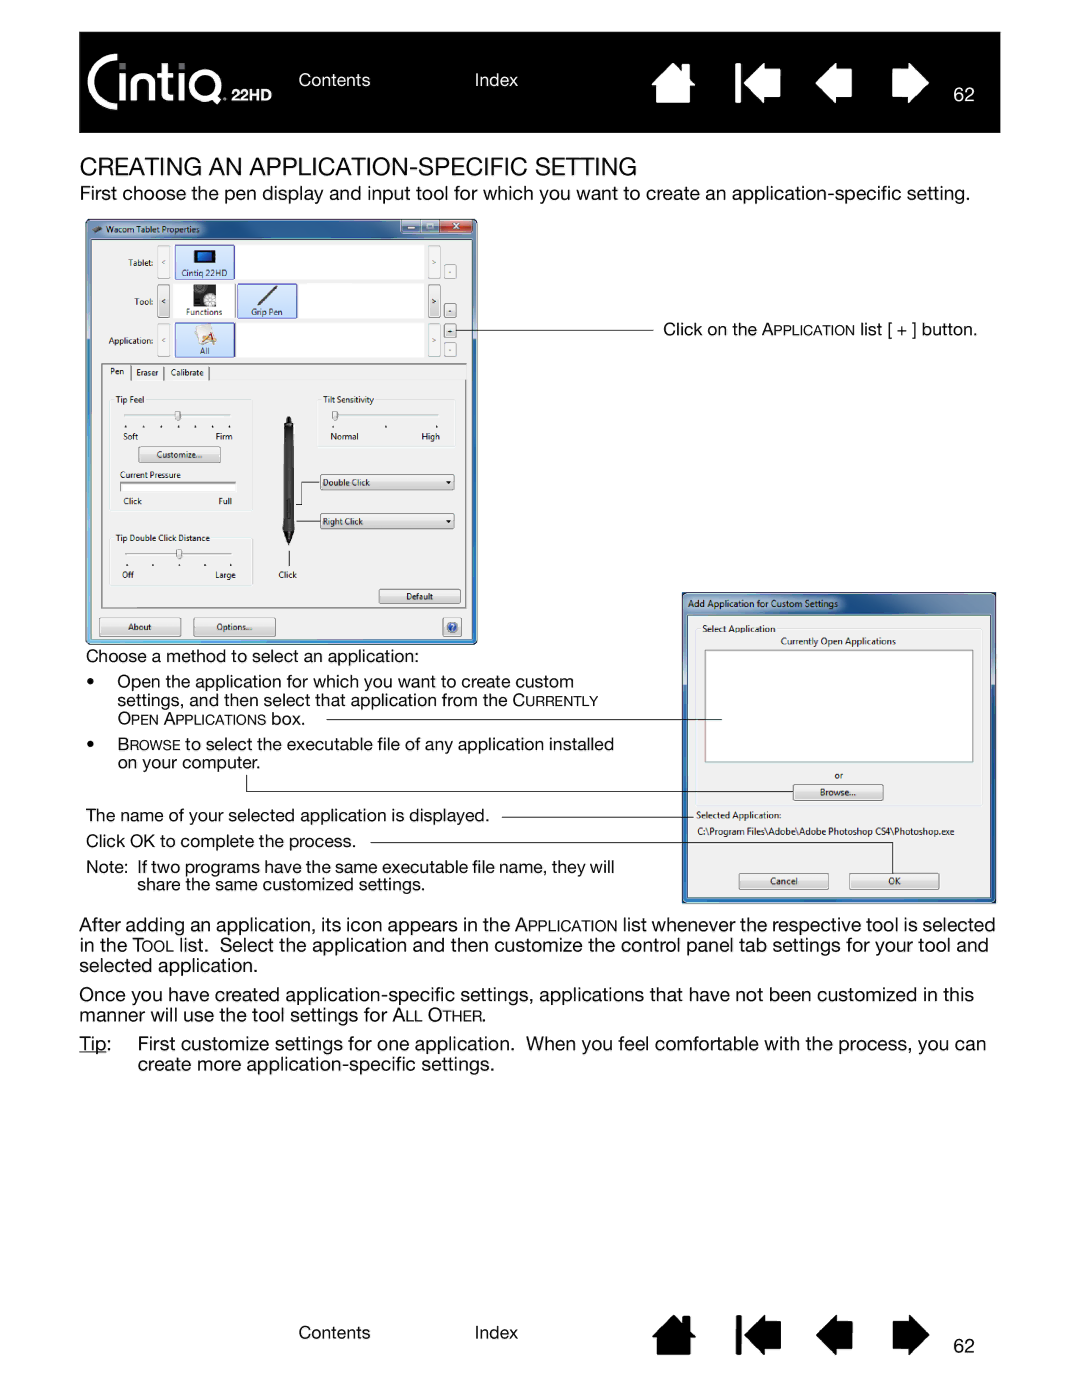
OPEN APPLICATIONS box
CHANGING APPLICATION-SPECIFIC SETTINGS
REMOVING APPLICATION-SPECIFIC SETTINGS
WORKING WITH MULTIPLE TOOLS
RENAMING THE TABLET IN THE TABLET LIST
ContentsIndex
Testing Cintiq Testing controls and input tools
TROUBLESHOOTING
6. Try testing Cintiq
Display troubleshooting Pen tablet troubleshooting
TESTING CINTIQ
8. Check any other tools, such as the optional Airbrush. See testing controls and input tools
Testing the Touch Strips Testing a pen
TESTING CONTROLS AND INPUT TOOLS
Testing the hardware control buttons Testing the ExpressKeys
TESTING THE TOUCH STRIPS
TESTING THE HARDWARE CONTROL BUTTONS
TESTING THE EXPRESSKEYS
For details, see using applications integrated for tablet control
TESTING A PEN
General display problems VGA problems
DISPLAY TROUBLESHOOTING
GENERAL DISPLAY PROBLEMS
Choose OTHER SETTINGS and RESET
VGA PROBLEMS
General problems Windows-specific problems Mac-specific problems
PEN TABLET TROUBLESHOOTING
GENERAL PROBLEMS
installation
Continue with calibrating the pen display
troubleshooting
controls and input tools
tools
The pen side switch does not
troubleshooting
The computer does not go to
WINDOWS-SPECIFIC PROBLEMS
troubleshooting
MAC-SPECIFIC PROBLEMS
See technical support options
Wacom Tablet Utility, select C URRENT USER or A LL USERS. Then click
Ink does not work correctly with the pen display
TECHNICAL SUPPORT OPTIONS
OBTAINING SOFTWARE UPDATES
ContentsIndex
The installer is asking for a password. What is the password?
FREQUENTLY ASKED QUESTIONS
What software applications support Cintiq features?
How do I reset my Cintiq preferences to the default settings?
Yes. See managing preferences
See ordering parts and accessories
See managing preferences
See caring for Cintiq
Caring for Cintiq Replacing the pen nib
CARE AND MAINTENANCE
CARING FOR CINTIQ
REPLACING THE PEN NIB
Important Replace the pen nib before or when it looks like this
Replace the nib when it gets too short or develops a flat point
The pen nib tip will wear with normal use
For replacement parts, see ordering parts and accessories
When the optional Airbrush is not in use, lay it flat on your desk
Using the Express View display Managing preferences
Optional display configurations Using an alternate mount or stand
Cable removal and replacement Uninstalling Cintiq
Installing multiple tablets
OPTIONAL DISPLAY CONFIGURATIONS
USING AN ALTERNATE MOUNT OR STAND
To remove the pen display from a VESA mount
5. Study the bearing hub components. You should have two bearing hub sections, a bearing stopper, and four screws. Locate the bearing stopper within one of the bearing hub sections. Either hub section can be used as they are identical parts
CABLE REMOVAL AND REPLACEMENT
5. Mount Cintiq on the display stand
Replace a cable
UNINSTALLING CINTIQ
USING THE EXPRESS VIEW DISPLAY
MANAGING PREFERENCES
UTILITY
INSTALLING MULTIPLE TABLETS
USING APPLICATIONS INTEGRATED FOR TABLET CONTROL
IMPORTING EXPERT SETTINGS
PEN AND DIGITAL INK CAPABILITIES IN WINDOWS
PRODUCT INFORMATION
ORDERING PARTS AND ACCESSORIES
AVAILABLE PARTS AND ACCESSORIES
GLOSSARY
Nib. The replaceable pen tip
Tilt sensitive. A quality of the pen tip and eraser that senses the amount of tilt between the tool and tablet. This is used to create natural-looking pen, brush, and eraser strokes in applications that are tilt sensitive
INDEX
ContentsIndex
Contents
Index
Contents
Index
WACOM TECHNOLOGY CORPORATION
WACOM INTERNATIONAL OFFICES
ContentsIndex
WACOM EUROPE GMBH