Version 4.01.17 User’s Guide
3 Dynatel
Future-ProofTesting Platform
Advanced Modular System 965AMS
Page
Contents
System Modes
Getting Started
Introduction
Example: To use the AC Volts, press F5
Introduction
Getting Started
3M Dynatel Advanced Modular System 965AMS
Welcome Screen
Help
Getting Started
High Voltage
Country
System Setup
Country
Language
Module
Network Setup
3M Dynatel Advanced Modular System 965AMS
press to quit without making changes
Units
System Setup
Change to continue or
Degrees: Fahrenheit or
Units
User Info
3M Dynatel Advanced Modular System 965AMS
Clock Settings
System Setup
2.Use the blue keys to enter the correct date
3.Press Select , then enter the correct time using the blue keys
Clock Settings
System Setup
Clock Settings
3M Dynatel Advanced Modular System 965AMS
Set Beep Volume
press to quit without making changes
Power Down Timeout
System Setup
Change to continue or
Custom Cable
the capacitance to ground
System Setup
Custom Cable
4. Use the blue keys to enter
ohms per thousand feet
System Setup
Custom Cable
6. Use the blue keys to enter
3M Dynatel Advanced Modular System 965AMS
System Setup
Custom Cable
Press OK to save the custom cable
Voltage Termination
Voltage Termination
System Setup
3M Dynatel Advanced Modular System 965AMS
Measurement Functions
Volts-DCor AC>Hook-Up
Volts-DCor AC
Volts-DCor AC>Operation
Volts-DCor AC>AC Volts
AC Normal Range—ActiveLine
Loop Current>Hook-Up
Loop Current
Loop Current>Operation
3. Over Current Warning
Loop Current>Ground Resistance
Loop Current>Ground Resistance>Hook-Up
Loop Current>Operation
Loop Current>Ground Resistance>Operation
Ohms Measurements>Hook-Up
Ohms Measurements
Ohms Measurements>Operation
Marginal
Ohms Measurements>Operation
Measurement Functions
3M Dynatel Advanced Modular System 965AMS
Ohms Measurements>Soak Test
Ohms Measurements>Voltage Compensation
1. Take an initial resistance
3M Dynatel Advanced Modular System 965AMS
Ohms Measurements>Soak Test
Measurement Functions
Initial Reading Reading After 1 or 2 Minutes
3M Dynatel Advanced Modular System 965AMS
Ohms Measurements>Soak Test
6. Use
Measurement Functions
Toolbox>Stored Results
Toolbox
Toolbox>Stored Results>Operation
Press View to see the list of files
Toolbox>Stored Results>Operation
Toolbox>Self-Calibrate>Hook-Up
Toolbox>Self-Calibrate
3M Dynatel Advanced Modular System 965AMS
Toolbox>Self-Calibrate>Operation
OK to save your choice
Measurement Functions
Toolbox>Ohms-to-DistanceCalculator>Operation
Toolbox>Ohms-to-DistanceCalculator
3M Dynatel Advanced Modular System 965AMS
5. Use the blue keys to enter the temperature
Toolbox>Ohms-to-DistanceCalculator>Operation
Measurement Functions
distance
Internet Explorer
Toolbox>Ohms-to-DistanceCalculator>Operation
6. Press Convert to find the
Toolbox>965AMS Results Manager
Toolbox 965AMS Results Manager Connections
Toolbox>965AMS Results Manager>Copying Files
Opens>Hook Up
Opens
Opens>Operation
Press Tip Gnd to display the T-Gdistance
Opens>Operation
Opens>Operation
Measurement Functions
Opens Calibrate Cable
1. Press Setup
2. Press
Press Measure
Opens>Calibrate Cable
3. Use the blue keys to enter the known distance
Measurement Functions
Ring B
Tone
Tone>Set-Up
Tone>Operation
Measurement Functions
Tone>Operation
3. Press Send Tone to send the tone
4. Press Stop Tone to stop the tone
Precision - 200 Hz and 19,999 Hz
Tone>Edit The Frequency Of A Tone
Tone>Applications>ID Tone
Tone>Applications
Tone>Edit The Frequency Of A Tone
Tone>Application>Wideband Tone
Tone>Applications>Precision Tone
RFL>Hook-Up
RFL Resistance Fault Locate
Tip-CrossSeparate Pair
RFL>Hook-Up
Ring-GroundSeparate Pair
Short Separate Pair
Fault
Ring B 1/Fault
Fault Strap
Fault
Fault
RFL>Separate-Pair, Single-SectionOperation
Ring B/Fault
Tip A/Fault
2.Press the blue key to enter the RFL function
RFL>Separate-Pair, Single-SectionOperation
arrow keys to select Single
Press Setup to choose the
RFL>Separate-Pair, Single-SectionOperation
Use the up and down
7.Press Unknown Length
8.Enter the temperature using the blue keys
RFL>Separate-Pair, Single-SectionOperation
Press OK to return to the main RFL screen
RFL>Separate-Pair, Single-SectionOperation
9. Press Test to review the settings
DTS is the distance to the strap
RFL>Separate-Pair, Single-SectionOperation
RFL>Separate-Pair, Multi-SectionOperation
3M Dynatel Advanced Modular System 965AMS
5.Press Setup to define the sections
RFL>Separate-Pair, Multi-SectionOperation
Measurement Functions
3M Dynatel Advanced Modular System 965AMS
RFL>Separate-Pair, Multi-SectionOperation
Press Select to move to
RFL>Separate-Pair, Multi-SectionOperation
8. Use the blue keys to enter
the section length
3M Dynatel Advanced Modular System 965AMS
RFL>Separate-Pair, Multi-SectionOperation
13.Use the up and down arrow keys to select the next
RFL>Separate-Pair, Multi-SectionOperation
Press OK to return to the Multiple Gauge screen
RFL>Separate-Pair, Multi-SectionOperation
3M Dynatel Advanced Modular System 965AMS
to the main RFL screen
18. Press Test to review the settings
RFL>Separate-Pair, Multi-SectionOperation
17. Press OK again to return
3M Dynatel Advanced Modular System 965AMS
RFL>Separate-Pair, Multi-SectionOperation
DTS is the distance to the strap
RFL Separate-Pair, Multi-SectionOperation
3M Dynatel Advanced Modular System 965AMS
RFL>Single-Pair, Single-SectionOperation
Measurement Functions
RFL>Single-Pair, Single-SectionOperation
3M Dynatel Advanced Modular System 965AMS
RFL>Single-Pair, Single-SectionOperation
Press OK to return to the main RFL screen
8.Enter the temperature using the blue keys
9. Press Test to review the settings
RFL>Single-Pair, Single-SectionOperation
3M Dynatel Advanced Modular System 965AMS
RFL>Single-Pair, Single-SectionOperation
14. Press Convert to distance to
RFL>Single-Pair, Single-SectionOperation
1. Use the Auto test
Measurement Functions
RFL>Single Pair, Multi-SectionOperation
3M Dynatel Advanced Modular System 965AMS
RFL>Single Pair, Multi-SectionOperation
Press Select to move to
RFL>Single Pair, Multi-SectionOperation
8. Use the blue keys to enter
the section length
3M Dynatel Advanced Modular System 965AMS
RFL>Single Pair, Multi-SectionOperation
Measurement Functions
RFL>Single Pair, Multi-SectionOperation
3M Dynatel Advanced Modular System 965AMS
RFL>Single Pair, Multi-SectionOperation
Measurement Functions
RFL>Single Pair, Multi-SectionOperation
17. Press OK again to return
to the main RFL screen
3M Dynatel Advanced Modular System 965AMS
RFL>Single Pair, Multi-SectionOperation
RFL>Wet Pulp>Hook-Up
RFL>Wet Pulp
RFL>Wet Pulp>Operation
RFL>Wet Pulp> Requirements
Press OK to continue
the temperature field
RFL Wet Pulp Operation
Press Select or
Press Start to start the test
RFL>Wet Pulp>Operation
RFL>Wet Pulp>Error Screens
2. The strap at the far-endis open. There should be a solid short at the far-end
RFL>Wet Pulp>Error Screens
DSL>DSL Loss
DSL Digital Subscriber Line
DSL>DSL Loss>Hook-Up
DSL>DSL Loss>Operation
Measurement Functions
DSL>DSL Loss>Operation
5. Press OK to make the
measurement
DSL>DSL Loss>Application Notes
Ring B
DSL>DSL Noise
DSL>DSL Noise>Hook-Up
DSL>DSL Noise>Operation
3M Dynatel Advanced Modular System 965AMS
4.Press OK when finished
DSL>DSL Noise>Operation
Measurement Functions
measure longitudinal noise
measure metallic noise
DSL DSL Noise Operation
Shorted Internally
DSL>DSL Noise>Application Notes
DSL>DSL Spectrum Analyzer>Hook-Up
DSL>DSL Spectrum Analyzer
DSL>DSL Spectrum Analyzer>Operation
3.Press Span to change the frequency range
DSL>DSL Spectrum Analyzer>Operation
3M Dynatel Advanced Modular System 965AMS
DSL DSL Spectrum Analyzer Operation
ADSL Upstream T1 HDSL ISDN
Measurement Functions
Center Frequencies
DSL>DSL Spectrum Analyzer>Application Notes
VDSL Spectrum
DSL>Resistance Balance>Hook-Up
DSL>Resistance Balance
DSL>Resistance Balance>Operation
DSL>Resistance Balance>Application Notes
DSL>Resistance Balance>Recommended Values
DSL>Resistance Balance>Operation
DSL DSL Impulse Noise Hook-Up
DSL>DSL Impulse Noise
DSL>DSL Impulse Noise>Operation
4.Press OK when finished
6. Press Setup to select Count Threshold Time
7. Press OK when finished
Measurement Functions
9. Press Setup to return to the setup screen
8. Press Restart to begin a
new test
DSL>DSL Impulse Noise>Application Notes
TDR>Event Recognition
“Dip” Events
Fault Icons
Measurement Functions
TDR Setup
2.Press Setup
1.Press the blue key to enter the TDR mode
You can choose to start
TDR>Setup
TDR Single Trace Mode Hook-Up
TDR>Single Trace Mode
TDR>Single Trace Mode>Operation
6.This trace shows a resistive fault at 219 feet
TDR>Dual Trace Mode>Hook-Up
TDR>Dual Trace Mode
TDR>Dual Trace Mode>Operation
TDR>Differential>Hook-Up
TDR>Differential
TDR>Dual Trace Mode>Operation
TDR Differential Operation
TDR>Crosstalk>Hook-Up
TDR>Crosstalk
TDR>Crosstalk>Operation
TDR>Memory Mode>Hook-Up
TDR>Memory Mode
TDR>Crosstalk>Operation
TDR>Memory Mode>Operation
3. Press the View key to
TDR>Peak Mode>Hook-Up
TDR>Peak Mode
TDR>Peak Mode>Operation
4. If the pair being tested
TDR>Peak Mode>Operation
Cable Length
TDR>Controls
Screen Pan
3M Dynatel Advanced Modular System 965AMS
TDR>Controls
Filter
Velocity of Propagation
Pulse Width
TDR>Controls
Gain
TDR Save
TDR>Controls
TDR>Controls
4.The data entered into each field will remain present for every saved result until explicitly changed or cleared. In this way information that is infrequently changed such as the Tech ID does not need to be re-keyedevery time. These two fields are appended to the TDR trace results when they are printed or stored in the PC Link software
POTS Loss
POTS
POTS Loss Hook-Up
standard telephone
POTS>Loss>Operation
3M Dynatel Advanced Modular System 965AMS
Press Setup to select or edit numbers from memory
POTS>Loss>Operation
Measurement Functions
c. Press Select
b.Verify that both ends of the circuit are on the
POTS>Loss>Operation
e. Press Dial to begin the test
4. Point to Point Measurements
POTS>Noise>Hook-Up
POTS>Noise
POTS>Noise>Operation
1. Use the blue keys to
POTS>Noise>Operation
a. Use the up and down arrow keys to find the quiet line number for the central office you want to measure
POTS>Noise>Operation
d. Press
Tip A
POTS>Longitudinal Balance
POTS Longitudinal Balance Hook-Up
Ring B
POTS>Longitudinal Balance>Operation
Measurement Functions
POTS>Longitudinal Balance>Operation
3M Dynatel Advanced Modular System 965AMS
c. Press Select to
POTS>Longitudinal Balance>Operation
POTS>Load Coils
Tip A
POTS>Load Coils>Hook-Up
POTS>Load Coils>Operation
Ring B
Measurement Functions
POTS>Load Coils>Operation
Press OK to return to Load Coil screen
5. Press Test to start the test
POTS>Caller ID>Hook-Up
POTS Caller ID
POTS>Load Coils>Operation
POTS>Caller ID>Operation
POTS Ringers Hook-Up
POTS>Ringers
POTS>Ringers>Operation
POTS>Level Trace
POTS>Level Trace>Operation
POTS>Level Trace>Hook-Up
5. This trace shows one load coil at 18,000 feet
POTS>Level Trace>Operation
POTS Kick Test Hook-Up
POTS>Kick Test
POTS>Kick Test>Operation
Press OK to start the test
2. Press Setup to enter the
POTS>Kick Test>Operation
type of cable
Ring B
POTS>Voice Band Spectrum Analyzer
POTS>Voice Band Spectrum Analyzer>Hook-Up
POTS>Kick Test>Operation
POTS>Voice Band Spectrum Analyzer>Operation
Auto Test Active POTS
Auto Test
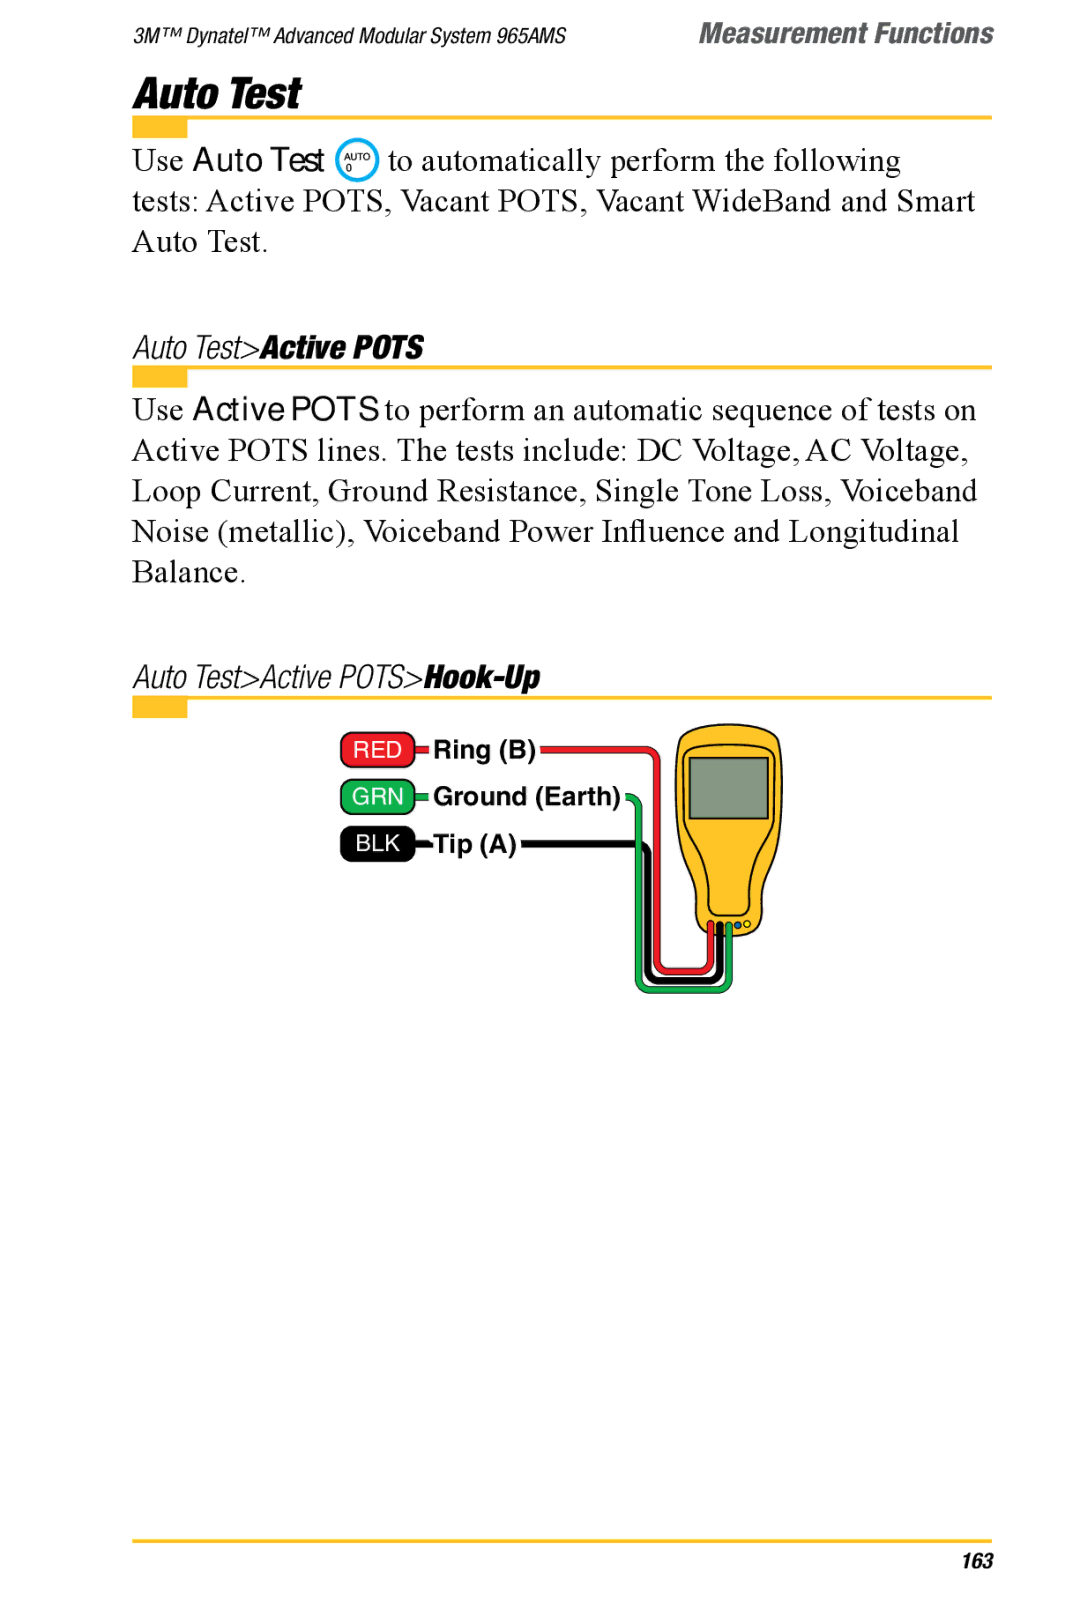
Auto Test>Active POTS>Hook-Up
Auto Test>Active POTS>Operation
3M Dynatel Advanced Modular System 965AMS
Auto Test>Active POTS>Operation
the loop start-groundstart
method. The default is loop
5. Press
Select to move to
3M Dynatel Advanced Modular System 965AMS
Auto Test>Active POTS>Operation
9. Press Select to move to
13.Press Val. to see the actual test results
Auto Test>Active POTS>Operation
Auto Test>Vacant POTS>Hook-Up
Auto Test>Vacant POTS
Auto Test>Vacant POTS>Operation
3. Press Select to move to
Auto Test>Vacant POTS>Operation
9. Press Value to see the actual test results
Auto Test>Vacant POTS>Operation
Single
Auto Test>Vacant Wideband
Measurement Functions
Insertion
Tip A
Auto Test>Vacant Wideband>Setup
Auto Test>Vacant Wideband>Hook-Up
Ring B
the up and down arrow
Auto Test>Vacant Wideband>Setup
2. Press Select to select the
gauge of your cable. Use
Press OK to return to the main Auto Test screen
Auto Test>Vacant Wideband>Setup
6. Press Test Pair 1 to start the
Auto Test>Vacant Wideband>Setup
the OK, Yield, or Stop
symbols
Auto Test>Vacant Wideband>Setup
9. Press Pass/Fail to see only
Auto Test>Expert Pair Test
Auto Test>Expert Pair Test>Features
Measurement Functions
Tip A
Auto Test>Expert Pair Test>Hook-Up
Auto Test>Expert Pair Test>Operation
Ring B
Measurement Functions
Auto Test>Expert Pair Test>Operation
Press Select
Press OK
3M Dynatel Advanced Modular System 965AMS
6. Test results
Auto Test>Expert Pair Test>Operation
Measurement Functions
Auto Test>Expert Pair Test>Operation
3M Dynatel Advanced Modular System 965AMS
Ring B
Talk Set>Setup
Talk Set
Talk Set Hook-Up
#needed
Talk Set Setup
8. Press OK to save this
Talk Set Setup
Talk Set>Setup
Talk Set>Operation
Note: Ground start
Measurement Functions
Talk Set>Operation
Microphone
Speaker
Talk Set>Operation
Talk Set>Applications
System Modes
Care & Maintenance
DC Charger
AC Charger
Care & Maintenance
Level of Charge
System Reset
4.Unplug the battery connector
Battery Pack
1.Power down the unit
3.Remove the battery cover
7.Replace the cover 8.Tighten the screws
Battery Pack
5. Plug in the new battery connector
6.Place the battery in the compartment
Test Leads
Battery Holder
Self-TestBoard>Check Opens
Self-TestBoard
3965AMS
Self-TestBoard Check RFL Performance
Resolution
Electrical Specifications
Specifications
Specifications
Functions
Electrical Specifications
Specifications
Resolution
Functions
Electrical Specifications
Specifications
Resolution
Specifications
General Specifications
Contact 3M
Contact 3M
Customer and Technical Support:
Repair Center: 1-800-426-8688,option
6801 River Place Blvd
Warranty; Limited Remedy; Limited Liability
Communication Markets Division
Important Notice