User Guide for Cisco Show and Share
User Guide for Cisco Show and Share
N T E N T S
Search Tip
Delete Keywords
FAQ
Troubleshooting
Viii
New Supported Languages
About Cisco Show and Share
Change History
New and Changed in Release
WebEx Recording Upload Support
Multiple Video Resolution Support
Mobile Application Support
Pulse Keyword and Speaker Identification Support
Show Private Video Check Box
Related Documentation
Pulse Keyword and Speaker Identification Enhancements
Xii
A P T E R
Accessing Cisco Show and Share
Prerequisites
Choose Tools Internet Options
Configuration Note for Microsoft Internet Explorer
Procedure
Http//servername
Access Cisco Show and Share
Sign In to Cisco Show and Share
Role What the role can do
About User Roles and Privileges
Set Your Personal Preferences
Cisco Show and Share Interface
Quick Start
Home
Video Playback
My Account
Upload Video
Record a Video
Publish Your Video
Quick Start Cisco Show and Share Interface
Global Navigation
Basic Navigation
Screen Elements
Header
Primary Tab Bar
Basic Search
Toggles to Open or Close a Drawer
Drawers
Secondary Tab Bar
Secondary Tab Bar
Example
Sidebars
Key Function
Keyboard Navigation
General Keyboard Navigation
Navigate the Public Videos
Navigate the Featured Videos
Control Video Playback
Browse and Search Videos
Browse the Featured Videos
Button View
Browse The Public Videos
Change the Public Videos List View
Sort the Public Videos
Filter by Category
Filter the Public Videos
Filter by Tag
Filter by Date
Filter by Keyword
Navigate Your Filtered Results
Play a Video
Search for Videos
Basic Search
Click Advanced Search
Advanced Search
Rated list
Click Specific category
RSS Feed Description
Subscribe to an RSS Feed
Search Tip
Page
About Video Playback
Concepts
See The Video Information Tabs,
Video Player
Control Name Details
Video Information Tabs
Pause and Play Videos
Procedures
Element Name Details
Play Videos Full Screen
Add a Video to Your Favorites List
Click Add Comment
Change the Video Resolution
Comment on Videos
Adding a General Comment
Click the Commentary or Timeline Comments tab
Adding a Timeline Comment
Flag a Comment as Inappropriate
Click in the Add additional tags box
Add Tags to Videos
Share Videos
Rate Videos
Click Copy Link
Copy the Video Link
Click Copy Embed Code
Embed the Video in a Web
Flash Embed Code
Embed the Extended Video Player in a Web
Modifying the Embed Code
Javascript Embed Code
Replace the getSimplePlayer text with getExtendedPlayer
Guidelines and Limitations
Click Send Email
Play Embedded Videos
Send the Video Link in E-Mail
Prerequisites
Guidelines and Limitations
View Pulse Information
About Pulse Keyword Identification
About Pulse Speaker Identification
Click All Speakers
Navigate the Video Using the Speakers List
To do this
Navigate the Video Using Both Speakers and Keywords
Navigate the Video Using the Keywords List
Go to the My Account Videos Uploaded
Re-Upload a Published Video
Prerequisite
Watch Slides
Jump to a Chapter
Read a Transcript
Download Files
Bottom of my video is cut off
Troubleshooting
Zip extension instead of a .docx, .xlsx, or .pptx extension
My embedded video appears as a black box on the web
Do not see the 720p option for the video I am watching
There is a delay when I try to replay a video
Page
About Video Editing
Edit Video
File Format Extensions
Limitations and Restrictions
Choose My Account Videos Uploaded
Open a Video to Edit
Edit Your Video
Click Delete a Segment
Trim Your Video
Create Chapters Within Your Video
Add Transitions Between Segments
Click Add Slides
Synchronize Slides to Your Video
Upload Slides
Synchronize Slides
Click Save Thumbnail
Change the Video Thumbnail
If your video is It uses this frame for the thumbnail
Then, Edit the Video
How to Label Unidentified or Guest Speakers in a Video
Label Speakers
Label Unidentified Speakers
Label Guest Speakers
Click Add new speaker
Delete Keywords
Edit Video Troubleshooting
Publish Your Video
Go to My Account Videos Live Events . Click Publish
Access the Publish Your Video
Go to My Account Videos Uploaded . Click Publish
Click Go to Publish
Publish Your Video Procedures
Click Select Group
Restrict Viewer Access to the Video
Edit the Video Summary
Click Create New Group
Publish Your Video Procedures
Add the Video to a Category
Disable Pulse Speakers and Keywords
Publish Your Video Procedures
Set the Video Interaction Options
To Disable Select
Select Let me choose
Add Related Videos
Choose At a scheduled time
Schedule Publication
Publish the Video
About Video Uploads
Prerequisites
Before You Begin
Record, Upload, or Link a Video
Use a Webcam to Record Video from Your Computer
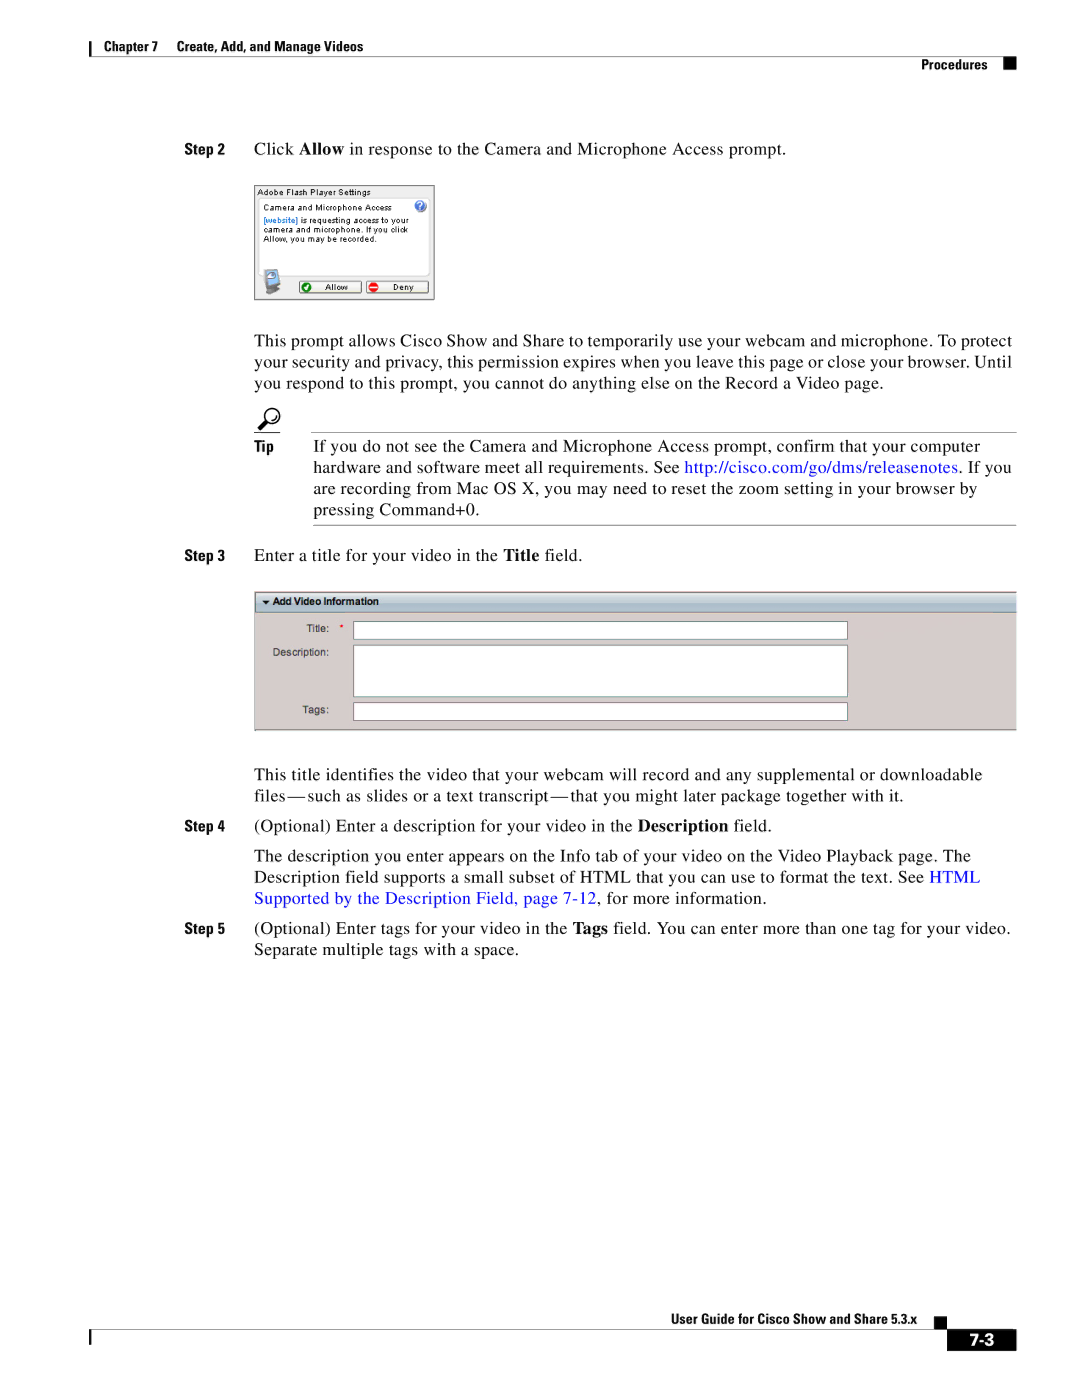
Create, Add, and Manage Videos Procedures
Create, Add, and Manage Videos Procedures
Limitations and Restrictions
Upload a Video File
Additional Supported Formats With a
Standard Supported Formats Cisco MXE
Create, Add, and Manage Videos Procedures
Format Extensions
Link to a Video File
File
Click Save URL
Expand the Add Optional Files drawer
Add Supplemental or Downloadable Files to a Video
Add Slides to a Video
Add Downloadable Files to a Video
Add a Text Transcript to a Video
Status Description
Reference
Save or Publish Your Video
About Video Status
Example Usage
Html Supported by the Description Field
Html Element Usage
Usage Example
Example
Result
FAQ
Why are my slides not synching to the video
Page
Live Events
Video/Audio Streams
About Live-Events
Live Events
On Demand
Non-DME Live Events
About Digital Media Encoders
About the Question-and-Answer Workflow
DME Live Events
Chapter
Guidelines and Limitations
Create a DME Live Event Draft
Administer a Live Event
Prepare for a Live Event
Live Events Procedures
Click Save as Draft
Click Add more polling replies to add an answer
Create a non-DME Live Event Draft
Choose My Account Videos Live Events
Preview a Live Event Draft
Edit a Live Event Draft
Publish a Live Event Listing
Click Do not categorize my video
Send a Live Event Notification
Start the Live Event
Start and Administer Moderate a Live Event
Live Events Procedures
Click Broadcast Stop and then Encoder Stop
Click Export Questions
Create a VoD From a Live Event
Download Questions From a Live Event
Supported Encoding Bit Rates for Flash Video on DMEs
Supported Dimensions for Encoded Video
Delete a Live Event
Film
Supported Encoding Profiles for Windows Media on DMEs
Capture Profiles for Windows Media 9 Conversions
Capture Profiles for Broadband
Variable Bit Rate
Capture Profiles for Color PDAs
Capture Profiles for Dial-up Modems and Isdn
Live Events Troubleshooting
Troubleshooting User Guide for Cisco Show and Share
About Cisco Show and Share Author Reports
Use Show and Share Author Reports
View Report Graph
About the Page View Report
Video Views Report Graph
About the Video View Report
Viewer Aggregation Report Table
About the Viewer Aggregation Report
Export Report Data
Generate Reports
Use Show and Share Author Reports Procedures