Stylus C40UX/C40SX/C20UX/C20SX | Revision A |
5.1 Overview
This section describes the procedure for adjustments required when the printer is disassembled and assembled for repair or service.
5.1.1 Required Adjustment
Table
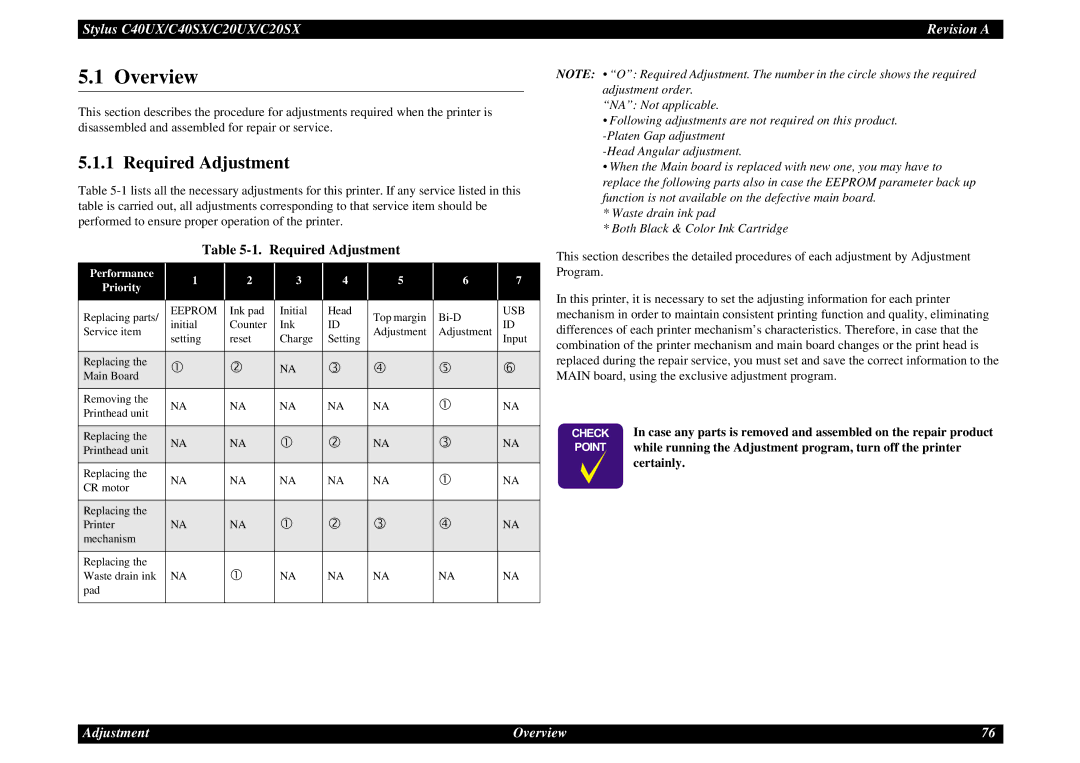
Table 5-1. Required Adjustment
Performance | 1 | 2 | 3 | 4 | 5 | 6 | 7 | |
Priority | ||||||||
|
|
|
|
|
|
| ||
|
|
|
|
|
|
|
| |
Replacing parts/ | EEPROM | Ink pad | Initial | Head | Top margin | USB | ||
initial | Counter | Ink | ID | ID | ||||
Service item | Adjustment | Adjustment | ||||||
setting | reset | Charge | Setting | Input | ||||
|
|
|
|
|
|
|
| |
Replacing the | c | d | NA | e | f | g | h | |
Main Board |
|
|
|
|
|
|
| |
Removing the | NA | NA | NA | NA | NA | c | NA | |
Printhead unit | ||||||||
|
|
|
|
|
|
| ||
|
|
|
|
|
|
|
| |
Replacing the | NA | NA | c | d | NA | e | NA | |
Printhead unit | ||||||||
|
|
|
|
|
|
| ||
|
|
|
|
|
|
|
| |
Replacing the | NA | NA | NA | NA | NA | c | NA | |
CR motor | ||||||||
|
|
|
|
|
|
| ||
|
|
|
|
|
|
|
| |
Replacing the |
|
| c | d | e | f |
| |
Printer | NA | NA | NA | |||||
mechanism |
|
|
|
|
|
|
| |
|
|
|
|
|
|
|
| |
Replacing the |
| c | NA | NA | NA | NA | NA | |
Waste drain ink | NA | |||||||
pad |
|
|
|
|
|
|
| |
|
|
|
|
|
|
|
|
NOTE: • “O”: Required Adjustment. The number in the circle shows the required adjustment order.
“NA”: Not applicable.
•Following adjustments are not required on this product.
•When the Main board is replaced with new one, you may have to replace the following parts also in case the EEPROM parameter back up function is not available on the defective main board.
* Waste drain ink pad
* Both Black & Color Ink Cartridge
This section describes the detailed procedures of each adjustment by Adjustment Program.
In this printer, it is necessary to set the adjusting information for each printer mechanism in order to maintain consistent printing function and quality, eliminating differences of each printer mechanism’s characteristics. Therefore, in case that the combination of the printer mechanism and main board changes or the print head is replaced during the repair service, you must set and save the correct information to the MAIN board, using the exclusive adjustment program.
CHECK In case any parts is removed and assembled on the repair product POINT while running the Adjustment program, turn off the printer
certainly.
Adjustment | Overview | 76 |