![]()
![]()
![]()
![]()
![]()
![]()
![]()
![]()
![]()
![]()
![]()
![]()
![]()
![]()
![]()
![]()
![]()
![]()
![]()
![]()
![]()
![]()
![]()
![]()
![]()
![]()
![]()
![]()
![]()
![]()
![]()
![]()
![]()
![]()
![]()
![]()
![]()
![]()
![]()
![]()
![]()
![]()
![]()
![]()
![]()
![]()
![]()
![]()
![]()
![]()
![]()
![]()
![]()
![]()
![]()
![]()
![]()
![]()
![]()
![]()
![]()
![]()
![]()
![]()
![]()
![]()
![]()
![]()
![]()
![]()
![]()
![]()
![]()
![]()
![]()
![]()
![]()
![]()
![]()
![]() MR-8HD
MR-8HD
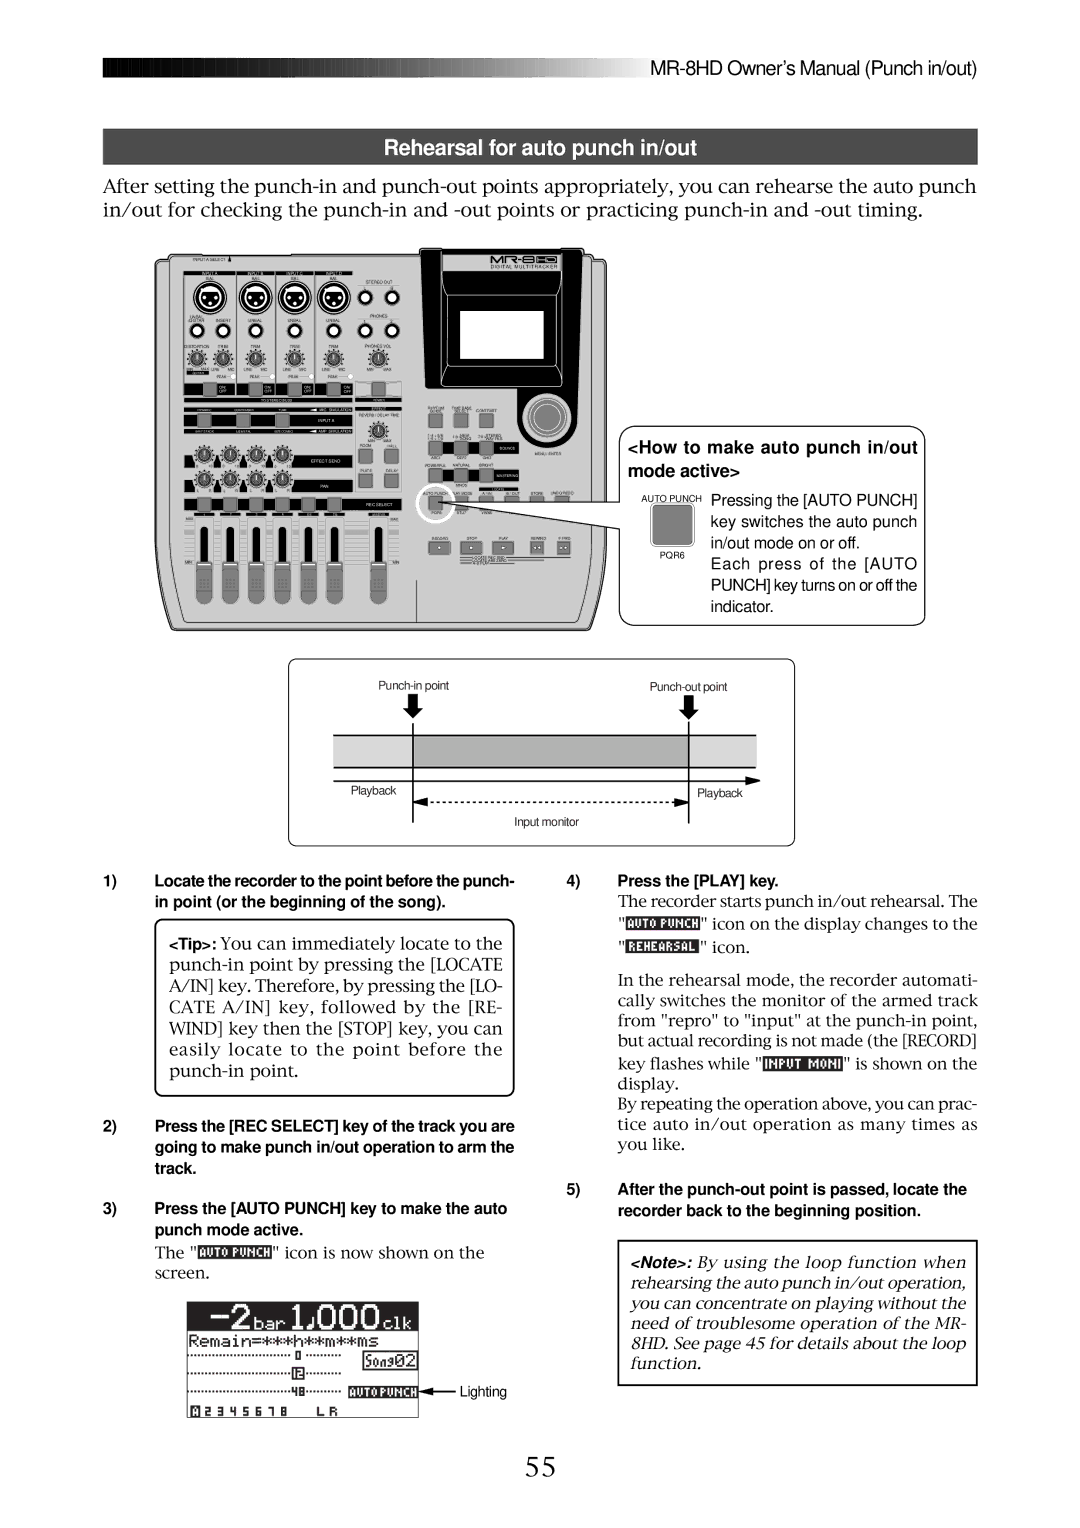
Rehearsal for auto punch in/out
After setting the
INPUT A SELECT |
|
|
|
|
| |
INPUT A |
| INPUT B | INPUT C | |||
BAL |
|
| BAL |
| BAL |
|
UNBAL | INSERT | UNBAL | UNBAL | |||
/GUITAR | ||||||
DISTORTION | TRIM |
| TRIM |
| TRIM |
|
MIN MAX LINE | MIC | LINE | MIC | LINE | MIC | |
GUITAR | PEAK |
| PEAK |
| PEAK |
|
|
|
|
| |||
| ON/ |
|
| ON/ |
| ON/ |
| OFF |
|
| OFF |
| OFF |
TO STEREO BUSS
INPUT D
BAL
UNBAL
TRIM
LINE MIC
PEAK
ON/
OFF
STEREO OUT
LR
PHONES
12
PHONES VOL
MIN MAX
POWER
DIGITAL MULTITRACKER
DYNAMIC | CONDENSER | TUBE | MIC SIMULATION |
|
|
| INPUT A |
BRIT STACK | US METAL | 60'S COMBO | AMP SIMULATION |
|
|
|
|
|
|
| EFFECT SEND |
0 | 10 | 0 | 10 | 0 | 10 | 0 | 10 |
|
|
|
|
|
|
| PAN |
L | R | L | R | L | R | L | R |
EFFECT
REVERB / DELAY TIME
MIN MAX
ROOM HALL
PLATE DELAY
RHYTHM | TIME BASE | CONTRAST |
|
|
GUIDE | SELECT |
|
| |
NEW | STEREO |
|
| |
7/8 >WAV FILE |
|
| ||
|
| BOUNCE |
| |
ABC1 | DEF2 | GHI3 |
| MENU / ENTER |
|
| |||
POWERFUL | NATURAL | BRIGHT |
|
|
|
| MASTERING |
| |
JKL4 | MNO5 |
|
|
|
|
| LOCATE |
|
|
AUTO PUNCH | PLAY MODE | A / IN | B / OUT | STORE UNDO/REDO |
<How to make auto punch in/out mode active>
|
|
|
|
|
| REC SELECT |
1 | 2 | 3 | 4 | 5/6 | 7/8 | MASTER |
MAX |
|
|
|
|
| MAX |
PQR6 | STU7 | VWX8 | YZ9 | DELETE |
AUTO PUNCH Pressing the [AUTO PUNCH] key switches the auto punch
MIN | MIN |
RECORD | STOP | PLAY | REWIND | F FWD | |
|
|
|
|
|
|
LOCATE REC END
LOCATE ABS ZERO
PQR6
in/out mode on or off.
Each press of the [AUTO PUNCH] key turns on or off the indicator.
|
|
|
|
|
|
|
|
|
|
|
|
Playback
Input monitor
Playback
1)Locate the recorder to the point before the punch- in point (or the beginning of the song).
<Tip>: You can immediately locate to the
2)Press the [REC SELECT] key of the track you are going to make punch in/out operation to arm the track.
3)Press the [AUTO PUNCH] key to make the auto punch mode active.
The "![]()
![]()
![]()
![]()
![]()
![]()
![]()
![]()
![]()
![]()
![]()
![]()
![]()
![]()
![]()
![]() " icon is now shown on the screen.
" icon is now shown on the screen.
![]()
![]()
![]() Lighting
Lighting
4)Press the [PLAY] key.
The recorder starts punch in/out rehearsal. The
"![]()
![]()
![]()
![]()
![]()
![]()
![]()
![]()
![]()
![]()
![]()
![]()
![]()
![]()
![]()
![]() " icon on the display changes to the
" icon on the display changes to the
"![]() " icon.
" icon.
In the rehearsal mode, the recorder automati- cally switches the monitor of the armed track from "repro" to "input" at the
key flashes while "![]() " is shown on the display.
" is shown on the display.
By repeating the operation above, you can prac- tice auto in/out operation as many times as you like.
5)After the
<Note>: By using the loop function when rehearsing the auto punch in/out operation, you can concentrate on playing without the need of troublesome operation of the MR- 8HD. See page 45 for details about the loop function.
55