Manuals
/
GE
/
Kitchen Appliance
/
Convection Oven
GE
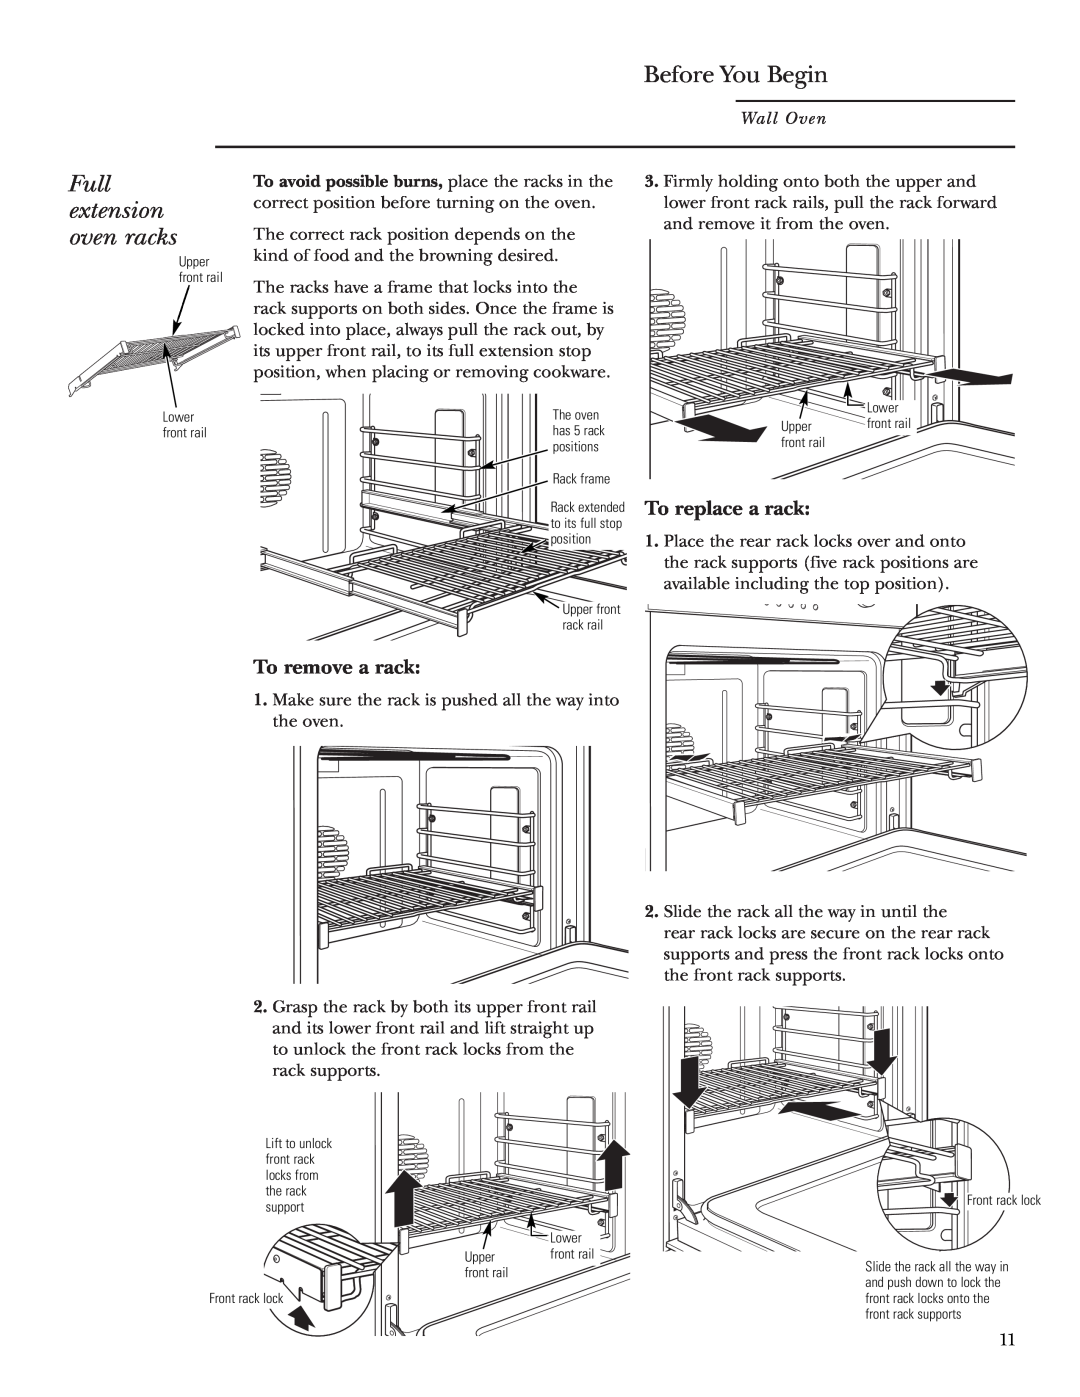
ZET1P, ZET2S Full extension oven racks, Before You Begin, To replace a rack, To remove a rack
Models:
ZET1P
ZET2P
ZET1S
ZET2S
1
11
128
128
Download
128 pages
4.21 Kb
8
9
10
11
12
13
14
15
Oven Control, Clock and Timer
configurar
The Problem Solver
Pièces et accessoires
Aperçu général des commandes
Oven thermostat adjustment
Self-Cleaning Oven
How to
What is
Pan placement
Page 11
Image 11
Page 10
Page 12
Page 11
Image 11
Page 10
Page 12
Contents
30″ Convection Wall Oven
La section française commence à la page
La sección en español empieza en la página
Owner’s Manual
Consumer Information
Contents
Introduction
Remove packaging tape
If you received a damaged wall oven Save time & money
Before using your wall oven
If you need service
Write down the model & serial numbers
SAFETY PRECAUTIONS
IMPORTANT SAFETY INSTRUCTIONS
IMPORTANT SAFETY NOTICE
Keep the oven vent unobstructed
Do not use oven for a storage area. Items stored in an oven can ignite
SELF-CLEANING OVEN
SAVE THESE INSTRUCTIONS
Convection Fan operates during convection cooking
Design information
Not all features are on all models. Appearance may vary
equipped
3 Mini-Knob
Oven Control, Clock and Timer
1 Oven Mode knob - Turn to select
2 Temperature knob - Turn to select
Controls Overview
Introduction to the oven controls
Introduction to the probe temperature set and time controls
Preheating
Pan placement
Oven air flow Aluminum foil
Baking pans/sheets
To remove a rack
Full extension oven racks
Before You Begin
To replace a rack
Baking
How to set the oven for baking
Broiling
Introduction to broiling
Aluminum foil
Close the door. Always broil with the door closed
How to set the oven for broiling
Using the Probe for Roasting
Proper placement of the probe
Temperature probe
Push to select
How to set the oven for roasting when using the probe
1-Rack convection baking
Convection fan
Cookware for convection cooking
Adapting recipes
Convection Baking
How to set the oven for convection baking
Convection Roasting
How to set the oven for convection roasting
Convection roasting tips
Convection Roasting with the Probe
How to set the oven for convection roasting with the probe
Pork
Convection roasting guide
Oven Temp
Beef
Convection Broiling
How to set the oven for convection broiling
Timed Cooking
Timed cooking immediate start and automatic stop
Timed cooking delayed start and automatic stop
Proofing
How to set the oven for proofing
Self-Cleaning Oven
Before a clean cycle
How to set the oven for cleaning
You may notice some white ash in the oven. Wipe it up
How to delay the start of cleaning
After a clean cycle
If the oven is not clean after one clean cycle, repeat
Clock and Control Lockout Features
Power failure Clock To set the clock
Control lockout
Timer Feature
Timer
Special Features
Special features of your oven control
Oven thermostat adjustment
Tones at the end of a timed cycle
more acceptable volume. There are three possible volume
Tone volume
12-hour 24-hour or clock blackout
12-hour 24-hour or clock blackout
Care and Cleaning
Control panel and knobs Oven heating elements Broiler pan and grid
Oven racks
To remove the door
Lift-off oven door- removal
Probe
The door is very heavy. Be careful when removing and lifting the door
NOTE If
Oven lights
To remove
To replace
Inside of the door
To clean the door
Stainless steel surfaces on some models
Painted surfaces on some models
Save time & money
The Problem Solver
LOCKED
The Problem Solver
Wall Oven
Wall Oven
Registration Ownership Product Consumer
Today Mail Important
Appliances GE
Warranty Registration Department P.O. Box Louisville, KY
Product
Consumer Product Ownership Registration
Monogramge.com
Follow these three steps to protect your new appliance investment
Parts and Accessories 800.626.2002
Consumer Services
In-Home Repair Service 800.444.1845
Service Contracts 800.626.2224
From the Date of the Original Purchase
WHAT IS COVERED
YOUR MONOGRAM WALL OVEN WARRANTY
WHAT IS NOT COVERED
Retirez le ruban d’emballage
Contenu
Information pour le client
Si vous avez reçu un four mural endommagé
Si vous avez besoin de service d’entretien ou de réparation
Avant d’utiliser votre four mural
Inscrivez les numéros de modèle et de série
MESURES DE SÉCURITÉ
MESURES DE SÉCURITÉ IMPORTANTES
AVIS IMPORTANT EN MATIÈRE DE SÉCURITÉ
Ne portez jamais de vêtements amples
CONSERVEZ CES DIRECTIVES
FOUR AUTONETTOYANT
à convection et le préchauffage
Renseignements descriptifs
sur certains modèles
Ventilateur de convection fonctionne durant la cuisson
11 Afficheur de l’heure de la journée Indique l’heure
Caractéristiques des commandes, de l’horloge
Commandes, l’horloge et la minuterie
CONV ROAST rôtissage par convection Pour le rôtissage par convection
Aperçu général des commandes
Présentation des commandes du four
Positionnement des casseroles
Écoulement d’air du four Le papier d’aluminium
Moules de cuisson/ plaques à pâtisserie
Préchauffage
Pour enlever une grille
Avant d’utiliser votre four
Pour remettre une grille en place
Comment régler une cuisson
Cuisson
Présentation de la cuisson au grilloir
Papier d’aluminium
Grillage
Comment régler un grillage dans votre four
Positionnement correct de la sonde
Sonde thermique
Utilisation de la sonde pour la cuisson
Enfoncez pour sélectionner
Comment régler un rôtissage avec la sonde thermique
Cuisson par convection sur 1 grille
Casseroles pour la cuisson par convection
Pour adapter vos recettes
Ventilateur de convection
Cuisson par convection
Comment régler une cuisson par convection
Conseils pour le rôtissage par convection
Rôtissage par convection
Comment régler un rôtissage par convection
Comment régler un rôtissage par convection avec la sonde thermique
Rôtissage par convection avec la sonde thermique
Porc
Guide de rôtissage par convection
Minutes/lb
Boeuf
Grilloir par convection
Comment régler le four pour la cuisson au grilloir par convection
Cuisson à minuterie mise en marche immédiate et arrêt automatique
Cuisson à l’aide de la minuterie
Cuisson à minuterie mise en marche différée et arrêt automatique
Fermentation
Comment régler le four pour le fermentation
Avant l’autonettoyage
Four autonettoyant
Comment régler le four pour le nettoyage
Pour différer le début de l’autonettoyage
Après l’autonettoyage
Pour régler l’horloge
Panne de courant Horloge
Fonctions horloge et verrouillage des commandes
Verrouillage des commandes
La fonction minuterie
Minuterie
Réglage du thermostat du four
Tonalités à la fin du cycle de minuterie
Caractéristiques spéciales des commandes du four
Caractéristiques spéciales
ou extinction de l’heure
Volume du son
12 heures 24 heures
sélection
2. Enfoncez pour choisir
Lèchefrite et grille
Éléments chauffants du four
Tableau de commande et boutons de sélection
Entretien et nettoyage
Grilles du four
Remise en place de la porte
Enlèvement de la porte du four en la soulevant- enlèvement
Sonde
Enlèvement de la porte
Ampoules du four
L’intérieur de la porte
Pour nettoyer la porte
Surfaces peintes sur certains modèles
Surfaces en acier inoxydable sur certains modèles
du four
Économisez du temps et de l’argent
Cuisson ou Rôtissage
Rôtissage
Caractéristiques spéciales
Économisez du temps et de l’argent
Horloge et Minuterie
Réglage du thermostat du four
Four mural
Four mural
GE Answer Center
Le service de réparation In- Home
Contrats de service
Pièces et accessoires
CE QUI N’EST PAS COUVERT
À partir de la date d’achat original
Garantie
CE QUI EST COUVERT
Cuidados y limpieza
Información para los clientes
Introducción
Retire la cinta de empaque
Si necesita servicio técnico
Antes de utilizar su horno de pared
Anote los números de modelo y serie
Si recibe un horno de pared dañado Ahorre tiempo y dinero
IMPORTANTE la salud de
INSTRUCCIONES IMPORTANTE DE SEGURIDAD
AVISO IMPORTANTE DE SEGURIDAD
PRECAUCIONES DE SEGURIDAD
No use papel de aluminio para cubrir
No utilice su horno para secar periódicos
AUTOLIMPIEZA DEL HORNO
GUARDE ESTAS INSTRUCCIONES
sus pantallas correspondientes en modelos equipados de esta manera
Información del diseño
No todas las funciones corresponden a todos los modelos
La apariencia puede variar
NOTA en algunos modelos de hornos de pared
CONV BAKE 1 RACK Hornear por convección en
CONV ROAST Asar por convección se utiliza para asar por convección
CONV BROIL Asar a la parrilla por convección
Perilla de modo del horno
Introducción a los controles del horno
Información general de los controles
Para precalentar, configure el horno a la temperatura correcta
Flujo de aire del horno
Papel de aluminio
Precalentamiento
extensión
Antes de comenzar
Parrillas
para horno
Hornear
Cómo configurar el horno para hornear
Std Broil Asado a la parrilla estándar
Introducción para asar a la parrilla
Asar a la parrilla
Cierre la puerta. Siempre ase con la puerta cerrada
Cómo configurar el horno para asar a la parrilla
Sonda de temperatura
Utilización de la sonda para asar
Ubicación apropiada de la sonda
Cómo configurar el horno para asar cuando se utiliza la sonda
Horneado por convección en varias parrillas
Horneado por convección en 1 parrilla
Ventilador de convección
Cómo adaptar recetas
Hornear por convección
Cómo configurar el horno para hornear por convección
Asado por convección
Cómo configurar el horno para asar por convección
Consejos para el asado por convección
para asar
configurar
Cómo
el horno
Cordero
Guía para asar por convección
Cerdo
Jamón
Cierre la puerta. Siempre ase a la parrilla con la puerta cerrada
Cómo configurar el horno para asar a la parrilla por convección
Asar a la parrilla por convección
Cocción programada
Cocción programada inicio inmediato y detención automática
Cocción programada inicio postergado y detención automática
Fermentación
Cómo configurar el horno para la fermentación
Cómo ajustar el horno para limpieza
Antes de un ciclo de limpieza
Horno autolimpieza
Después de un ciclo de limpieza
Cómo posponer el inicio de la limpieza
Bloqueo del control
Corte de energía Reloj Para ajustar el reloj
Funciones del reloj y del bloqueo del control
Para cancelar el temporizador
Función temporizador
Temporizador
Para configurar el temporizador
Características especiales
Ajuste del termostato del horno
Funciones especiales
de control de su horno
Volumen del sonido
Reloj de 12 horas 24 horas o supresión del reloj
Función Sabbath, apagado de 12 horas o sin apagado
Elementos calentadores del horno
Panel de control y perillas
Asadera y rejilla
Cuidados y Limpieza
Parrillas para hornos
Para quitar la puerta
Puerta extraíble del horno- extracción
Sonda
La puerta es muy pesada. Tenga cuidado al quitar y levantar la puerta
NOTA si las
Luces del horno
Para retirar
Para volver a colocar
Interior de la puerta
Para limpiar la puerta
Superficies pintadas en algunos modelos
Superficies de acero inoxidable en algunos modelos
¡Ahorran tiempo y dinero
Solución de problemas
LA PANTALLA PARPADEA
hoy Envíe Importante
producto de propiedad de consumidor del Inscripción
Número de serie
Inscripción del consumidor de propiedad de producto
Producto
Número de modelo
Contratos de servicio
Centro de atención GE
Servicio de reparación a domicilio
Para clientes con necesidades especiales…
A partir de la fecha de la compra original
COBERTURA
GARANTÍA DE SU HORNO DE PARED MONOGRAM
QUÉ NO ESTÁ CUBIERTO
Top
Page
Image
Contents