Software technical reference
Page
Page
Copyright
Trademark Credits
Table of Contents
Linking to Advanced Printer Settings
Printer driver features
Incompatible Print Settings constraint messages
113
Installing Windows printing system components
Index
List of tables
155
List of figures
Hewlett-Packards Electronic Registration dialog box 1 175
Software Technical Reference Enww
Purpose and scope
Introduction
HP Color LaserJet 3500 series printer models
Ppm A4- size media
Supported operating systems
Additional operating environments
HP LaserJet user documentation
Technology background information
HP LaserJet printer drivers
AdobeR Acrobat ReaderR
HP Color LaserJet 3500 printing-system install notes
Bidirectional communication
LJ3500USERREFERENCE.CHM
Method Connection type Microsoft Share 2000
Host
Method Connection type Netware 4 Novell Netware 5
Method Connection type Microsoft Windows Me NT 4.0 2000 XP
USB
Microsoft Share 2000/XP Other Host Host with With Client
Queue
Driver Autoconfiguration
Windows 2000, Windows XP, and Windows Server
TCP/IP HP IPX/SPX
Windows 9.x, Windows Me, and Windows NT
Operating System Configuration Method Parallel
Network Installer
Add Printer Wizard
HP Toolbox requirements
Drivers that support Enterprise AutoConfiguration
HP Toolbox
To view the HP Toolbox
Toolbox Frame
Top Banner
Status tab
Toolbox, Status tab, Device Status option
Troubleshooting tab
Toolbox Links Other Links
Maintenance
Print Quality Tools
Description
Error Messages
Control panel Message
Recommended action
Control panel Message Description Recommended action
Description Recommended action
Order Transfer KIT
Paper Path Test
Demo
Configuration
Intermittent Mode
Menu MAP
Remove AT
Reload Tray Trnsprncy Size
Remove ALL Print Cartridges
Replace Color
Replace Fuser KIT
Replace
Replace Transfer KIT
USE Tray X Type Size
Unauthorized Supply
Unsupported Data on FS Dimm in Slot
Yysupply
Lower Rear Door
13.XX.YY JAM Inside
Memory
13.XX.YY JAM Inside Upper Rear Door
Insufficient
Buffer Overflow
Load Tray X Type Size
Xxxx
Control panel Description Message
No System Printer Error
Settings
Permanent Storage Write Fail
Toolbox, Troubleshooting tab, Paper Jams option
Paper Jams
Troubleshooting tab-Supported Media
Supported Media
Toolbox, Troubleshooting tab, Printer Pages option
Printer Pages
Toolbox, Alerts tab, Set up Status and Alerts option
Alerts tab
Linking to Advanced Printer Settings
Documentation tab
User Guide
HP Advanced Printer Settings
Other Links
Advanced Printer Settings Pages
Configuration
Device status
Page
Settings tab
Other Links
Configure Device
Networking Tab Categories
Diagnostics
Networking tab
Security
Device Status and Alerts
System Tray Notification of Device Status and Alerts
Set up Status and Alerts
Set up Email Alerts
Administrative Settings
Remote firmware update
Determining the current level of firmware
Remote firmware update through a local Windows port
Remote firmware update through a Windows network
Downloading the new firmware from the HP Web site
Remote firmware update for Unix systems
Windows operating systems
Mac operating systems
Put path
Put c\My Documents\LJFW.RFU
Put and a space
Remote firmware update using FTP through a browser
Remote firmware update using Fetch Mac OS 9.x only
FTP
Remote firmware update using the LPR command
Click Select File
Click Download
Click Device Management, then click All Devices
Printer messages during firmware update
Update messages
Printer message Explanation
Troubleshooting a firmware update failure
Troubleshooting a firmware update
Troubleshooting a firmware update
Euro character
Printing system and installer
Printing-system components
HP Color LaserJet 3500 software CD-ROM for Windows systems
Technical support updates
CD-ROM
Installable components
Installer features
Printer drivers
Click Settings
Macintosh and Macintosh-compatible system-driver versions
Click Properties
HP Web JetAdmin
Additional productivity tools
HP Web Registration
HP Web JetAdmin support
Printing-system components
Color LaserJet 3500 driver features
Access to drivers
Help system
Whats this? Help
Context-sensitive Help
Constraint messages
Bubble Help
Property page with Bubble Help icons
Print Task Quick Sets group box
Paper/Quality tab features
Print Task Quick Sets
Paper Options group box
Default Print Settings
Default Print Settings User Guide Print Settings
Preconfigurable1
Wysiwyg
User Guide Print Settings
Type new Quick Set name here
Document preview image
Finishing tab features
Print Task Quick Sets group box Document Options group box
Booklet layout
Document Options
Flip Pages Up
Book and booklet printing
Pages per Sheet
Printing a Booklet using Booklet Layout
Printing a Book using Booklet Layout
Print Page Borders
Rotate
Page-order preview images Pages per sheet
Effects tab features
Print Task Quick Sets group box Resizing options group box
Watermarks group box
Scale to Fit option
Print Document On setting
Resizing options group box
Normal Size option
Watermarks group box
Print Document On is selected Pages per Sheet is not
Confidential Do not Copy Draft
Current watermarks
Watermark details
Options
Watermark message
Message angle
Font attributes
Default settings
Shading
Size
Basics tab features
Basics tab
Orientation
Copies
Front to Back Back to Front
Copy Count
Collated
Color tab features
Color Options group box
Printer Properties Tabs
About tab
Color Options group box
HP Color LaserJet printing system features
Incompatible Print Settings constraint messages
An Incompatible Print Settings message
Advanced tab features
Paper/Output settings Graphic settings
Paper/Output settings
Graphic settings
Image Color Management
ICM Method
Advanced Printing Features
Advanced Printing Features Printer Features Layout Options
ICM Intent
Raster Compression
Printer Features
Layout Options
Orientation Order
102
103
104
105
106
Paper Options group box
Size is drop-down menu
First Page options
Use different paper check box
Use different paper check box
Source is drop-down menu
Type Is drop-down menu
Using the First Page and Other Pages options
Other Pages options
Back Cover options
Add a blank cover option check box
Add a blank back cover option button
Print Task Quick Sets group box
Finishing tab
Document Options group box
Correct Order for Rear Bin
Print on Both Sides manually
Printing a Booklet
Paper size Left Binding Paper size Right Binding
Printing a book
116
117
Actual Size setting Scale to Fit option
Document Preview
Sample
120
121
122
123
Color Options settings
General
Printer Properties Tabs
About tab
Off, which sets Trapping and Adaptive Halftoning to Off
Device Settings
Device Settings tab features
Form to Tray Assignment option Installable Options option
Installable Options
Form to Tray Assignment
Availability and fulfillment
Structure and availability of the software CD-ROM
In-box file layout
HP LaserJet software CD-ROM, Windows partition
Web deployment
In-box CD-ROMs
Web ordering
CD-ROM versions
Printing-system software
Standalone drivers
Point-and-print bundles
Software component availability
Bidirectional communication
Installers
Component 98/Me 2K/XP Mac Drivers
Remote management and status
Component Operating
Software component localization
Software component localization by language, A-I
System
135
Software component localization by language, J-Z
137
Driver support for job accounting feature
Driver feature comparison in various operating systems
Driver support for job stream output feature
Job stream output
Driver support for connectivity
Driver type DMC Config Editor
Connectivity
Driver support for bidirectional communication
Driver support for bundle feature
HP Preconfiguration/Settings Retention
UI Features
Driver support for user interface features
Driver support for constraint feature
Help Features
Driver support for help features
Constraint Support
Driver support for document layout feature
Document Layout
Custom Preference Storage/Recall
Driver support for custom storage and recall features
Finishing Options
Driver support for finishing options
Print Controls
Driver support for font features
Font Support
Driver support for print controls
Color Settings
Driver support for color settings
Paper Sizes
Driver support for watermarks feature
Watermarks
Driver support for paper sizes
Paper Types
Driver support for paper types
B5JIS
Driver support for paper sources
Paper Sources
Alternate Paper Sources
Driver support for alternate paper sources
Paper Destinations
Installable Options
Driver support for installable options
Driver support for paper destinations
150
Installing Windows printing system components
System requirements
Font support
Default fonts
Default fonts
Basic fonts
HELR45W.TTF
GARR46W.TTF
GARR66W.TTF
HELR65W.TTF
Installation instructions
General installation for Windows 98, Me, NT 4.0, 2000, XP,
Detailed Windows installation
Choose Setup Language dialog box text strings
User options and descriptions
InstallShield Wizard dialog box text strings
InstallShield Wizard dialog box
Title of dialog box Text in dialog box
Clicking Installation Notes opens
Welcome dialog box text strings
HP Software License Agreement
HP Software License Agreement dialog box text strings
Text in dialog box Title of dialog box
Printer Connection dialog box text strings
Title of dialog box Text in dialog box Printer Connection
Your computer?
Connector Type dialog box text strings
Title of dialog box Text in dialog box Connector Type
Other option button
Model dialog box text strings
Title of dialog box Text in dialog box Model
Installation Type dialog box text strings
Installation Type dialog box
Printer Name dialog box text strings
Title of dialog box Text in dialog box Printer Name
Printer Sharing dialog box text strings
Title of dialog box Text in dialog box Printer Sharing
Printer Location and Comment dialog box
Ready to Install dialog box text strings
Title of dialog box Text in dialog box Ready to Install
Installing HP Color LaserJet 3500 dialog box text strings
Are being unstalled Program
Finish dialog box text strings
Finish dialog box
Test Page dialog box text strings
Test Page dialog box
Custom Installation
Installation type dialog box, Custom Installation option
Custom Installation dialog box text strings
Title of dialog box Text in dialog box Custom Installation
Product registration HP WebReg
Hewlett-Packards Electronic Registration dialog box
Hewlett-Packards Electronic Registration text strings
Registration
Welcome to Hewlett-Packards Registration dialog box
Hewlett-Packards Electronic Registration dialog box 1
Title of dialog box Hewlett-Packards Electronic Registration
Hewlett-Packards Electronic Registration dialog box 2
This is the second of three dialog boxes
Hewlett-Packards Electronic Registration dialog box 3
Exiting registration text strings
Exiting registration! dialog box
HP preconfiguration
Silent installer
Customized silent installer
Command-line silent install
Driver-only installation
Method 1 Command line
Method 2 SETUP.LST
Click Have Disk
Successful, contact Microsoft
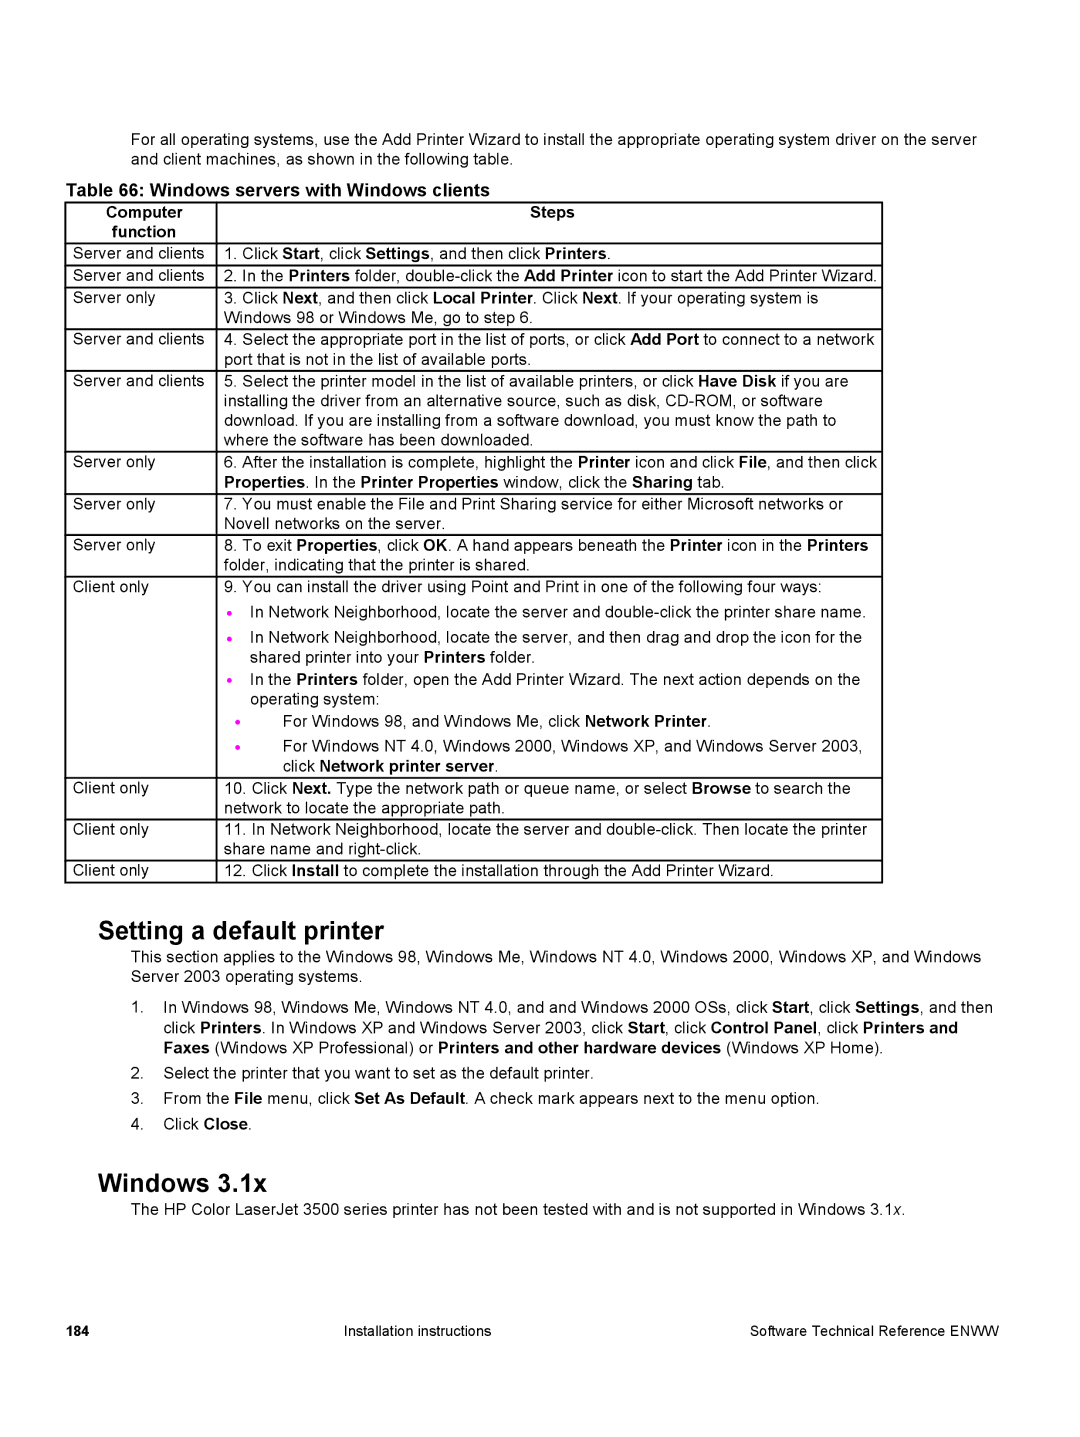
Windows servers with Windows clients
Setting a default printer
Windows
Computer Steps Function
Macintosh component descriptions
HP LaserJet PPDs
PDEs Mac OS X only, 10.1 and later
ColorSync profiles
Install notes
HP LaserJet Utility
Online help
187
188
Installing the Macintosh printing system
To set up an AppleTalk networked printer with Mac OS
To set up a printer with Mac OS
To set up an IP/LPR networked printer with Mac
In-box disk layout
To set up a USB direct printer connection with Mac OS
Uninstalling the Macintosh printing system
Click HP Color LaserJet 3500, and then click Select
Mac OS Classic installation
Main Install dialog box sequence
HP LaserJet Installer dialog text strings easy install
HP LaserJet Installer dialog box easy install
HP LaserJet Installer dialog text strings custom install
HP LaserJet Installer dialog box custom install
Stop button
Installing dialog text strings
Installation successful dialog text strings
Continue
HP LaserJet Screen Fonts Installer dialog box sequence
HP LaserJet Screen Fonts splash screen dialog text strings
Installation was successful dialog text strings
HP LaserJet Screen Fonts installer dialog text strings 1
HP LaserJet Screen Fonts installer dialog text strings 2
Conditional number Copy process Stop button
Mac OS X installation
· Printer Descriptions OS
Printer Dialog extensions OS
201
202
Media attributes
Paper-source commands
Paper-source commands
Paper source
Supported features and attributes by driver
Media types and sizes
Paper sizes Width Height PCL 6 margins
Supported input media types
Tray 41 Sheet Duplexing unit
Background information and terminology
HP Color LaserJet 3500 custom paper sizes
Print server operating system migration
Version 2 driver
Point and Print in a mixed operating system environment
Version 3 driver
Operating system and driver version support Version
Symptoms of driver incompatibility in a mixed OS environment
209
Migration strategies
Strategy 1 Use Windows NT 4.0 drivers to support all clients
211
Compatible PCL 5 and PCL 6 drivers
Printer series PCL 5 driver PCL 6 driver
Compatible PS drivers
Printer series PS driver PS 4 driver 2,3,4 PS 5 driver
Frequently asked questions
What drivers do I have installed?
Additional Drivers dialog box in Windows XP
Additional Drivers dialog box in Windows Server
Reference
218
Index
220 Index
221
222 Index